Native Commento server with Docker Compose
Note: this is a translation of my post (English), describing the implementation of the comment server used on the same site where the original is located.
TL; DR version: I developed the Commento server configuration, which is easily and simply deployed in semi-automatic mode. Copy this repository to yourself from GitHub and follow the instructions in README .
Some time ago, I irresistibly wanted to change Disqus - which is perhaps the most common system for adding comments to pages - to a free and open Commento .
Why Commento?
The problem with Disqus, like many other "free" products, is that the product in this case is the user - that is, you. In addition, Disqus “enriches” every page where it is used with megabytes of scripts and more than a hundred additional HTTP requests.
Plus, its free version shows ads from which you can pay off "just" for $ 9 per month (Plus plan). This alone is enough to want to find something better.
At some point, I stumbled upon this post and found out about the existence of a free comment server called Commento . By a lucky coincidence, Commento just recently became completely open - before it was available in two versions, free Community and commercial Enterprise . Thanks to its developer Adhityaa Chandrasekar.
Commento is orders of magnitude more efficient than Disqus, the typical size of the additional load with it is about 11 KB , plus the comments themselves, of course. Approximately the same situation with the required HTTP requests.
Another plus of the Commento server is that it is very fast, as it is written in Go.
Well, as a cherry on the cake, he has an import of comments from Disqus, what more could you dream of?
Use cases for Commento
For non-advanced (technically) users, Commento has a ready-to-use cloud service on commento.io . The author suggests that you choose the monthly fee yourself, but it cannot be less than $ 3 "for technical reasons."
Mr. Chandrasekar also generously offers a free account on Commento.io in exchange for “non-trivial patches” for the product.
Well, I chose the third option: to raise the Commento server myself. In this case, you are not dependent on anyone (besides the hoster, of course), and I love independence.
Difficulties
I am a big fan of Docker containers and also often use Docker Compose , a tool for managing groups of several related containers. Commento has a ready-to-use Docker image in the GitLab container registry.
Therefore, the decision to use containers ripened by itself - but first a few things had to be decided.
Difficulty No. 1: PostgreSQL
Commento requires a fairly recent version of the PostgreSQL server, unfortunately no other SQL servers are supported.
Well, we still run everything in containers anyway, so it's pretty simple.
Difficulty # 2: No HTTPS Support
Commento itself is a web server, but it only supports the insecure HTTP protocol.
It should be noted that this practice is quite common these days: in this case, the server is hidden behind the reverse proxy , which also performs SSL offloading. The thing is that SSL / HTTPS support is absolutely necessary in this case, after all, in the yard 2019 and looking at attempts to authorize a user using an unsecured Internet protocol will be very wry.
I decided to use the Nginx server, firstly, I had considerable experience working with it, and secondly, it is very fast, economical and stable. And publishes official builds of Docker images .
The second ingredient in the HTTPS recipe is an SSL certificate for the domain. I am eternally grateful to EFF and Mozilla for creating the Let's Encrypt Certificate Authority , which issues millions of free certificates every month.
Let's Encrypt also provides a free command line utility called certbot , which greatly simplifies the process of obtaining and updating a certificate. Well and - of course - the Docker image for him!
Difficulty # 3: Certbot Chicken Egg Problem
But this trick is more tricky.
We want to refer to the SSL certificate in the configuration of our reverse proxy on Nginx, which means that without a certificate it simply refuses to start. At the same time, to get an SSL certificate for a domain, you need a working HTTP server, which Let's Encrypt will prove your ownership of this domain.
I managed to solve this problem, and, it seems to me, pretty elegantly:
- First, a dummy, invalid certificate is generated, whose sole purpose is to let Nginx start.
- Nginx and certbot jointly receive a new, now valid certificate.
- As soon as the certificate is received, certbot goes into “standby mode”, waking up every 12 hours to check whether it needs to be updated - according to the recommendations of Let's Encrypt.
- When the moment has come and the certificate has been renewed, certbot will signal Nginx to restart.
Difficulty No. 4: something must be preserved
I strongly suspect that you want user comments to be saved after a reboot or system update.
Also, so that Let's Encrypt does not ban you due to too frequent requests, it would be nice to keep the received certificates for the entire expiration date.
Both points were resolved in the proposed configuration using the volumes of the Docker, automatically created by systemd when Commento was first launched. Volumes are marked as “external,” so Docker skips them when removing containers using docker-compose down -v
.
Bring it all together
Now you can see how it all works together.
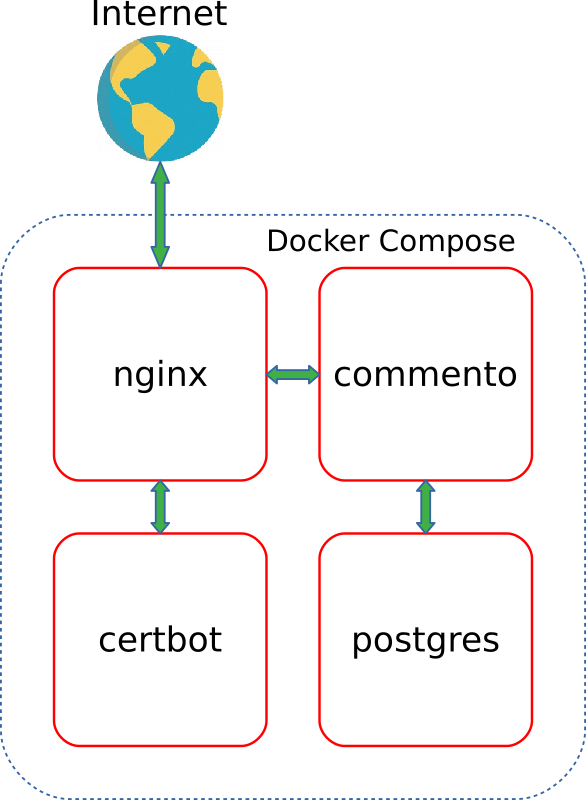
The figure below shows the interaction and traffic between the four containers:
I applied the built-in Docker Compose depends_on
option to ensure that containers start in the correct order.
If you only want to start your own Commento server, you can skip the rest of the article and go directly to the code on GitHub .
Well, I will talk more about this implementation in more detail later.
How does it all work
Compose File
As you can see in the picture above, my “composition” consists of four services:
-
certbot
-certbot
utility from EFF -
nginx
- reverse proxy implementing SSL offloading -
app
- Commento server -
postgres
- PostgreSQL database
The docker-compose.yml
contains declarations of its own Docker network, called commento_network
, and three volumes, of which two are external (that is, must be created outside of Compose):
-
commento_postgres_volume
stores PostgreSQL server data for Commento: users, moderators, comments, etc. -
certbot_etc_volume
contains certificates received bycertbot
.
Nginx
The Nginx container is built on the basis of the lightweight official image based on Alpine, and uses the following script to run:
#!/bin/sh trap exit TERM # Wait for the certificate file to arrive wait_for_certs() { echo 'Waiting for config files from certbot...' i=0 while [[ ! -f /etc/letsencrypt/options-ssl-nginx.conf ]]; do sleep 0.5 [[ $((i++)) -gt 20 ]] && echo 'No files after 10 seconds, aborting' && exit 2 done } # Watches for a "reload flag" (planted by certbot container) file and reloads nginx config once it's there watch_restart_flag() { while :; do [[ -f /var/www/certbot/.nginx-reload ]] && rm -f /var/www/certbot/.nginx-reload && echo 'Reloading nginx' && nginx -s reload sleep 10 done } # Wait for certbot wait_for_certs # Start "reload flag" watcher watch_restart_flag & # Run nginx in the foreground echo 'Starting nginx' exec nginx -g 'daemon off;'
- Line 3 ( ARRGHHH, Habr does not support the display of line numbers in the code - approx. Transl. ) An interrupt handler is registered so that Nginx and the background monitoring process successfully complete work when the container stops.
- Line 27 calls the wait function, which pauses the Nginx startup process until the SSL configuration files created by the
certbot
containercertbot
. Without this, Nginx would refuse to start. - Line 30 creates a background process that regularly, every ten seconds, checks for a flag file with the name
.nginx-reload
, and as soon as it detects it, instructs Nginx to reload the configuration. This file also creates certbot when the certificate is updated. - Line 34 starts Nginx in normal mode. Moreover,
exec
means that the current shell process is replaced by the Nginx process.
Another important file in this image is the Commento virtual server configuration, which forces Nginx to forward HTTPS requests to the commento
container:
server { listen [::]:443 ssl ipv6only=on; listen 443 ssl; server_tokens off; root /var/www/html; index index.html index.htm index.nginx-debian.html; server_name __DOMAIN__; location / { proxy_pass http://app:8080/; proxy_set_header Host $http_host; proxy_set_header X-Real-IP $remote_addr; proxy_set_header X-Forwarded-For $proxy_add_x_forwarded_for; } ssl_certificate /etc/letsencrypt/live/__DOMAIN__/fullchain.pem; ssl_certificate_key /etc/letsencrypt/live/__DOMAIN__/privkey.pem; include /etc/letsencrypt/options-ssl-nginx.conf; ssl_dhparam /etc/letsencrypt/ssl-dhparams.pem; } server { listen 80 default_server; listen [::]:80 default_server; server_tokens off; server_name __DOMAIN__; location /.well-known/acme-challenge/ { root /var/www/certbot; } # Redirect to HTTPS on port 80 location / { return 301 https://$host$request_uri; } }
The first server block (lines 1-21 ) describes how to work with HTTPS and the forwarding rule. This is where the Let's Encrypt certificate files are mentioned (or the stubs used instead).
The domain served by the server is passed as an argument when building the image; it replaces the line __DOMAIN__
in the server config.
The second block (lines 23-38 ) is the configuration of the HTTP server, which is used by the certbot to confirm domain ownership (the so-called “ACME challenge”). All other requests cause a redirect to the corresponding address via HTTPS.
certbot
Our certbot image is based on the official build with the following script:
#!/bin/sh trap exit TERM # Wait until nginx is up and running, up to 10 seconds wait_for_nginx() { echo 'Waiting for nginx...' i=0 while ! nc -z nginx 80 &>/dev/null; do sleep 0.5 [[ $((i++)) -gt 20 ]] && echo "nginx isn't online after 10 seconds, aborting" && exit 4 done echo 'nginx is up and running' } # Check vars [[ -z "$DOMAIN" ]] && echo "Environment variable 'DOMAIN' isn't defined" && exit 2 [[ -z "$EMAIL" ]] && echo "Environment variable 'EMAIL' isn't defined" && exit 2 TEST="${TEST:-false}" # Check external mounts data_dir='/etc/letsencrypt' www_dir='/var/www/certbot' [[ ! -d "$data_dir" ]] && echo "Directory $data_dir must be externally mounted" [[ ! -d "$www_dir" ]] && echo "Directory $www_dir must be externally mounted" # If the config/certificates haven't been initialised yet if [[ ! -e "$data_dir/options-ssl-nginx.conf" ]]; then # Copy config over from the initial location echo 'Initialising nginx config' cp /conf/options-ssl-nginx.conf /conf/ssl-dhparams.pem "$data_dir/" # Copy dummy certificates mkdir -p "$data_dir/live/$DOMAIN" cp /conf/privkey.pem /conf/fullchain.pem "$data_dir/live/$DOMAIN/" # Wait for nginx wait_for_nginx # Remove dummy certificates rm -rf "$data_dir/live/$DOMAIN/" # Run certbot to validate/renew certificate test_arg= $TEST && test_arg='--test-cert' certbot certonly --webroot -w /var/www/certbot -n -d "$DOMAIN" $test_arg -m "$EMAIL" --rsa-key-size 4096 --agree-tos --force-renewal # Reload nginx config touch /var/www/certbot/.nginx-reload # nginx config has been already initialised - just give nginx time to come up else wait_for_nginx fi # Run certbot in a loop for renewals while :; do certbot renew # Reload nginx config touch /var/www/certbot/.nginx-reload sleep 12h done
A brief tour of its lines:
- Line 3 , as in the previous script, is required for the regular completion of the container.
- Lines 17-19 check the required variables.
- And in lines 22-25 - that the directories required for certbot to work are mounted correctly.
- Next is a fork:
- Lines 30-50 are executed only at the first start of the container:
- A dummy certificate is copied, allowing Nginx to start normally.
- Nginx, meanwhile, is waiting for the end of this process, after which it continues to download.
- Once Nginx has started, certbot initiates the process of obtaining a valid certificate from Let's Encrypt.
- And finally, as soon as the certificate is received, the
.nginx-reload
file is created, hinting to Nginx that it is time to reload the config.
- Line 54 waits for Nginx to start - in the case when a full certificate is already available.
- Lines 30-50 are executed only at the first start of the container:
- After all this (lines 58-63 ), he continues to cycle, once every 12 hours checking the need to renew the certificate and signaling Nginx to restart.
Commento and PostgreSQL
The app
and postgres
containers use the original images provided by the developers without any changes.
Systemd Service
The last piece of this puzzle is the systemd commento.service
unit file , on which you need to create a symlink in /etc/systemd/system/commento.service
so that it starts at a good time when the system starts:
[Unit] Description=Commento server [Service] TimeoutStopSec=30 WorkingDirectory=/opt/commento ExecStartPre=-/usr/bin/docker volume create commento_postgres_volume ExecStartPre=-/usr/bin/docker volume create certbot_etc_volume ExecStartPre=-/usr/local/bin/docker-compose -p commento down -v ExecStart=/usr/local/bin/docker-compose -p commento up --abort-on-container-exit ExecStop=/usr/local/bin/docker-compose -p commento down -v [Install] WantedBy=multi-user.target
Rows:
- Line 6 implies that the project code is cloned to the
/opt/commento
directory - this is much simpler. - Lines 7-8 create external volumes, if they are not already.
- In line 9 , the possible remains of the previous containers are deleted. External volumes are preserved.
- Line 10 marks the actual launch of Docker Compose. The
--abort-on-container-exit
flag--abort-on-container-exit
entire flock of containers when any of them are--abort-on-container-exit
. Thanks to this, systemd will at least be aware that the service is stopped. - Line 11 is again cleaning and deleting containers, networks, and volumes.
Source
A fully working implementation, requiring only setting variables in docker-compose.yml
, is available on GitHub . You only need to carefully follow the steps described in README .
The code is subject to the MIT License .
Thank you for reading to this place, comments are frantically welcome!
All Articles