Fantastic plugins, vol. 1. Theory
Life with a multi-module project is not so simple. To avoid the routine of creating a new module, we created our own plug-in for Android Studio. In the process of implementation, we encountered a lack of practical documentation, tried several approaches and dug up many pitfalls. It turned out two articles: “Theory” and “Practice” . Meet me!

What will I talk about?
- Why a plugin? Why a plugin?
- Drawing up a checklist
- Checklist Automation Options
- Plugin Development Basics
- Actions
- UI development in plugins
- findings
- IDEA Internals: Components, PSI
- IDEA Internal Unit
- PSI
- findings
Why a plugin? Why a plugin?
If you are developing a multi-module Android project, then you know what kind of routine it is to create a new module each time. You need to create a module, configure Gradle in it, add dependencies, wait for synchronization, do not forget to fix something in the application module - it all takes a lot of time. We wanted to automate the routine, and we started by compiling a checklist of what we do each time we create a new module.
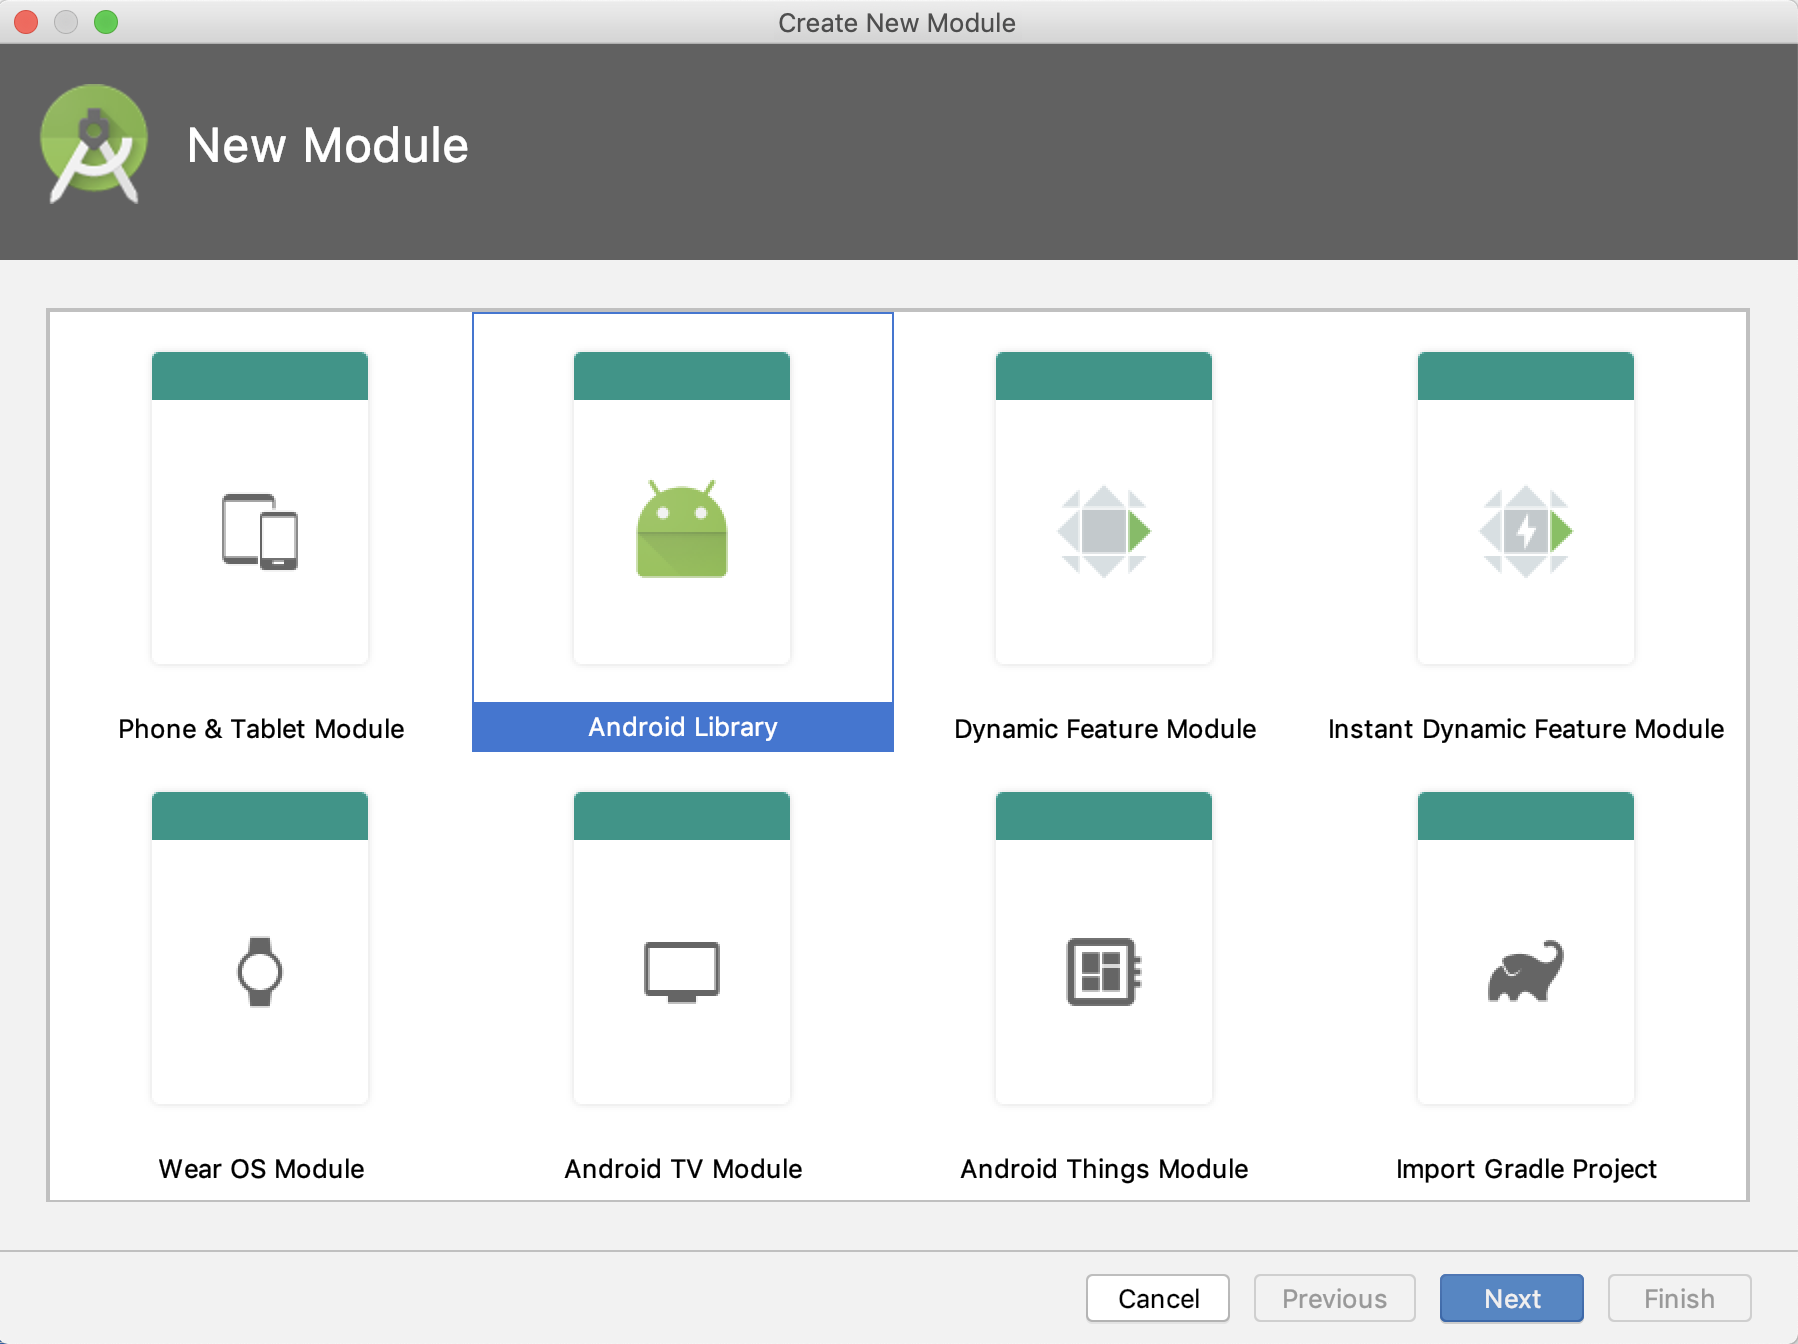
1. Firstly, we create the module itself through the menu File -> New -> New module -> Android library.
2. We write the paths to the module in the settings.gradle file, because we have several types of modules - core-modules and feature-modules, which are in different folders.
// settings.gradle include ':analytics project(':analytics').projectDir = new File(settingsDir, 'core/framework-metrics/analytics) ... include ':feature-worknear' project(':feature-worknear').projectDir = new File(settingsDir, 'feature/feature-worknear')
3. Change the constants compileSdk , minSdk , targetSdk in the generated build.gradle : replace them with the constants defined in the root build.gradle .
// Feature module build.gradle … android { compileSdkVersion rootProject.ext.targetSdkVersion defaultConfig { minSdkVersion rootProject.ext.minSdkVersion targetSdkVersion rootProject.ext.targetSdkVersion ... } }
Note: we recently removed this part of the work to our Gradle plugin, which helps to configure all the necessary parameters of the build.gradle file in several lines.
4. Since we are writing all the new code in Kotlin, we standardly connect two plugins: kotlin-android and kotlin-kapt . If the module is somehow connected with the UI, we additionally connect the kotlin-android-extensions module.
// Feature module build.gradle apply plugin: 'com.android.library' apply plugin: 'kotlin-android' apply plugin: 'kotlin-android-extensions' apply plugin: 'kotlin-kapt'
5. We connect the general libraries and core-modules. Core-modules are, for example, logger, analytics, some general utilities, and libraries - RxJava, Moxy and many others.
// Feature module build.gradle dependencies { def libraries = rootProject.ext.deps compileOnly project(':logger') compileOnly project(':analytics') … // Kotlin compileOnly libraries.kotlin // DI compileOnly libraries.toothpick kapt libraries.toothpickCompiler }
6. Set up kapt for Toothpick. Toothpick is our main DI framework. Most likely you know: in order to use code generation rather than reflection in the release assembly, you need to configure the annotation processor so that it understands where to get the factories for the created objects:
// Feature module build.gradle defaultConfig { ... javaCompileOptions { annotationProcessorOptions { arguments = [ toothpick_registry_package_name: "ru.hh.feature_worknear" ] } } ...
Note: in hh.ru we use the first version of Toothpick, in the second we removed the ability to use code generation .
7. We configure kapt for Moxy inside the created module. Moxy is our main framework for creating MVP in an application, and you need to twist it a bit so that it can work in a multi-module project. In particular, register the package of the created module in the kapt arguments:
// Feature module build.gradle android { ... kapt { arguments { arg("moxyReflectorPackage", "ru.hh.feature_worknear") } } ...
Note: we have already switched to the new version of Moxy , and this part of the code generation has lost its relevance.
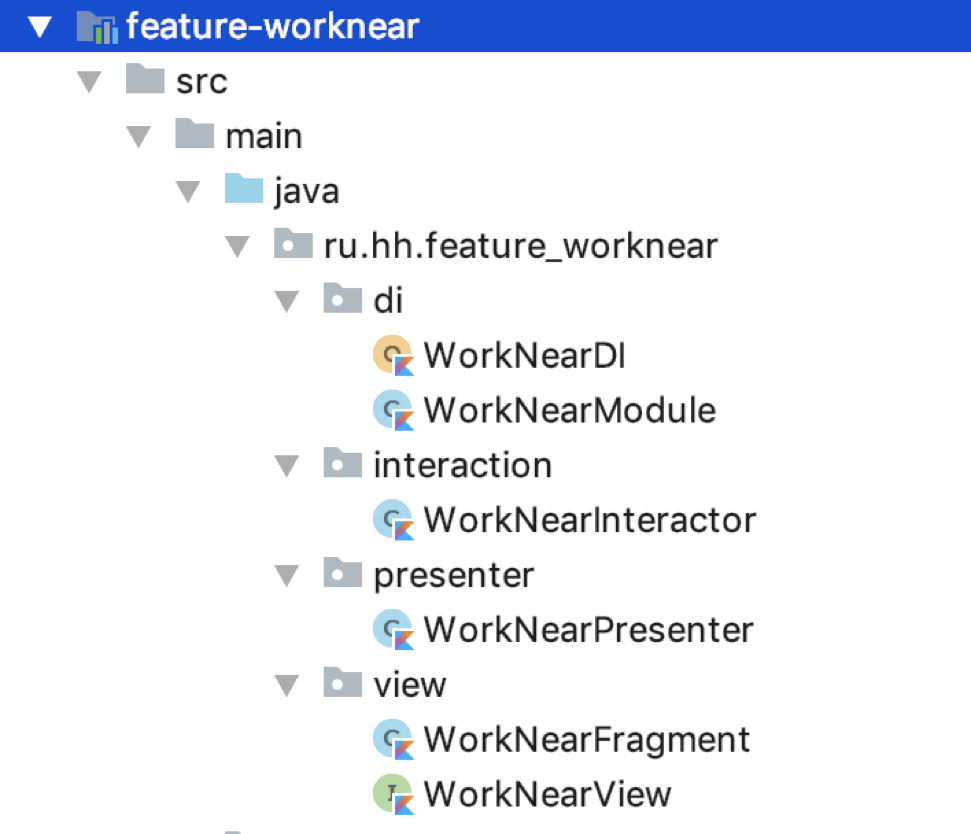
8. We generate a bunch of new files. I mean not those files that are created automatically (AndroidManifest.xml, build.gradle, .gitignore), but the general framework of the new module: interactors, repositories, DI modules, presenters, fragments. There are a lot of these files, they at the beginning have the same structure, and creating them is a routine.
9. We connect our created module to the application module. In this step, you must remember to configure Toothpick in the build.gradle file of the application module. To do this, we add the package of the created module to the special argument annotation processor - toothpick_registry_children_package_names .
// App module build.gradle defaultConfig { … javaCompileOptions { annotationProcessorOptions { arguments = [ toothpick_registry_package_name: "ru.hh.android", toothpick_registry_children_package_names: [ "ru.hh.analytics", "ru.hh.feature_worknear", ... ].join(",") ] } } …
After that, we configure Moxy in the application module. We have a class that is marked with the annotation @RegisterMoxyReflectorPackages - there we add the package name of the created module:
// App module file @RegisterMoxyReflectorPackages( "ru.hh.feature_force_update", "ru.hh.feature_profile", "ru.hh.feature_worknear" ... ) class MoxyReflectorStub
And, in the end, do not forget to connect the created module to the dependences block of the application module:
// Application module build.gradle dependencies { def libraries = rootProject.ext.deps implementation project(':logger') implementation project(':dependency-handler') implementation project(':common') implementation project(':analytics') implementation project(':feature_worknear') ...
We got a checklist of nine points.
Since there are many points, it is likely to forget something. And then spend hours wondering what happened and why the project is not going to.
We decided that you can’t live like that and you need to change something.
Checklist Automation Options
After compiling the checklist, we began to look for options for automating its items.
The first option was an attempt to do “Ctrl + C, Ctrl + V” . We tried to find an implementation for creating the Android Library module, which is available to us “out of the box”. In the folder with Android Studio (for MacOs: / Applications / Android \ Studio.app/Contents/plugins/android/lib/templates/gradle-projects/ ) you can find a special folder with the templates of those projects that you see when you select File - > New -> New Module. We tried to copy the NewAndroidModule template by changing the id inside the template.xml.ftl file. Then they launched the IDE, started to create a new module, and ... Android Studio crashed because the list of modules that you see in the menu for creating a new module is hard-coded, you cannot change it with a primitive copy-paste. When you try to take and add, delete or change an element, Android Studio just crashes.

The second option for automating the checklist was the FreeMarker template engine . After an unsuccessful copy-paste attempt, we decided to take a closer look at the module templates and found FreeMarker templates under the hood.
I won’t tell you what FreeMarker is in detail - there is a good article from RedMadRobot and a video from MosDroid from Lesha Bykov . But in short - this is an engine for generating files using templates and special Map-ki java-objects. You feed templates, objects, and FreeMarker generates code at the output.
But look again at the checklist:

If you look closely, you can see that it is divided into two large groups of tasks:
- The tasks of generating a new code (1, 3, 4, 5, 6, 7, 8) and
- Tasks for modifying an existing code (2, 7, 8, 9)
And if FreeMarker copes with tasks from the first group with a bang, then it does not cope with the second at all. As a small example: in the current implementation of FreeMarker integration in Android Studio, when you try to insert a line into the settings.gradle file that does not start with the word 'include', the studio will crash . Here we caught the sad, and decided to abandon the use of FreeMarker.
After a failure with FreeMarker, the idea came up to write my own console utility for performing a checklist. Inside Intellij IDEA it is possible to use a terminal, so why not? Let's write a script on the bash, total business:
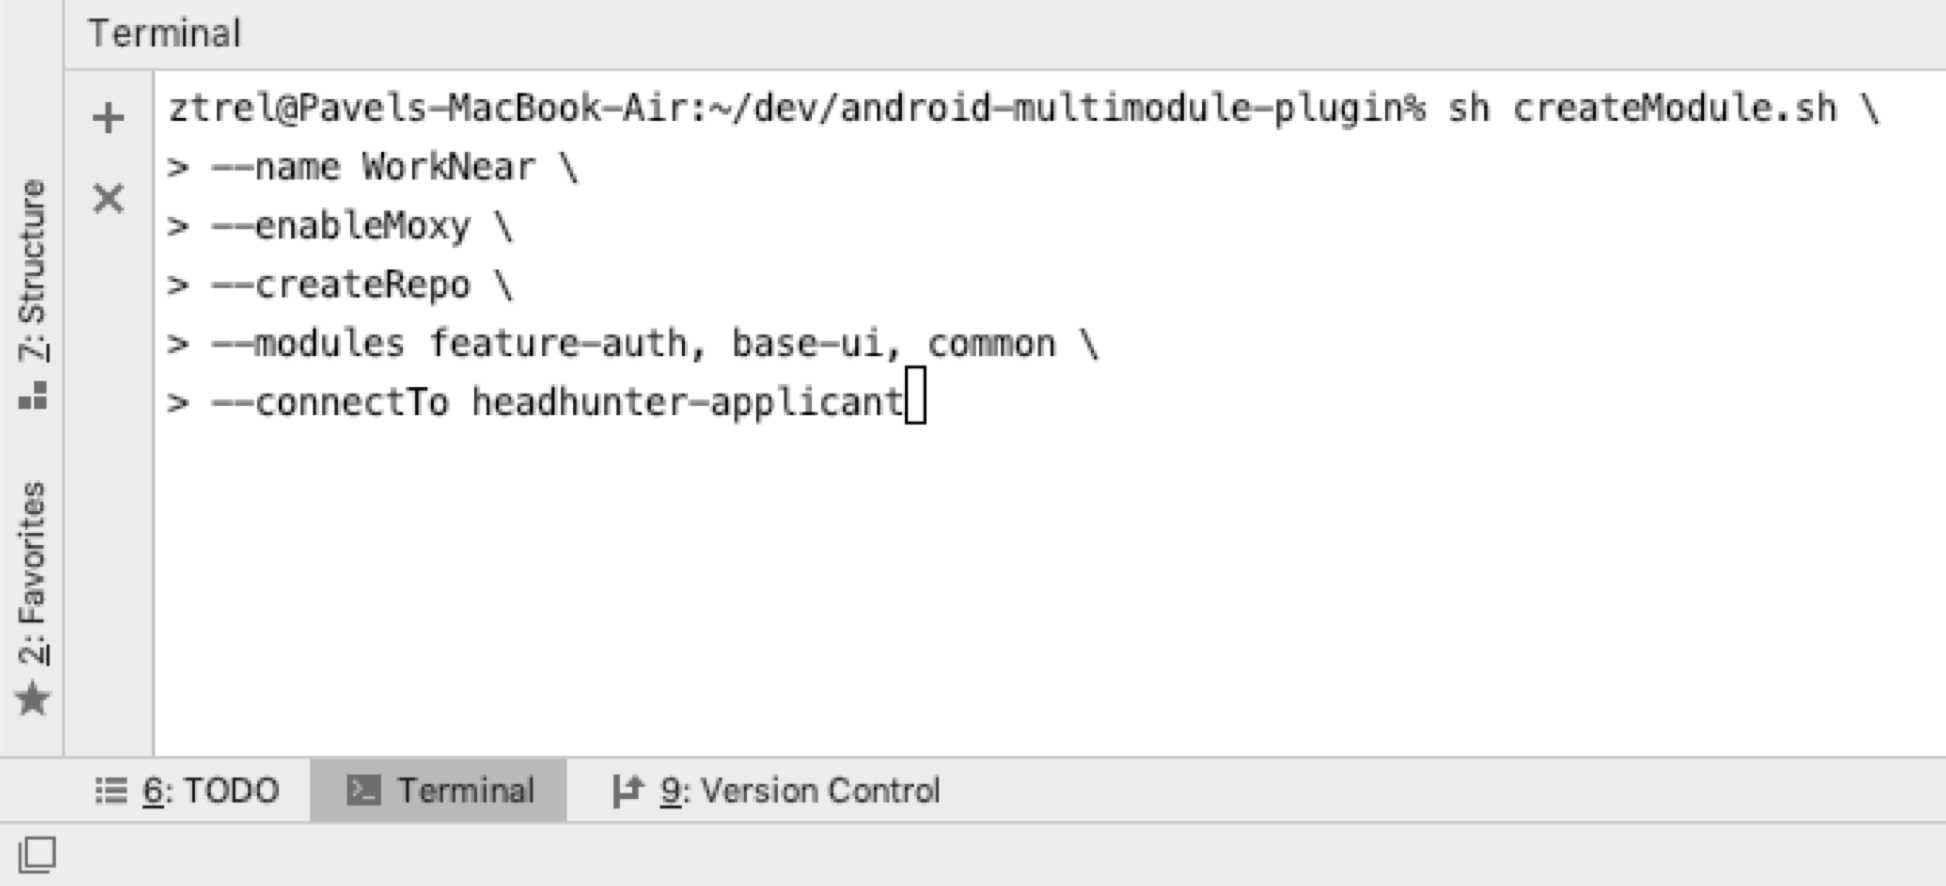
But since we want to be able to flexibly configure the created module, we will have to enter many different flags, which will not be very convenient to print in the console.
After that, we took a step back and remembered that we were working inside Intellij IDEA. And how is it arranged? There is a certain core of classes, an engine to which many plug-ins are attached, which add the functionality we need.
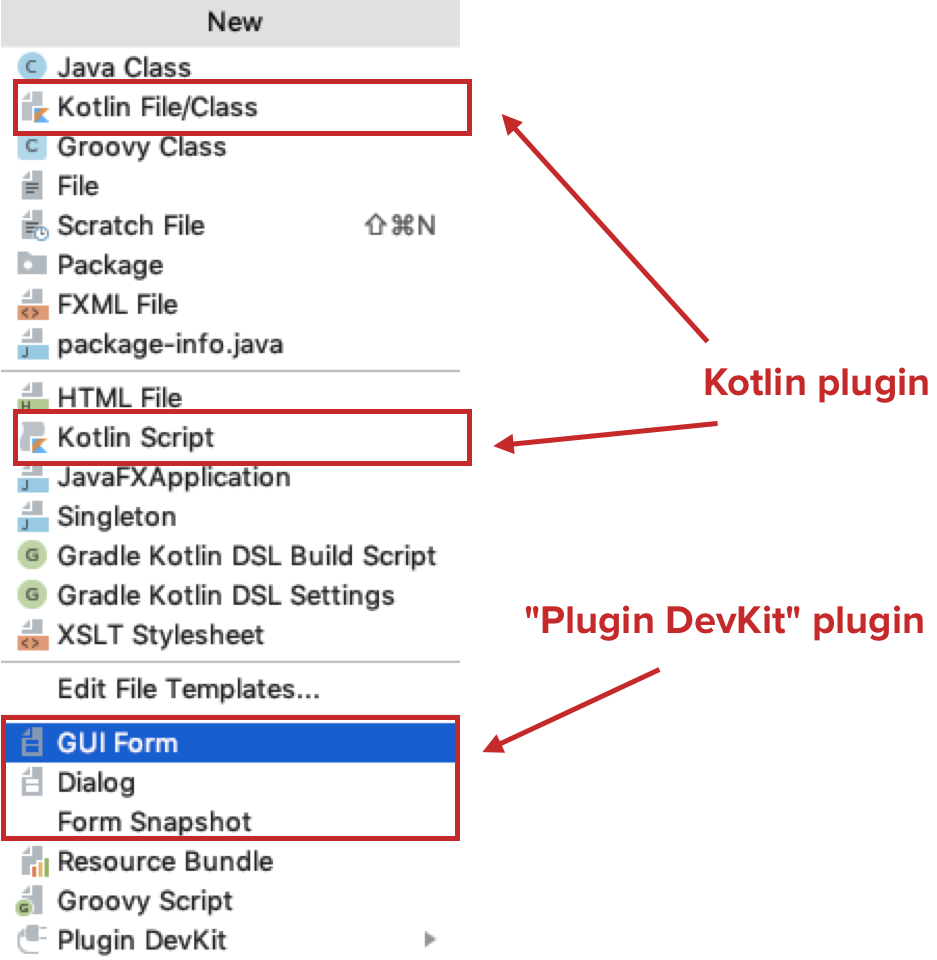
How many of you see in the screenshot more than two connected plugins?


Here they are connected at least three. If you work with Kotlin, then you have the Kotlin plugin enabled. If you are working in a project with Gradle, then the Gradle plugin is also included. If you are working in a project with a version control system - Git, SVN, or something else - you have the appropriate plugin included to integrate this VCS.
We looked into the official JetBrains plugin repository , and it turned out that there are already over 4000 officially registered plugins! Almost the whole world writes plugins, and these plugins can do anything: starting from integrating a programming language into IDEA and ending with specific tools that can be run from within IDEA.
In short, we decided to write our own plugin.
Plugin Development Basics
Let's move on to the basics of plugin development. To get started, you only need three things:
- IntelliJ IDEA , minimum Community Edition (You can work in the Ultimate version, but it will not give special advantages when developing plugins);
- The Plugin DevKit connected to it is a special plugin that adds the ability to write other plugins;
- And any JVM language in which you want to write a plugin. It could be Kotlin, Java, Groovy - anything.
We start by creating a plugin project. We select New project , point Gradle , we tick off IntelliJ Platform Plugin and we create the project.
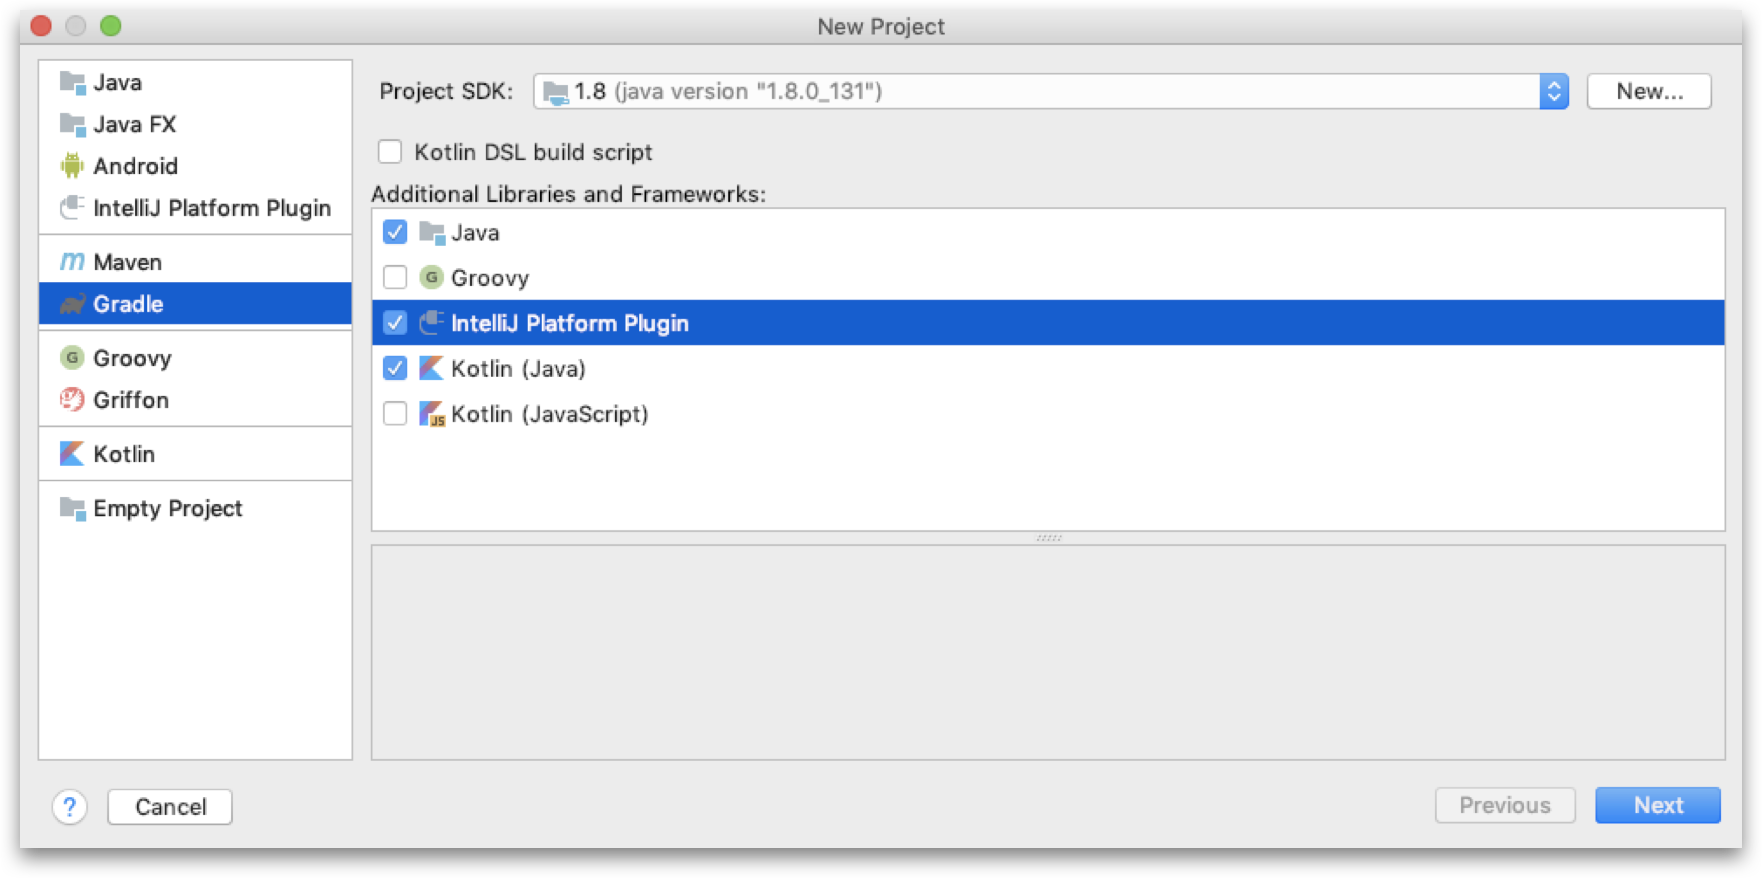
Note: If you do not see the IntelliJ Platform Plugin checkbox, it means that you do not have Plugin DevKit installed.
After filling in the required fields, we will see an empty plugin structure.

Let's take a closer look at it. It consists of:
- Folders in which you will write the code for the future project; ( main / java , main / kotlin , etc);
- build.gradle file, in which you will declare the dependencies of your plugin on some libraries, and also will configure such a thing as gradle-intellij-plugin .
gradle-intellij-plugin - Gradle plugin that allows you to use Gradle as a plugin build system. This is convenient because almost every Android developer is familiar with Gradle and knows how to work with it. In addition, gradle-intellij-plugin adds useful gradle tasks to your project, in particular:
- runIde - this task launches a separate IDEA instance with a plugin that you are developing so that you can debug it;
- buildPlugin - collects the zip archive of your plugin so that you can distribute it either locally or through the official IDEA repository;
- verifyPlugin - this task checks your plugin for gross errors that may not allow it to integrate into Android Studio or some other IDEA.
What else is gradle-intellij-plugin giving ? With its help, it becomes easier to add dependencies on other plugins, but we'll talk about that a little later, but for now I can say that gradle-intellij-plugin is your bro, use it.
Back to the plugin structure. The most important file of any plugin is plugin.xml .
<idea-plugin> <id>com.experiment.simple.plugin</id> <name>Hello, world</name> <vendor email="myemail@yourcompany.com" url="http://www.mycompany.com"> My company </vendor> <description><![CDATA[ My first ever plugin - try to open Hello world dialog<br> ]]></description> <depends>com.intellij.modules.lang</depends> <depends>org.jetbrains.kotlin</depends> <depends>org.intellij.groovy</depends> <idea-version since-build="163"/> <actions> <group description="My actions" id="MyActionGroup" text="My actions"> <separator/> <action id="com.experiment.actions.OpenHelloWorldAction" class="com.experiment.actions.OpenHelloWorldAction" text="Show Hello world" description="Open dialog"> <add-to-group group-id="NewGroup" anchor="last"/> </action> </group> </actions> <idea-plugin>
This is a file that contains:
- Your plugin metadata: identifier, name, description, vendor information, change log
- Description of dependencies on other plugins;
- Here you can also specify the IDEA version with which your plugin will work correctly
- Actions are also described here.
Actions
What are Actions ? Suppose you open a menu to create a new file. In fact, each element of this menu has been added by some kind of plugin:
Actions are the entry points to your plugin for users. Each time the user clicks on a menu item, you get control inside the plugin, you can respond to this click and do what is necessary.
How are Actions created? Let's write a simple Action that will display a dialog with the message "Hello, World".
class OpenHelloWorldAction : AnAction() { override fun actionPerformed(actionEvent: AnActionEvent) { val project = actionEvent.project Messages.showMessageDialog( project, "Hello world!", "Greeting", Messages.getInformationIcon() ) } override fun update(e: AnActionEvent) { super.update(e) // TODO - Here we can update our action (for example, disable it) } override fun beforeActionPerformedUpdate(e: AnActionEvent) { super.beforeActionPerformedUpdate(e) // TODO - This method calls right before 'actionPerformed' } }
To create an Action, we, firstly, create a class that inherits from the AnAction class. Secondly, we must override the actionPerformed method, where the special parameter of the AnActionEvent class comes . This parameter contains information about the execution context of your Action. Context refers to the project in which you are working, the file that is now open in the user’s code editor, the elements selected in the project tree, and other data that can help in processing your tasks.
To show the "Hello, world" dialog, we first get the project (just from the AnActionEvent parameter), and then use the utility class Messages to display the dialog box.
What additional features do we have inside the Action? We can override two methods: update and beforeActionPerformedUpdate .
The update method is called every time the execution context of your Action changes. Why it may be useful to you: for example, to update the menu item that was added by your plugin. Suppose you wrote an Action that can only work with Kotlin files, and the user has now opened the Groovy file. Then in the update method you can make your action inaccessible.
The beforeActionPerformedUpdate method is similar to the update method, but it is called right before actionPerformed . This is the last opportunity to influence your Action. The documentation recommends that you do not perform anything “heavy” in this method so that it runs as soon as possible.
You can also bind Actions to certain elements of the IDEA interface and set them default key combinations for calling - I recommend reading more about this here .
UI development in plugins
If you need your own dialog design, you'll have to work hard. We developed our UI because we wanted to have a convenient graphical interface in which it would be possible to mark a few ticks, have a selector for enum values, and so on.
Plugin DevKit for development of UI adds some actions, such as GUI form and Dialog . The first creates an empty form for us, the second - a form with two buttons: Ok and Cancel .
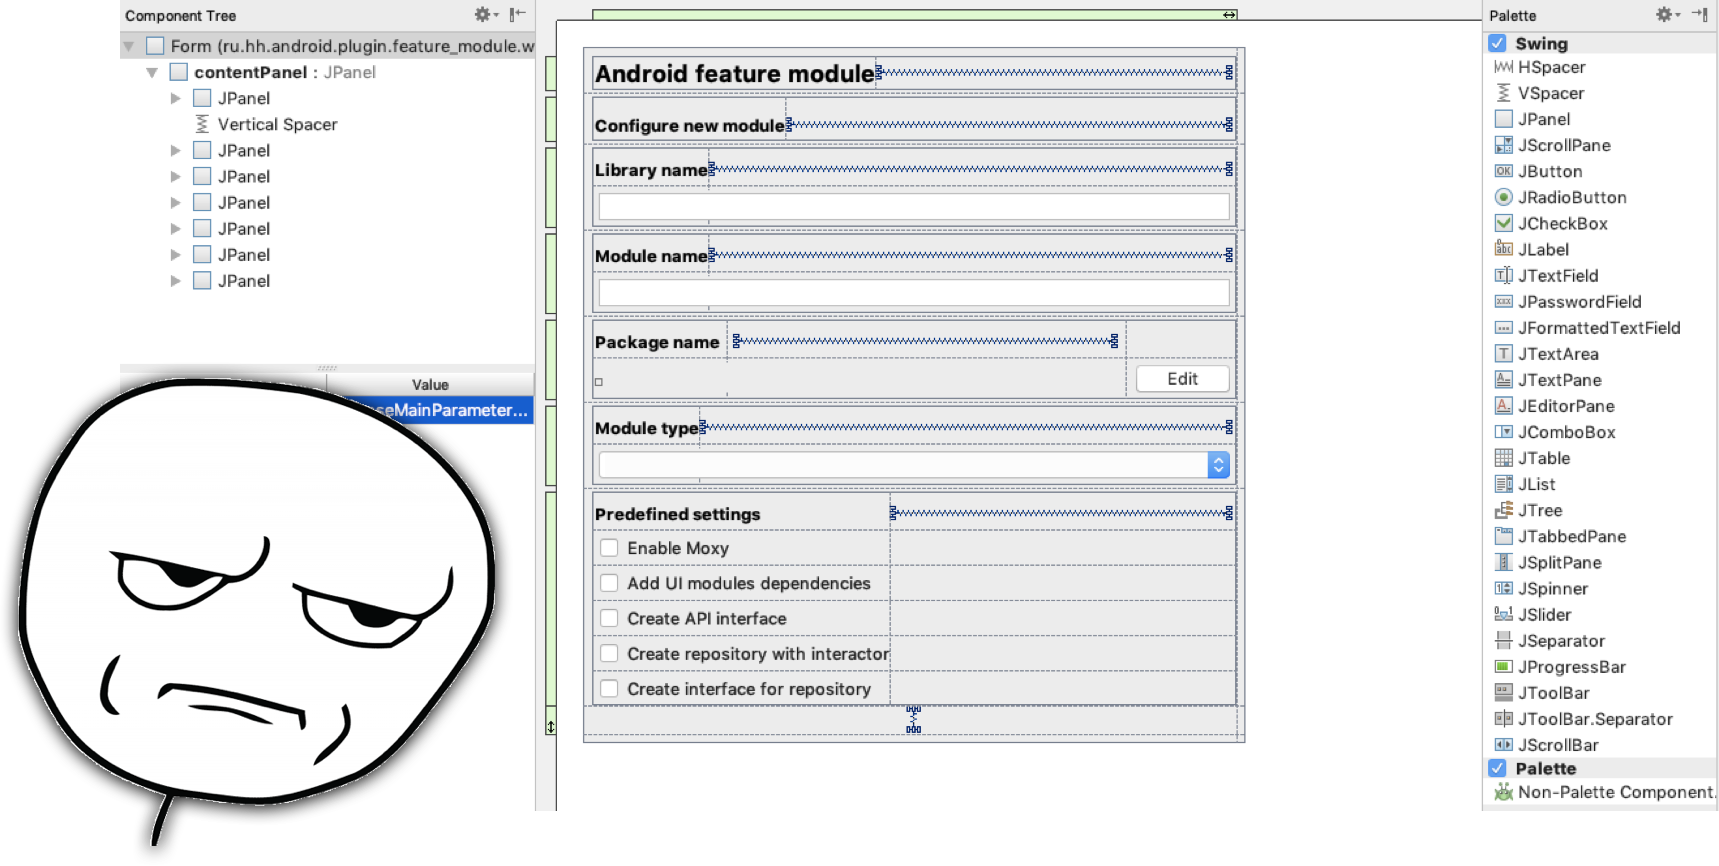
Okay, there is a form designer , but he is ... so-so. In comparison, even the Layout designer in Android Studio looks comfortable and good. The entire UI is developed on a library such as Java Swing. This form designer generates a human-readable XML file. If you can’t do something in the form designer (example: insert several controls in the same grid cell and hide all but one of the controls), you need to go to this file and change it - IDEA will pick up these changes.
Almost every form consists of two files: the first has the extension .form , this is just the XML file, the second is the so-called Bound class , which can be written in Java, Kotlin, but whatever you want. It acts as a form controller. Unexpectedly, but writing in Java is much easier than in other languages. Because, for example, tuning for Kotlin is not so perfect yet. When you add new components in working with the Java class, these components are automatically added to the class, and when you change the name of the component in the designer, it is automatically pulled. But in the case of Kotlin, components are not added - no integration occurs, you can forget something and not understand why nothing works.
We summarize the basics
- To create a plugin you will need: IDEA Community Edition, Plugin DevKit and Java connected to it.
- gradle-intellij-plugin is your bro, it will greatly simplify your life, I recommend using it.
- Do not write your own UI unless necessary. There are many utility classes in IDEA that allow you to create your own UI out of the box. If you need something complicated - get ready to work hard.
- The plugin can have any number of Actions. The same plugin can add a lot of functionality to your IDEA.
IDEA Internals: Components, PSI
Let's talk about the intestines of IDEA, about how it is arranged inside. I’m telling you so that nothing will crumble in your head when I explain the practical part, and so that you understand where it comes from.
How is IDEA arranged? At the first level of the hierarchy is a class such as Application . This is a separate IDEA instance. For each IDEA instance, one Application class object is created. For example, if you run AppCode, Intellij IDEA, Android Studio at the same time, you will get three separate instances of the Application class. This class is designed to handle the input / output stream.
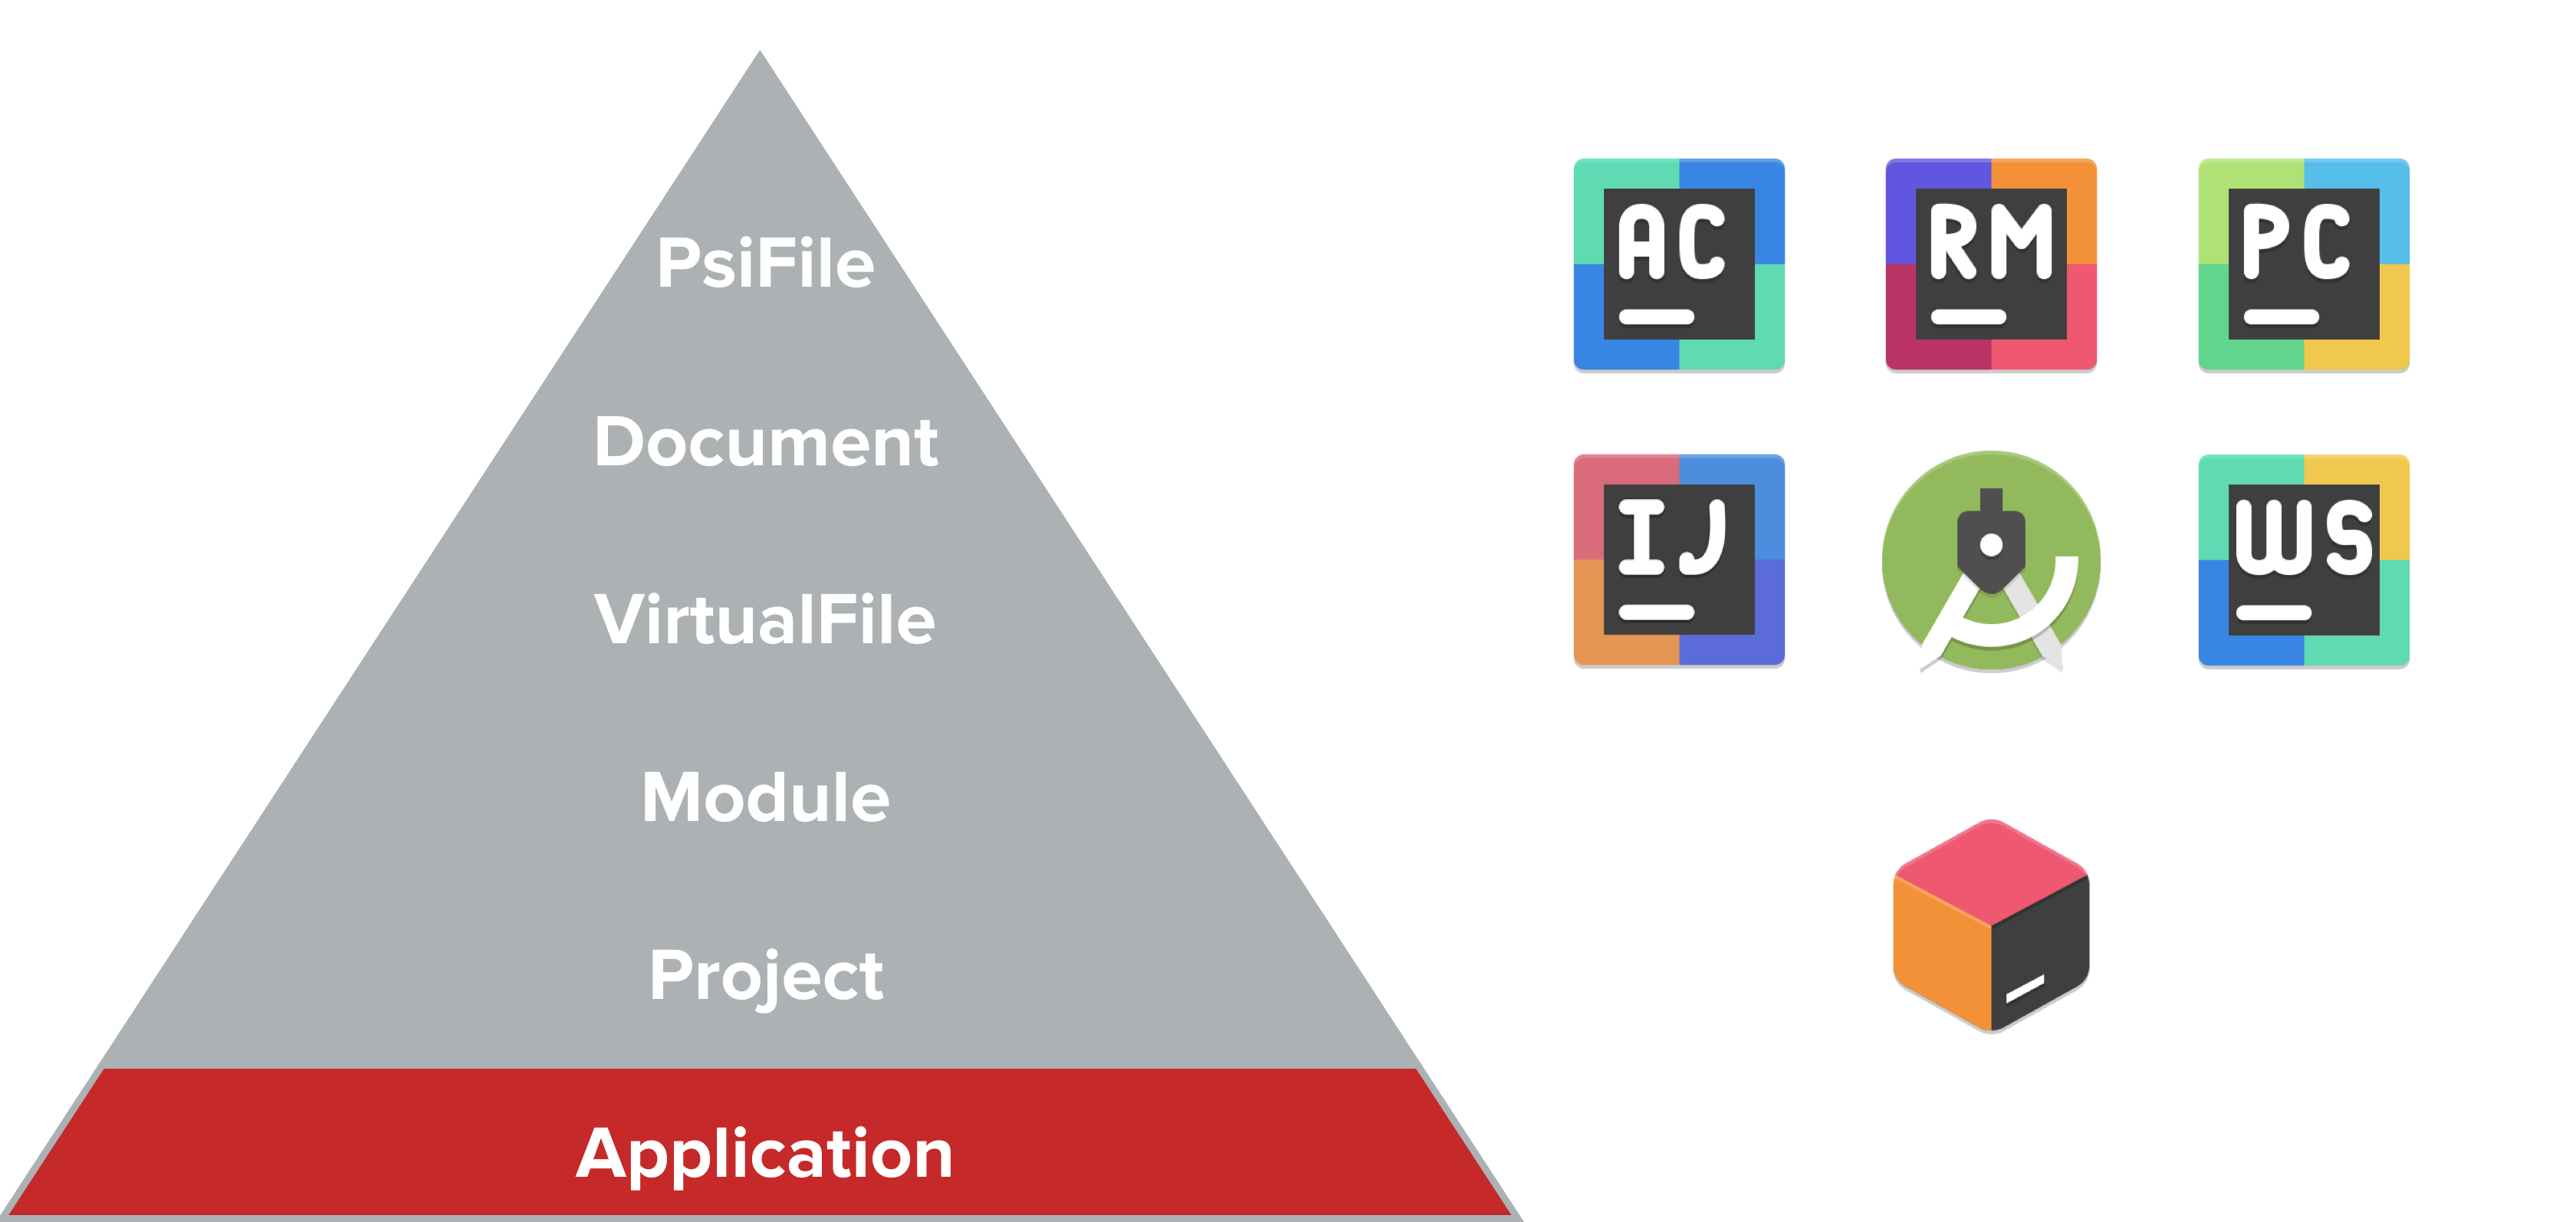
The next level is the Project class. This is the closest concept to what you see when opening a new project in IDEA. Project is usually needed to get other components inside IDEA: utility classes, managers, and much more.
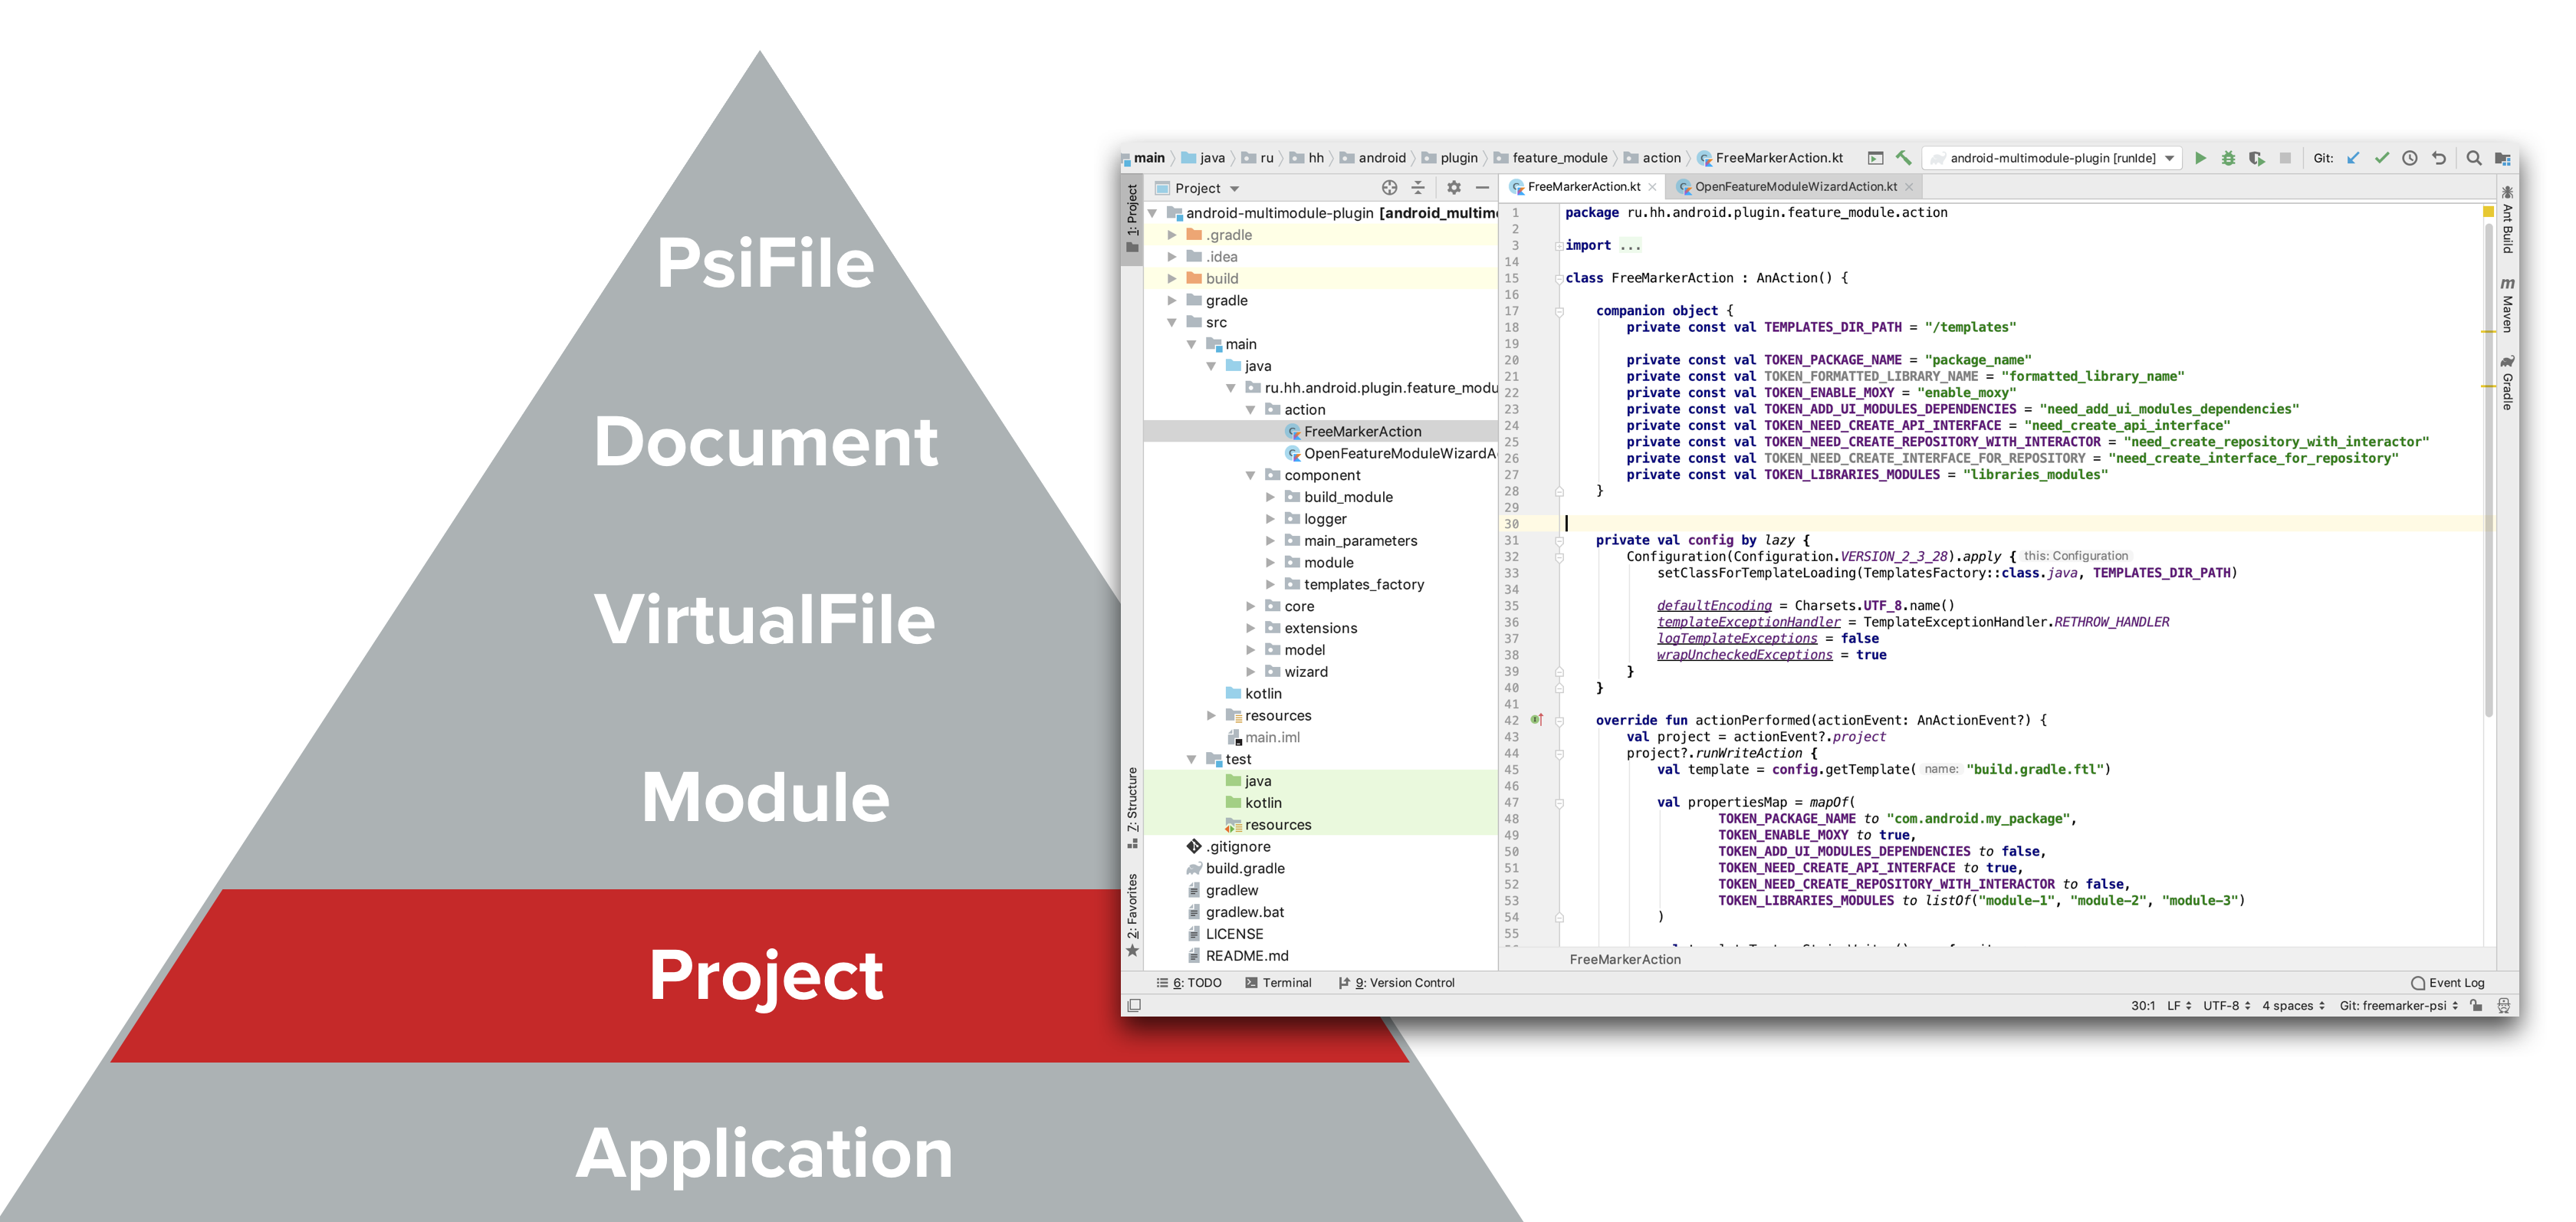
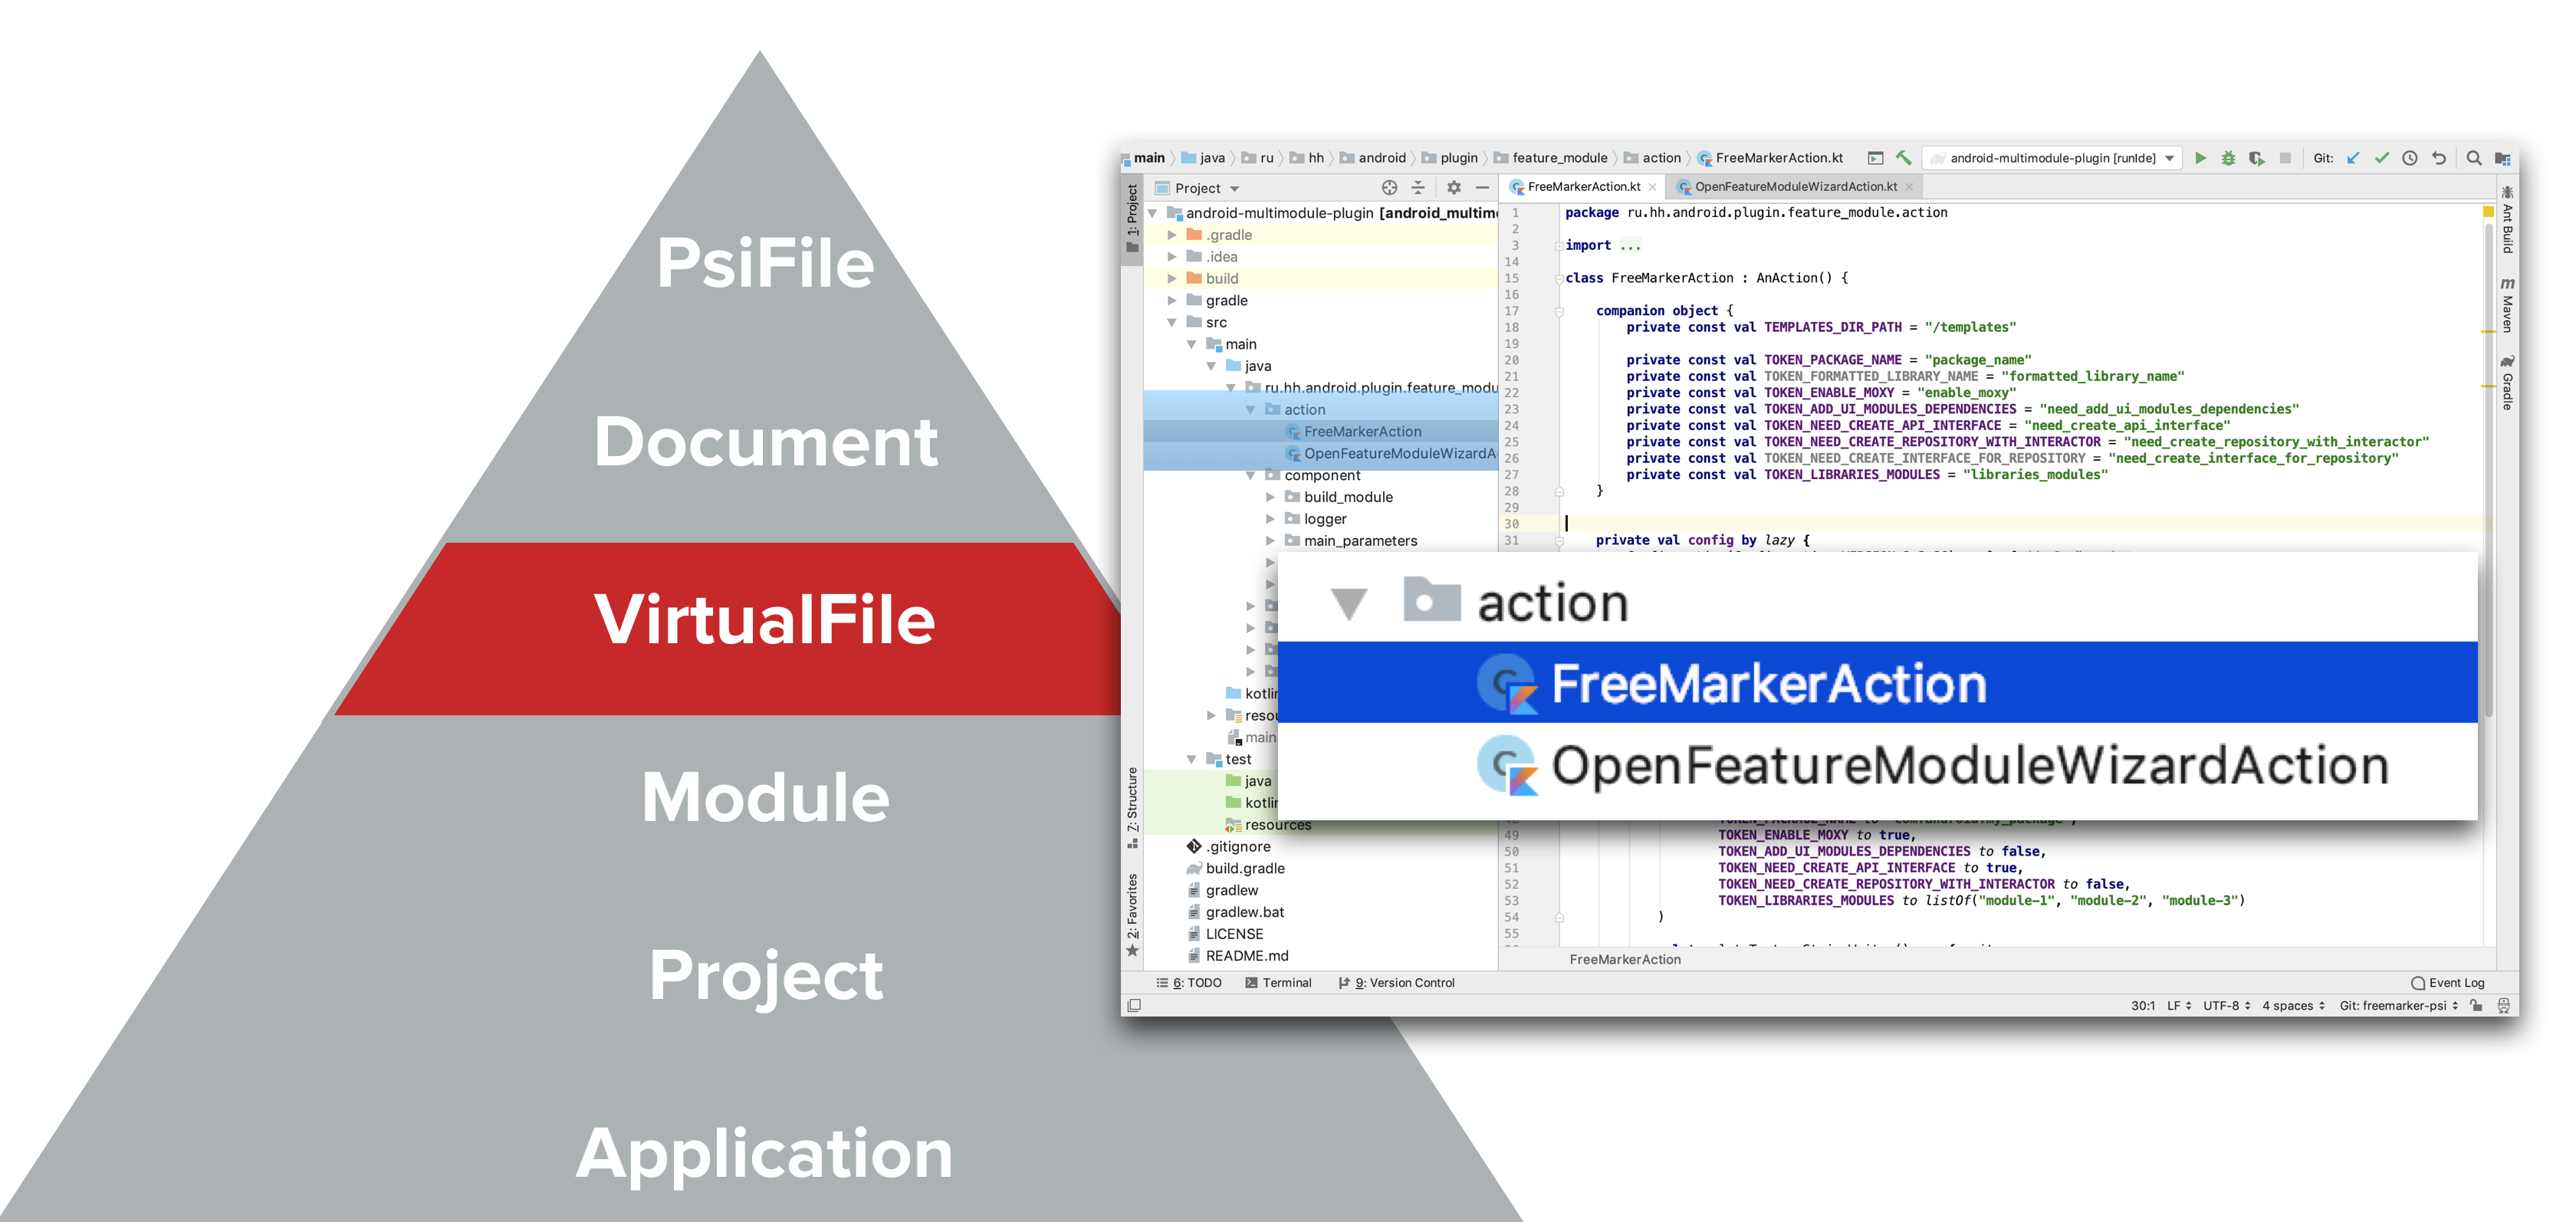
The next level of detail is the Module class. In general, a module is a hierarchy of classes grouped into one folder. But here by modules we mean Maven modules, Gradle modules. This class is needed, firstly, to determine the dependencies between the modules, and secondly, to search for classes inside these modules.
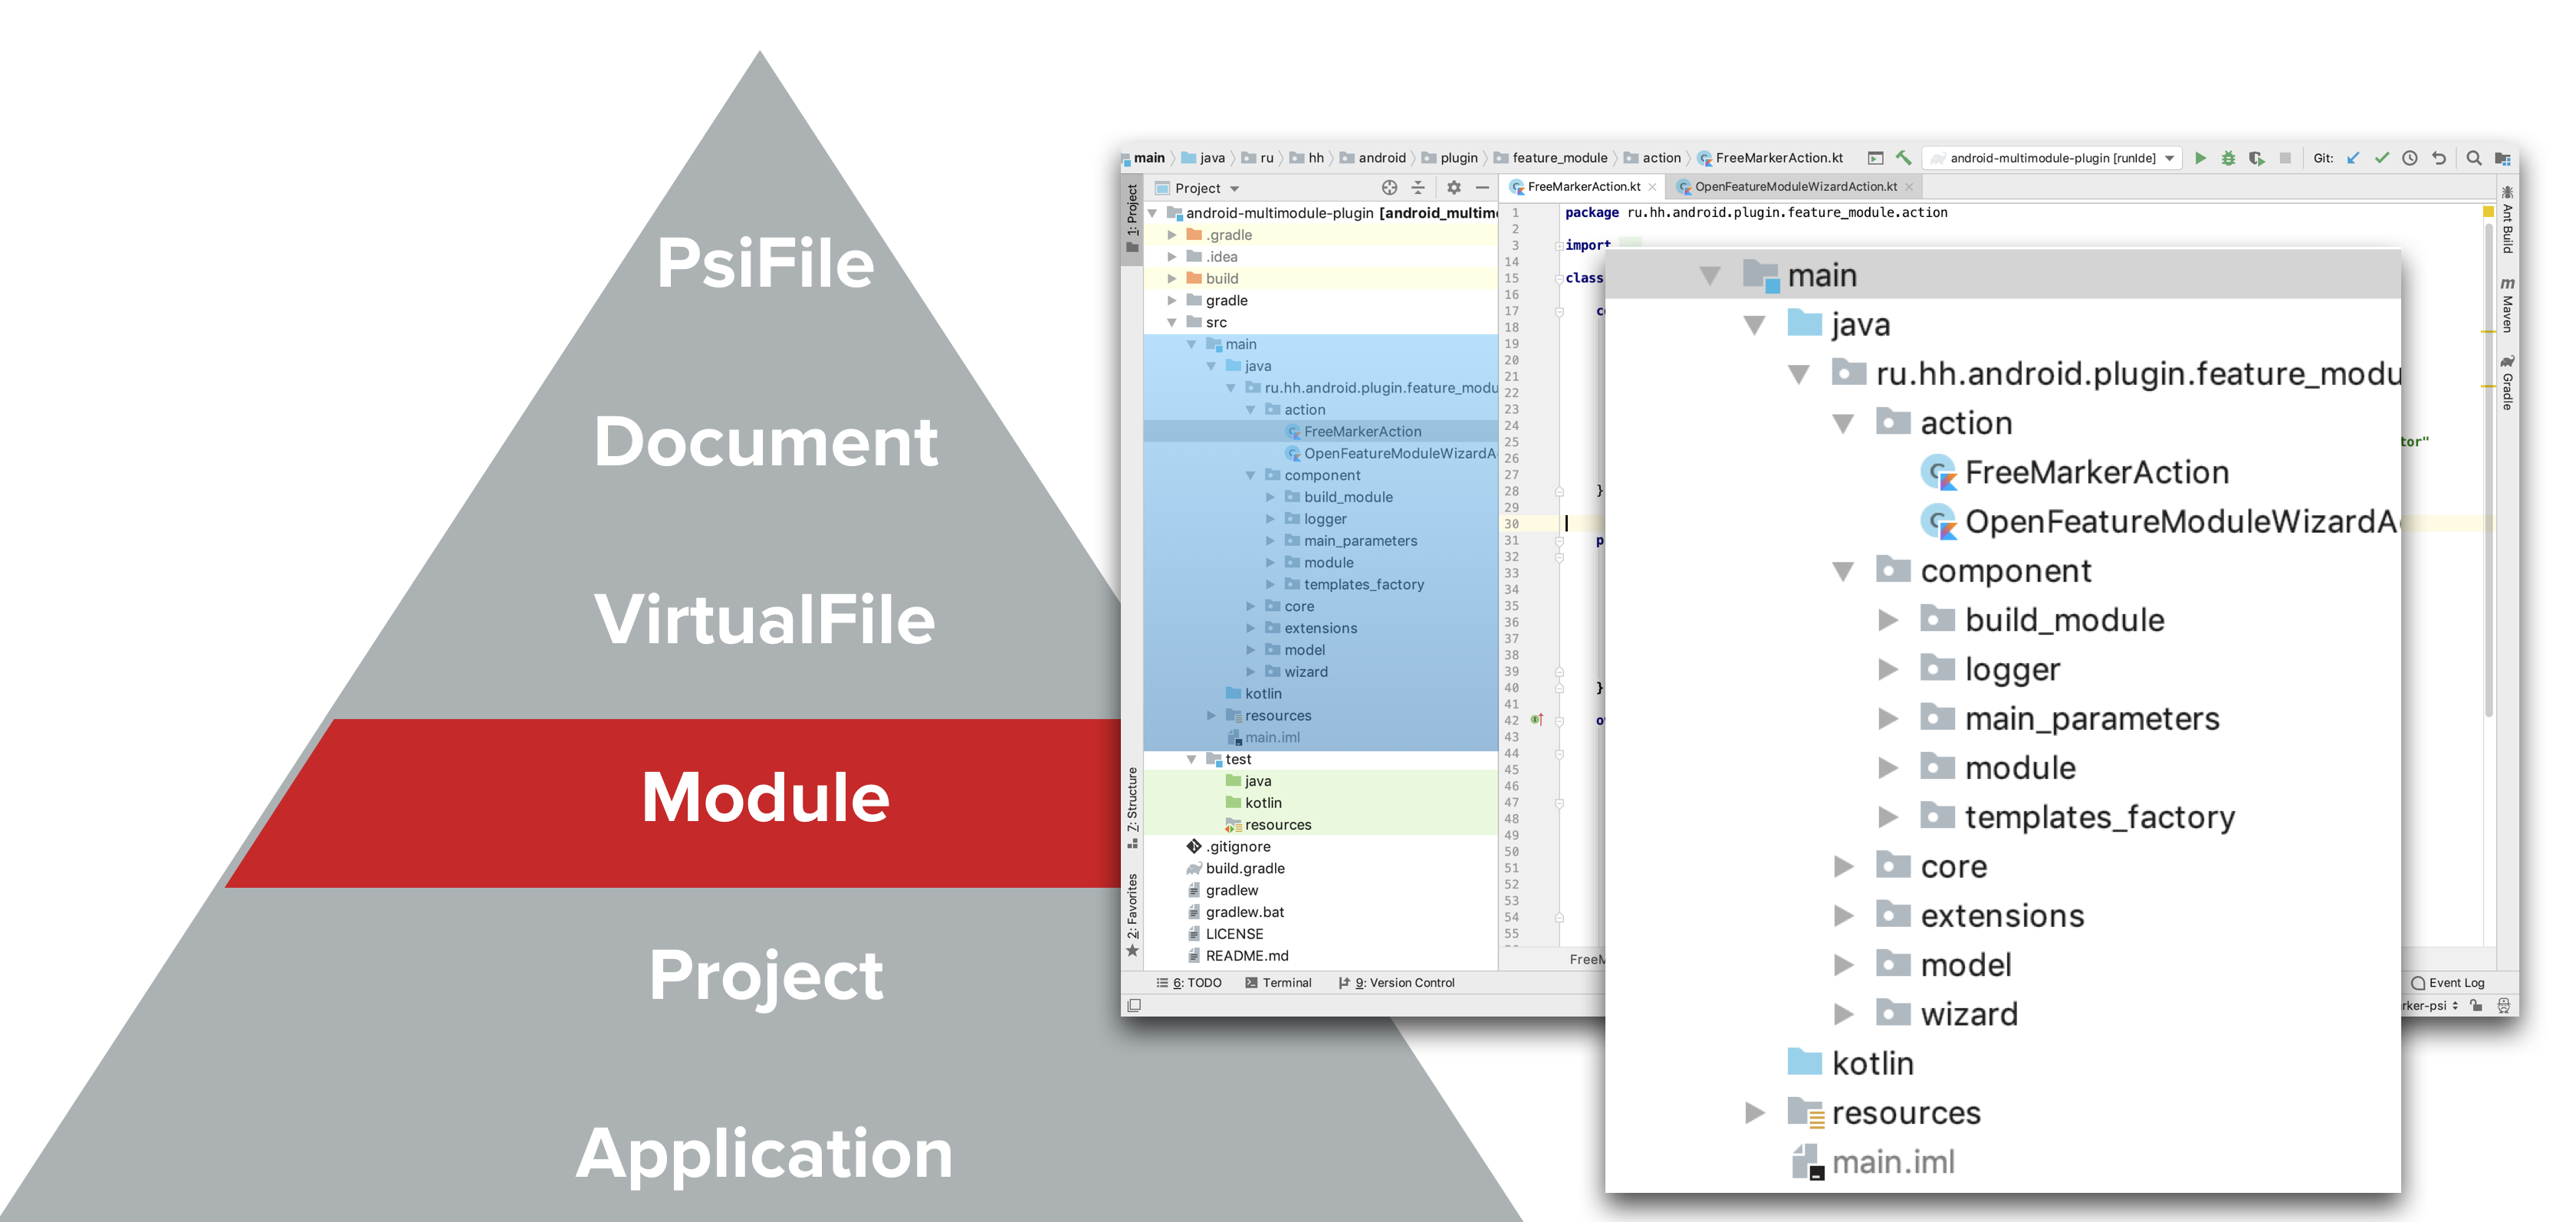
The next level of detail is the VirtualFile class. This is an abstraction over the real file that is on your disk. Multiple VirtualFile instances can correspond to each real file, but they are all equal. At the same time, if the real file is deleted, then VirtualFile will not be deleted on its own, but simply become invalid.
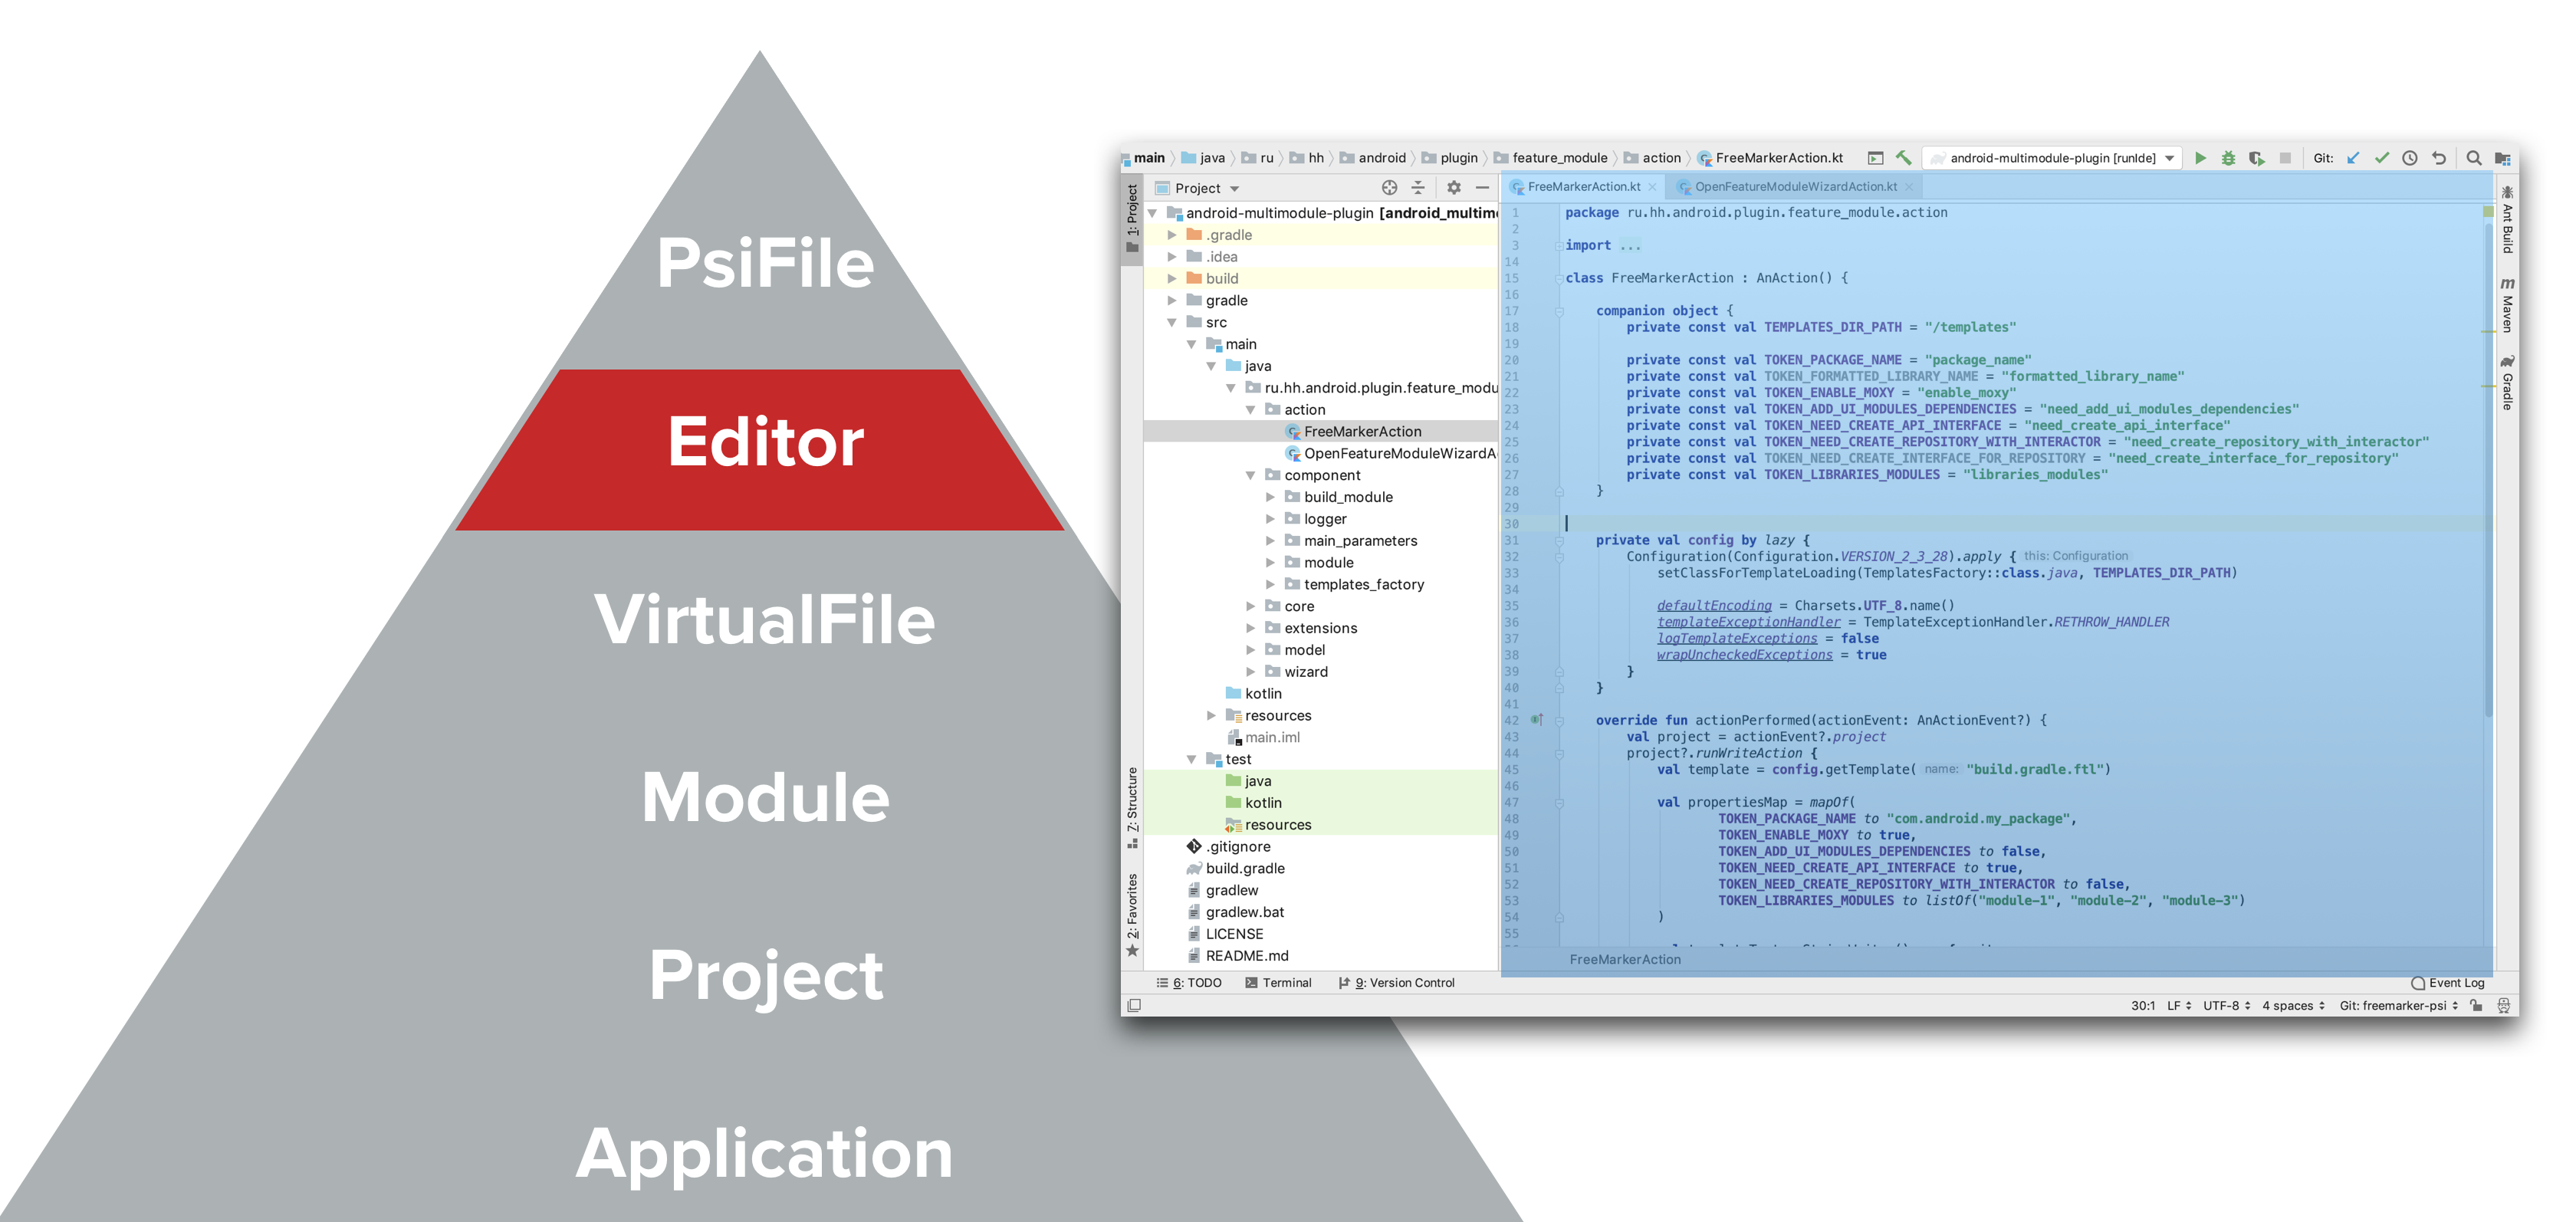
An entity such as Document is associated with each VirtualFile . It is an abstraction over the text of your file. Document is needed so that you can track events related to changes in the text of the file : the user inserted a line, deleted a line, etc., etc.

A little to the side of this hierarchy is the Editor class - this is a code editor. Each project can have one Editor . It is needed so that you can track events related to the code editor: the user has highlighted the line where the caret is, and so on.
The last thing I wanted to talk about is PsiFile . This is also an abstraction over real files, but from the point of view of representing code elements . PSI stands for Program Structure Interface.
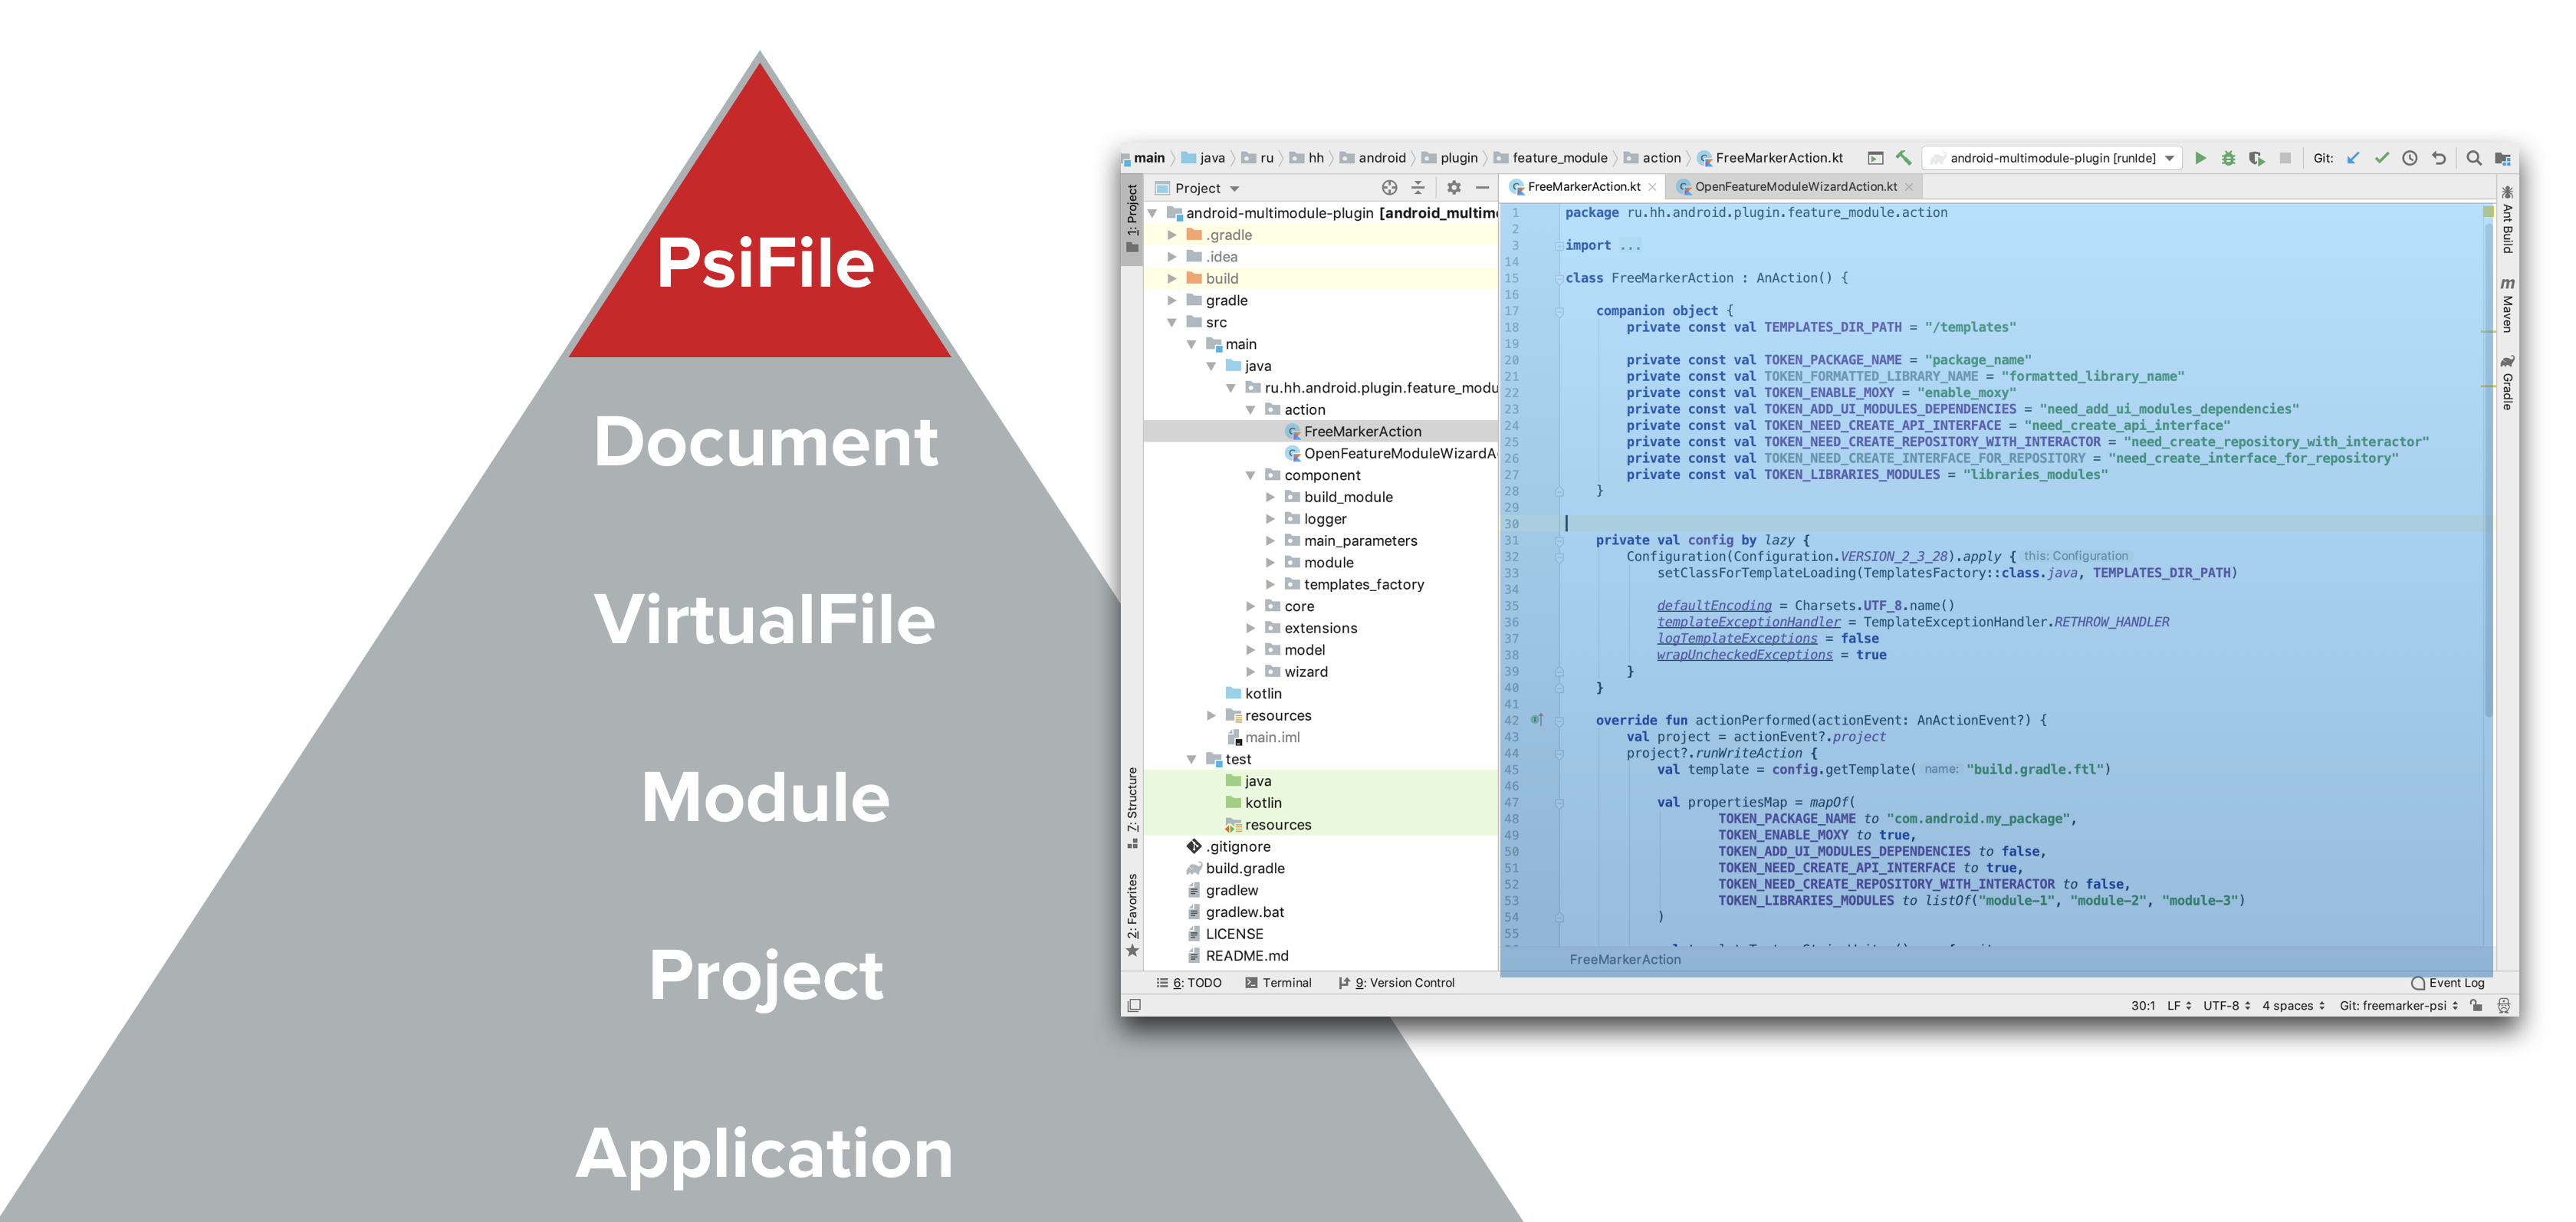
And what does each program consist of? Consider a regular Java class.
package com.experiment; import javax.inject.Inject; class SomeClass { @Inject String injectedString; public void someMethod() { System.out.println(injectedString); } }
It consists of specifying a package, imports, classes, fields, methods, annotations, keywords, data types, modifiers, identifiers, method references, expressions and tokens. And for each element there is an abstraction of PsiElements . That is, each of your programs consists of PsiElements .
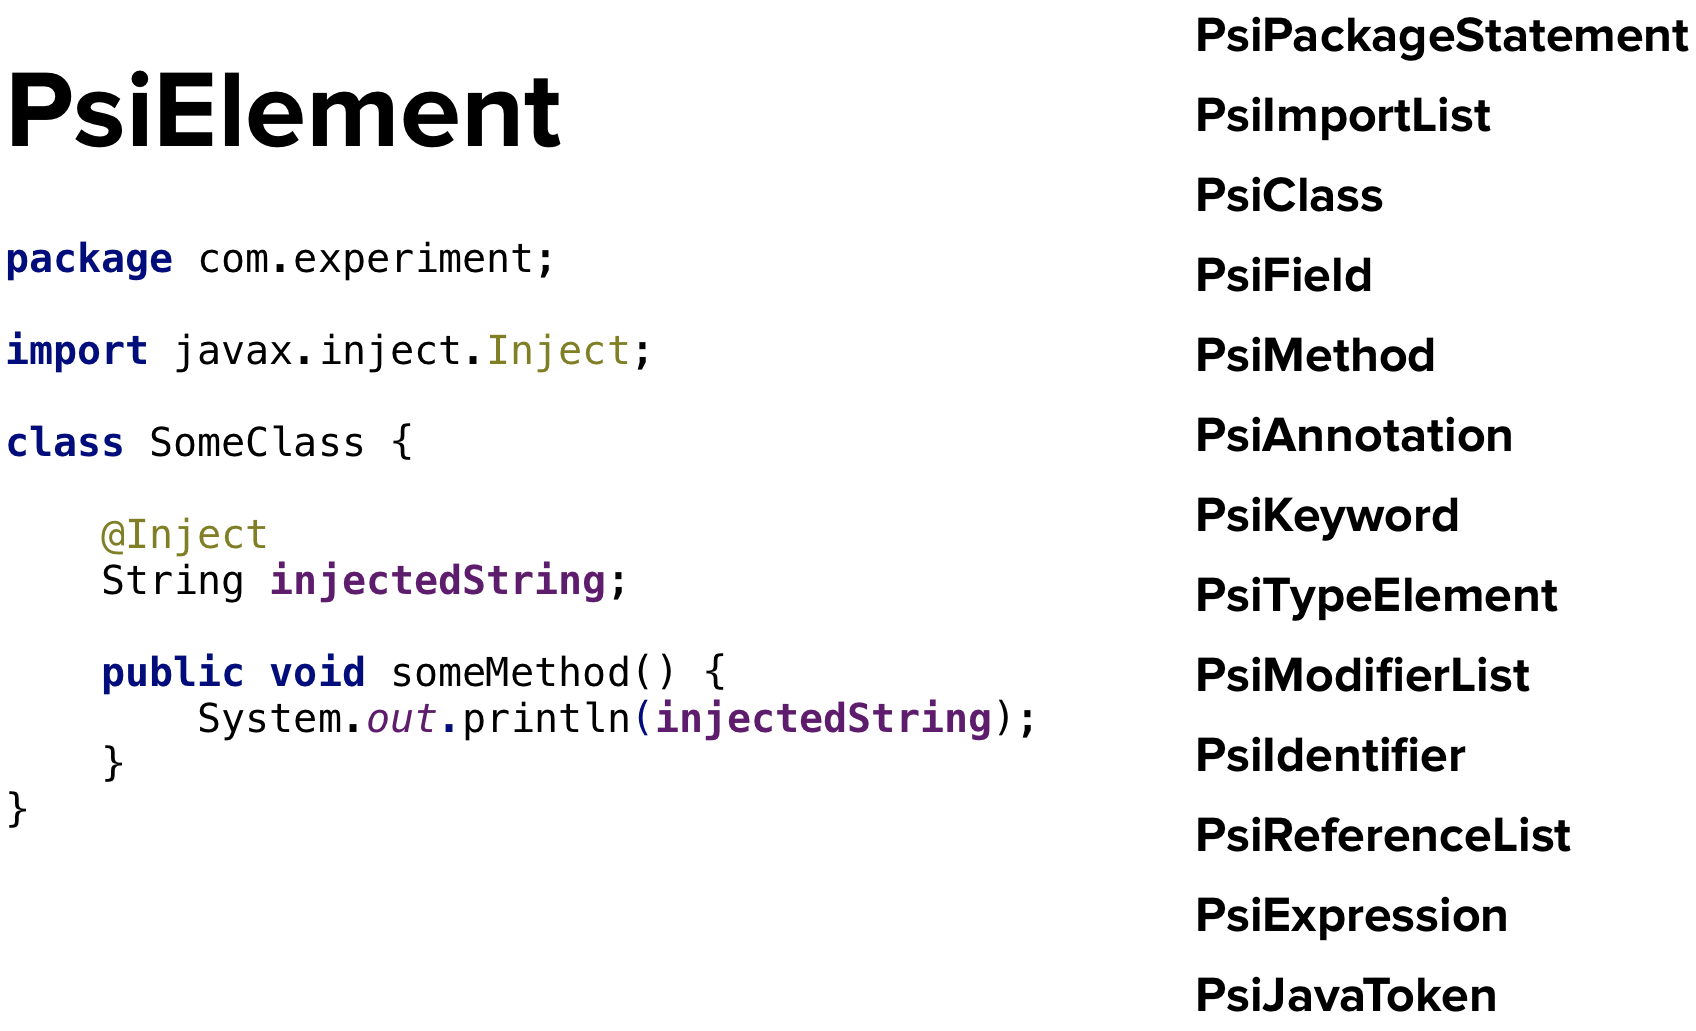
PsiFile , in turn, is a tree structure where each element can have a parent and many descendants.

I would like to mention that PSI does not equal an abstract syntax tree . An abstract syntax tree is a representation tree of your program after the parser has passed your program, and it is detached from any programming language. PSI, on the contrary, is tied to a specific programming language. When you work with a Java class, you are dealing with Java PsiElements. When working with a Groovy class - with Groovy PsiElements, and so on. , PSI- - , , , – .
PSI – PSI- IDEA. , , , . .
IDEA
- PSI IDEA;
- PSI- IDEA, ;
- PsiElement-.
- About creating a plugin for time tracking
- Beginning of a large series of articles complementing the plugin documentation
- Creating your own Tool window
- About expanding the functionality of the code editor
- A small example of creating your own plugin
- About adding a new file type to IntelliJ IDEA
- About adding file navigation capabilities inside IDEA
- IntelliJ IDEA
- , , . , .
- Droidcon Italy 2017 , , , , FreeMarker- . , .
- KotlinConf , Square SQLDelight, Java, Kotlin.
All Articles