We control focus or a pinch of C # and STM32 for a webcam
It all started very funny. Two webcams from the manufacturer Logitech (model C525) were connected to my computer. Quite good cameras, but, as it turned out later, with drivers of very dubious quality. In fact, this is a problem not only of this manufacturer. Their configuration utility replaces the system, but does not even suspect that the computer may have more than one camera of this model. As a result, when you open the settings window for different cameras from OBS Studio, the focus always changed for one. The mess.
At one time, he played a lot with capturing and broadcasting cameras in VLC. From his interface I learned about DirectShow . I decided to develop in C #, despite the lack of experience (we will not consider labs in the university). Literally in the evening, I sketched TrackBars for all the cameras found, and fortunately there was no limit. I threw the utility off to a couple of familiar video bloggers for use on streams.
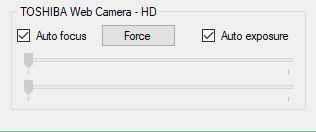
Next, they received a request to expand the functionality. Add white balance adjustment. Then why not let the user choose the parameters that he needs? For each camera separately. From this moment tabs appeared. The first is general, with selected parameters, and a tab for each detected webcam.
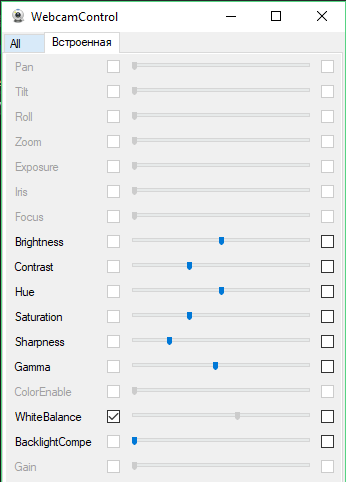
True, not all parameters are supported by the camera. Only 3 states: not available, only manual adjustment, manual and automatic adjustment. There is also only automatic, but I don’t remember getting it from any device. Accordingly, some lines are turned off. For laptop cameras, for example, half of the list associated with capture settings is not available. But the correction is already there.
During the implementation of the “tabbed interface”, the thought came to my mind: to attach an encoder. In SLR cameras, twisting the focus ring is very convenient. But they didn’t deliver it to webcams. So the STM32F070 babies were connected to the project. These are the smallest chips with support for USB 2.0. The habr already has a good article about Custom HID , so you can skip the detailed description of this item. The device layout is extremely simple. No piping is needed for this microcontroller. Only now he does not know how to start the built-in generator on PLL, so quartz is required. Of the control elements, in addition to the encoder, there are 4 buttons. One of them is built into the encoder. Such are now very common. About the appointment of each will be a little later.
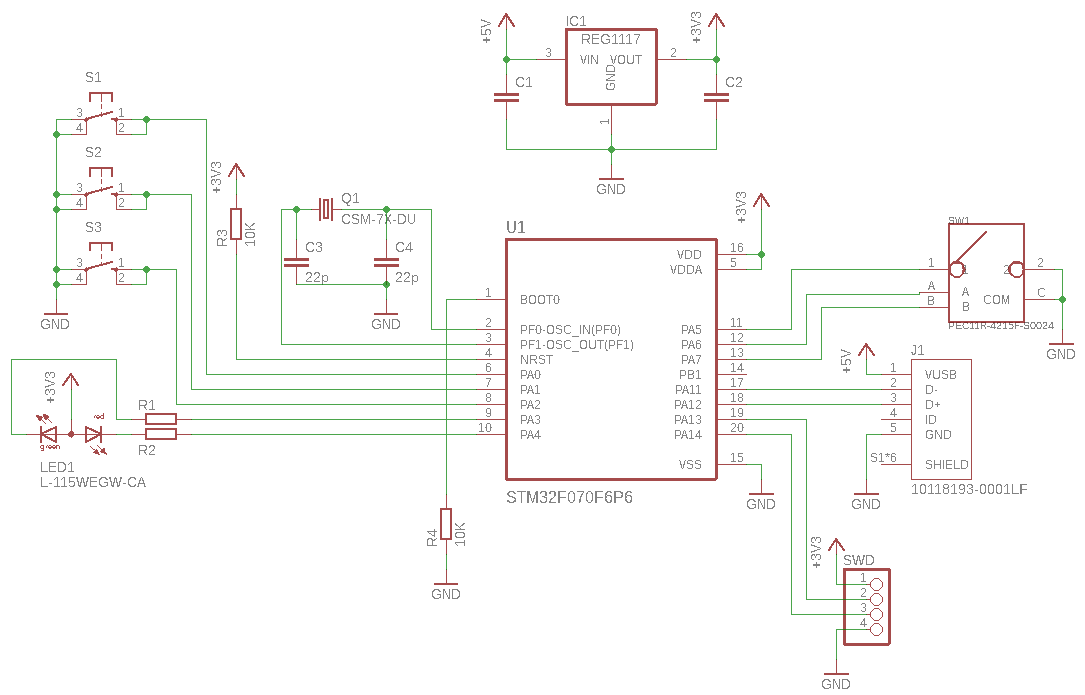
To debug software, two instances of the HID device were soldered. But they are assembled almost on a breadboard. These are actually scarves for Pinboard II. In vain, when wiring them, I did not immediately add a USB port and a linear stabilizer. It would look less collective farm (no). In the finished device, it is planned to place the scarf in the camera holder on a tripod. Of course, printed on a 3D printer. So that only one wire leads to the camera, you can also place a USB hub in the same place. For example, FE1.1s are not much larger than STM32. But honest 480 megabits. In general, the implementation of iron is still an open question.
Those who wish to repeat can download the source from the repository . The cost of a piece of iron by components is conditionally 100 rubles, 55 of which the microcontroller “eats”. In my case, quartz costs 20 megahertz, but this is "what was in the bins." Change the denomination, but reconfigure the clock system so that the USB module suits everything.

Now about the appointment of hardware buttons. The built-in encoder returns the parameter to automatic mode, if possible. Rotation translates into manual. Since the user can adjust several parameters, you need to switch between them. Button S1 is responsible for looping through the parameters, and on S2 and S3 you can assign specific ones so as not to be distracted by the program window by checking the selected parameter.
Indication is used to identify devices. On the camera tab, you can bind the HID device to a specific camera. The LED lights up when selected in the drop-down list. The diagram provides an LED with two crystals in one housing, but all its features are not used. Left for the future.
Each HID device has its own unique serial number, which is transmitted via USB. It is he who is displayed in the list. The uniqueness of the numbers is ensured by the identifier of the microcontroller itself. This is the production date and its place on the plate. A very fun method of formation. Although the serial number is not stored in the INI file, but the path to the device (contains VID, PID and GUID). All settings are readable, so the file can be edited with notepad. But why.
The camera blade is a nasty thing. OBS Studio, for example, leaves the last frame. Sometimes you don’t immediately notice a breakdown. So a helmet notice. In general, handling the connection of new and reconnecting existing devices was the most difficult task. Both webcams and HID. Basically the first. Affected by the lack of programming experience in C #. It would be necessary to read some kind of book ... How many streams passed while it still worked ... The process was broadcast on YouTube, where viewers periodically prompted both by code and by application functionality. It is very convenient. Collective mind.
So, because of the oblique drivers, such crafts appear. Of course, over time it will be updated, debugged, so there’s a link to the repository .
All Articles