How we played music with neural networks v 2.0
Hi, Habr.
This post is about how we brought neural networks into real life. If you like applied robotics and engineering, or like neurons, or blink an LED on Arduin, it will be interesting. However, this is a story about how to assemble many different components and technologies into a single whole and make an idea out of it. Details under the cut.

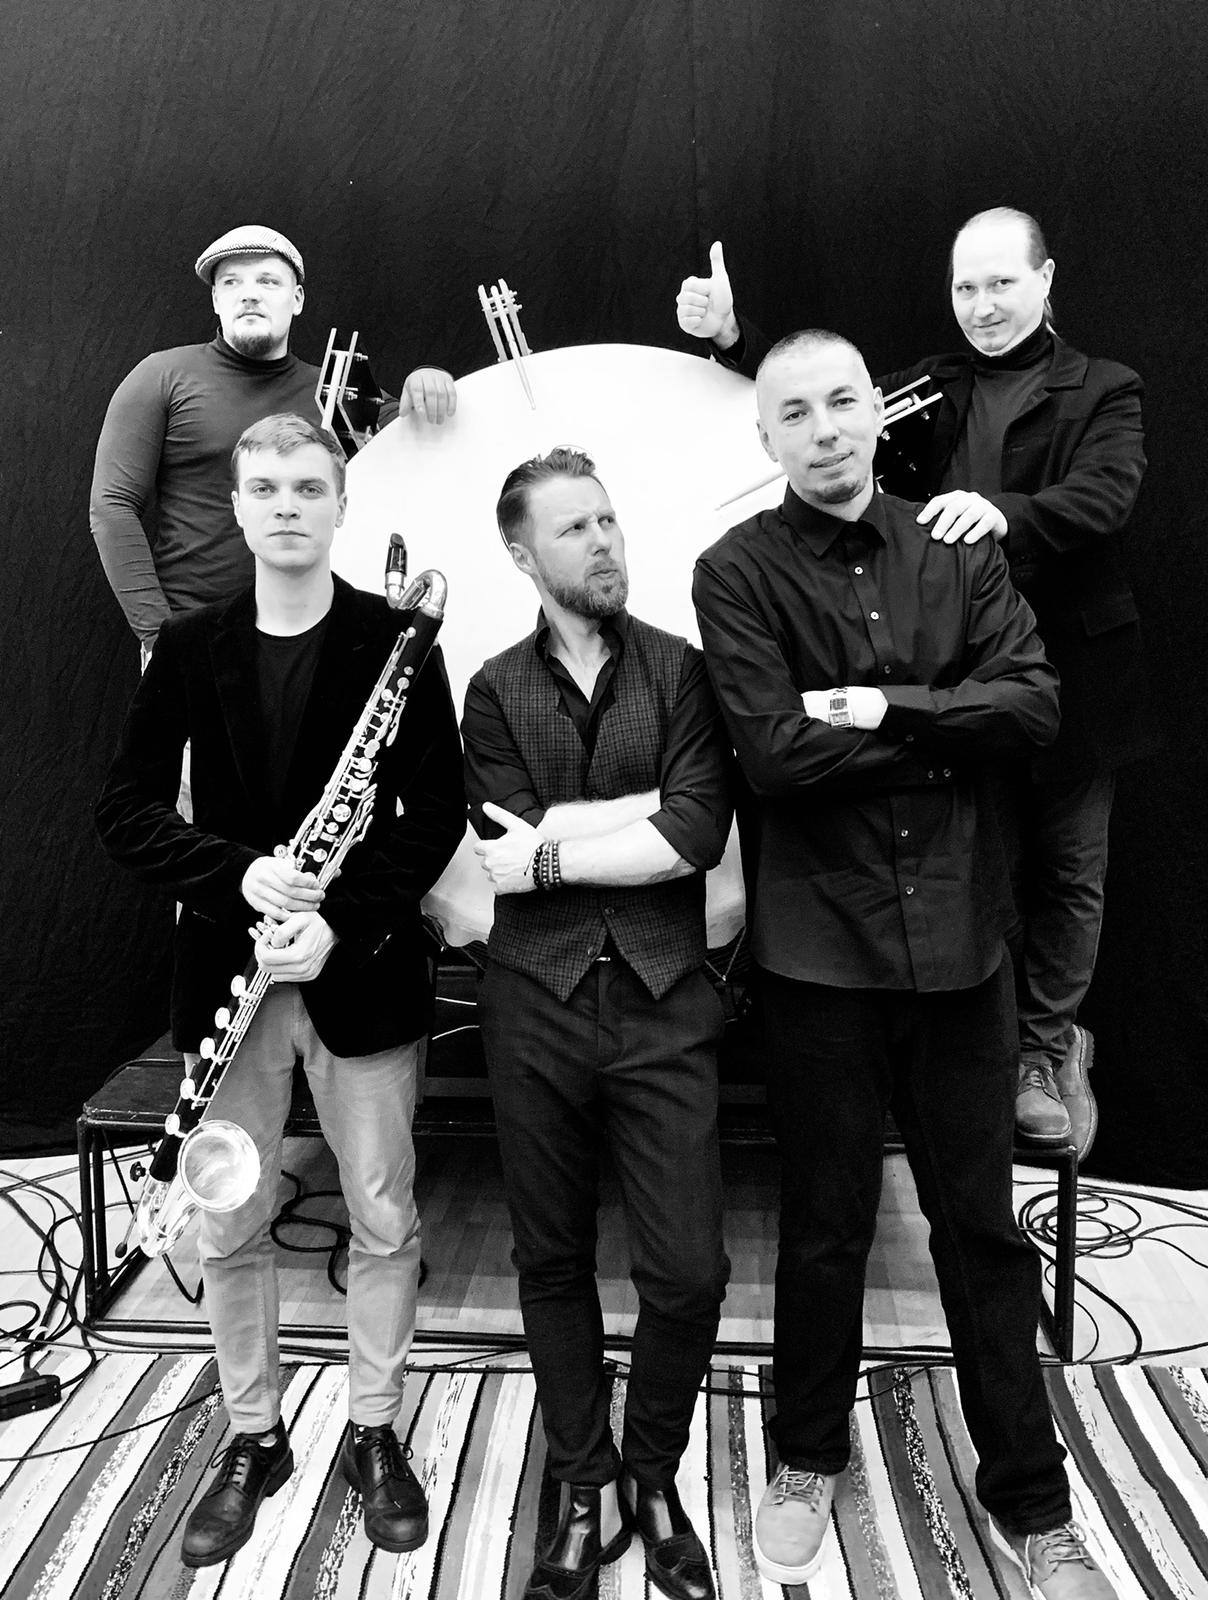
A year and a half ago, we did a project where we used recurrent neural networks to generate music. It describes how it was. This year, Eesti Kontsert (the target institution, the largest organizer of performances in the country) held a series of concerts "Technology and Music" and we were invited to make a performance within this series. We are the MODULSHTEIN group (Alexander Zhedelev, Marten Altrov and Aleksey Seminikhin) , as well as Alexander Potuzhny, who was engaged in mechanical engineering, and I, Alexander Tavgen, software architect from Playtech. If in the last project everything happened inside one machine and the signals from the models were displayed on samples, then the idea of this project is to bring the signals out and connect them to a live instrument. And since we use models to generate rhythm, the instrument on which the machine will play is a drum.
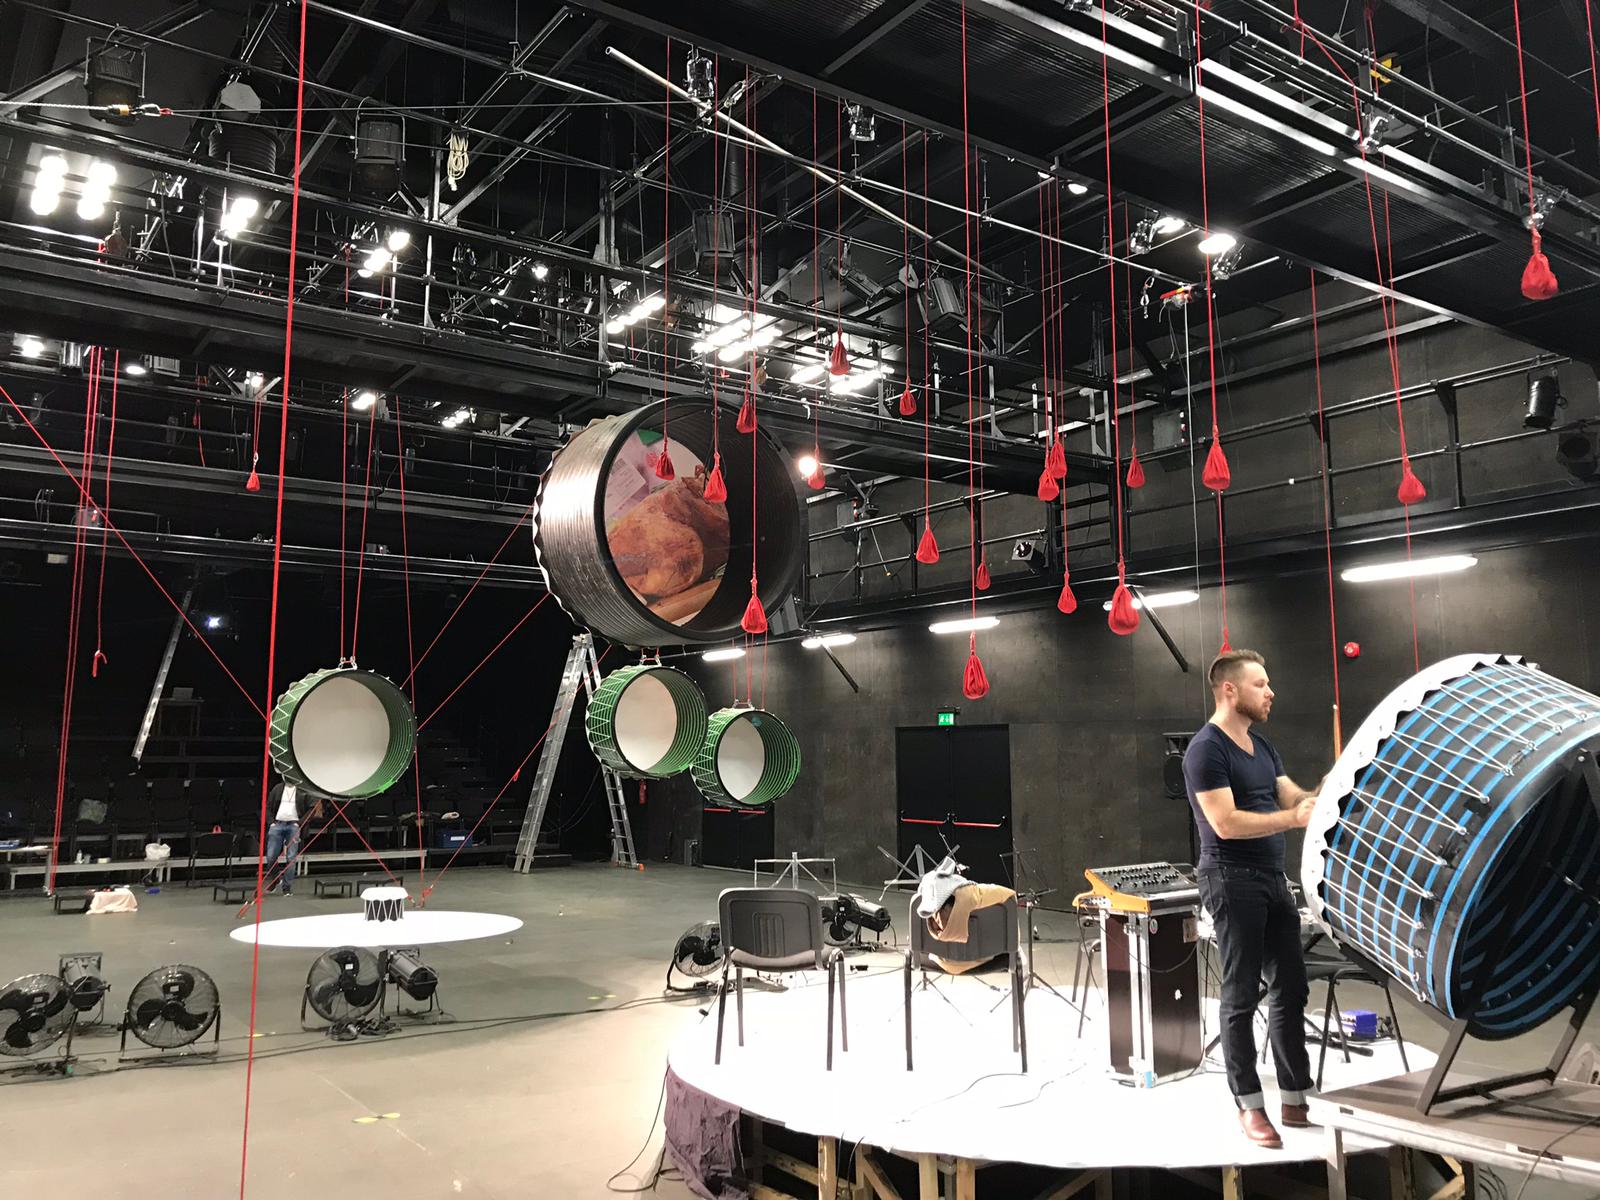
The drum that we will use is part of the props left from the IDEM audio-visual presentation.
Music, like language, especially spoken language, has a temporary structure. This is rhythm, intervals, dynamics. If we simulate a musical sequence as a stream of certain symbols, then in order to simulate this temporal structure, recurrent neural networks are suitable. The famous article by Andrej Karpathy is a great introduction to the principles behind recurrent neural networks, and there are some great examples. What is the only network trained on Linux source code? Or a model trained in Donald Trump's speeches.
The MIDI protocol is ideal for representing music as a stream of characters. Thus, we need to convert the MIDI signals to the input for models, and transform the output of the model back to MIDI. And then the Magenta project from Google comes to the rescue, which was announced in 2016.
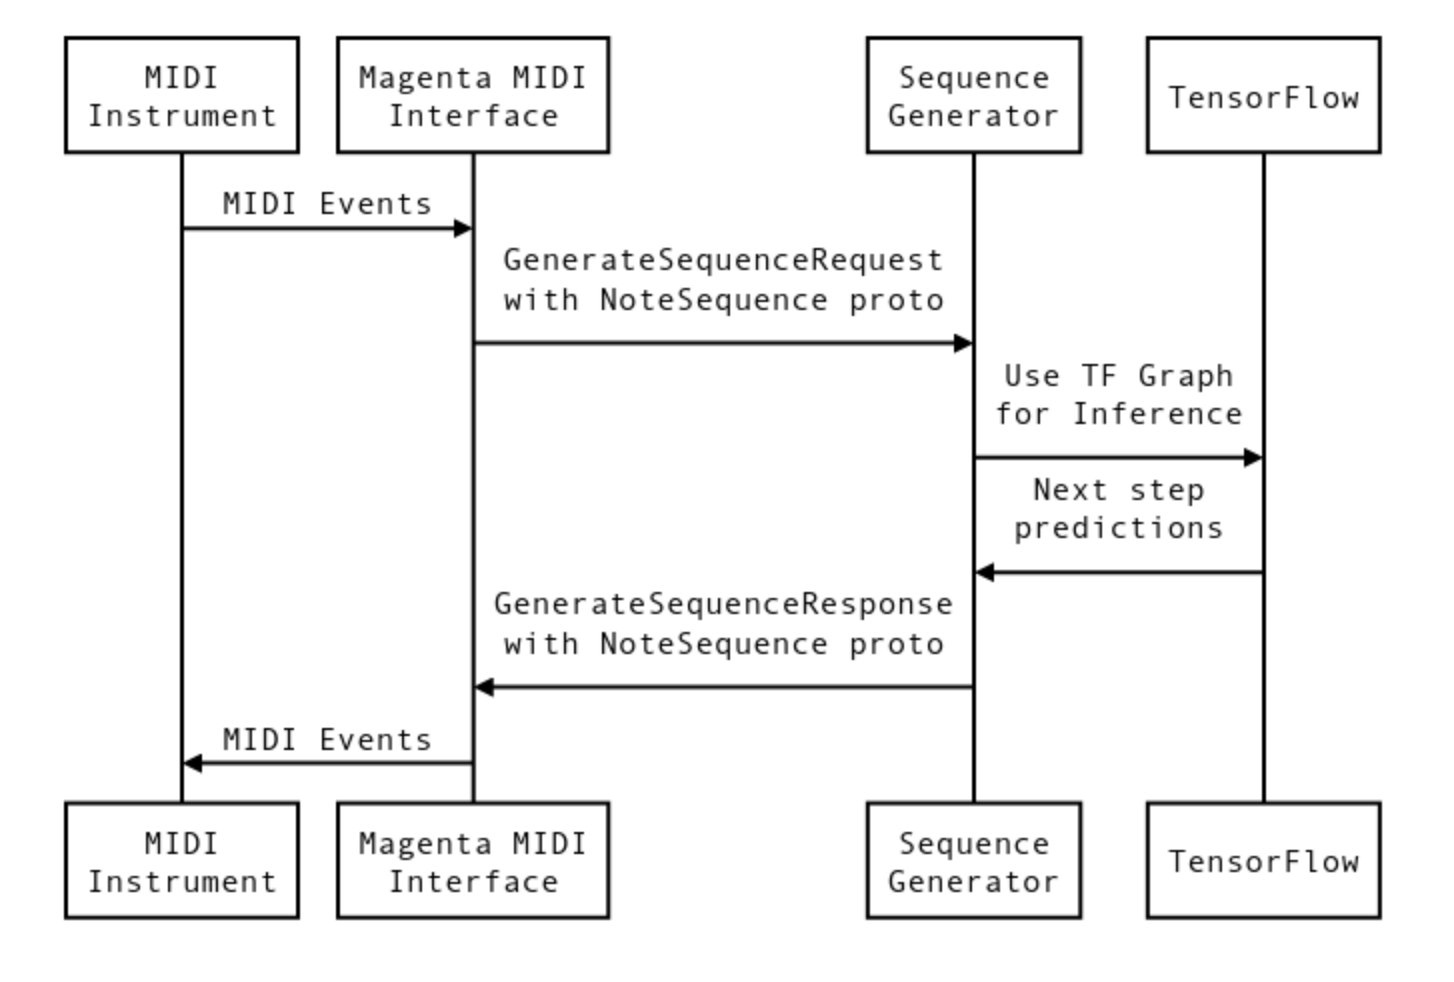
In essence, Magenta provides a MIDI interface for TensorFlow models. Virtual MIDI ports are created for call-response, roughly speaking - input and output. You can run multiple parallel ports. You can connect a TensorFlow model to each pair of ports. The so-called bundle file is the training checkpoint and graph metadata from TensorFlow. So you can briefly describe the interaction process.
I described it in detail here .
But if in the previous project we displayed MIDI signals coming from the models to the samples, then this time we need to output them and connect them to the motors. That is, everything can be represented somehow like this: Tensorflow-Magenta-MIDI-Serial-Microcontroller-Actuators. The first three steps have already been taken and all the attention has gone to the last three links.
Before you think about how to convert and send signals from the machine, you need to select a microcontroller that will receive signals and control the actuators. The easiest option is to take an Arduino-compatible platform, although any ATMega-based controller is suitable.
Arduino can read Serial via USB, and the task was to convert MIDI signals to serial port protocol. There is an open project hairless-midiserial projectgus.github.io/hairless-midiserial , which allows you to convert MIDI to Serial devices, both for input and output. The convenience of MIDI as a whole is that you can very flexibly control and connect different devices.

Well, then you need to get the tools and start trying various design options.
The first prototype had to be done in order to evaluate possible delays and problems with synchronization.
The signal went to Arduino, where, depending on the height of the notes, it was displayed on different outputs. For tests, I put together a classic MOSFET-based circuit. MOSFET is roughly a transistor that allows you to control high currents; giving a control signal, you can open and close the transistor.

Well, what kind of Arduino project is without flashing LED. I set the LED so that in case of problems I understand where they are, whether the signal from the Arduino goes to the MOSFET input. In general, it looked like this, the cats really liked it.
In general, there were no significant delays and connection problems, but problems of a different plan were clarified. Solenoids are not suitable for extracting sound from our big drum, they lack the force of impact. The 5-volt solenoids themselves. It was decided to look for something more powerful. The next choice is the motors that are used in car locks. They are powerful enough, with good traction, and cheap.

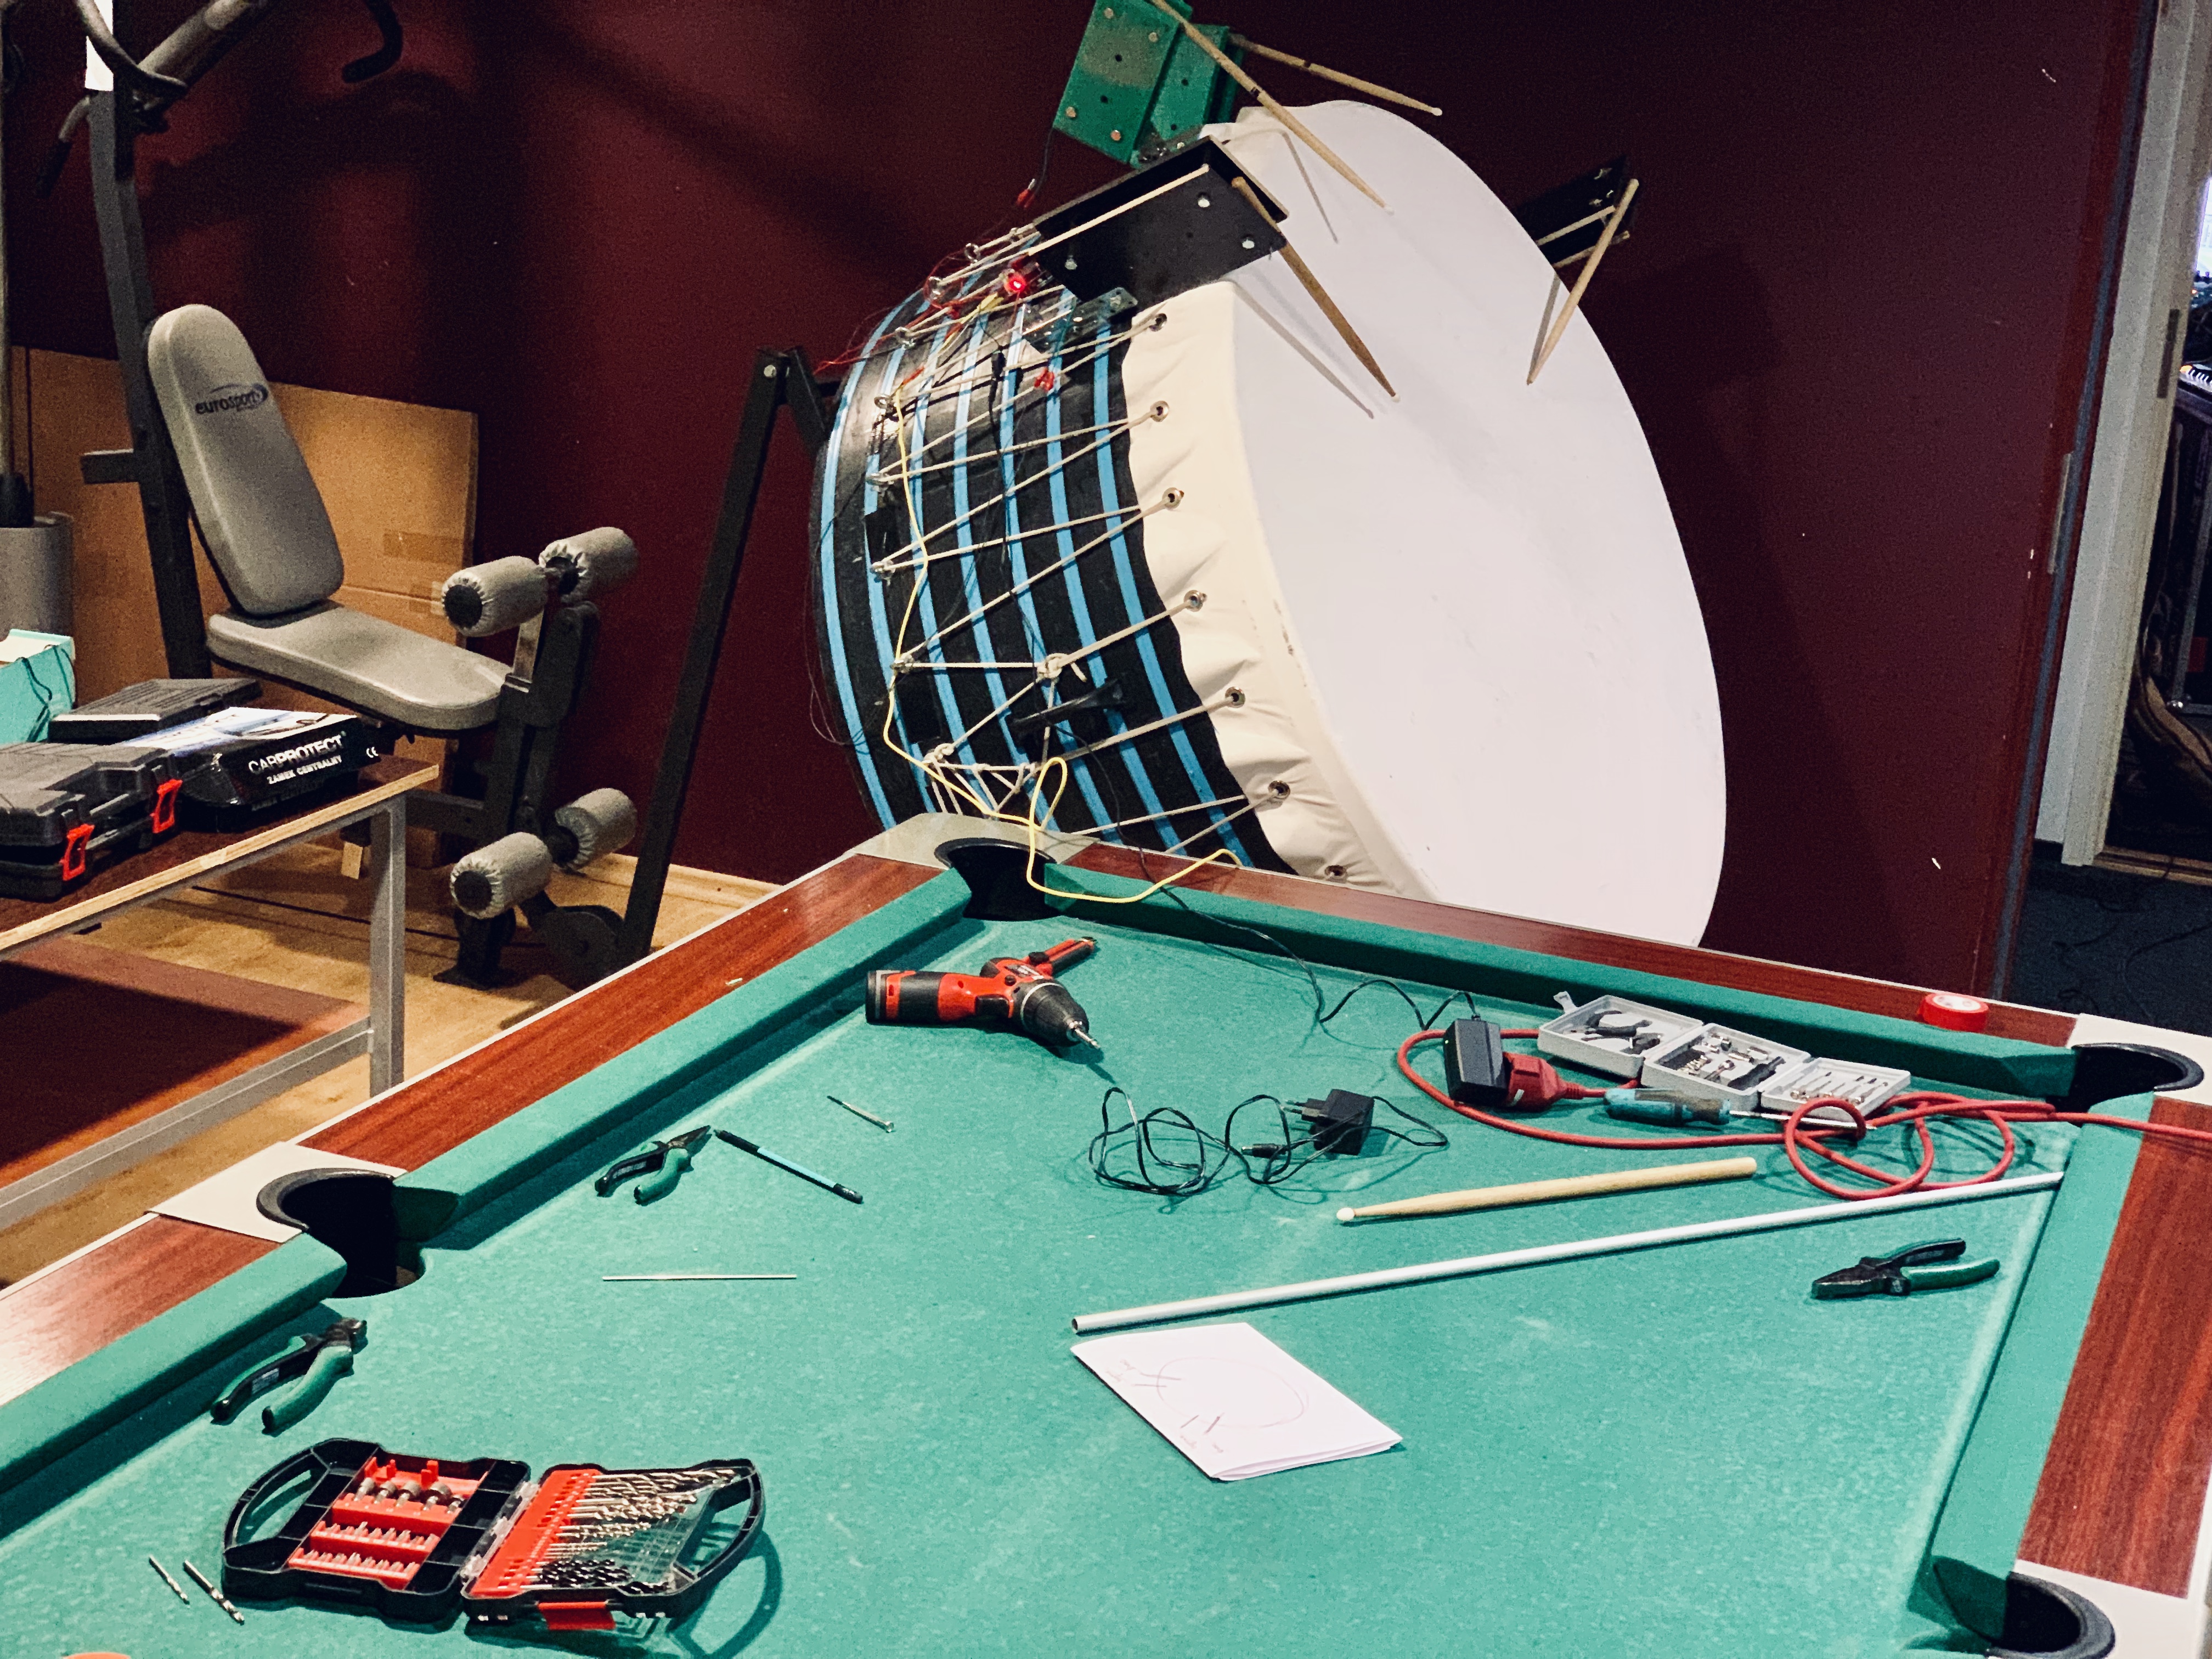
But there is one point. The motor for the car door has not only a forward stroke, but also a reverse stroke. To beat them, you need to perform very fast forward-pause-backward movements, but for forward-backward movement you cannot do just one MOSFET, since you need to change the current direction for the motor ( H-Bridge ) so that it moves in both directions, so I bought motor shield for Arduino compatible with Adafruit. This type, only on one chip.

Here is the version already with a motor bridge and a motor from a car door.
Flashing LEDs on Arduino is one thing, but we had to build a system that would play the hour of the concert. And here are the difficulties.
Since the motors are controlled by music, it would be possible to make sex toys from this. He staged his favorite music, such as the Imperial March, and ...
The final assembly and rehearsals were performed at the music studio of the Russian Theater of Estonia.
The problem with rehearsals with a neural network is also that the network itself is non-deterministic. The interaction takes place in a call-response mode, and each time the network answers will be different - therefore, it is impossible to rehearse the final version.
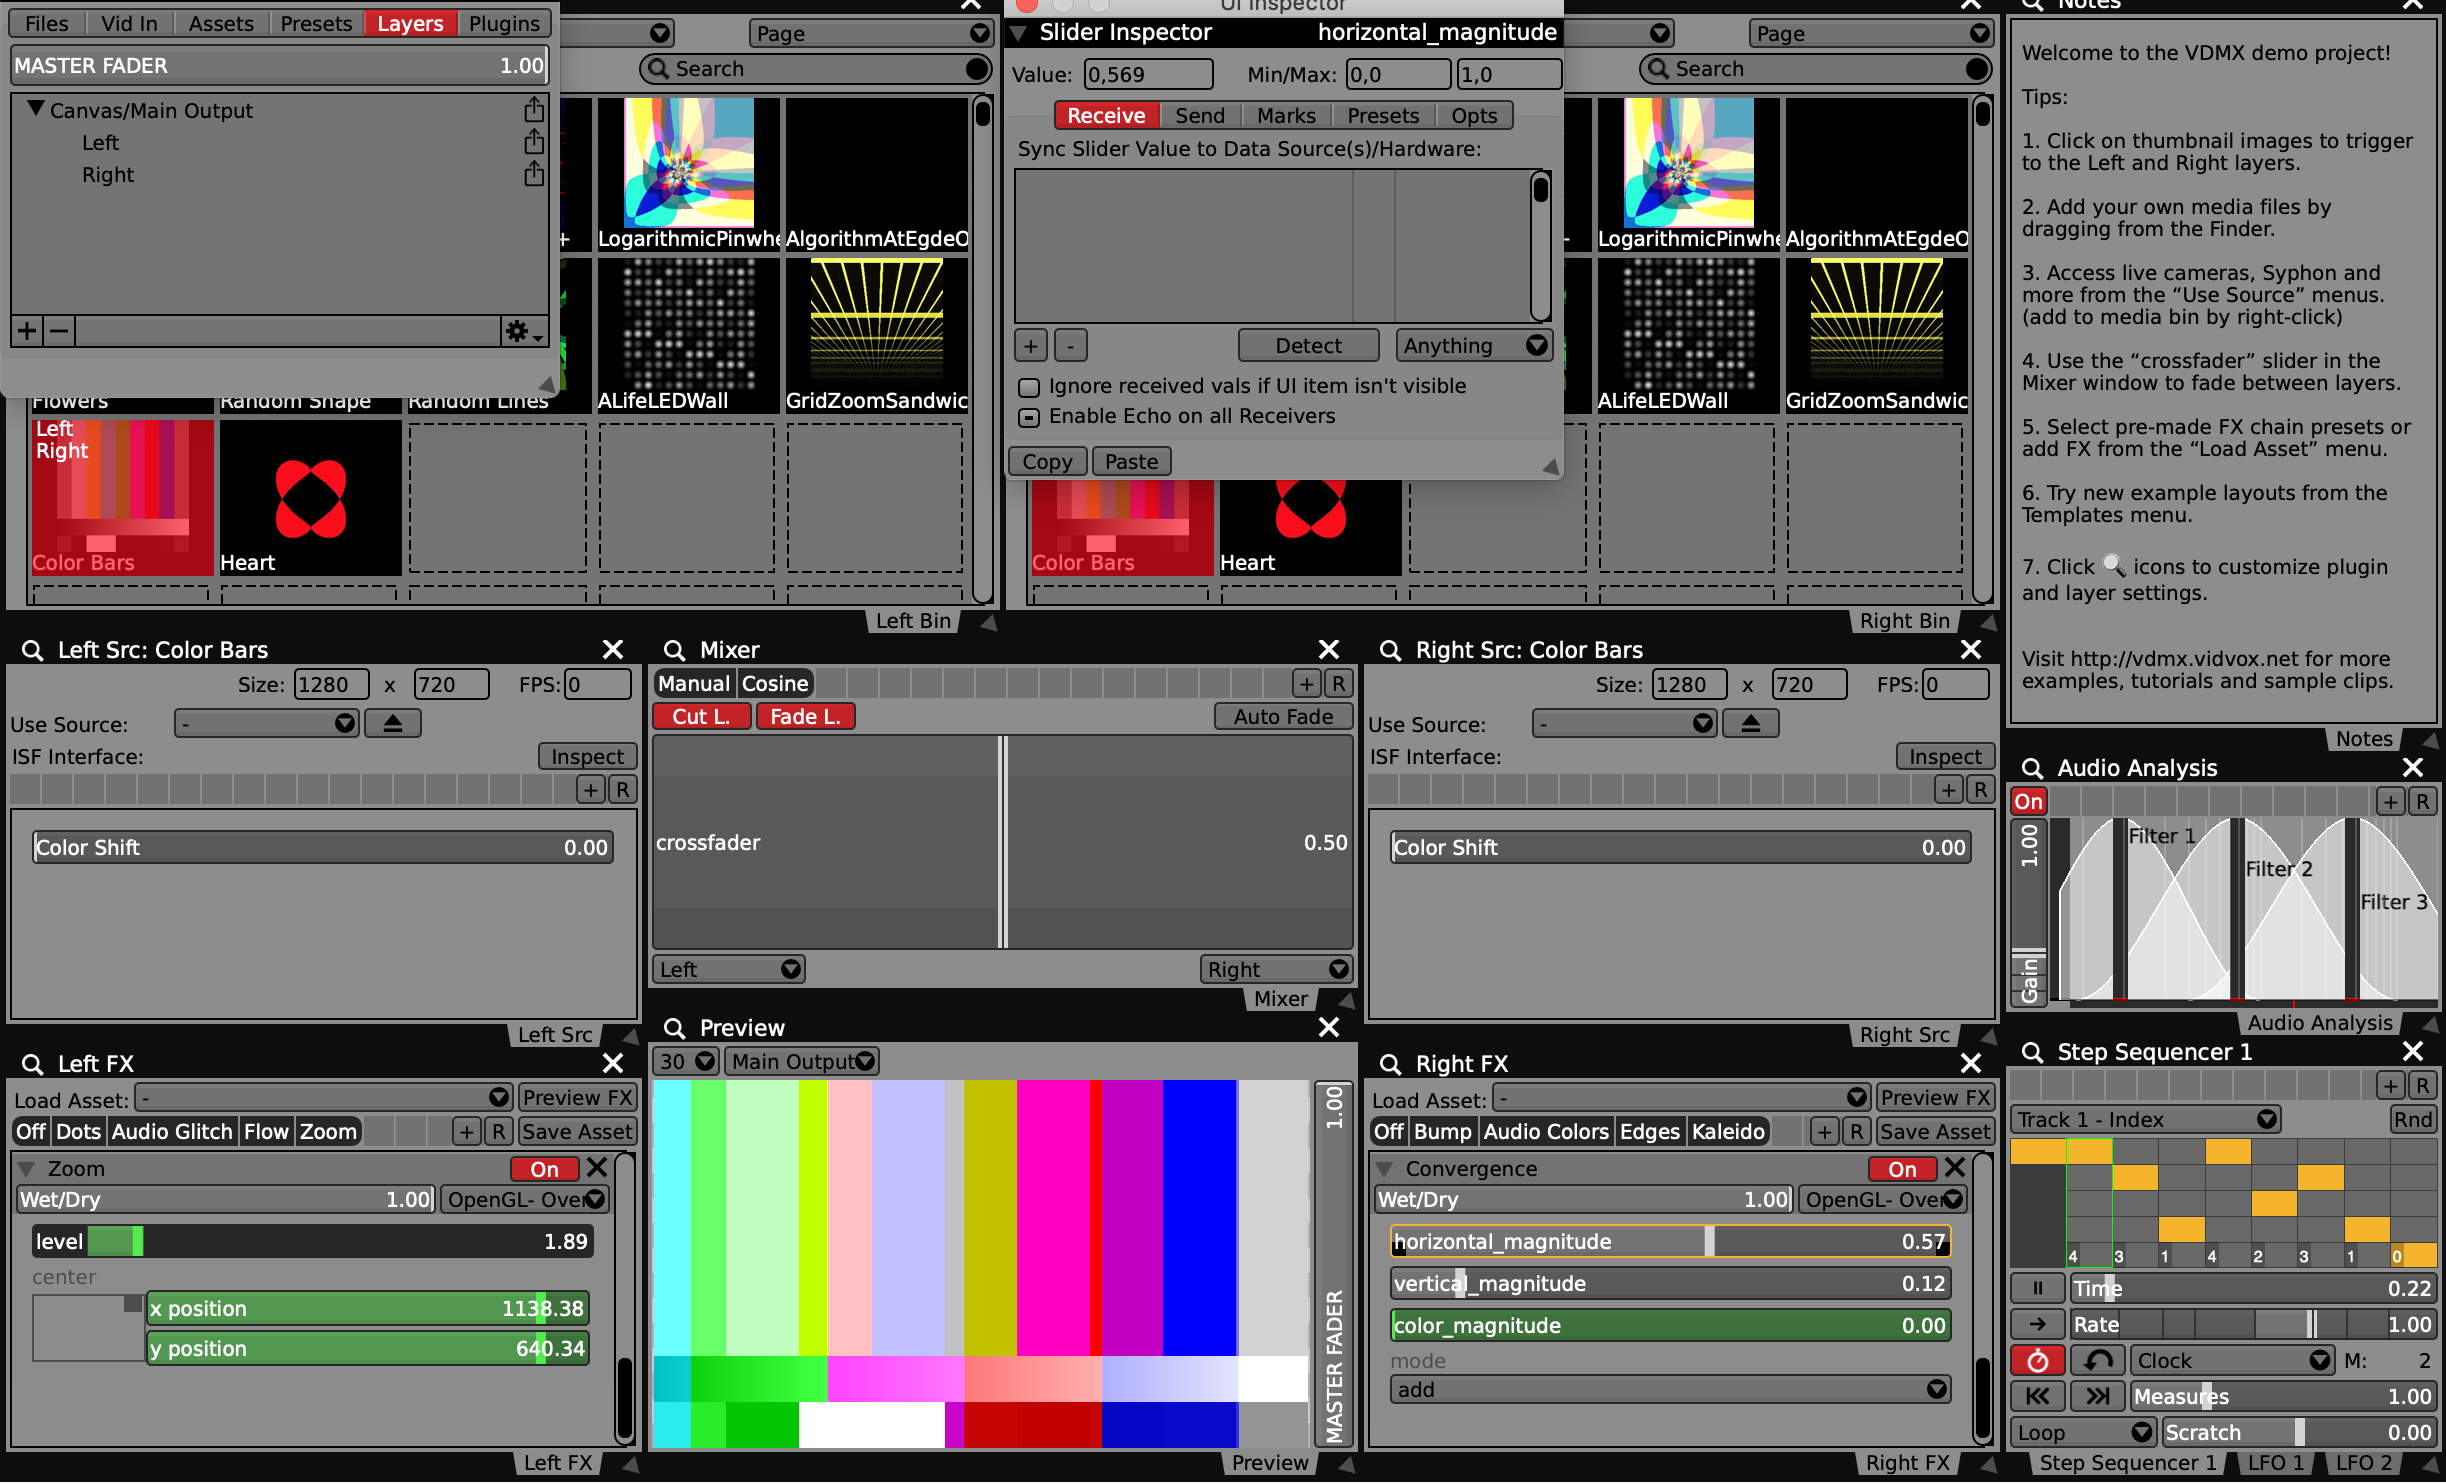
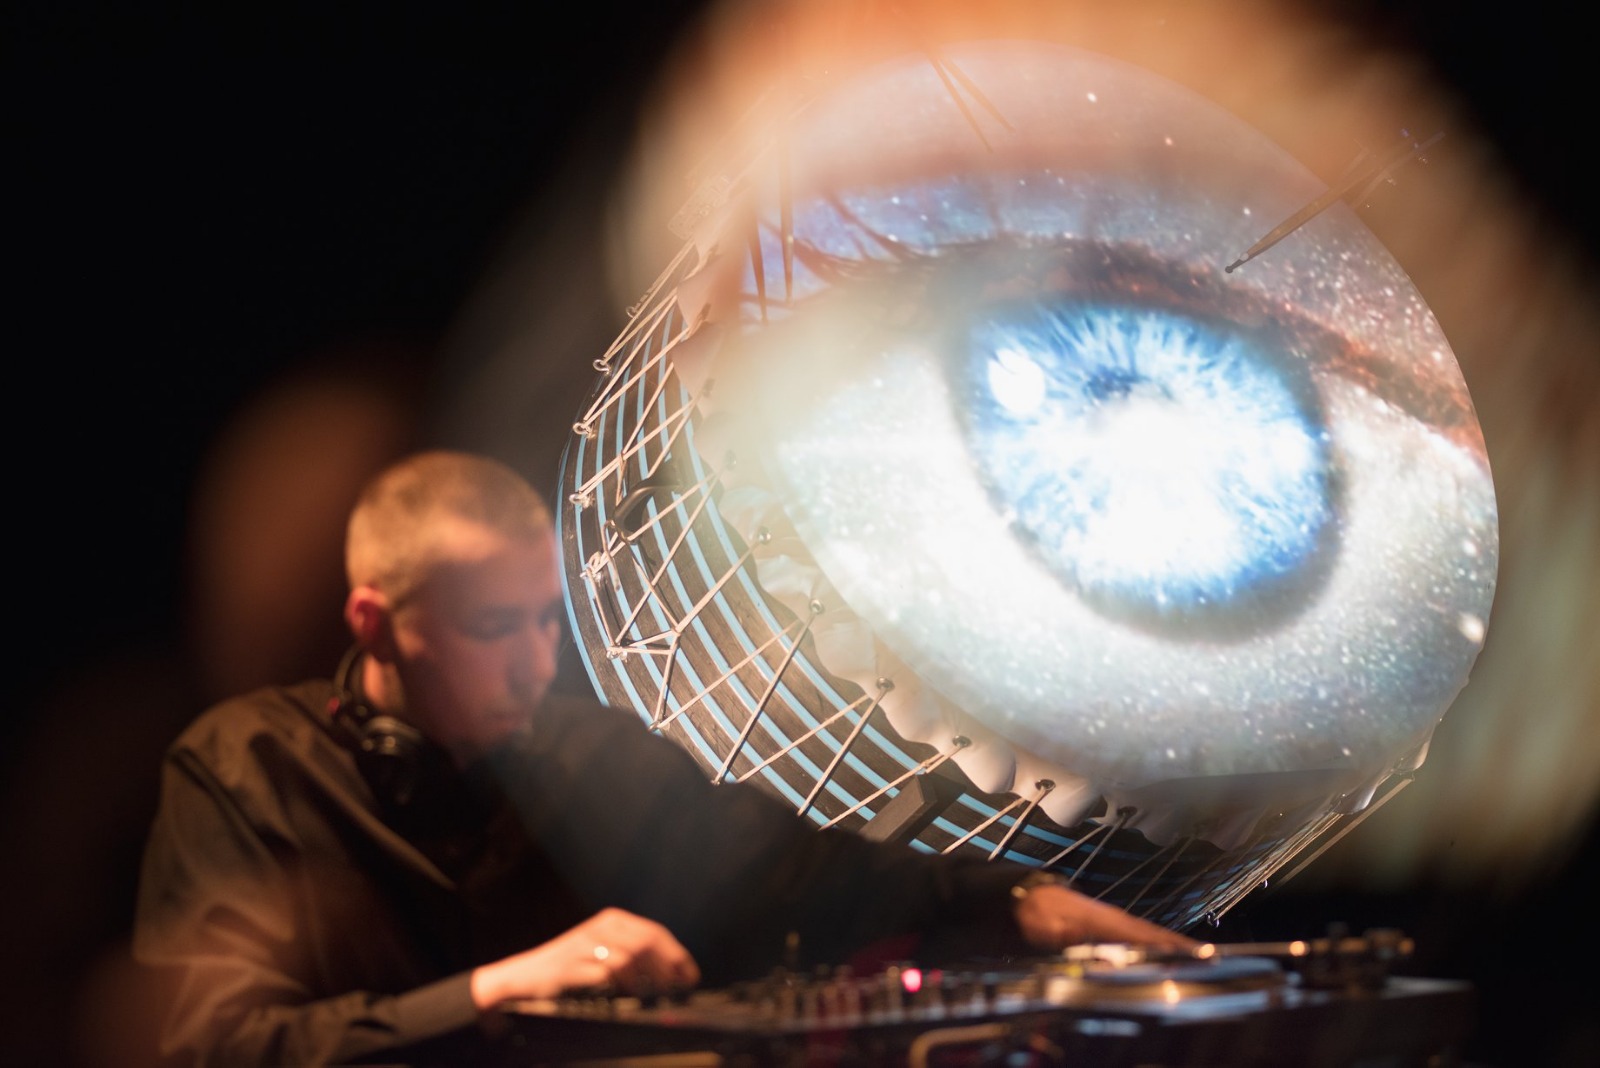
For the performance, we also prepared a video. Initially, we thought to control the video stream via MIDI, too, to play overlays and reduce the video generated by the GAN - but we did not manage to make an environment for the second machine and connect to the models. Therefore, the video for each part of the performance was pre-rendered; GAN and overlay management were used. Everything synchronized with the main midi_clock.
For live I used VDMX5, through which the video stream went.
Shortly before the performance, they made a presentation on television.
And it was very unusual to see posters at the Estonia concert hall (this is like the Bolshoi Theater for Moscow).
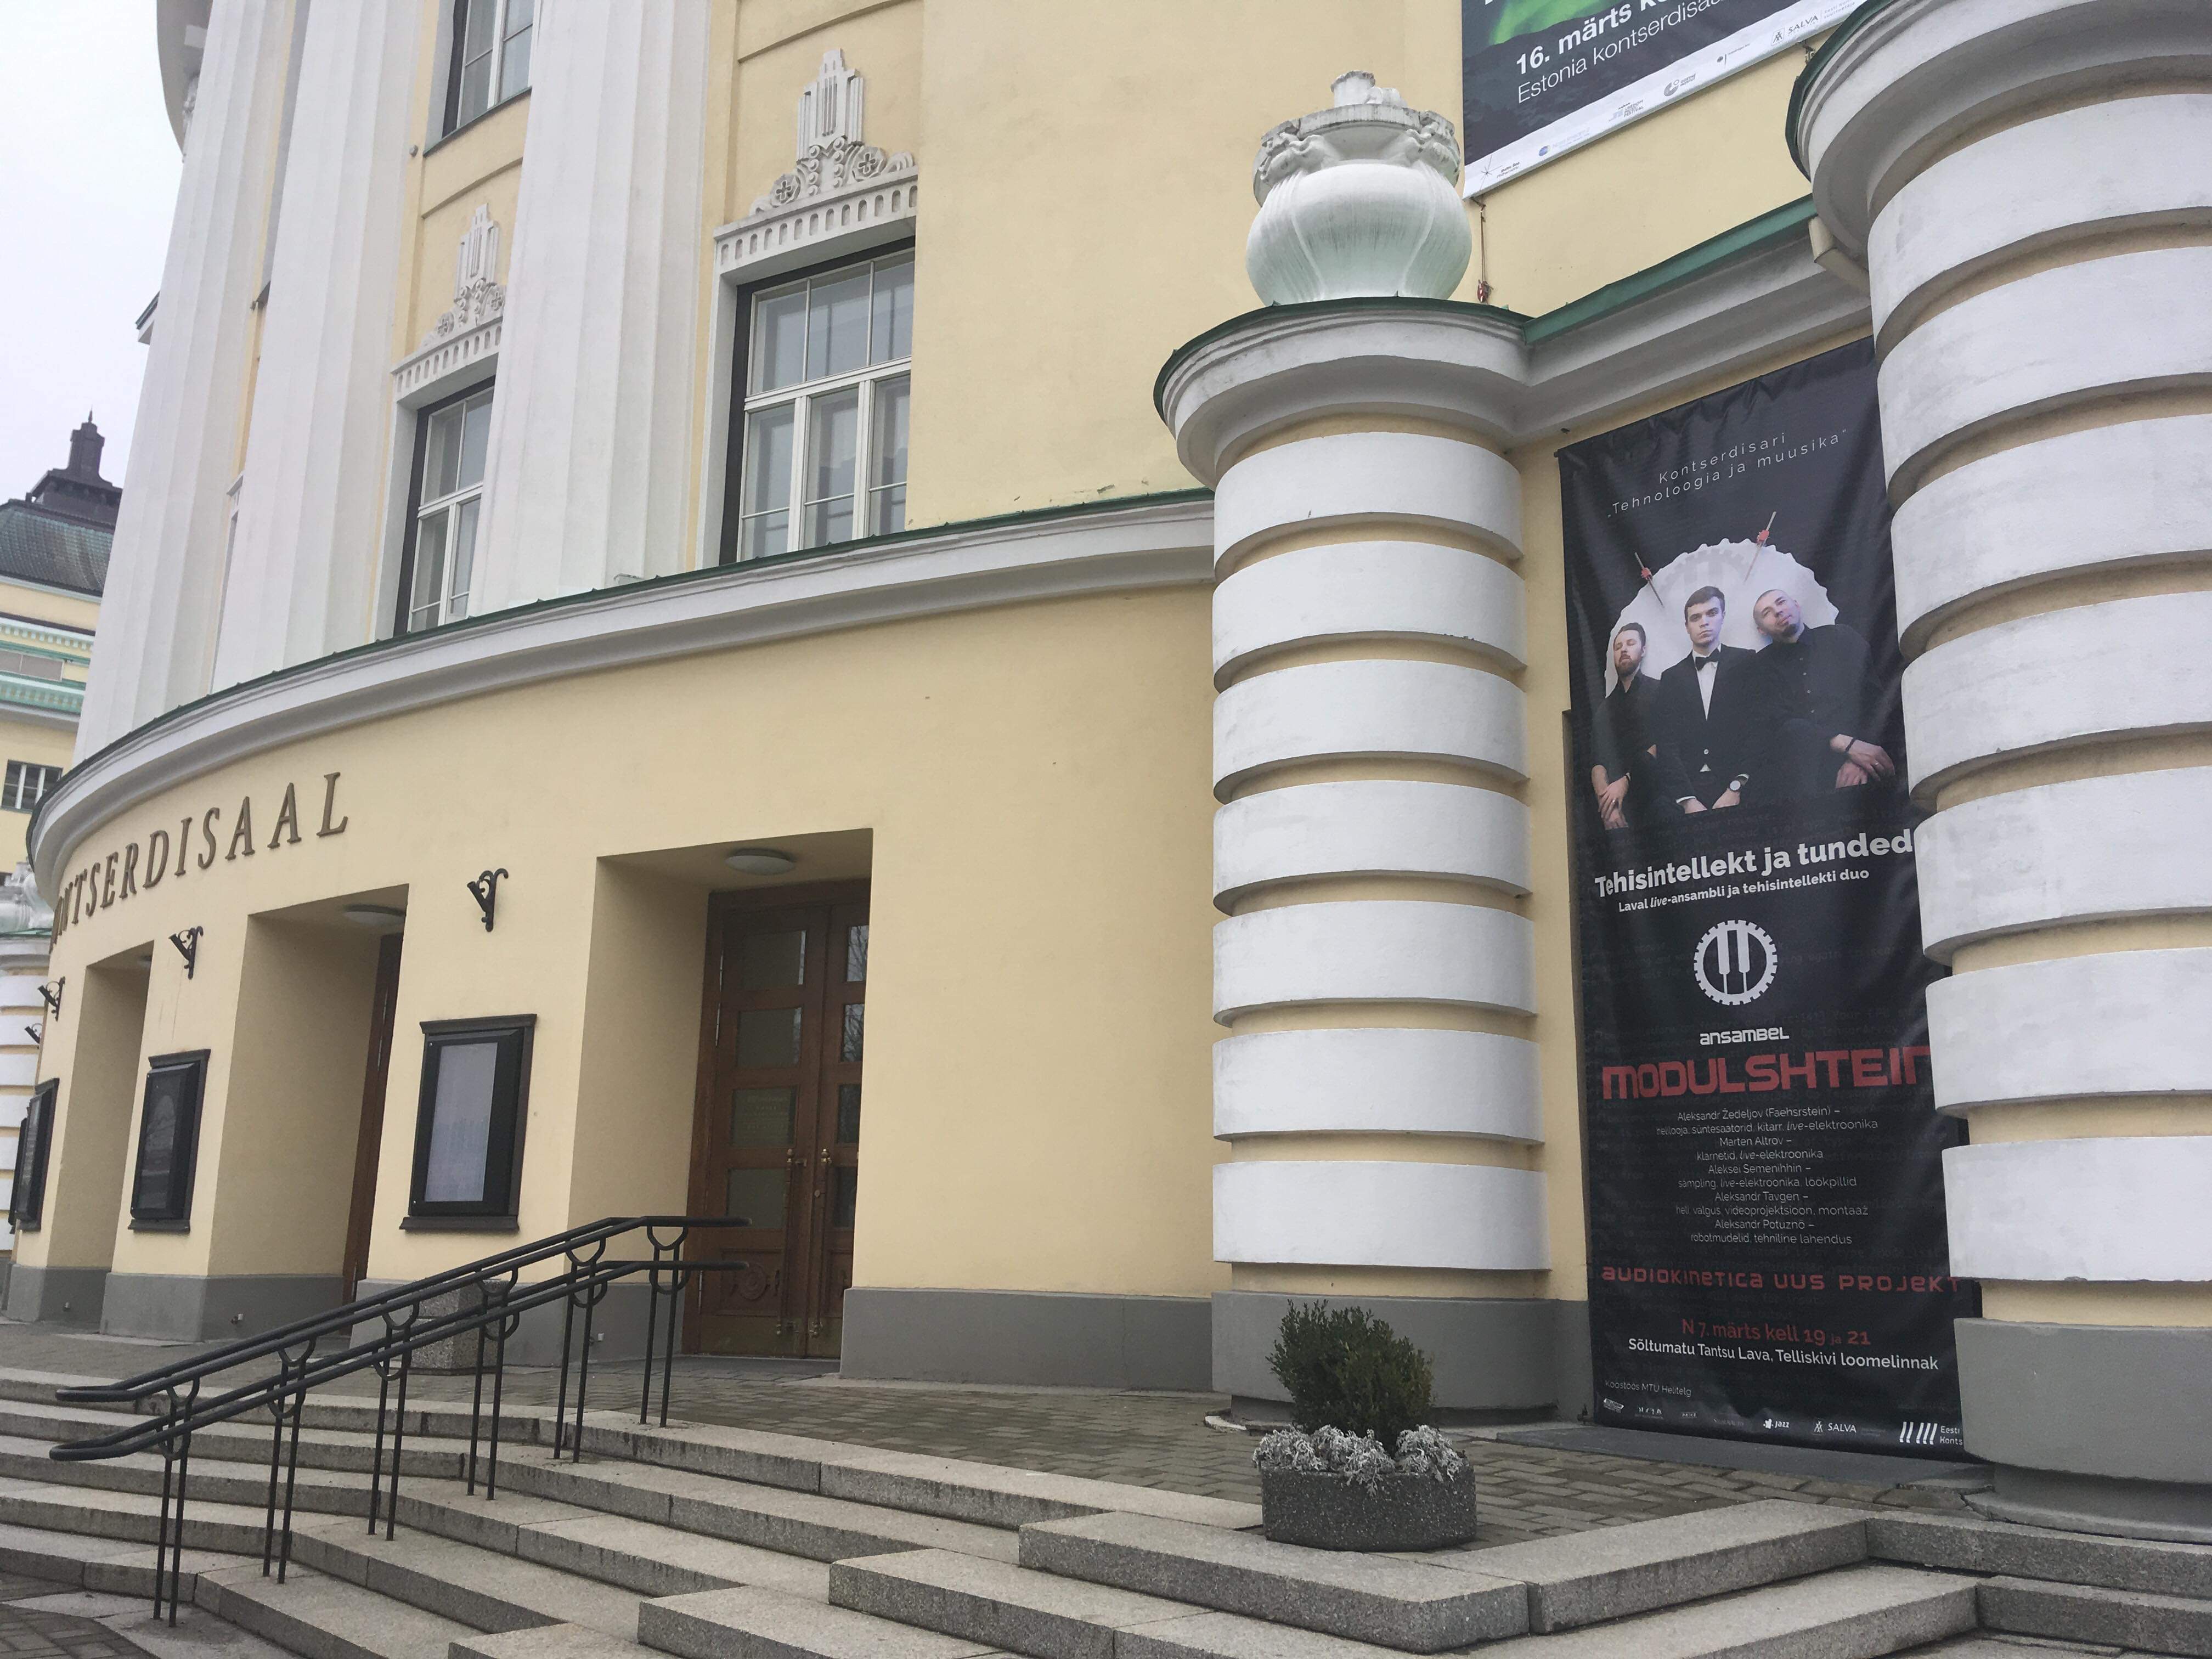
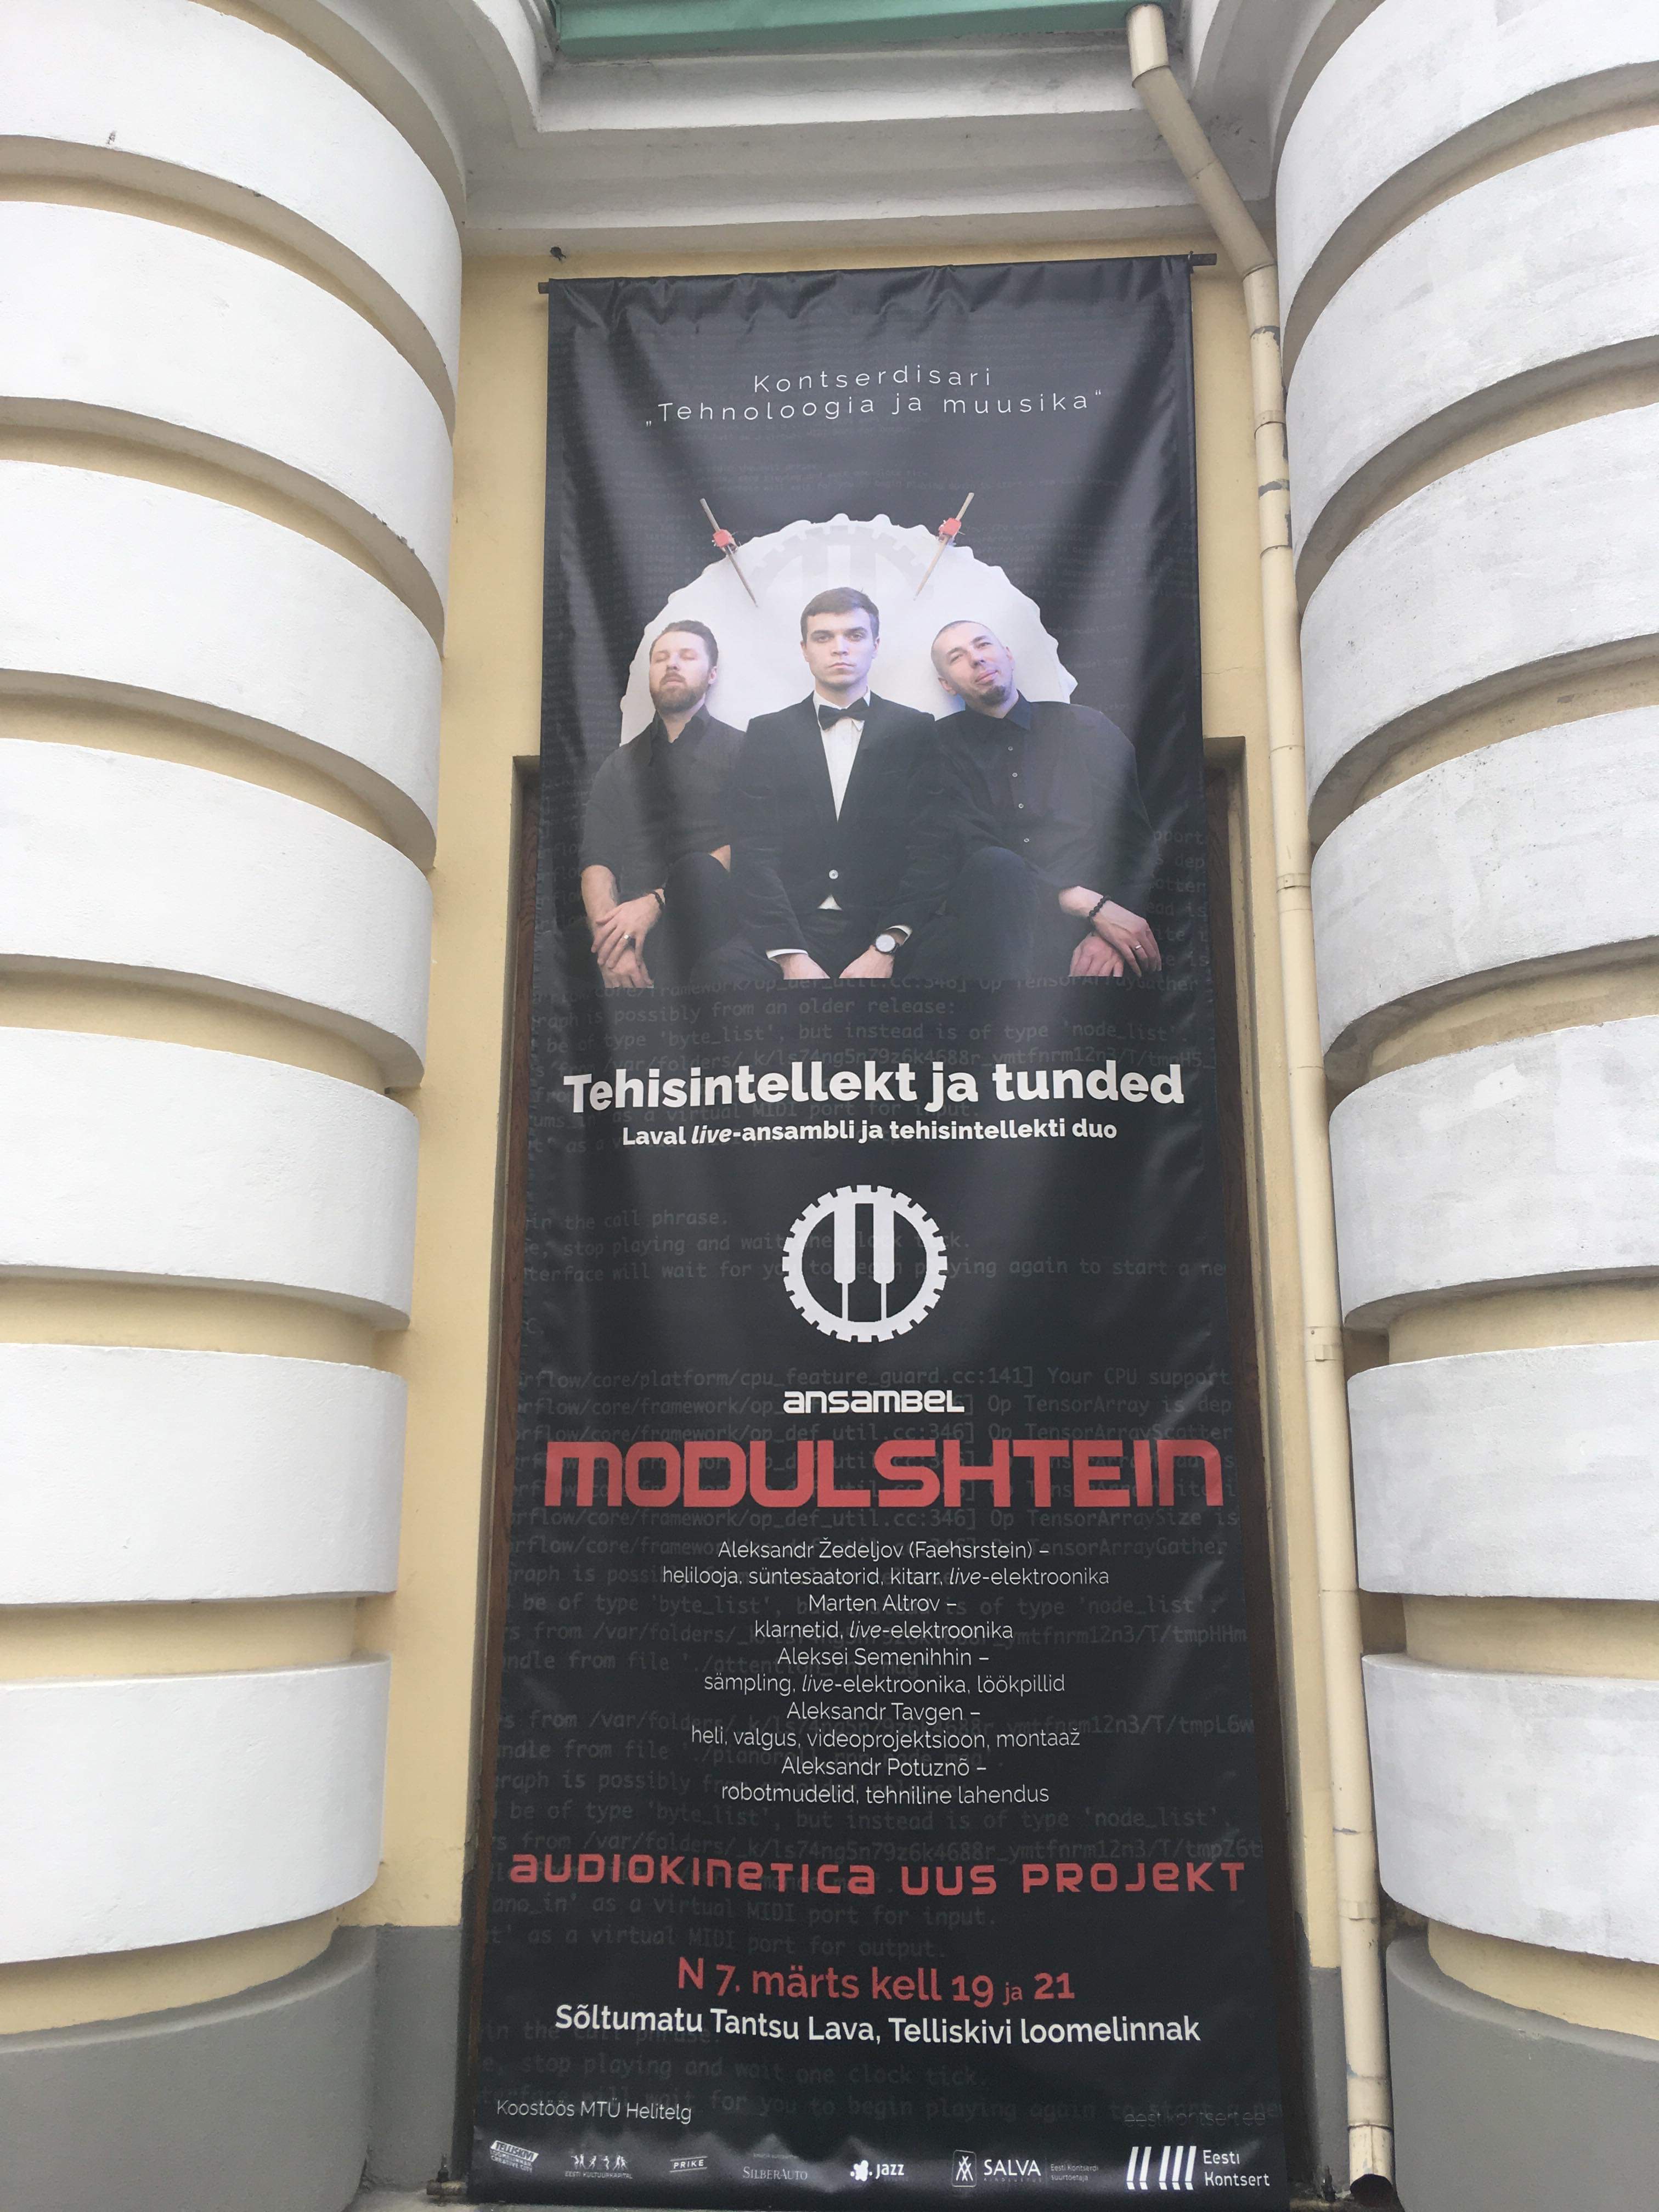
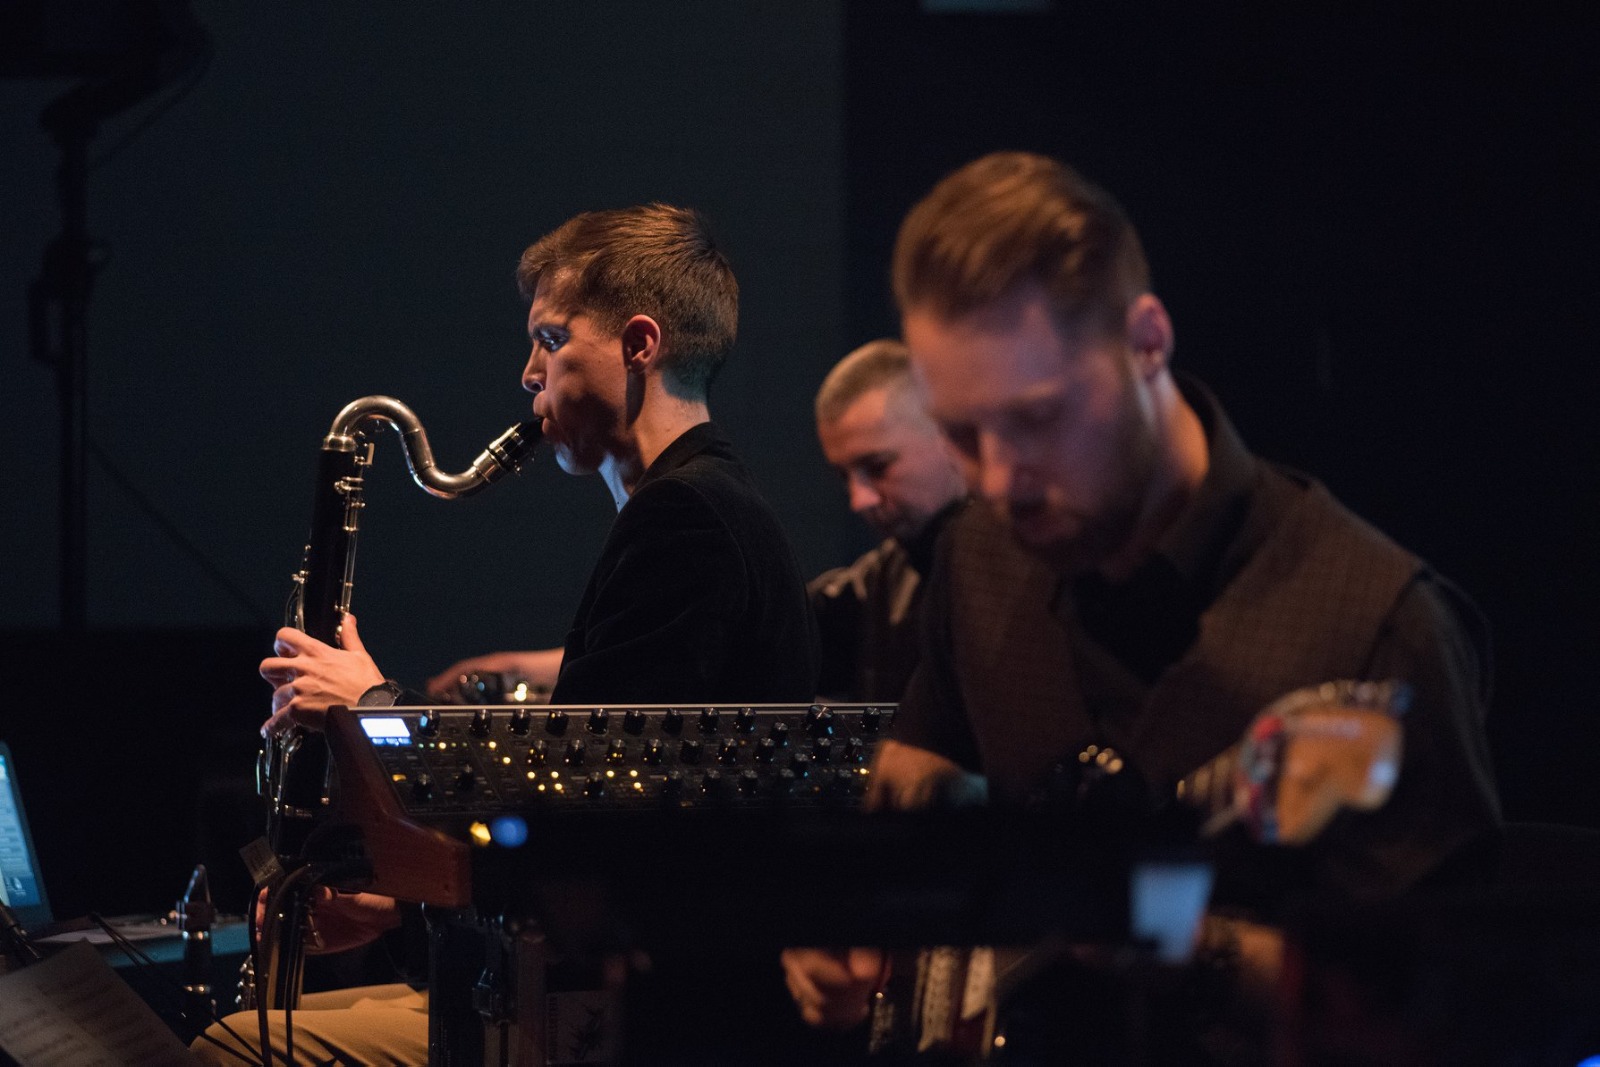
The performance itself took place on the stage of Sõltumatu Tantsu Lava, it is a small hall (a little more than 100 people) in the creative quarter of Telliskivi in the Vaba Lava complex. Just installing and setting up all the equipment took more than 4 hours. Fully connected already almost at night.
And already without light.
The hall was full, despite the late publicity. I was at the side of the scene and controlled the video stream. The concert itself was a great success - how the model worked, how the sound and video went. The audience said that they were sent to the trip somewhere in 10-15 minutes. :) Everything turned out very atmospheric.

www.Audiokinetica.com
Aleksandr Tavgen - IT solution, software development
Aleksandr Potužnoi - technical support
Modulshtein:
www.Modulshtein.com
On spotify
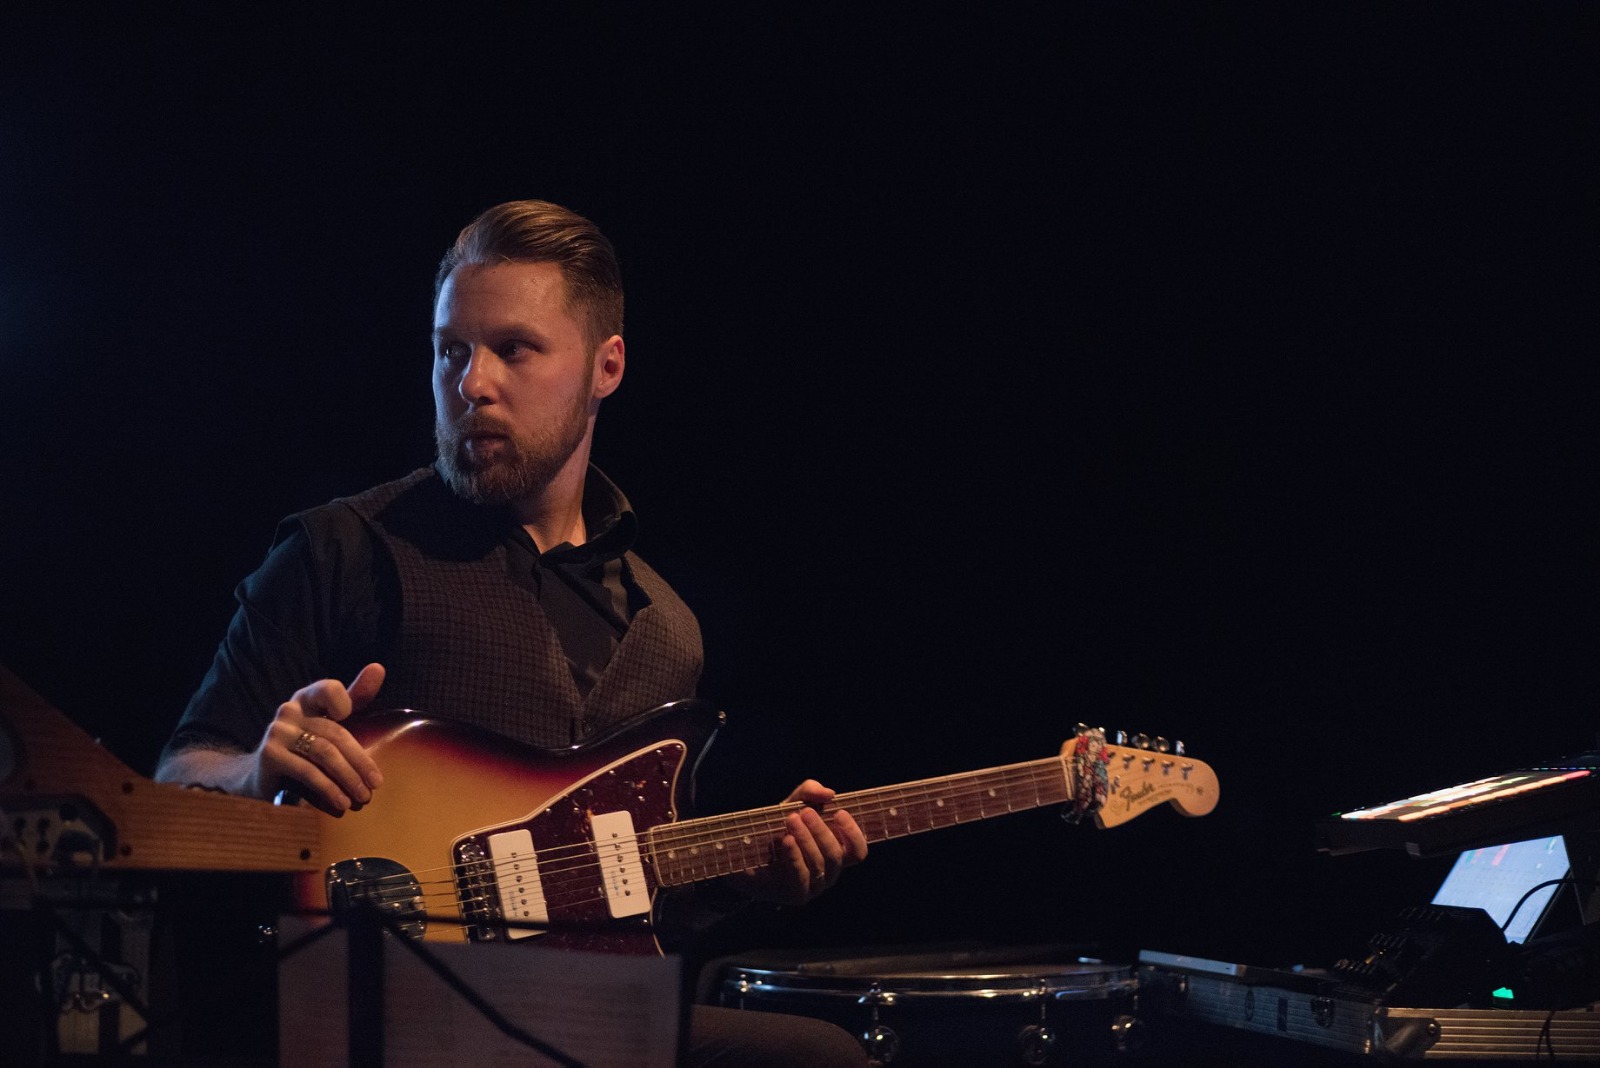
Aleksandr Žedeljov aka FAERSHTEIN– guitar, Ableton, analog synth
Marten Altrov - clarinet, bass clarinet
Aleksei Semenihhin aka DJ Bandit - Fx, Samples, Scratches
This post is about how we brought neural networks into real life. If you like applied robotics and engineering, or like neurons, or blink an LED on Arduin, it will be interesting. However, this is a story about how to assemble many different components and technologies into a single whole and make an idea out of it. Details under the cut.
A year and a half ago, we did a project where we used recurrent neural networks to generate music. It describes how it was. This year, Eesti Kontsert (the target institution, the largest organizer of performances in the country) held a series of concerts "Technology and Music" and we were invited to make a performance within this series. We are the MODULSHTEIN group (Alexander Zhedelev, Marten Altrov and Aleksey Seminikhin) , as well as Alexander Potuzhny, who was engaged in mechanical engineering, and I, Alexander Tavgen, software architect from Playtech. If in the last project everything happened inside one machine and the signals from the models were displayed on samples, then the idea of this project is to bring the signals out and connect them to a live instrument. And since we use models to generate rhythm, the instrument on which the machine will play is a drum.
The drum that we will use is part of the props left from the IDEM audio-visual presentation.
A little introduction
Music, like language, especially spoken language, has a temporary structure. This is rhythm, intervals, dynamics. If we simulate a musical sequence as a stream of certain symbols, then in order to simulate this temporal structure, recurrent neural networks are suitable. The famous article by Andrej Karpathy is a great introduction to the principles behind recurrent neural networks, and there are some great examples. What is the only network trained on Linux source code? Or a model trained in Donald Trump's speeches.
The MIDI protocol is ideal for representing music as a stream of characters. Thus, we need to convert the MIDI signals to the input for models, and transform the output of the model back to MIDI. And then the Magenta project from Google comes to the rescue, which was announced in 2016.
In essence, Magenta provides a MIDI interface for TensorFlow models. Virtual MIDI ports are created for call-response, roughly speaking - input and output. You can run multiple parallel ports. You can connect a TensorFlow model to each pair of ports. The so-called bundle file is the training checkpoint and graph metadata from TensorFlow. So you can briefly describe the interaction process.
I described it in detail here .
But if in the previous project we displayed MIDI signals coming from the models to the samples, then this time we need to output them and connect them to the motors. That is, everything can be represented somehow like this: Tensorflow-Magenta-MIDI-Serial-Microcontroller-Actuators. The first three steps have already been taken and all the attention has gone to the last three links.
Before you think about how to convert and send signals from the machine, you need to select a microcontroller that will receive signals and control the actuators. The easiest option is to take an Arduino-compatible platform, although any ATMega-based controller is suitable.
Arduino can read Serial via USB, and the task was to convert MIDI signals to serial port protocol. There is an open project hairless-midiserial projectgus.github.io/hairless-midiserial , which allows you to convert MIDI to Serial devices, both for input and output. The convenience of MIDI as a whole is that you can very flexibly control and connect different devices.
Well, then you need to get the tools and start trying various design options.
The first prototype had to be done in order to evaluate possible delays and problems with synchronization.
The signal went to Arduino, where, depending on the height of the notes, it was displayed on different outputs. For tests, I put together a classic MOSFET-based circuit. MOSFET is roughly a transistor that allows you to control high currents; giving a control signal, you can open and close the transistor.
Well, what kind of Arduino project is without flashing LED. I set the LED so that in case of problems I understand where they are, whether the signal from the Arduino goes to the MOSFET input. In general, it looked like this, the cats really liked it.
In general, there were no significant delays and connection problems, but problems of a different plan were clarified. Solenoids are not suitable for extracting sound from our big drum, they lack the force of impact. The 5-volt solenoids themselves. It was decided to look for something more powerful. The next choice is the motors that are used in car locks. They are powerful enough, with good traction, and cheap.
But there is one point. The motor for the car door has not only a forward stroke, but also a reverse stroke. To beat them, you need to perform very fast forward-pause-backward movements, but for forward-backward movement you cannot do just one MOSFET, since you need to change the current direction for the motor ( H-Bridge ) so that it moves in both directions, so I bought motor shield for Arduino compatible with Adafruit. This type, only on one chip.
Here is the version already with a motor bridge and a motor from a car door.
And now about general mechanics
Flashing LEDs on Arduino is one thing, but we had to build a system that would play the hour of the concert. And here are the difficulties.
- Rigidity of a design. The motors are powerful enough, and the mounts to which they must be mounted must withstand vibration for an hour.
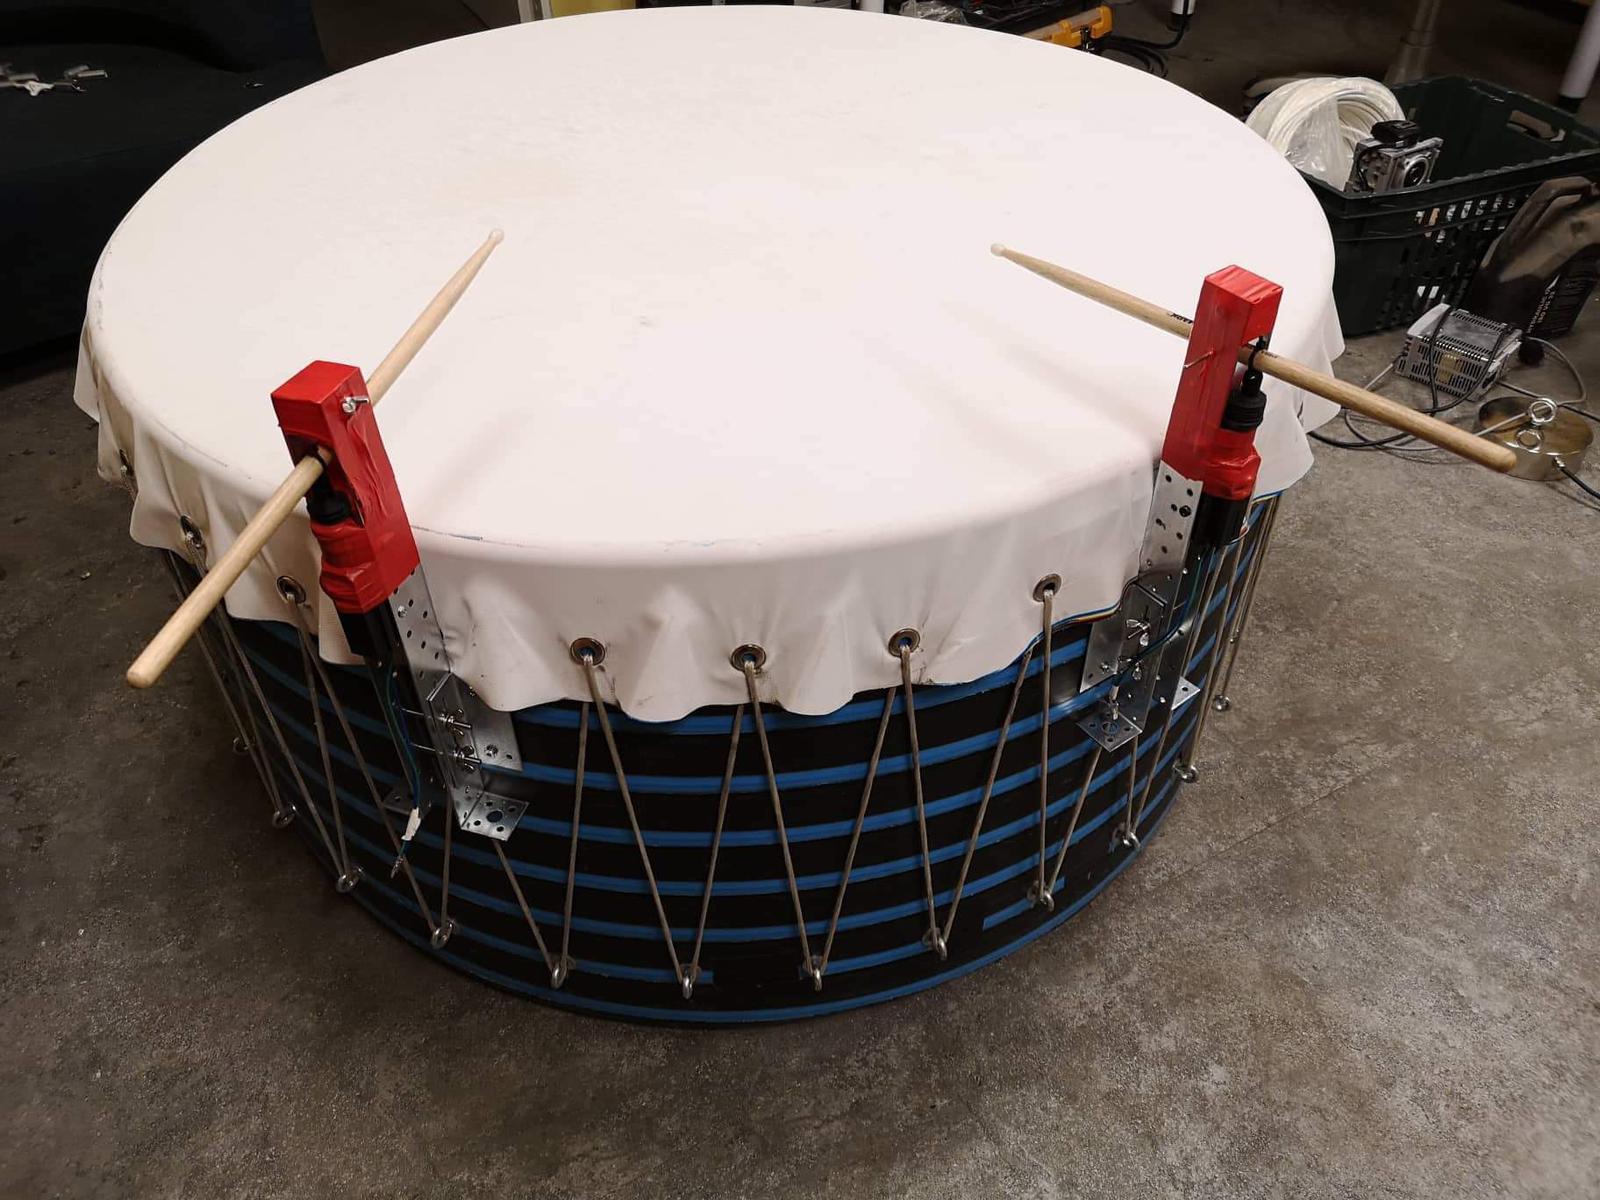
We tried 3 or 4 design options until we found an acceptable one. The hitch with the stick should not be rigid, since the stick should have an elastic rebound from the drum, and a rigid hitch will greatly degrade the sound. We used building screeds.
- The mechanics of the impact itself. It consisted of fast forward movement, pause and backward movement. But how large should the intervals of this movement be? This can only be determined empirically. Moreover, the intervals depended on the place of attachment of the stick, the displayed notes. We determined the intervals by trial and error. To make it clear, the part of the Arduino code responsible for the blows looked like this.

- All motors are different. The motors themselves are mechanically driven and therefore produce quite noticeable noise. But the noise becomes much stronger, if the motor deviates from the axis of the impact, and this increases the risk of motor breakdown. Given the vibration and impact forces, we again rested on the rigidity of the structure. Alexander Potuzhny did a lot here in terms of improving fixtures.
- Reset the controller from spurious interference. Since there will be many devices, cables around, and the motors themselves give noise.
Since the motors are controlled by music, it would be possible to make sex toys from this. He staged his favorite music, such as the Imperial March, and ...
Assembly and rehearsal
The final assembly and rehearsals were performed at the music studio of the Russian Theater of Estonia.
The problem with rehearsals with a neural network is also that the network itself is non-deterministic. The interaction takes place in a call-response mode, and each time the network answers will be different - therefore, it is impossible to rehearse the final version.
Music concept
For the performance, we also prepared a video. Initially, we thought to control the video stream via MIDI, too, to play overlays and reduce the video generated by the GAN - but we did not manage to make an environment for the second machine and connect to the models. Therefore, the video for each part of the performance was pre-rendered; GAN and overlay management were used. Everything synchronized with the main midi_clock.
For live I used VDMX5, through which the video stream went.
Shortly before the performance, they made a presentation on television.
And it was very unusual to see posters at the Estonia concert hall (this is like the Bolshoi Theater for Moscow).
Performance
The performance itself took place on the stage of Sõltumatu Tantsu Lava, it is a small hall (a little more than 100 people) in the creative quarter of Telliskivi in the Vaba Lava complex. Just installing and setting up all the equipment took more than 4 hours. Fully connected already almost at night.
And already without light.
The hall was full, despite the late publicity. I was at the side of the scene and controlled the video stream. The concert itself was a great success - how the model worked, how the sound and video went. The audience said that they were sent to the trip somewhere in 10-15 minutes. :) Everything turned out very atmospheric.
www.Audiokinetica.com
Aleksandr Tavgen - IT solution, software development
Aleksandr Potužnoi - technical support
Modulshtein:
www.Modulshtein.com
On spotify
Aleksandr Žedeljov aka FAERSHTEIN– guitar, Ableton, analog synth
Marten Altrov - clarinet, bass clarinet
Aleksei Semenihhin aka DJ Bandit - Fx, Samples, Scratches
All Articles