Training Cisco 200-125 CCNA v3.0. Day 15. Slow Communication and Port Security
Before starting the lesson, I want to say that on our website nwking.org you can find not only information on studying the CCNA course, but also many other topics that are useful for a network specialist. We publish there interesting information about products of other manufacturers and reviews of various programs.
Today we will discuss two important issues: slow connections and the Port Security switch security feature.
When you take on the responsibilities of a Cisco network technician, one of the most important issues you will have to solve is slow connections. An employee of the company may contact you who complains that the Internet is slow, there is slow access to the server, IP-telephony voice calls are slowly being made, and so on. This problem is very common in office networks and can occur for a variety of reasons, for example, when the traffic volume sharply increases on some day, which significantly slows down the connection.
As a network engineer, you should pay attention to the most diverse aspects of the problem in order to find where the cause of its occurrence lies. Now I'm not talking about troubleshooting in the whole OSI model, but you should have a work plan, a sequence of actions that you take to find the source of the problem, and you need to understand what exactly it consists of. If someone calls you and says that they have too slow an Internet connection, you must go to this site yourself and check it from your computer. Sometimes large social networking sites are slowed down due to a large influx of users, in which case you do not need to look for a solution to the problem on your network. Therefore, you should consider all aspects of a slow connection, as sometimes the problems of your colleagues do not depend on the state of their computers. If a site is loading slowly, you should check if other sites are slow. If all sites load slowly, we can conclude that the reason is not in a particular site, but in the problem of your Internet connection.

You need to divide the problem into separate components in order to understand in which part the problem lies.
In most cases, there are two reasons for a slow connection: the speed and duplex of the switch port. You know that all modern switches are designed for data transfer at a speed of 10/100 Mbit / s for Fast Ethernet devices or 1 Gbit / s for Gigabit Ethernet devices. Naturally, Gigabit Ethernet devices can also run at 10/100 Mbps. Thus, we have devices with different speeds, but most devices made 4-5 years ago do not support 1 Gbit / s, providing only Fast Ethernet. However, many modern devices do not support full duplex.
Half duplex is when the device can only send or only receive traffic, and full duplex is when the device can simultaneously transmit and receive information. If you set your computer in half-duplex mode, that is, it can either send or receive traffic, and the switch port to which the computer is connected will work in full-duplex mode, then such a connection will not work. Therefore, the ideal case is when both devices operate in the same duplex mode - half duplex or full duplex and at the same speed, for example, 100 Mbps. If one port runs at 10 Mbps and the other 100 Mbps, communication may fail. Therefore, you must be careful with these things.
In most cases, the device configuration is set to automatic compatibility mode by default, that is, the switch port speed mode and the computer network port port are set to automatic duplex mode. However, for a Fast Ethernet port of a switch with a speed of 100 Mbps this can cause a problem. In most cases, the switch ports provide speed compatibility, but sometimes they are mistaken, because they cannot "negotiate" with the second device. In this case, one device can choose for itself half-duplex mode, and the second - full duplex.
In this case, Gigabit Ethernet behaves better, and there is an explanation for this. The fact is that many years ago, when the Fast Ethernet standard was created, the vast majority of devices worked in half-duplex mode. By default, if the device is not matched, the Fast Ethernet switch, set to automatic speed selection and automatic duplex, uses a speed of 100 Mbps and half duplex mode.
Suppose that you set one of the devices to full duplex mode and assign a speed of 100 Mbps, and then you want to extend these parameters to all the switches on your network. However, one of the devices on the network may be in automatic mode, and when connected to the port of the device you configured, it will go to a speed of 100 Mbps, but at the same time, by default for automatic mode it will go to half duplex. If this happens, you are in for big trouble.
But if both devices use the Gigabit Ethernet standard and both are in automatic mode, then by default they go into a state of full duplex at a speed of 1 Gbit / s, or 1000 Mbit / s.
If someone calls you and says that his computer is slow, you can use the show int <port name> command to view the status of the switch interface.

From here you can extract a lot of useful information. You can see that Fast Ethernet is enabled (Fast Ethernet0 / 1 is up), where “up” means that physically this port really works. It is further reported that the network protocol is active, line protocol is up, that is, the connection is established and working. Further, you can see that the port operating mode is Full-duplex and the connection speed is 100 Mbps.
If you see that the mode is set to half duplex, then something may be out of order. In this case, you need to check the device on the other side of the connection, and if it also works in half-duplex mode, then the reason for the slow operation of the computer is different. However, if there is an inconsistency of the “full duplex - half duplex” modes, this can be the cause of many problems.
If your device is in half-duplex mode, it either only sends or only receives data. But the switch working in full duplex mode does not know about it, and, receiving data, sends data at the same time, while your device is not able to receive it, because it is busy sending traffic. As a result, data “collides” and is simply lost. As we know from previous lessons, TCP is a mechanism that checks the sequence of frames and in this case will try to repeat the transfer of lost data. However, an attempt to repeat the transmission of traffic that did not reach the destination will significantly slow down the data exchange. At the same time, seeing that the traffic has not reached the recipient, TCP will try to repeat the transfer of lost data again and again. This process also slows down the network.
Another useful parameter for evaluating the operation of a switch is the speed of data input and output during the last 5 minutes of operation, showing how much data is being received and sent during this time in bits / s or in packets / s. If the switch is in working condition, these parameters must contain some values. If you see 0, which means zero traffic through this port, then something is wrong. Information on the number of broadcasts received broadcasts received and the number of collisions is also useful. As we already said, if the switch has 48 ports, the number of collisions should also be 48, and if you see 0, this means that none of the ports in this switch work. The number of late collision equal to 0 also indicates a malfunction in the switch.
I will go to the Packet Tracer program to show how you can configure these things. We enter the settings of SW0 using the config t command. I advise you to take a piece of paper and write down the commands that I will use. I think, writing down commands manually, you will remember them much faster than if you type them on the keyboard using command line prompts. So, to enter global configuration mode, I type the configure terminal command and then go to the interface we are interested in with the interface fastEthernet 0/1 command. In order to set the speed of this port, I type speed, and the system produces 3 possible parameters.

Packet Tracer only has a Fast Ethernet switch, there is no Gigabit Ethernet switch, so the maximum speed is 100 Mbps. I can set the speed to 10 or 100, for this I use the speed 100 command, and since I manually set the speed, I must also manually select the duplex mode for this port.
You cannot use the automatic speed mode and the manual duplex setting mode; you must set either of these parameters to the automatic selection mode, or assign both parameters manually.
I warn you: never change the settings of these parameters in a working network during business hours. If you do this, the switch will disable the port, reboot and enable the port with the new parameters, but for those 5 seconds during which it will reboot, network connections will be interrupted. I recommend that you make these settings only in a new, newly created network, or after hours.
So, to configure duplex, you need to enter the duplex command, after which the system will display three possible modes: auto, full duplex and half duplex.

I will issue the duplex full command to enable full duplex for this port. If you look at the parameters of the f0 / 1 interface, you can see a line with full duplex and 100 Mbps modes. At the same time, let's look at the current configuration, for which we use the show run command.
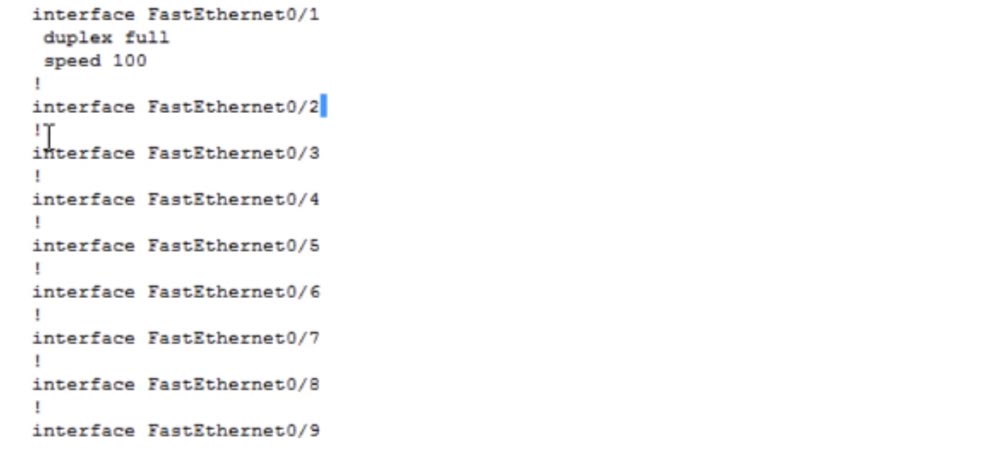
You can see that the FastEthernet0 / 1 port operation parameters are listed separately, while the operation mode is not specified for other ports. This is because I configured it manually, and all other ports are configured by default.
If I want to disable this port and use the interface interface FastEthernet0 / 1 shutdown command and look at the configuration again, I will see that the shutdown line has been added to the parameters of this port. Thus, if there is no shutdown line under the line with the switch interface designation, this means that this port is in the on state.

Now I will change the operating mode of this port using the speed auto and duplex auto commands.

If we look at the current configuration again, we will not see any changes, because the speed auto and duplex auto commands are the default commands, and the default mode parameters are not displayed in the current device configuration. So, I showed you how to configure the speed and duplex of the port.
And now the question is: do you think the idea of hard tuning the speed and duplex from the point of view of operating switches in the working environment is a good idea? Answer: it depends on the specific conditions.
The idea of manually adjusting the parameters is not bad, but it leads to a huge amount of work - you will have to manually configure each switch of the working network at a speed of 100 Mbps and full duplex. Therefore, there is an unwritten rule - to do this only for critical network devices, such as servers or routers. End devices, computers or IP telephones are usually connected to them, so a hard port setup should not lead to any surprises. After setting the speed to 100 Mbit / s or 1 Gbit / s and full duplex mode, the client device connected to this port supports the selected connection parameters without any problems. So tight configuration of critical network devices will help you save a lot of time.
So, if you have a problem with a slow connection, one way to resolve it is to configure speed and duplex.
Before moving on to the issue of port security, we’ll look at what this security is. Imagine that your office has wall outlets for network cables, and your computers, mainly desktops, are connected to these outlets.
Question: what can prevent me, as a hacker, from disconnecting your computer and connecting my own to this outlet? Nothing! I can bring my home computer as a trainee, and you know that home laptops are usually infected with viruses or contain malware, because you upload music, movies and other content to them. If you connect your computer to the office network using a cable or wireless connection, you can easily compromise it by spreading viruses through it. Of course you do not want this.
But if you are a hacker, then you can easily carry out a man-in-the-middle attack. You connect your device to this port, change the MAC address and make sure that all devices in the office send traffic through the fake gateway that you created in order to access the Internet. Using Wireshark or any packet analysis software, the hacker will be able to decrypt the intercepted traffic and get the data, passwords and other confidential information of interest to him.
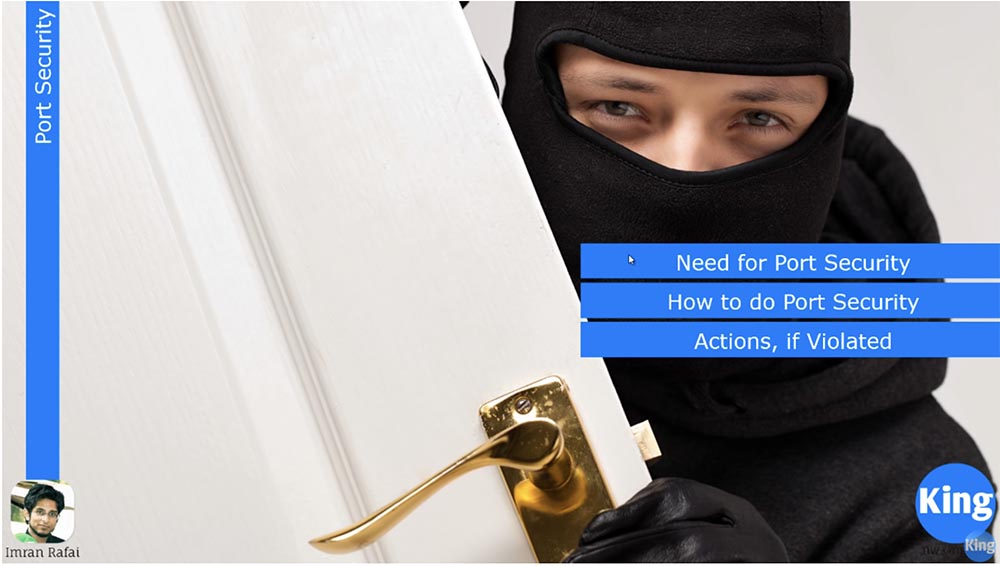
The first line of defense is Port Security. If you ask me if this feature is the best way to protect, I will answer - of course not. This is just the first line of defense. But security is not one ingenious trick, it is a multi-level system. You have physical security, security of the second level of OSI, third level, seventh and so on. Security in general is much more than just port security, but this is the first line of defense, so we’ll look at how you can ensure it and how to protect yourself from someone disconnecting your office computer from your network and connecting your own instead.
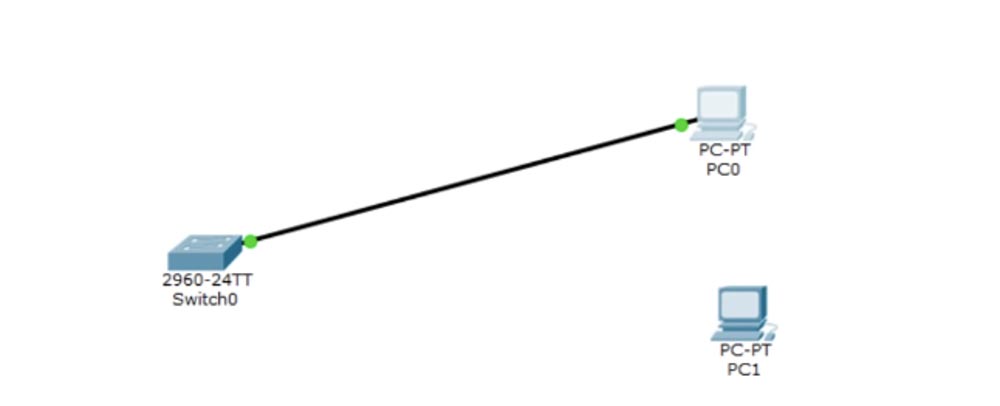
Back to the Packet Tracer program. We have a PC0 computer that I connected to the Sw0 switch, and I want to assign an IP address to this computer.

I enter the switch command line terminal and enter the show int brief command, which shows the status of all ports on the device. Shown here are all 24 Fast Ethernet ports and 2 Gigabit ports, as well as the default virtual network VLAN1 with IP address 10.1.1.1. Next, I enter the PC0 network settings, where I entered all the parameters in advance.

To enable Port security, you must first do the following: I enter the interface f0 / 1 command because it is the port to which the computer is connected, and I want to ensure the security of this particular port.
You must remember that the port security function can only be enabled for the access port, and the trunk port works in a different mode. Therefore, first of all, you should turn this port into an access port. To do this, I sequentially enter the switchport mode access and switchport access vlan 1 commands. Next, I want to enable the port security function, type the switchport port-security command, and the system offers me three options to choose from.
Under the list of parameters you see the symbols (correct), which mean that the switchport port-security command is itself a valid command, that is, typing it and pressing “Enter”, I turn on the port security function. If you now click on this port, you can see that the Port security feature is enabled. But before you do this, you need to make some settings.
You can use the first parameter to protect the MAC address. To do this, use the switchportort-security mac-address command, which means that this switch port will only use the MAC address of the PC0 connected to it.
Let's look at the configuration of the IP address of the computer, for which we enter the command PC> ipconfig / all in the command line terminal. We see the name of the connection - FastEthernet0 and the physical address of this computer is 0001.6307.EEAE, that is, the MAC address.
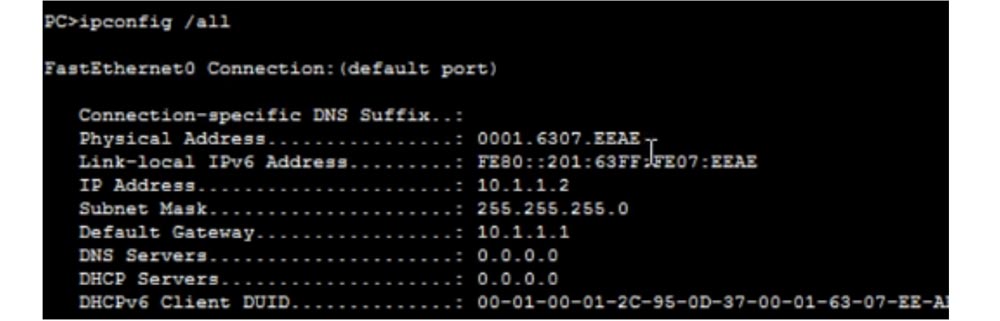
If instead of Packet Tracer you try to view the network configuration of the computer using the Windows command line, the MAC address will be presented in a different format as a set of 6 two-character groups.
In principle, this is the same address, it is just that MS Windows presents it as a hexadecimal number, and Cisco prefers to use 3 four-character groups, but the MAC address itself is exactly the same in both cases.

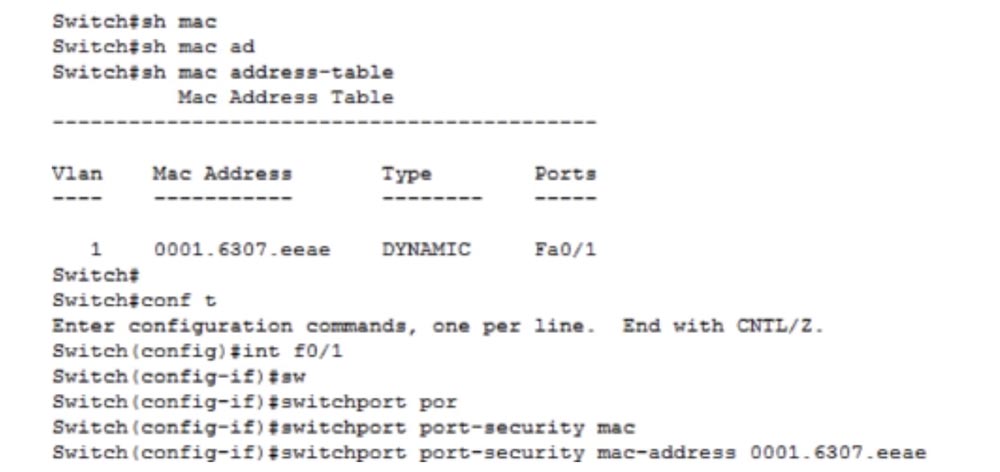
I copy this MAC address and paste it at the end of the line with the switchportort-security mac-address command. This means that port f0 / 1 can only communicate with a given MAC address.

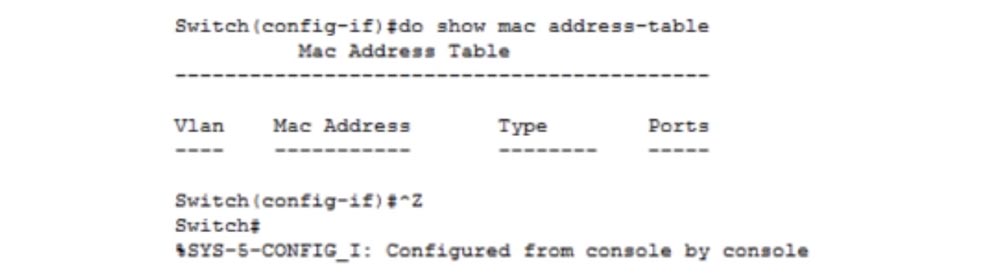
If you do not want to type this address manually, you can use the do show mac address-table command to see the MAC addresses of devices connected to the selected port. You see that the table is empty, because this port is currently not accepting traffic.
In order for data to appear here, you need to generate traffic. I give the port f0 / 1 the no shutdown command, after which the port should change red to green. For some reason this does not happen, I again ask to show me the status of the ports with the show ip interface brief command and see that the port f0 / 1 is still in the down state. I’ll try to figure out why it didn’t turn on, and I will direct traffic to it from the computer with the ping command. You see that the connection has been established and both ports are now indicated by green dots.
I reissue the show mac address-table command, and you see that the MAC address of the computer has now appeared here. If you do not want to print this address or enter the computer to copy it from the ipconfig command prompt window, you can simply copy it from here and paste it into the desired command.
So, there are 2 ways: if you know the MAC address, you can simply print it at the end of the command, or browse the switch MAC address table and copy the desired address from there.
MAC- stiky, : switchport ort-security mac-address sticky. , , port security. , «» , , . stiky, , MAC- «» MAC- .
. show run , Fa0/1 : switchport mode access switchport ort-security mac-address sticky. switchport ort-security maximum. maximum , MAC- . . , , , IP-, , MAC-. switchport ort-security maximum 2. – maximum 1 – , .
— switchport ort-security violation. MAC-, «» MAC-, , , violation, . ?
switchport ort-security violation. shutdown , MAC-, , , . , . ort-security violation – protect restrict. , . , protect, MAC- , , .
restrict , , «» MAC- «» . , restrict – SNMP- , . , MAC-, . , protect restrict , . ort-security violation shutdown.
, Port Security. switchport ort-security «». , MAC-. show run, , MAC- «» switchport ort-security mac-address sticky 0001.6307.. 48 , 48 , stiky , . , PC0 , SW0.
, , PC1. , , , , IP-, PC0, . , IP- 10.1.1.1. , . , : « 5 : Fast Ethernet 0/1 «».
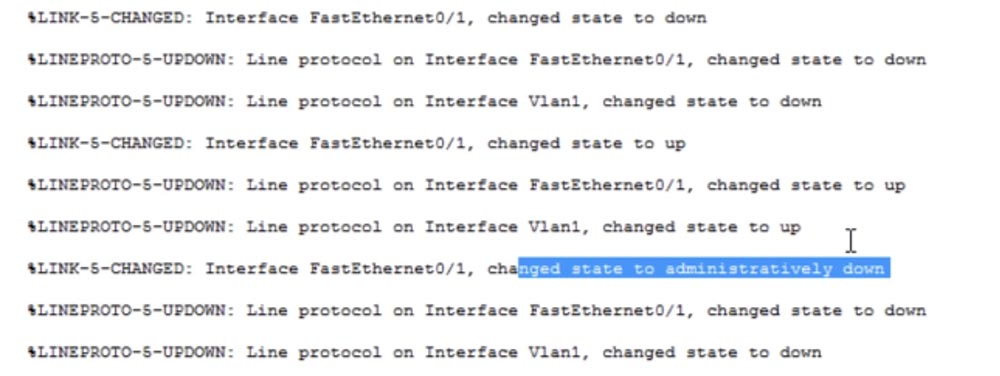
, . , . 3 , , MAC- . , Packet Tracer – , , «error-disabled», .
, . , - , , show interface brief. , Fa0/1, , manual down, shutdown . , , – show int f0/1, .
, – err-disabled, . , Port Security. , show port-security .
, Fa0/1 , «» MAC-, 1, 1, - – Shutdown. , , MAC-.

. , 15 , CCNA , . CCNA , , Cisco, . , , .
, – show rt-security address. , MAC-.

VLAN 1, MAC- , — SecureSticky — FastEthernet0/1. rt-security interface fastEthernet0/1, , .
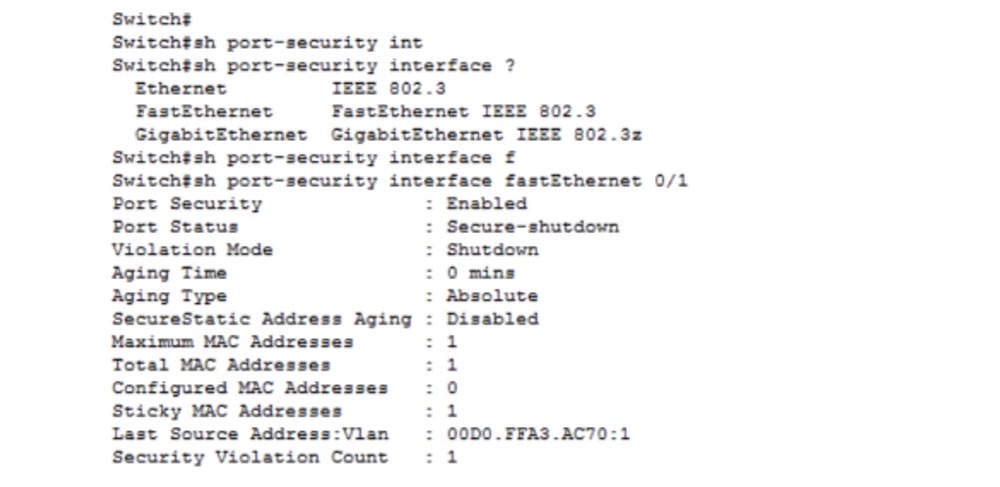
Port Status: Secure-shutdown, , - , MAC-. , MAC-, Last Source Address, MAC- .
Aging Time – , MAC- , - , . 0. MAC- 1, MAC- 1, MAC- 0, . «» MAC- 1, MAC- 1 , . , , .
, PC1 PC0. , , , SW0 MAC-, , . , int f0/1 shutdown, , no shutdown. Port Security, show port-security interface f0/1, , Secure-up, . , , .
Port Security. , . ! , Port Security . , , . MAC- MAC- , , . . Port Security .
Thank you for staying with us. Do you like our articles? Want to see more interesting materials? Support us by placing an order or recommending it to your friends, a 30% discount for Habr users on a unique analogue of entry-level servers that we invented for you: The whole truth about VPS (KVM) E5-2650 v4 (6 Cores) 10GB DDR4 240GB SSD 1Gbps from $ 20 or how to divide the server? (options are available with RAID1 and RAID10, up to 24 cores and up to 40GB DDR4).
Dell R730xd 2 times cheaper? Only we have 2 x Intel TetraDeca-Core Xeon 2x E5-2697v3 2.6GHz 14C 64GB DDR4 4x960GB SSD 1Gbps 100 TV from $ 199 in the Netherlands! Dell R420 - 2x E5-2430 2.2Ghz 6C 128GB DDR3 2x960GB SSD 1Gbps 100TB - from $ 99! Read about How to Build Infrastructure Bldg. class c using Dell R730xd E5-2650 v4 servers costing 9,000 euros for a penny?
Today we will discuss two important issues: slow connections and the Port Security switch security feature.
When you take on the responsibilities of a Cisco network technician, one of the most important issues you will have to solve is slow connections. An employee of the company may contact you who complains that the Internet is slow, there is slow access to the server, IP-telephony voice calls are slowly being made, and so on. This problem is very common in office networks and can occur for a variety of reasons, for example, when the traffic volume sharply increases on some day, which significantly slows down the connection.
As a network engineer, you should pay attention to the most diverse aspects of the problem in order to find where the cause of its occurrence lies. Now I'm not talking about troubleshooting in the whole OSI model, but you should have a work plan, a sequence of actions that you take to find the source of the problem, and you need to understand what exactly it consists of. If someone calls you and says that they have too slow an Internet connection, you must go to this site yourself and check it from your computer. Sometimes large social networking sites are slowed down due to a large influx of users, in which case you do not need to look for a solution to the problem on your network. Therefore, you should consider all aspects of a slow connection, as sometimes the problems of your colleagues do not depend on the state of their computers. If a site is loading slowly, you should check if other sites are slow. If all sites load slowly, we can conclude that the reason is not in a particular site, but in the problem of your Internet connection.
You need to divide the problem into separate components in order to understand in which part the problem lies.
In most cases, there are two reasons for a slow connection: the speed and duplex of the switch port. You know that all modern switches are designed for data transfer at a speed of 10/100 Mbit / s for Fast Ethernet devices or 1 Gbit / s for Gigabit Ethernet devices. Naturally, Gigabit Ethernet devices can also run at 10/100 Mbps. Thus, we have devices with different speeds, but most devices made 4-5 years ago do not support 1 Gbit / s, providing only Fast Ethernet. However, many modern devices do not support full duplex.
Half duplex is when the device can only send or only receive traffic, and full duplex is when the device can simultaneously transmit and receive information. If you set your computer in half-duplex mode, that is, it can either send or receive traffic, and the switch port to which the computer is connected will work in full-duplex mode, then such a connection will not work. Therefore, the ideal case is when both devices operate in the same duplex mode - half duplex or full duplex and at the same speed, for example, 100 Mbps. If one port runs at 10 Mbps and the other 100 Mbps, communication may fail. Therefore, you must be careful with these things.
In most cases, the device configuration is set to automatic compatibility mode by default, that is, the switch port speed mode and the computer network port port are set to automatic duplex mode. However, for a Fast Ethernet port of a switch with a speed of 100 Mbps this can cause a problem. In most cases, the switch ports provide speed compatibility, but sometimes they are mistaken, because they cannot "negotiate" with the second device. In this case, one device can choose for itself half-duplex mode, and the second - full duplex.
In this case, Gigabit Ethernet behaves better, and there is an explanation for this. The fact is that many years ago, when the Fast Ethernet standard was created, the vast majority of devices worked in half-duplex mode. By default, if the device is not matched, the Fast Ethernet switch, set to automatic speed selection and automatic duplex, uses a speed of 100 Mbps and half duplex mode.
Suppose that you set one of the devices to full duplex mode and assign a speed of 100 Mbps, and then you want to extend these parameters to all the switches on your network. However, one of the devices on the network may be in automatic mode, and when connected to the port of the device you configured, it will go to a speed of 100 Mbps, but at the same time, by default for automatic mode it will go to half duplex. If this happens, you are in for big trouble.
But if both devices use the Gigabit Ethernet standard and both are in automatic mode, then by default they go into a state of full duplex at a speed of 1 Gbit / s, or 1000 Mbit / s.
If someone calls you and says that his computer is slow, you can use the show int <port name> command to view the status of the switch interface.
From here you can extract a lot of useful information. You can see that Fast Ethernet is enabled (Fast Ethernet0 / 1 is up), where “up” means that physically this port really works. It is further reported that the network protocol is active, line protocol is up, that is, the connection is established and working. Further, you can see that the port operating mode is Full-duplex and the connection speed is 100 Mbps.
If you see that the mode is set to half duplex, then something may be out of order. In this case, you need to check the device on the other side of the connection, and if it also works in half-duplex mode, then the reason for the slow operation of the computer is different. However, if there is an inconsistency of the “full duplex - half duplex” modes, this can be the cause of many problems.
If your device is in half-duplex mode, it either only sends or only receives data. But the switch working in full duplex mode does not know about it, and, receiving data, sends data at the same time, while your device is not able to receive it, because it is busy sending traffic. As a result, data “collides” and is simply lost. As we know from previous lessons, TCP is a mechanism that checks the sequence of frames and in this case will try to repeat the transfer of lost data. However, an attempt to repeat the transmission of traffic that did not reach the destination will significantly slow down the data exchange. At the same time, seeing that the traffic has not reached the recipient, TCP will try to repeat the transfer of lost data again and again. This process also slows down the network.
Another useful parameter for evaluating the operation of a switch is the speed of data input and output during the last 5 minutes of operation, showing how much data is being received and sent during this time in bits / s or in packets / s. If the switch is in working condition, these parameters must contain some values. If you see 0, which means zero traffic through this port, then something is wrong. Information on the number of broadcasts received broadcasts received and the number of collisions is also useful. As we already said, if the switch has 48 ports, the number of collisions should also be 48, and if you see 0, this means that none of the ports in this switch work. The number of late collision equal to 0 also indicates a malfunction in the switch.
I will go to the Packet Tracer program to show how you can configure these things. We enter the settings of SW0 using the config t command. I advise you to take a piece of paper and write down the commands that I will use. I think, writing down commands manually, you will remember them much faster than if you type them on the keyboard using command line prompts. So, to enter global configuration mode, I type the configure terminal command and then go to the interface we are interested in with the interface fastEthernet 0/1 command. In order to set the speed of this port, I type speed, and the system produces 3 possible parameters.
Packet Tracer only has a Fast Ethernet switch, there is no Gigabit Ethernet switch, so the maximum speed is 100 Mbps. I can set the speed to 10 or 100, for this I use the speed 100 command, and since I manually set the speed, I must also manually select the duplex mode for this port.
You cannot use the automatic speed mode and the manual duplex setting mode; you must set either of these parameters to the automatic selection mode, or assign both parameters manually.
I warn you: never change the settings of these parameters in a working network during business hours. If you do this, the switch will disable the port, reboot and enable the port with the new parameters, but for those 5 seconds during which it will reboot, network connections will be interrupted. I recommend that you make these settings only in a new, newly created network, or after hours.
So, to configure duplex, you need to enter the duplex command, after which the system will display three possible modes: auto, full duplex and half duplex.
I will issue the duplex full command to enable full duplex for this port. If you look at the parameters of the f0 / 1 interface, you can see a line with full duplex and 100 Mbps modes. At the same time, let's look at the current configuration, for which we use the show run command.
You can see that the FastEthernet0 / 1 port operation parameters are listed separately, while the operation mode is not specified for other ports. This is because I configured it manually, and all other ports are configured by default.
If I want to disable this port and use the interface interface FastEthernet0 / 1 shutdown command and look at the configuration again, I will see that the shutdown line has been added to the parameters of this port. Thus, if there is no shutdown line under the line with the switch interface designation, this means that this port is in the on state.
Now I will change the operating mode of this port using the speed auto and duplex auto commands.
If we look at the current configuration again, we will not see any changes, because the speed auto and duplex auto commands are the default commands, and the default mode parameters are not displayed in the current device configuration. So, I showed you how to configure the speed and duplex of the port.
And now the question is: do you think the idea of hard tuning the speed and duplex from the point of view of operating switches in the working environment is a good idea? Answer: it depends on the specific conditions.
The idea of manually adjusting the parameters is not bad, but it leads to a huge amount of work - you will have to manually configure each switch of the working network at a speed of 100 Mbps and full duplex. Therefore, there is an unwritten rule - to do this only for critical network devices, such as servers or routers. End devices, computers or IP telephones are usually connected to them, so a hard port setup should not lead to any surprises. After setting the speed to 100 Mbit / s or 1 Gbit / s and full duplex mode, the client device connected to this port supports the selected connection parameters without any problems. So tight configuration of critical network devices will help you save a lot of time.
So, if you have a problem with a slow connection, one way to resolve it is to configure speed and duplex.
Before moving on to the issue of port security, we’ll look at what this security is. Imagine that your office has wall outlets for network cables, and your computers, mainly desktops, are connected to these outlets.
Question: what can prevent me, as a hacker, from disconnecting your computer and connecting my own to this outlet? Nothing! I can bring my home computer as a trainee, and you know that home laptops are usually infected with viruses or contain malware, because you upload music, movies and other content to them. If you connect your computer to the office network using a cable or wireless connection, you can easily compromise it by spreading viruses through it. Of course you do not want this.
But if you are a hacker, then you can easily carry out a man-in-the-middle attack. You connect your device to this port, change the MAC address and make sure that all devices in the office send traffic through the fake gateway that you created in order to access the Internet. Using Wireshark or any packet analysis software, the hacker will be able to decrypt the intercepted traffic and get the data, passwords and other confidential information of interest to him.
The first line of defense is Port Security. If you ask me if this feature is the best way to protect, I will answer - of course not. This is just the first line of defense. But security is not one ingenious trick, it is a multi-level system. You have physical security, security of the second level of OSI, third level, seventh and so on. Security in general is much more than just port security, but this is the first line of defense, so we’ll look at how you can ensure it and how to protect yourself from someone disconnecting your office computer from your network and connecting your own instead.
Back to the Packet Tracer program. We have a PC0 computer that I connected to the Sw0 switch, and I want to assign an IP address to this computer.
I enter the switch command line terminal and enter the show int brief command, which shows the status of all ports on the device. Shown here are all 24 Fast Ethernet ports and 2 Gigabit ports, as well as the default virtual network VLAN1 with IP address 10.1.1.1. Next, I enter the PC0 network settings, where I entered all the parameters in advance.
To enable Port security, you must first do the following: I enter the interface f0 / 1 command because it is the port to which the computer is connected, and I want to ensure the security of this particular port.
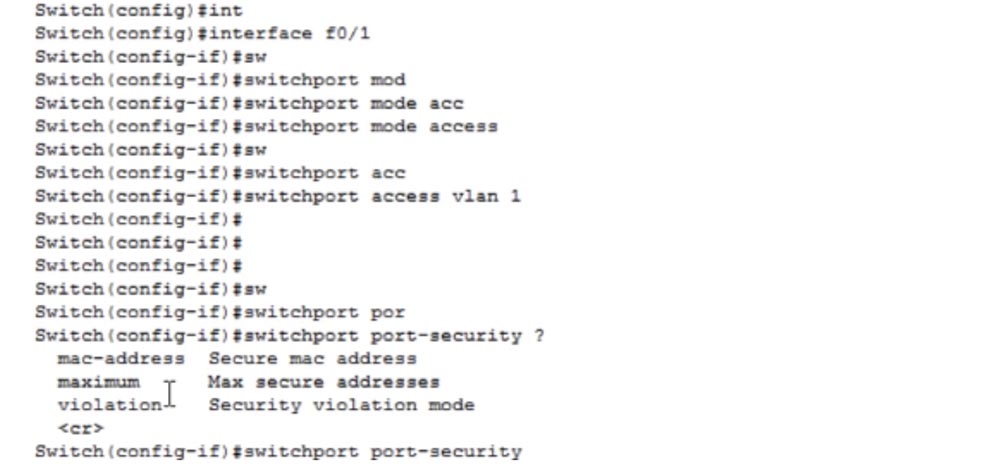
You must remember that the port security function can only be enabled for the access port, and the trunk port works in a different mode. Therefore, first of all, you should turn this port into an access port. To do this, I sequentially enter the switchport mode access and switchport access vlan 1 commands. Next, I want to enable the port security function, type the switchport port-security command, and the system offers me three options to choose from.
Under the list of parameters you see the symbols (correct), which mean that the switchport port-security command is itself a valid command, that is, typing it and pressing “Enter”, I turn on the port security function. If you now click on this port, you can see that the Port security feature is enabled. But before you do this, you need to make some settings.
You can use the first parameter to protect the MAC address. To do this, use the switchportort-security mac-address command, which means that this switch port will only use the MAC address of the PC0 connected to it.
Let's look at the configuration of the IP address of the computer, for which we enter the command PC> ipconfig / all in the command line terminal. We see the name of the connection - FastEthernet0 and the physical address of this computer is 0001.6307.EEAE, that is, the MAC address.
If instead of Packet Tracer you try to view the network configuration of the computer using the Windows command line, the MAC address will be presented in a different format as a set of 6 two-character groups.
In principle, this is the same address, it is just that MS Windows presents it as a hexadecimal number, and Cisco prefers to use 3 four-character groups, but the MAC address itself is exactly the same in both cases.
I copy this MAC address and paste it at the end of the line with the switchportort-security mac-address command. This means that port f0 / 1 can only communicate with a given MAC address.
If you do not want to type this address manually, you can use the do show mac address-table command to see the MAC addresses of devices connected to the selected port. You see that the table is empty, because this port is currently not accepting traffic.
In order for data to appear here, you need to generate traffic. I give the port f0 / 1 the no shutdown command, after which the port should change red to green. For some reason this does not happen, I again ask to show me the status of the ports with the show ip interface brief command and see that the port f0 / 1 is still in the down state. I’ll try to figure out why it didn’t turn on, and I will direct traffic to it from the computer with the ping command. You see that the connection has been established and both ports are now indicated by green dots.
I reissue the show mac address-table command, and you see that the MAC address of the computer has now appeared here. If you do not want to print this address or enter the computer to copy it from the ipconfig command prompt window, you can simply copy it from here and paste it into the desired command.
So, there are 2 ways: if you know the MAC address, you can simply print it at the end of the command, or browse the switch MAC address table and copy the desired address from there.
MAC- stiky, : switchport ort-security mac-address sticky. , , port security. , «» , , . stiky, , MAC- «» MAC- .
. show run , Fa0/1 : switchport mode access switchport ort-security mac-address sticky. switchport ort-security maximum. maximum , MAC- . . , , , IP-, , MAC-. switchport ort-security maximum 2. – maximum 1 – , .
— switchport ort-security violation. MAC-, «» MAC-, , , violation, . ?
switchport ort-security violation. shutdown , MAC-, , , . , . ort-security violation – protect restrict. , . , protect, MAC- , , .
restrict , , «» MAC- «» . , restrict – SNMP- , . , MAC-, . , protect restrict , . ort-security violation shutdown.
, Port Security. switchport ort-security «». , MAC-. show run, , MAC- «» switchport ort-security mac-address sticky 0001.6307.. 48 , 48 , stiky , . , PC0 , SW0.
, , PC1. , , , , IP-, PC0, . , IP- 10.1.1.1. , . , : « 5 : Fast Ethernet 0/1 «».
, . , . 3 , , MAC- . , Packet Tracer – , , «error-disabled», .
, . , - , , show interface brief. , Fa0/1, , manual down, shutdown . , , – show int f0/1, .
, – err-disabled, . , Port Security. , show port-security .
, Fa0/1 , «» MAC-, 1, 1, - – Shutdown. , , MAC-.
. , 15 , CCNA , . CCNA , , Cisco, . , , .
, – show rt-security address. , MAC-.
VLAN 1, MAC- , — SecureSticky — FastEthernet0/1. rt-security interface fastEthernet0/1, , .
Port Status: Secure-shutdown, , - , MAC-. , MAC-, Last Source Address, MAC- .
Aging Time – , MAC- , - , . 0. MAC- 1, MAC- 1, MAC- 0, . «» MAC- 1, MAC- 1 , . , , .
, PC1 PC0. , , , SW0 MAC-, , . , int f0/1 shutdown, , no shutdown. Port Security, show port-security interface f0/1, , Secure-up, . , , .
Port Security. , . ! , Port Security . , , . MAC- MAC- , , . . Port Security .
Thank you for staying with us. Do you like our articles? Want to see more interesting materials? Support us by placing an order or recommending it to your friends, a 30% discount for Habr users on a unique analogue of entry-level servers that we invented for you: The whole truth about VPS (KVM) E5-2650 v4 (6 Cores) 10GB DDR4 240GB SSD 1Gbps from $ 20 or how to divide the server? (options are available with RAID1 and RAID10, up to 24 cores and up to 40GB DDR4).
Dell R730xd 2 times cheaper? Only we have 2 x Intel TetraDeca-Core Xeon 2x E5-2697v3 2.6GHz 14C 64GB DDR4 4x960GB SSD 1Gbps 100 TV from $ 199 in the Netherlands! Dell R420 - 2x E5-2430 2.2Ghz 6C 128GB DDR3 2x960GB SSD 1Gbps 100TB - from $ 99! Read about How to Build Infrastructure Bldg. class c using Dell R730xd E5-2650 v4 servers costing 9,000 euros for a penny?
All Articles