Homebridge Automation with Node-Red
In my opinion, one of the main disadvantages of homebridge is the lack of the ability to create advanced scripts. All automation is assigned to the home center, which can be an iPad (connected to charging), Apple TV or HomePod. Not everyone has these devices, in addition, HomeKit has very poor automation. This situation can be corrected using Node-Red . The article is intended for users who already have homebridge installed and configured .
Briefly: Node-RED is a tool for connecting hardware, APIs and online services by building links between various nodes (blocks).
On Raspbian, this is installed:
By default, Node-Red runs on port 1880.
There is a huge library of modules with sets of blocks of various functionalities. Not spared and homebridge. Install node-red-contrib-homebridge-automation :
Let's try to turn on the light bulb. To do this, drag the hb-control , function block (this block will send a command to turn on) and inject (within the framework of this article, it is necessary only to manually activate the script). For the first time, for hb blocks, you need to specify a PIN and update the list of devices. Then you can add the necessary blocks:
Now, by clicking on the button in the inject block, the light should light up. In addition to hb-contoll, there are also hb-event, hb-status and hb-resume blocks. A detailed description of the blocks can be found in the official repository .
The function block is designed to manipulate data using JavaScript features. The block accepts the msg variable along with the payload parameter, by default, most of the blocks in Node-Red work with the payload parameter.
It is worth talking about the Debug block, with it you can see the output of the blocks to understand what the error is if your idea does not work.
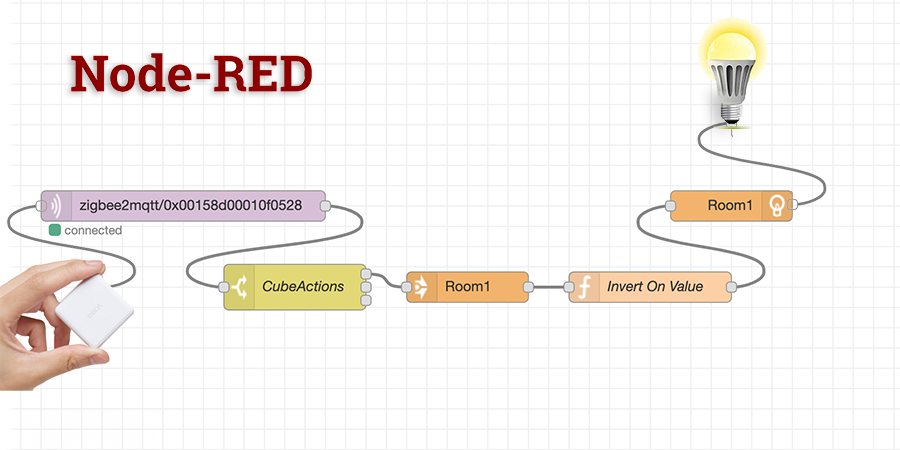
Now let's do something interesting, for example, make the light change state after turning the MagicCube 90 degrees. In a previous article , I showed how to make friends zigbee devices with homebridge. MagicCube, like other zigbee devices, will appear in the MQTT broker after pairing.
Node-Red supports the MQTT protocol out of the box. Add the MQTT block, specify the server address and Topic cube.
A cube can convey the following states:
shake, wakeup, fall, tap, slide, flip180, flip90, rotate_left and rotate_right
Add a switch block to separate one state from another. Define flip90 , shake and tap conditions in switch . Connect the top output to hb-status to get the current status of the bulb. The hb-status block is connected to the Invert On Value block by inverting the state, and its output is connected to the hb-controll and when the cube is rotated, the bulb will change the on / off state. It should look something like this:

Flow can be imported from here:
Thus, it is possible to “sculpt” complex automation schemes from blocks. In the library you can find modules with sets of blocks for completely different tasks, for example, for recording video surveillance cameras or working with files from cameras.
Briefly: Node-RED is a tool for connecting hardware, APIs and online services by building links between various nodes (blocks).
Definition on the official website:
Node-RED is a programming tool for wiring together hardware devices, APIs and online services in new and interesting ways.
It provides a browser-based editor that makes it easy to wire together flows using the wide range of nodes in the palette that can be deployed to its runtime in a single-click.
On Raspbian, this is installed:
sudo apt-get install nodered sudo systemctl enable nodered.service sudo service nodered start
By default, Node-Red runs on port 1880.
There is a huge library of modules with sets of blocks of various functionalities. Not spared and homebridge. Install node-red-contrib-homebridge-automation :
cd ~/.node-red npm install node-red-contrib-homebridge-automation sudo service nodered restart
Let's try to turn on the light bulb. To do this, drag the hb-control , function block (this block will send a command to turn on) and inject (within the framework of this article, it is necessary only to manually activate the script). For the first time, for hb blocks, you need to specify a PIN and update the list of devices. Then you can add the necessary blocks:
Now, by clicking on the button in the inject block, the light should light up. In addition to hb-contoll, there are also hb-event, hb-status and hb-resume blocks. A detailed description of the blocks can be found in the official repository .
Function block code
var ret_msg={}; ret_msg.payload = {}; ret_msg.payload.On = true; return ret_msg;
The function block is designed to manipulate data using JavaScript features. The block accepts the msg variable along with the payload parameter, by default, most of the blocks in Node-Red work with the payload parameter.
It is worth talking about the Debug block, with it you can see the output of the blocks to understand what the error is if your idea does not work.
Now let's do something interesting, for example, make the light change state after turning the MagicCube 90 degrees. In a previous article , I showed how to make friends zigbee devices with homebridge. MagicCube, like other zigbee devices, will appear in the MQTT broker after pairing.
Node-Red supports the MQTT protocol out of the box. Add the MQTT block, specify the server address and Topic cube.
A cube can convey the following states:
shake, wakeup, fall, tap, slide, flip180, flip90, rotate_left and rotate_right
Add a switch block to separate one state from another. Define flip90 , shake and tap conditions in switch . Connect the top output to hb-status to get the current status of the bulb. The hb-status block is connected to the Invert On Value block by inverting the state, and its output is connected to the hb-controll and when the cube is rotated, the bulb will change the on / off state. It should look something like this:
Invert On Value Code
var ret_msg=msg; ret_msg.payload.On = !msg.payload.On; return ret_msg;
Flow can be imported from here:
Flow
[ { "id": "f0f31eb6.22f16", "type": "tab", "label": "Flow 1", "disabled": false, "info": "" }, { "id": "e0f72465.9e4fb8", "type": "mqtt in", "z": "f0f31eb6.22f16", "name": "", "topic": "zigbee2mqtt/0x00158d00010f0528", "qos": "2", "datatype": "auto", "broker": "8ec472b.e73e29", "x": 160, "y": 80, "wires": [ [ "43f74679.730588" ] ] }, { "id": "8539109.d872ff", "type": "debug", "z": "f0f31eb6.22f16", "name": "", "active": true, "tosidebar": true, "console": false, "tostatus": false, "complete": "false", "x": 670, "y": 60, "wires": [] }, { "id": "c5db7c5b.399f4", "type": "hb-status", "z": "f0f31eb6.22f16", "name": "Room1", "Homebridge": "HomeBridge", "Manufacturer": "YeeLight", "Service": "Lightbulb", "device": "HomeBridgeA1:23:AD:E3:CD:32YeeLightRoom100000043", "conf": "7948a496.505c2c", "x": 340, "y": 180, "wires": [ [ "9ef696d9.51a378" ] ] }, { "id": "43f74679.730588", "type": "switch", "z": "f0f31eb6.22f16", "name": "CubeActions", "property": "payload", "propertyType": "msg", "rules": [ { "t": "cont", "v": "flip90", "vt": "str" }, { "t": "cont", "v": "tap", "vt": "str" }, { "t": "cont", "v": "shake", "vt": "str" } ], "checkall": "true", "repair": false, "outputs": 3, "x": 150, "y": 240, "wires": [ [ "c5db7c5b.399f4" ], [], [] ] }, { "id": "f476dcba.a6511", "type": "hb-control", "z": "f0f31eb6.22f16", "name": "Room1", "Homebridge": "HomeBridge", "Manufacturer": "YeeLight", "Service": "Lightbulb", "device": "HomeBridgeA1:23:AD:E3:CD:32YeeLightRoom100000043", "conf": "7948a496.505c2c", "x": 700, "y": 180, "wires": [] }, { "id": "9ef696d9.51a378", "type": "function", "z": "f0f31eb6.22f16", "name": "Invert On Value", "func": "var ret_msg=msg;\nret_msg.payload.On = !msg.payload.On;\nreturn ret_msg;", "outputs": 1, "noerr": 0, "x": 520, "y": 180, "wires": [ [ "f476dcba.a6511" ] ] }, { "id": "8ec472b.e73e29", "type": "mqtt-broker", "z": "", "name": "mosquitto", "broker": "127.0.0.1", "port": "1883", "clientid": "", "usetls": false, "compatmode": true, "keepalive": "60", "cleansession": true, "birthTopic": "", "birthQos": "0", "birthPayload": "", "closeTopic": "", "closeQos": "0", "closePayload": "", "willTopic": "", "willQos": "0", "willPayload": "" }, { "id": "7948a496.505c2c", "type": "hb-conf", "z": "", "username": "111-11-111" } ]
Thus, it is possible to “sculpt” complex automation schemes from blocks. In the library you can find modules with sets of blocks for completely different tasks, for example, for recording video surveillance cameras or working with files from cameras.
PS Thoughts aloud:
I began to get involved in programming at school. First it is the ardor of Pascal, then Delphi. Later I got carried away with the “Olympiad” programming and they explained to me that you won’t go far at Pascal. Started learning C ++. Then it went and went, and the realization came that the programming language is not particularly important, it is chosen for specific tasks.
Of course there are gurus who “ate the dog” and can write anything in their favorite language
I am haunted by the thought that no matter how technologies develop, many are still very far from the banal automation of work and life processes through programming. I really hope that with the advent of tools such as Node-Red or Blockly , the entry threshold will greatly decrease. Having learned how to build a system out of cubes in the same Node-Red, people will probably get to the function block and learn JS with interest, and then everything will happen by itself.
All Articles