Manage your laptop stand with digispark
I decided to write an article about a very simple device made in two evenings. It solved a long-standing problem, which I am very happy about and use it to this day. It worked properly for about 3 months. Actually, this is what happened in the end. Who are interested, please, under the cat.

So you saw the result. Let's start the story from afar.
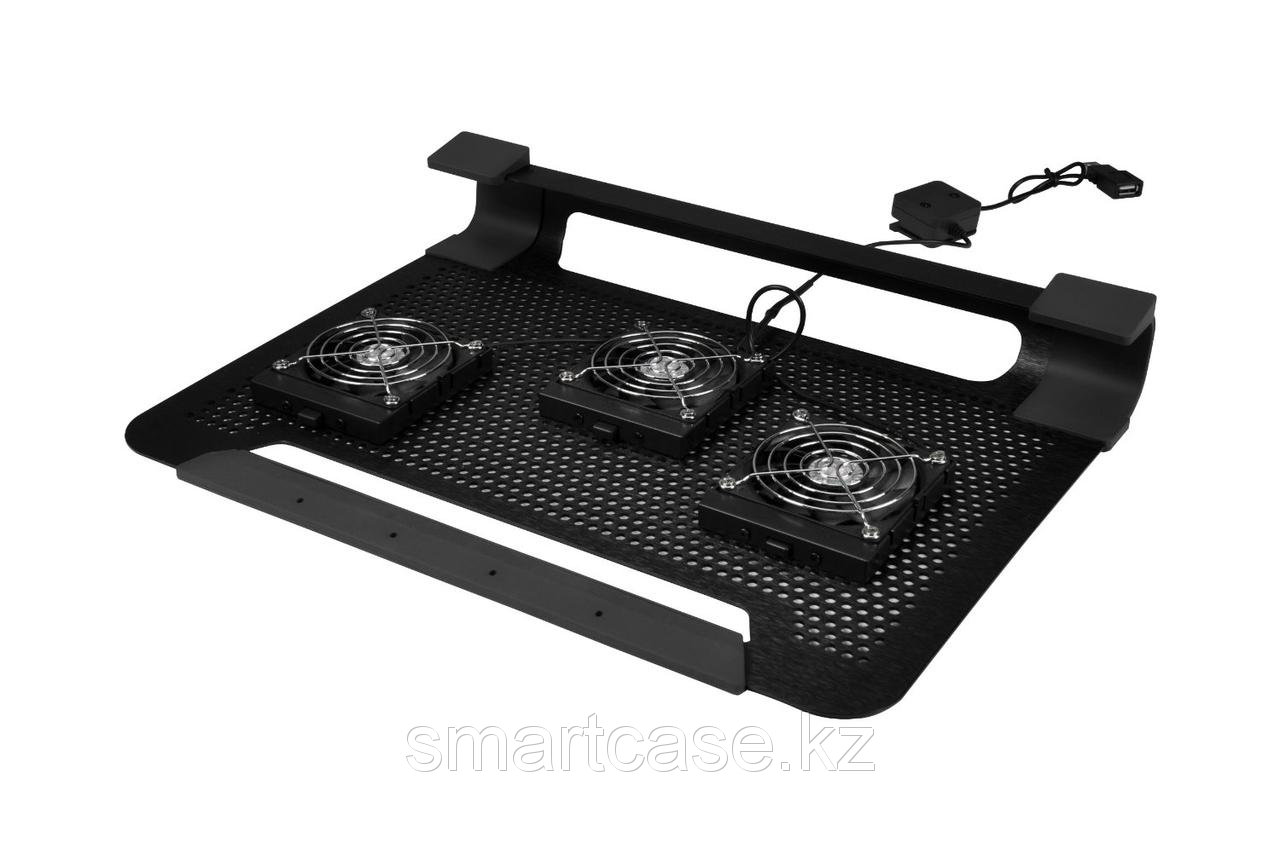
I have a stand for a laptop (for me it serves as the main computer, and therefore it is always on). And the stand is not simple, for cooling down, you can attach 3 coolers, plug the stand into USB, and the coolers will spin. If the coolers are installed successfully, then it drops 7 degrees from the processor. In general, the thing is necessary. Everything would be fine, but the coolers in the stand, frankly so-so, always spin at full power - which implies that in silence there is a constant monotonous rustle. It’s as if someone had a small chainsaw in the stand. Here is the actual culprit of the article:
One fine evening, while parcels were arriving with aliexpres, I “enjoyed” the singing of the stand in silence. And he firmly decided - enough for me. It was decided to manage the stand on usb. The hand has already reached out to stick some kind of stm32f1 with hardware usb. And then it dawned on me - there is digispark (the same attiny85, only on the board) Cheap, already with a binding for software usb, ideal for this task - to click on a transistor. He spread for him a quick small scarf with a mosfet controlled by one of the pins, and a place for an RGB LED.
It turned out like this:

Under the spoiler there is an explanation of the details on the board and a picture for printing if someone is going to repeat:
I printed it on transparent paper for laser printers in 2 copies, glued it into one completely opaque photo mask. This is such a trick for those with photoresist problems. I cut a piece of fiberglass, pasted a photoresist in water, smoothed it with a plastic card, ironed it at 60 degrees. A photo:

Next came the exposure and etching in a lemon and peroxide, and after removing the photoresist and finally drilling and tinning. The final result before component sealing:

The components were soldered (yes what to solder - a usb connector, a pair of smd, yes digispark itself) There were no jambs in the wiring - I marked usb mom on the wrong layer, which made her turn upside down. In general, I would rather have made the board connected to the computer on a thin cord, but it is, by the way. The result you saw in the first photo.
It remained to write the code. At first I wanted to use makefile and pure C, but decided that arduino ide is faster. I did so. The only thing is that the Chinese digispark did not want to go on usb until I patched the official hex loader with my programmer. After that, I wanted to write code with pid control and a fan shim, but changed my mind. As a result, on digispark, the code that just listens to the virtual serial port, and if one appears there, it turns on the fans, if zero turns it off.
Now there was a part for the computer. I have a laptop on linux, so I wrote a bash script and stuffed it into autoload, all it does is look for our digispark in the list of devices, it parses the output of the sensors command every N minutes and if temperature> 80 sends 1, if <60 sends 0 .
The device worked stably for 3 months. Life has become more pleasant. Below is the bash script code.
So you saw the result. Let's start the story from afar.
I have a stand for a laptop (for me it serves as the main computer, and therefore it is always on). And the stand is not simple, for cooling down, you can attach 3 coolers, plug the stand into USB, and the coolers will spin. If the coolers are installed successfully, then it drops 7 degrees from the processor. In general, the thing is necessary. Everything would be fine, but the coolers in the stand, frankly so-so, always spin at full power - which implies that in silence there is a constant monotonous rustle. It’s as if someone had a small chainsaw in the stand. Here is the actual culprit of the article:
One fine evening, while parcels were arriving with aliexpres, I “enjoyed” the singing of the stand in silence. And he firmly decided - enough for me. It was decided to manage the stand on usb. The hand has already reached out to stick some kind of stm32f1 with hardware usb. And then it dawned on me - there is digispark (the same attiny85, only on the board) Cheap, already with a binding for software usb, ideal for this task - to click on a transistor. He spread for him a quick small scarf with a mosfet controlled by one of the pins, and a place for an RGB LED.
It turned out like this:
Under the spoiler there is an explanation of the details on the board and a picture for printing if someone is going to repeat:
Parts List and Printed Circuit Board Image 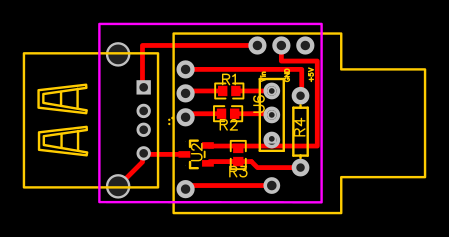
U2 - irlml6244trbpf - mosfet
R3-0603 10k resistor
R1, R2 - 0603 220 ohm resistor
R4 - 0.25 W 220 ohm resistor
U6 is an RGB LED, but it did not solder. In my opinion it is superfluous.
Please note that the usb mother on this board is divorced on the wrong layer!
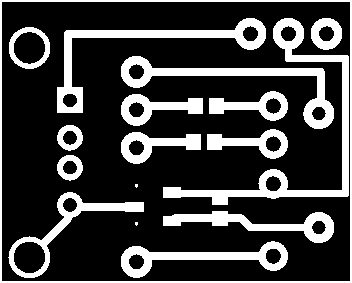
Below is the image to print - the print width is 0.93 inches.
U2 - irlml6244trbpf - mosfet
R3-0603 10k resistor
R1, R2 - 0603 220 ohm resistor
R4 - 0.25 W 220 ohm resistor
U6 is an RGB LED, but it did not solder. In my opinion it is superfluous.
Please note that the usb mother on this board is divorced on the wrong layer!
Below is the image to print - the print width is 0.93 inches.
I printed it on transparent paper for laser printers in 2 copies, glued it into one completely opaque photo mask. This is such a trick for those with photoresist problems. I cut a piece of fiberglass, pasted a photoresist in water, smoothed it with a plastic card, ironed it at 60 degrees. A photo:
Next came the exposure and etching in a lemon and peroxide, and after removing the photoresist and finally drilling and tinning. The final result before component sealing:
The components were soldered (yes what to solder - a usb connector, a pair of smd, yes digispark itself) There were no jambs in the wiring - I marked usb mom on the wrong layer, which made her turn upside down. In general, I would rather have made the board connected to the computer on a thin cord, but it is, by the way. The result you saw in the first photo.
It remained to write the code. At first I wanted to use makefile and pure C, but decided that arduino ide is faster. I did so. The only thing is that the Chinese digispark did not want to go on usb until I patched the official hex loader with my programmer. After that, I wanted to write code with pid control and a fan shim, but changed my mind. As a result, on digispark, the code that just listens to the virtual serial port, and if one appears there, it turns on the fans, if zero turns it off.
Now there was a part for the computer. I have a laptop on linux, so I wrote a bash script and stuffed it into autoload, all it does is look for our digispark in the list of devices, it parses the output of the sensors command every N minutes and if temperature> 80 sends 1, if <60 sends 0 .
The device worked stably for 3 months. Life has become more pleasant. Below is the bash script code.
#!/bin/bash FLAG=1 while [ true ] do for sysdevpath in $(find /sys/bus/usb/devices/usb*/ -name dev); do ( syspath="${sysdevpath%/dev}" devname="$(udevadm info -q name -p $syspath)" [[ "$devname" == "bus/"* ]] && continue eval "$(udevadm info -q property --export -p $syspath)" [[ -z "$ID_SERIAL" ]] && continue if [ $ID_SERIAL = "digistump.com_Digispark_Serial" ] then #echo "/dev/$devname - $ID_SERIAL" #echo "$FLAG" >> /dev/$devname CORE_0=$(sensors | grep 'Core 0' | awk '{print int($3)}') CORE_1=$(sensors | grep 'Core 1' | awk '{print int($3)}') #Phys_1=$(sensors | grep 'Physical id 0' | awk '{print int($3)}') #TEMP1=$(sensors | grep 'temp1' | awk '{print int($3)}') #TEMP2=$(sensors | grep 'temp2' | awk '{print int($3)}') #echo "$CORE_0" #echo "$CORE_1" let "TEMP = (CORE_0 + CORE_1) / 2 " #echo "$TEMP" if [ $TEMP -gt 80 ] then #echo HIGH #notify-send "HIGH TEMP, fan on, T="$TEMP echo "1" >> /dev/$devname echo "1" >> /dev/$devname fi if [ $TEMP -lt 60 ] then #echo LOW echo "0" >> /dev/$devname echo "0" >> /dev/$devname fi sleep 1 fi ) done sleep 4 done
All Articles