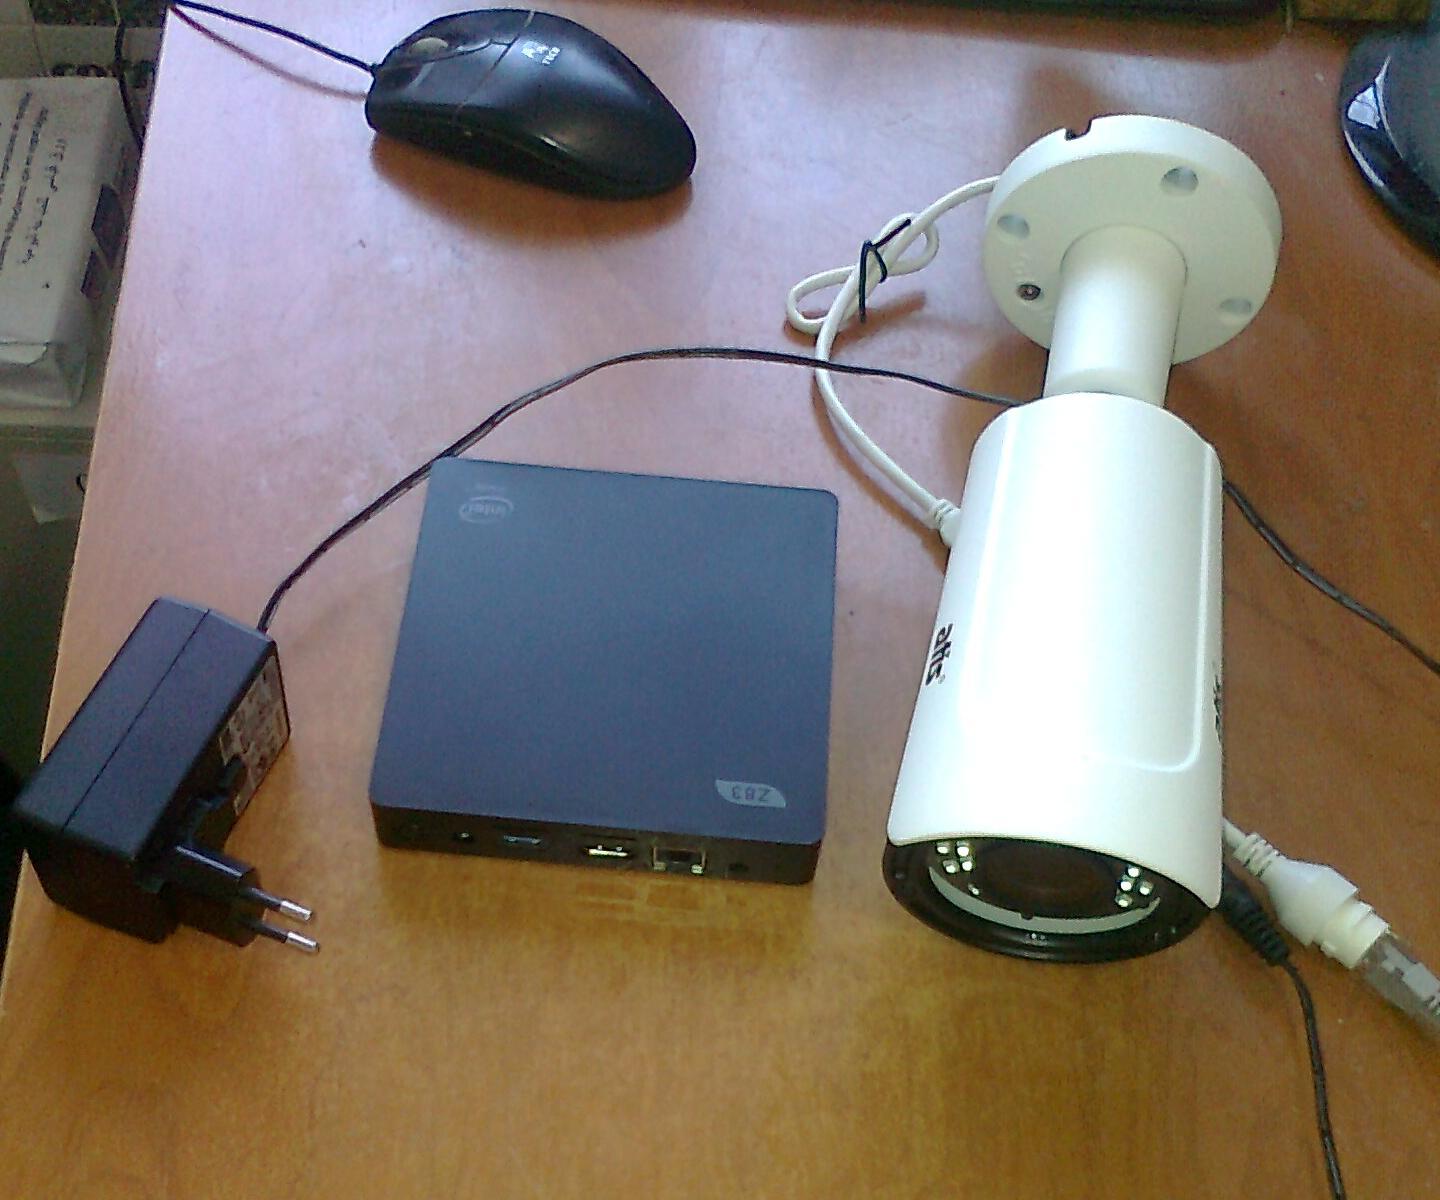
図1 Intel ATOM Z83IIコンピューターとATIS IPカメラ
FFmpegは、ビデオアプリケーションまたは汎用ユーティリティを作成するためのライブラリであり、ビデオ処理のすべてのハードワークを行い、すべてのデコード、エンコード、多重化、および逆多重化を行います。
タスク :h.264標準のフルHD IPカメラは、RTSPストリームを送信します。 解凍されたフレームのサイズは1920x1080ピクセルで、周波数は毎秒25フレームです。 RAMでデコードされたフレームを受信し、25フレームごとにディスクに保存する必要があります。
この例では、プログラムでフレームをデコードします。 目標は、FFmpegの使用方法を学び、ハードウェアデコードを使用して得られた結果をさらに比較することです。 FFmpegが表示されます-簡単です!
FFmpegのインストール :多くの人は、ハードウェア用にFFmpegを構築することを提案しています。 zeranoeビルドを使用することをお勧めします。これにより、タスクが大幅に簡素化されます。 zeranoeアセンブリにDXVA2のサポートが含まれていることは非常に重要です。DXVA2は、今後ハードウェアデコードに役立つでしょう。
32ビットまたは64ビットを選択する前に、 https://ffmpeg.zeranoe.com/builds/にアクセスし 、2つの共有アーカイブと開発アーカイブをダウンロードします。 devアーカイブはライブラリ(.lib)とincludeを保存します。 共有アーカイブには、将来のプログラムでフォルダーに書き換える必要がある必要な.dllが含まれています。
したがって、C:\ドライブにffmpegフォルダーを作成します。 devアーカイブからファイルを書き換えます。
FFmpegをVisual Studio 2017に接続する:新しいプロジェクトを作成します。 プロジェクトのプロパティに移動します(プロジェクト-プロパティ)。 次に、C / C ++で「インクルードファイル用の追加ディレクトリ」を選択します。 値を設定します: "C:\ ffmpeg \ dev \ include;"。 その後、リンカ追加ライブラリディレクトリに移動し、値を「C:\ ffmpeg \ dev \ lib;」に設定します。 それだけです FFmpegはプロジェクトに接続されています。
FFmpegを使用した最初のプロジェクト:ソフトウェアビデオのデコードと各25フレームのディスクへの記録。 FFmpegでビデオファイルを操作する原理を図2のフローチャートに示します
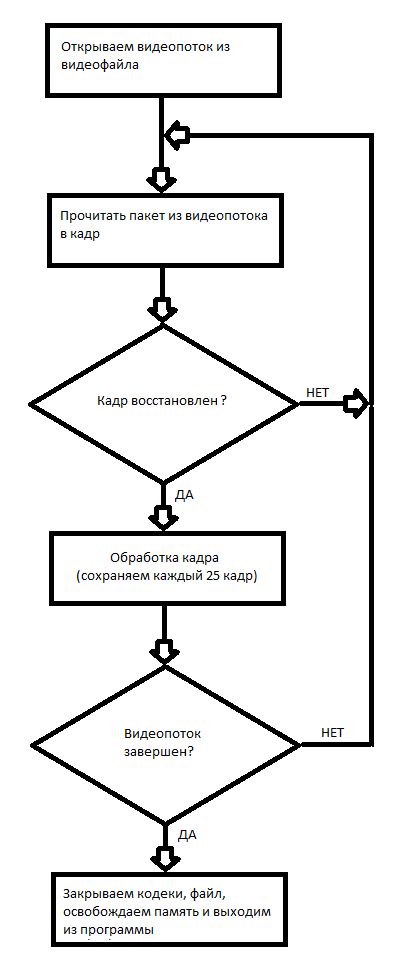
図2ビデオファイルの操作のブロック図。
C ++プロジェクトのコードは次のとおりです
// 21 2019 // , , http://dranger.com/ffmpeg/tutorial01.html // #include "pch.h" extern "C" { #include <libavcodec/avcodec.h> #include <libavformat/avformat.h> #include <libswscale/swscale.h> #include <libavformat/avio.h> #include <libavutil/pixdesc.h> #include <libavutil/hwcontext.h> #include <libavutil/opt.h> #include <libavutil/avassert.h> #include <libavutil/imgutils.h> #include <libavutil/motion_vector.h> #include <libavutil/frame.h> } <cut /> #include <stdio.h> #include <stdlib.h> #include <string.h> #pragma comment(lib, "avcodec.lib") #pragma comment(lib, "avformat.lib") #pragma comment(lib, "swscale.lib") #pragma comment(lib, "avdevice.lib") #pragma comment(lib, "avutil.lib") #pragma comment(lib, "avfilter.lib") #pragma comment(lib, "postproc.lib") #pragma comment(lib, "swresample.lib") #define _CRT_SECURE_NO_WARNINGS #pragma warning(disable : 4996) // compatibility with newer API #if LIBAVCODEC_VERSION_INT < AV_VERSION_INT(55,28,1) #define av_frame_alloc avcodec_alloc_frame #define av_frame_free avcodec_free_frame #endif void SaveFrame(AVFrame *pFrame, int width, int height, int iFrame) { FILE *pFile; char szFilename[32]; int y; // sprintf(szFilename, "frame%d.ppm", iFrame); pFile = fopen(szFilename, "wb"); if (pFile == NULL) return; // fprintf(pFile, "P6\n%d %d\n255\n", width, height); // for (y = 0; y < height; y++) fwrite(pFrame->data[0] + y * pFrame->linesize[0], 1, width * 3, pFile); // fclose(pFile); } <cut /> int main(int argc, char *argv[]) { AVFormatContext *pFormatCtx = NULL; int i, videoStream; AVCodecContext *pCodecCtxOrig = NULL; AVCodecContext *pCodecCtx = NULL; AVCodec *pCodec = NULL; AVFrame *pFrame = NULL; AVFrame *pFrameRGB = NULL; AVPacket packet; int frameFinished; int numBytes; uint8_t *buffer = NULL; struct SwsContext *sws_ctx = NULL; if (argc < 2) { printf("Please provide a movie file\n"); return -1; } // av_register_all(); // if (avformat_open_input(&pFormatCtx, argv[1], NULL, NULL) != 0) return -1; // // if (avformat_find_stream_info(pFormatCtx, NULL) < 0) return -1; // : , , av_dump_format(pFormatCtx, 0, argv[1], 0); // videoStream = -1; for (i = 0; i < pFormatCtx->nb_streams; i++) if (pFormatCtx->streams[i]->codec->codec_type == AVMEDIA_TYPE_VIDEO) { videoStream = i; break; } if (videoStream == -1) return -1; // <cut /> // pCodecCtxOrig = pFormatCtx->streams[videoStream]->codec; // pCodec = avcodec_find_decoder(pCodecCtxOrig->codec_id); if (pCodec == NULL) { fprintf(stderr, "Unsupported codec!\n"); return -1; // } // pCodecCtx = avcodec_alloc_context3(pCodec); if (avcodec_copy_context(pCodecCtx, pCodecCtxOrig) != 0) { fprintf(stderr, "Couldn't copy codec context"); return -1; // } // if (avcodec_open2(pCodecCtx, pCodec, NULL) < 0) return -1; // // pFrame = av_frame_alloc(); // RGB pFrameRGB = av_frame_alloc(); if (pFrameRGB == NULL) return -1; // numBytes = avpicture_get_size(AV_PIX_FMT_RGB24, pCodecCtx->width, pCodecCtx->height); buffer = (uint8_t *)av_malloc(numBytes * sizeof(uint8_t)); // . avpicture_fill((AVPicture *)pFrameRGB, buffer, AV_PIX_FMT_RGB24, pCodecCtx->width, pCodecCtx->height); // SWS context RGB sws_ctx = sws_getContext(pCodecCtx->width, pCodecCtx->height, pCodecCtx->pix_fmt, pCodecCtx->width, pCodecCtx->height, AV_PIX_FMT_RGB24, SWS_BILINEAR, NULL, NULL, NULL ); <cut /> // 25 i = 0; while (av_read_frame(pFormatCtx, &packet) >= 0) { // ? if (packet.stream_index == videoStream) { // avcodec_decode_video2(pCodecCtx, pFrame, &frameFinished, &packet); // ? if (frameFinished) { // RGB sws_scale(sws_ctx, (uint8_t const * const *)pFrame->data, pFrame->linesize, 0, pCodecCtx->height, pFrameRGB->data, pFrameRGB->linesize); // if (++i % 25 == 0) SaveFrame(pFrameRGB, pCodecCtx->width, pCodecCtx->height,i); } } // av_free_packet(&packet); } // av_free(buffer); av_frame_free(&pFrameRGB); av_frame_free(&pFrame); avcodec_close(pCodecCtx); avcodec_close(pCodecCtxOrig); avformat_close_input(&pFormatCtx); return 0; }
なぜなら 私のIPカメラにはIP 192.168.1.168があり、プログラム呼び出しは次のとおりです。
decode.exe rtsp://192.168.1.168
また、この例ではビデオファイルをデコードできます。場所を示すだけで十分です。
したがって、この例では、プログラムでビデオファイルをデコードし、受信したフレームをディスクに保存する方法を学びました。 フレームは.ppm形式で保存されます。 WindowsでIrfanView 64またはGIMPを使用して、これらのファイルを開くことができます。
結論: RTSP Full HD H.264ストリームのソフトウェアデコードには最大2つのIntel ATOM Z8350コアが必要です;さらに、パケット損失が定期的に発生するため、一部のフレームが正しくデコードされません。 この方法は、リアルタイム操作が必要ないため、記録されたビデオファイルのデコードにより適しています。
次の記事では、ハードウェアでRTSPストリームをデコードする方法を説明します。
プロジェクトでアーカイブする
ワーキングプログラム
FFmpegの資料へのリンク:
1. 少し時代遅れのFFmpegの操作に関するチュートリアル。
2. FFmpegに関するさまざまな有用な情報。
3. FFmpegが提供するさまざまなライブラリの使用に関する情報。