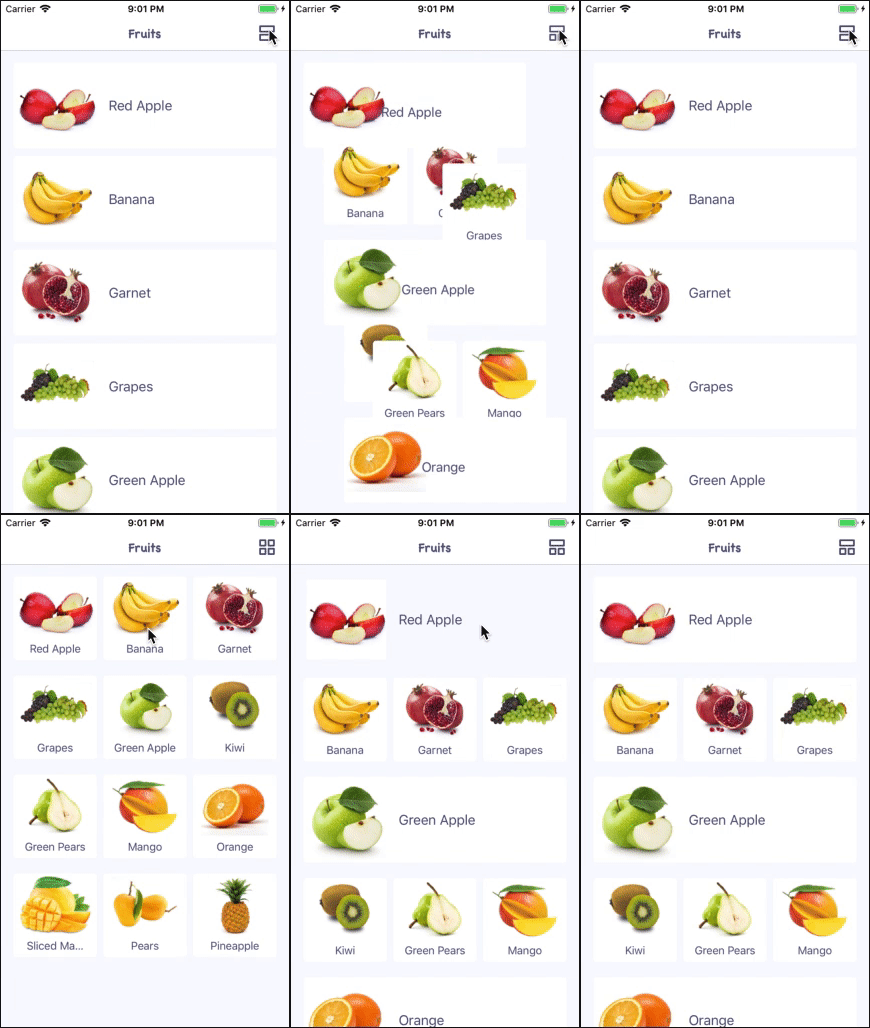
この記事では、要素のさまざまな表示方法の使用と、それらの再利用と動的な変更について検討します。 ここでは、コレクションと自動レイアウトの操作の基本については説明しません。
その結果、例が得られます。

モバイルアプリケーションを開発する場合、多くの場合、テーブルビューだけでは不十分で、より興味深いユニークな要素のリストを表示する必要があります。 さらに、要素の表示方法を変更する機能は、アプリケーションの「チップ」になる可能性があります。
上記の機能はすべて、UICollectionViewおよびUICollectionViewDelegateFlowLayoutプロトコルのさまざまな実装を使用して実装するのが非常に簡単です。
完全なプロジェクトコード。
実装にまず必要なもの:
- FruitsViewControllerクラス:UICollectionViewController。
- フルーツデータモデル
struct Fruit { let name: String let icon: UIImage }
- FruitCollectionViewCellクラス:UICollectionViewCell
果物を表示するためのUIImageViewとUILabelを含むセル
再利用のために、xibを使用して別のファイルにセルを作成します。
設計上、2つの可能なセルオプションがあることがわかります-下のテキストと画像の右側のテキスト。


まったく異なる種類のセルが存在する場合があります。その場合、2つの個別のクラスを作成して、目的のクラスを使用する必要があります。 私たちの場合、そのような必要はなく、UIStackViewで1つのセルで十分です。

セルのインターフェースを作成する手順:
- UIViewを追加
- その中にUIStackView(水平)を追加します
- 次に、UIImageViewとUILabelをUIStackViewに追加します。
- UILabelの場合、水平および垂直のコンテンツ圧縮抵抗優先度= 1000の値を設定します。
- UIImageViewアスペクト比に1を追加し、優先度を750に変更します。
これは、水平モードで正しく表示するために必要です。
次に、セルを水平モードと垂直モードの両方で表示するためのロジックを作成します。
水平表示の主な基準は、セル自体のサイズです。 つまり 十分なスペースがある場合-水平モードを表示します。 そうでない場合、垂直。 十分なスペースがあると仮定します。これは、画像が正方形であるため、幅が高さの2倍の場合です。
セルコード:
class FruitCollectionViewCell: UICollectionViewCell { static let reuseID = String(describing: FruitCollectionViewCell.self) static let nib = UINib(nibName: String(describing: FruitCollectionViewCell.self), bundle: nil) @IBOutlet private weak var stackView: UIStackView! @IBOutlet private weak var ibImageView: UIImageView! @IBOutlet private weak var ibLabel: UILabel! override func awakeFromNib() { super.awakeFromNib() backgroundColor = .white clipsToBounds = true layer.cornerRadius = 4 ibLabel.font = UIFont.systemFont(ofSize: 18) } override func layoutSubviews() { super.layoutSubviews() updateContentStyle() } func update(title: String, image: UIImage) { ibImageView.image = image ibLabel.text = title } private func updateContentStyle() { let isHorizontalStyle = bounds.width > 2 * bounds.height let oldAxis = stackView.axis let newAxis: NSLayoutConstraint.Axis = isHorizontalStyle ? .horizontal : .vertical guard oldAxis != newAxis else { return } stackView.axis = newAxis stackView.spacing = isHorizontalStyle ? 16 : 4 ibLabel.textAlignment = isHorizontalStyle ? .left : .center let fontTransform: CGAffineTransform = isHorizontalStyle ? .identity : CGAffineTransform(scaleX: 0.8, y: 0.8) UIView.animate(withDuration: 0.3) { self.ibLabel.transform = fontTransform self.layoutIfNeeded() } } }
主要部分に移りましょう-コントローラーと、セルタイプの表示と切り替えのロジックに進みましょう。
可能なすべての表示状態について、列挙型PresentationStyleを作成します。
また、ナビゲーションバーで状態を切り替えるボタンを追加します。
class FruitsViewController: UICollectionViewController { private enum PresentationStyle: String, CaseIterable { case table case defaultGrid case customGrid var buttonImage: UIImage { switch self { case .table: return imageLiteral(resourceName: "table") case .defaultGrid: return imageLiteral(resourceName: "default_grid") case .customGrid: return imageLiteral(resourceName: "custom_grid") } } } private var selectedStyle: PresentationStyle = .table { didSet { updatePresentationStyle() } } private var datasource: [Fruit] = FruitsProvider.get() override func viewDidLoad() { super.viewDidLoad() self.collectionView.register(FruitCollectionViewCell.nib, forCellWithReuseIdentifier: FruitCollectionViewCell.reuseID) collectionView.contentInset = .zero updatePresentationStyle() navigationItem.rightBarButtonItem = UIBarButtonItem(image: selectedStyle.buttonImage, style: .plain, target: self, action: #selector(changeContentLayout)) } private func updatePresentationStyle() { navigationItem.rightBarButtonItem?.image = selectedStyle.buttonImage } @objc private func changeContentLayout() { let allCases = PresentationStyle.allCases guard let index = allCases.firstIndex(of: selectedStyle) else { return } let nextIndex = (index + 1) % allCases.count selectedStyle = allCases[nextIndex] } } // MARK: UICollectionViewDataSource & UICollectionViewDelegate extension FruitsViewController { override func collectionView(_ collectionView: UICollectionView, numberOfItemsInSection section: Int) -> Int { return datasource.count } override func collectionView(_ collectionView: UICollectionView, cellForItemAt indexPath: IndexPath) -> UICollectionViewCell { guard let cell = collectionView.dequeueReusableCell(withReuseIdentifier: FruitCollectionViewCell.reuseID, for: indexPath) as? FruitCollectionViewCell else { fatalError("Wrong cell") } let fruit = datasource[indexPath.item] cell.update(title: fruit.name, image: fruit.icon) return cell } }
コレクション内の要素を表示する方法に関するすべては、UICollectionViewDelegateFlowLayoutプロトコルで説明されています。 したがって、コントローラーから実装を削除し、独立した再利用可能な要素を作成するために、ディスプレイのタイプごとにこのプロトコルの個別の実装を作成します。
ただし、2つのニュアンスがあります。
- このプロトコルでは、セル選択メソッド(didSelectItemAt :)も説明しています。
- 一部のメソッドとロジックは、N個すべてのマッピングメソッドで同じです(この例では、N = 3)。
したがって、 CollectionViewSelectableItemDelegateプロトコルを作成し、標準のUICollectionViewDelegateFlowLayoutプロトコルを拡張します。 このプロトコルでは、セル選択のクローズを定義し、必要に応じて追加のプロパティとメソッド(たとえば、表現に異なるタイプが使用される場合はセルタイプを返します)を定義します。 これは最初の問題を解決します。
protocol CollectionViewSelectableItemDelegate: class, UICollectionViewDelegateFlowLayout { var didSelectItem: ((_ indexPath: IndexPath) -> Void)? { get set } }
2番目の問題を解決するために、ロジックの複製を使用して、すべての一般的なロジックを含む基本クラスを作成します。
class DefaultCollectionViewDelegate: NSObject, CollectionViewSelectableItemDelegate { var didSelectItem: ((_ indexPath: IndexPath) -> Void)? let sectionInsets = UIEdgeInsets(top: 16.0, left: 16.0, bottom: 20.0, right: 16.0) func collectionView(_ collectionView: UICollectionView, didSelectItemAt indexPath: IndexPath) { didSelectItem?(indexPath) } func collectionView(_ collectionView: UICollectionView, didHighlightItemAt indexPath: IndexPath) { let cell = collectionView.cellForItem(at: indexPath) cell?.backgroundColor = UIColor.clear } func collectionView(_ collectionView: UICollectionView, didUnhighlightItemAt indexPath: IndexPath) { let cell = collectionView.cellForItem(at: indexPath) cell?.backgroundColor = UIColor.white } }
この場合、一般的なロジックは、セルを選択するときにクロージャを呼び出し、 強調表示された状態に切り替えるときにセルの背景を変更することです。
次に、表形式、各行の3つの要素、および最初の2つのメソッドの組み合わせの3つの表現の実装について説明します。
表形式 :
class TabledContentCollectionViewDelegate: DefaultCollectionViewDelegate { // MARK: - UICollectionViewDelegateFlowLayout func collectionView(_ collectionView: UICollectionView, layout collectionViewLayout: UICollectionViewLayout, sizeForItemAt indexPath: IndexPath) -> CGSize { let paddingSpace = sectionInsets.left + sectionInsets.right let widthPerItem = collectionView.bounds.width - paddingSpace return CGSize(width: widthPerItem, height: 112) } func collectionView(_ collectionView: UICollectionView, layout collectionViewLayout: UICollectionViewLayout, insetForSectionAt section: Int) -> UIEdgeInsets { return sectionInsets } func collectionView(_ collectionView: UICollectionView, layout collectionViewLayout: UICollectionViewLayout, minimumLineSpacingForSectionAt section: Int) -> CGFloat { return 10 } }
各行に3つの要素:
class DefaultGriddedContentCollectionViewDelegate: DefaultCollectionViewDelegate { private let itemsPerRow: CGFloat = 3 private let minimumItemSpacing: CGFloat = 8 // MARK: - UICollectionViewDelegateFlowLayout func collectionView(_ collectionView: UICollectionView, layout collectionViewLayout: UICollectionViewLayout, sizeForItemAt indexPath: IndexPath) -> CGSize { let paddingSpace = sectionInsets.left + sectionInsets.right + minimumItemSpacing * (itemsPerRow - 1) let availableWidth = collectionView.bounds.width - paddingSpace let widthPerItem = availableWidth / itemsPerRow return CGSize(width: widthPerItem, height: widthPerItem) } func collectionView(_ collectionView: UICollectionView, layout collectionViewLayout: UICollectionViewLayout, insetForSectionAt section: Int) -> UIEdgeInsets { return sectionInsets } func collectionView(_ collectionView: UICollectionView, layout collectionViewLayout: UICollectionViewLayout, minimumLineSpacingForSectionAt section: Int) -> CGFloat { return 20 } func collectionView(_ collectionView: UICollectionView, layout collectionViewLayout: UICollectionViewLayout, minimumInteritemSpacingForSectionAt section: Int) -> CGFloat { return minimumItemSpacing } }
表形式と3行連続の組み合わせ。
class CustomGriddedContentCollectionViewDelegate: DefaultCollectionViewDelegate { private let itemsPerRow: CGFloat = 3 private let minimumItemSpacing: CGFloat = 8 // MARK: - UICollectionViewDelegateFlowLayout func collectionView(_ collectionView: UICollectionView, layout collectionViewLayout: UICollectionViewLayout, sizeForItemAt indexPath: IndexPath) -> CGSize { let itemSize: CGSize if indexPath.item % 4 == 0 { let itemWidth = collectionView.bounds.width - (sectionInsets.left + sectionInsets.right) itemSize = CGSize(width: itemWidth, height: 112) } else { let paddingSpace = sectionInsets.left + sectionInsets.right + minimumItemSpacing * (itemsPerRow - 1) let availableWidth = collectionView.bounds.width - paddingSpace let widthPerItem = availableWidth / itemsPerRow itemSize = CGSize(width: widthPerItem, height: widthPerItem) } return itemSize } func collectionView(_ collectionView: UICollectionView, layout collectionViewLayout: UICollectionViewLayout, insetForSectionAt section: Int) -> UIEdgeInsets { return sectionInsets } func collectionView(_ collectionView: UICollectionView, layout collectionViewLayout: UICollectionViewLayout, minimumLineSpacingForSectionAt section: Int) -> CGFloat { return 20 } func collectionView(_ collectionView: UICollectionView, layout collectionViewLayout: UICollectionViewLayout, minimumInteritemSpacingForSectionAt section: Int) -> CGFloat { return minimumItemSpacing } }
最後の手順は、ビューデータをコントローラーに追加し、目的のデリゲートをコレクションに設定することです。
重要な点:コレクションのデリゲートはweakであるため、ビューオブジェクトへのコントローラーに強力なリンクが必要です。
コントローラで、タイプに関して利用可能なすべてのビューのディクショナリを作成します。
private var styleDelegates: [PresentationStyle: CollectionViewSelectableItemDelegate] = { let result: [PresentationStyle: CollectionViewSelectableItemDelegate] = [ .table: TabledContentCollectionViewDelegate(), .defaultGrid: DefaultGriddedContentCollectionViewDelegate(), .customGrid: CustomGriddedContentCollectionViewDelegate(), ] result.values.forEach { $0.didSelectItem = { _ in print("Item selected") } } return result }()
そして、 updatePresentationStyle()メソッドで、アニメーション化された変更をコレクションデリゲートに追加します。
collectionView.delegate = styleDelegates[selectedStyle] collectionView.performBatchUpdates({ collectionView.reloadData() }, completion: nil)
要素があるビューから別のビューにアニメーションで移動するために必要なのはそれだけです:)

したがって、任意の画面に任意の方法で要素を表示したり、ディスプレイを動的に切り替えたりできます。最も重要なのは、コードが独立しており、再利用可能でスケーラブルであるということです。
完全なプロジェクトコード。