前回の記事で、 長方形の操作方法を説明することを約束しました。 OneLineの開発中に、Rectクラスの拡張機能をいくつか作成しました。これにより、GUIでの作業が大幅に簡素化されます。 今、私はそれらを別のライブラリーRectExに割り当てました。
カットの下の詳細。
問題の本質
UnityでPropertyDrawerを作成する場合、GUILayoutの代わりにGUIクラスを使用する必要があります。これは、手動でマークアップを操作することを意味します。 コードは多くのnew Rect(...)
とrect.y += rect.height + 5
に囲まれrect.y += rect.height + 5
、読み取りや変更が困難になっています。 マジックナンバーが混同されると(以下、インターネットの例になります)、コードは非常に不活性になり、プログラマーはすべての新しい変更をゲームデザイナのock笑として認識します。
長い間、私は問題に我慢しました。ただ、あまり悪いことをしないようにしています。 しかし、彼がOneLineの開発を始めたとき、彼はRectクラスの多くの拡張機能も書きました。
人はどうですか
インターネットでは、githubのチュートリアルとソースコードで四角形をカットする多くの方法を見つけました。 次は小さな選択です。 それらの中からお気に入りを見つけますか? そうでない場合は、コメントにオプションを記述してください。記事に追加します。
不必要なものをすべて取り除き、より目立つようにするために、自分の裁量で見つけたルールを見つけました。
事前に長方形を準備します
// Calculate rects var amountRect = new Rect (position.x, position.y, 30, position.height); var unitRect = new Rect (position.x+35, position.y, 50, position.height); var nameRect = new Rect (position.x+90, position.y, position.width-90, position.height); // Draw fields - passs GUIContent.none to each so they are drawn without labels EditorGUI.PropertyField (amountRect, property.FindPropertyRelative ("amount"), GUIContent.none); EditorGUI.PropertyField (unitRect, property.FindPropertyRelative ("unit"), GUIContent.none); EditorGUI.PropertyField (nameRect, property.FindPropertyRelative ("name"), GUIContent.none);
ソースはこちらです。
Rect minRect = new Rect(position.x, position.y, position.width * 0.4f - 5, position.height); Rect mirroredRect = new Rect(position.x + position.width * position.y, position.width * 0.2f, position.height); Rect maxRect = new Rect(position.x + position.width * 0.6f + 5, position.y, position.width * 0.4f - 5, position.height);
ソースはこちらです。
var firstRect = new Rect(position){ width = position.width / 2 }; var secondRect = new Rect(position){ x = position.x + position.width / 2, width = position.width / 2 }; EditorGUI.PropertyField(firstRect, property.FindPropertyRelative("first")); EditorGUI.PropertyField(secondRect, property.FindPropertyRelative("second"));
ソースはこちらです。
チュートリアルは、1つのことを行うように教えられている場合には適していますが、すべてのベストプラクティスが含まれているわけではありません。 具体的には、これらはより多くの魔法の数字を描くように教えられています。
float curveWidth = 50; var sliderRect = new Rect (rect.x, rect.y, rect.width - curveWidth, rect.height) EditorGUI.Slider (sliderRect, scale, min, max, label); var curveRect = new Rect (rect.width - curveWidth, rect.y, curveWidth, rect.height); EditorGUI.PropertyField (curveRect, curve, GUIContent.none);
ソースはこちらです。
このようなコードは、多数のプロパティが描画される場合には読みにくくなります。
このコードは保守が困難です。 3つのプロパティを描画し、突然4番目/ 5番目を追加する必要がある場合でも。
しかし、もっと良い方法があります!
1つの長方形:塗装=>移動
float count = labels.Length; float space = 2; float width = (position.width - (count - 1) * space) / count; position.width = num2; for (int i = 0; i < count; i++){ EditorGUI.PropertyField(position, properties[i], labels[i]); position.x += count + space; }
ここのソース
public override void OnGUI(Rect rect, SerializedProperty prop, GUIContent label) { Rect position = rect; float height = EditorGUIUtility.singleLineHeight; float space = EditorGUIUtility.standardVerticalSpacing; position.height = height; var property = prop.FindPropertyRelative("m_NormalColor"); var property2 = prop.FindPropertyRelative("m_HighlightedColor"); var property3 = prop.FindPropertyRelative("m_PressedColor"); var property4 = prop.FindPropertyRelative("m_DisabledColor"); var property5 = prop.FindPropertyRelative("m_ColorMultiplier"); var property6 = prop.FindPropertyRelative("m_FadeDuration"); EditorGUI.PropertyField(position, property); position.y += height + space; EditorGUI.PropertyField(position, property2); position.y += height + space; EditorGUI.PropertyField(position, property3); position.y += height + space; EditorGUI.PropertyField(position, property4); position.y += height + space; EditorGUI.PropertyField(position, property5); position.y += height + space; EditorGUI.PropertyField(position, property6); }
ソースはこちらです。
今回は、コードの読み取りがはるかに良くなり、保守が多少簡単になります。 ただし、クラスのすべてのフィールドが画面上で同じサイズである限り、すべてが非常にきれいに見えます(最初の例では幅が等しい部分に分割され、2番目の例では高さが分割されます)。
異なるサイズの要素を描画する必要がある場合、このコードははるかに複雑です。
RectExでそれを行う方法
RectExはRectクラスを拡張するいくつかのメソッドを追加しますが、最も有用なのはColumnとRowの 2つです。
なぜそんな奇妙な名前なのか?
まず、それらをSplitVerticallyおよびSplitHorizontallyと呼びました。 長すぎて、不快で、読めないことさえありました。
SplitVとSplitHを試しました。 短くて便利になりました。 ただし、それぞれの機能を常に忘れてしまいます。 1つは水平線でカットし、もう1つは垂直線でカットします。 または、一方が水平列を返し、もう一方が垂直列を返しますか?
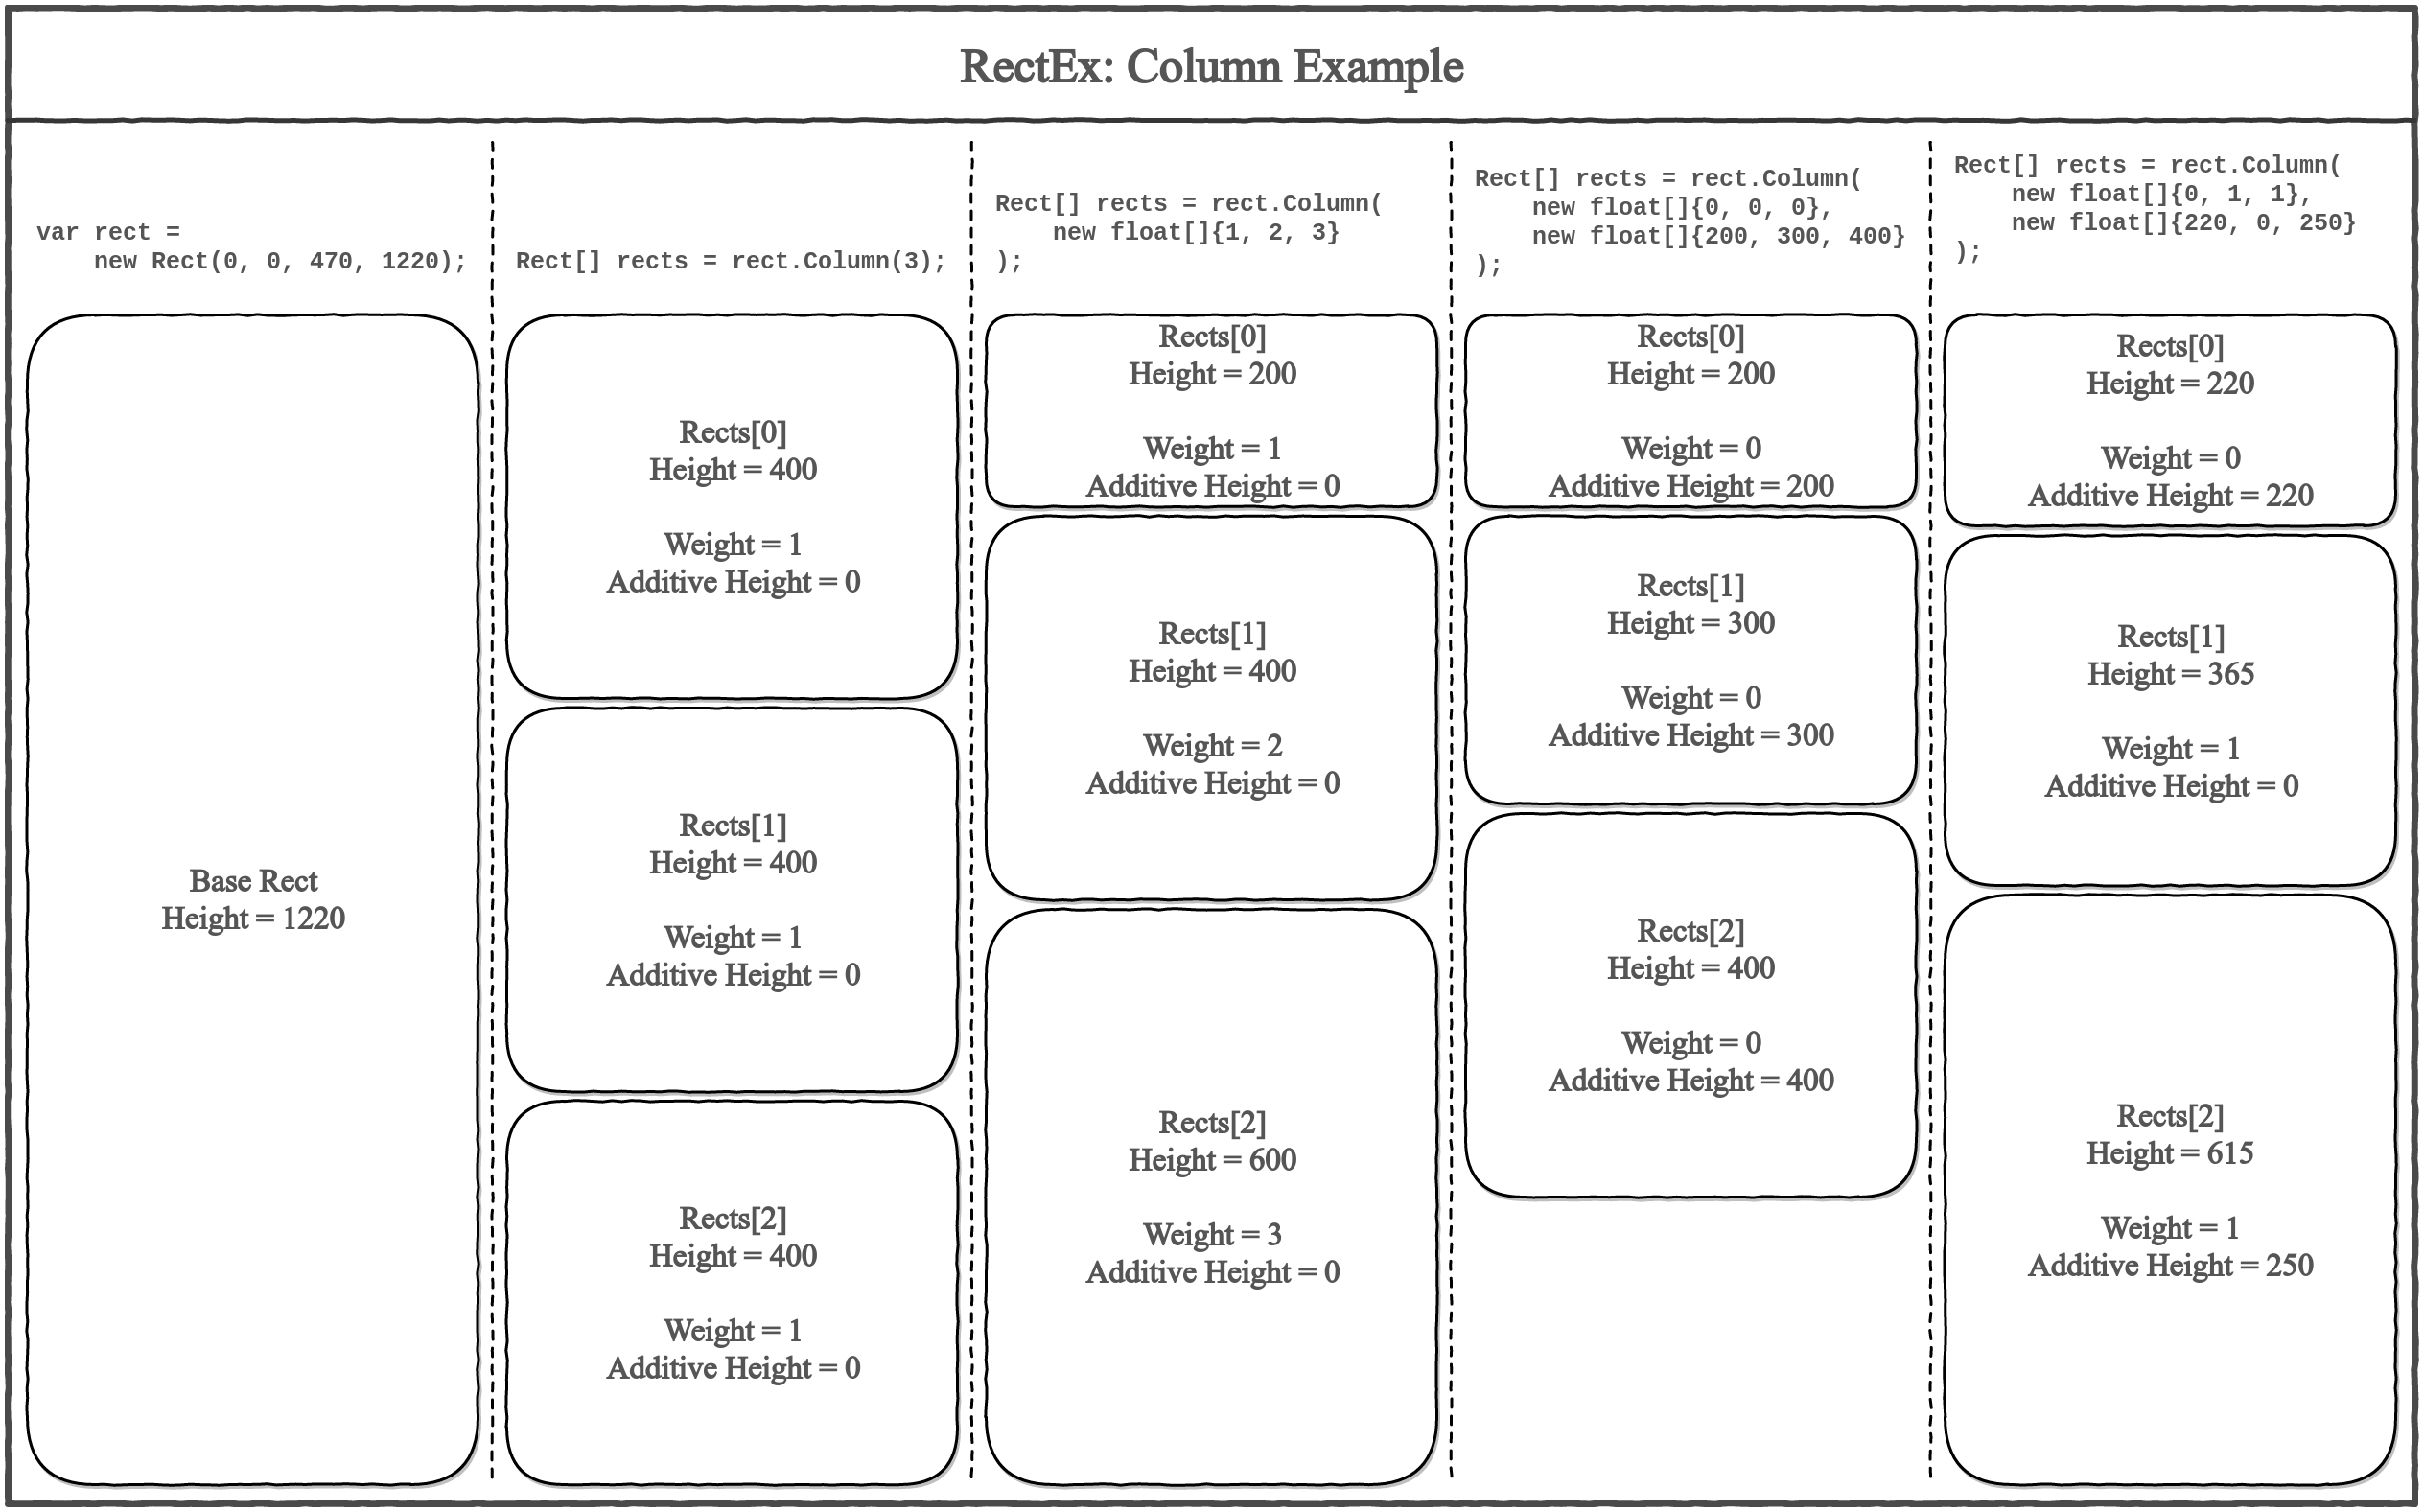
いつものように、数学、つまり紳士、Vector-Column、Vector-Row(姓が二重であるため両方の単語が大きい)が助けになりました。 rect.Row(5)
を見ると、メソッドが行を返し、 rect.Column(5)
が列であることがすぐにrect.Column(5)
ます。
次はデモンストレーションです。
var rects = rect.Row(3); EditorGUI.PropertyField(rects[0], property.FindPropertyRelative("first")); EditorGUI.PropertyField(rects[1], property.FindPropertyRelative("second")); EditorGUI.PropertyField(rects[2], property.FindPropertyRelative("third"));
文字列の交換を簡単にするためにi++
を追加しました。
var rects = rect.Column(3); int i = 0; EditorGUI.PropertyField(rects[i++], property.FindPropertyRelative("first")); EditorGUI.PropertyField(rects[i++], property.FindPropertyRelative("second")); EditorGUI.PropertyField(rects[i++], property.FindPropertyRelative("third"));
この例では、相対的な重みをColumnメソッドに渡します。これに基づいて、2番目の要素は最初の要素の2倍、3番目の要素は3になります。
var rects = rect.Column(new float[]{1, 2, 3}); EditorGUI.PropertyField(rects[0], property.FindPropertyRelative("first")); EditorGUI.PropertyField(rects[1], property.FindPropertyRelative("second")); EditorGUI.PropertyField(rects[2], property.FindPropertyRelative("third"));
わかりやすくするために、 2つの対称図を描きました。この図では、RawメソッドとColumnメソッド(クリック可能な画像)の使用例を示しました。
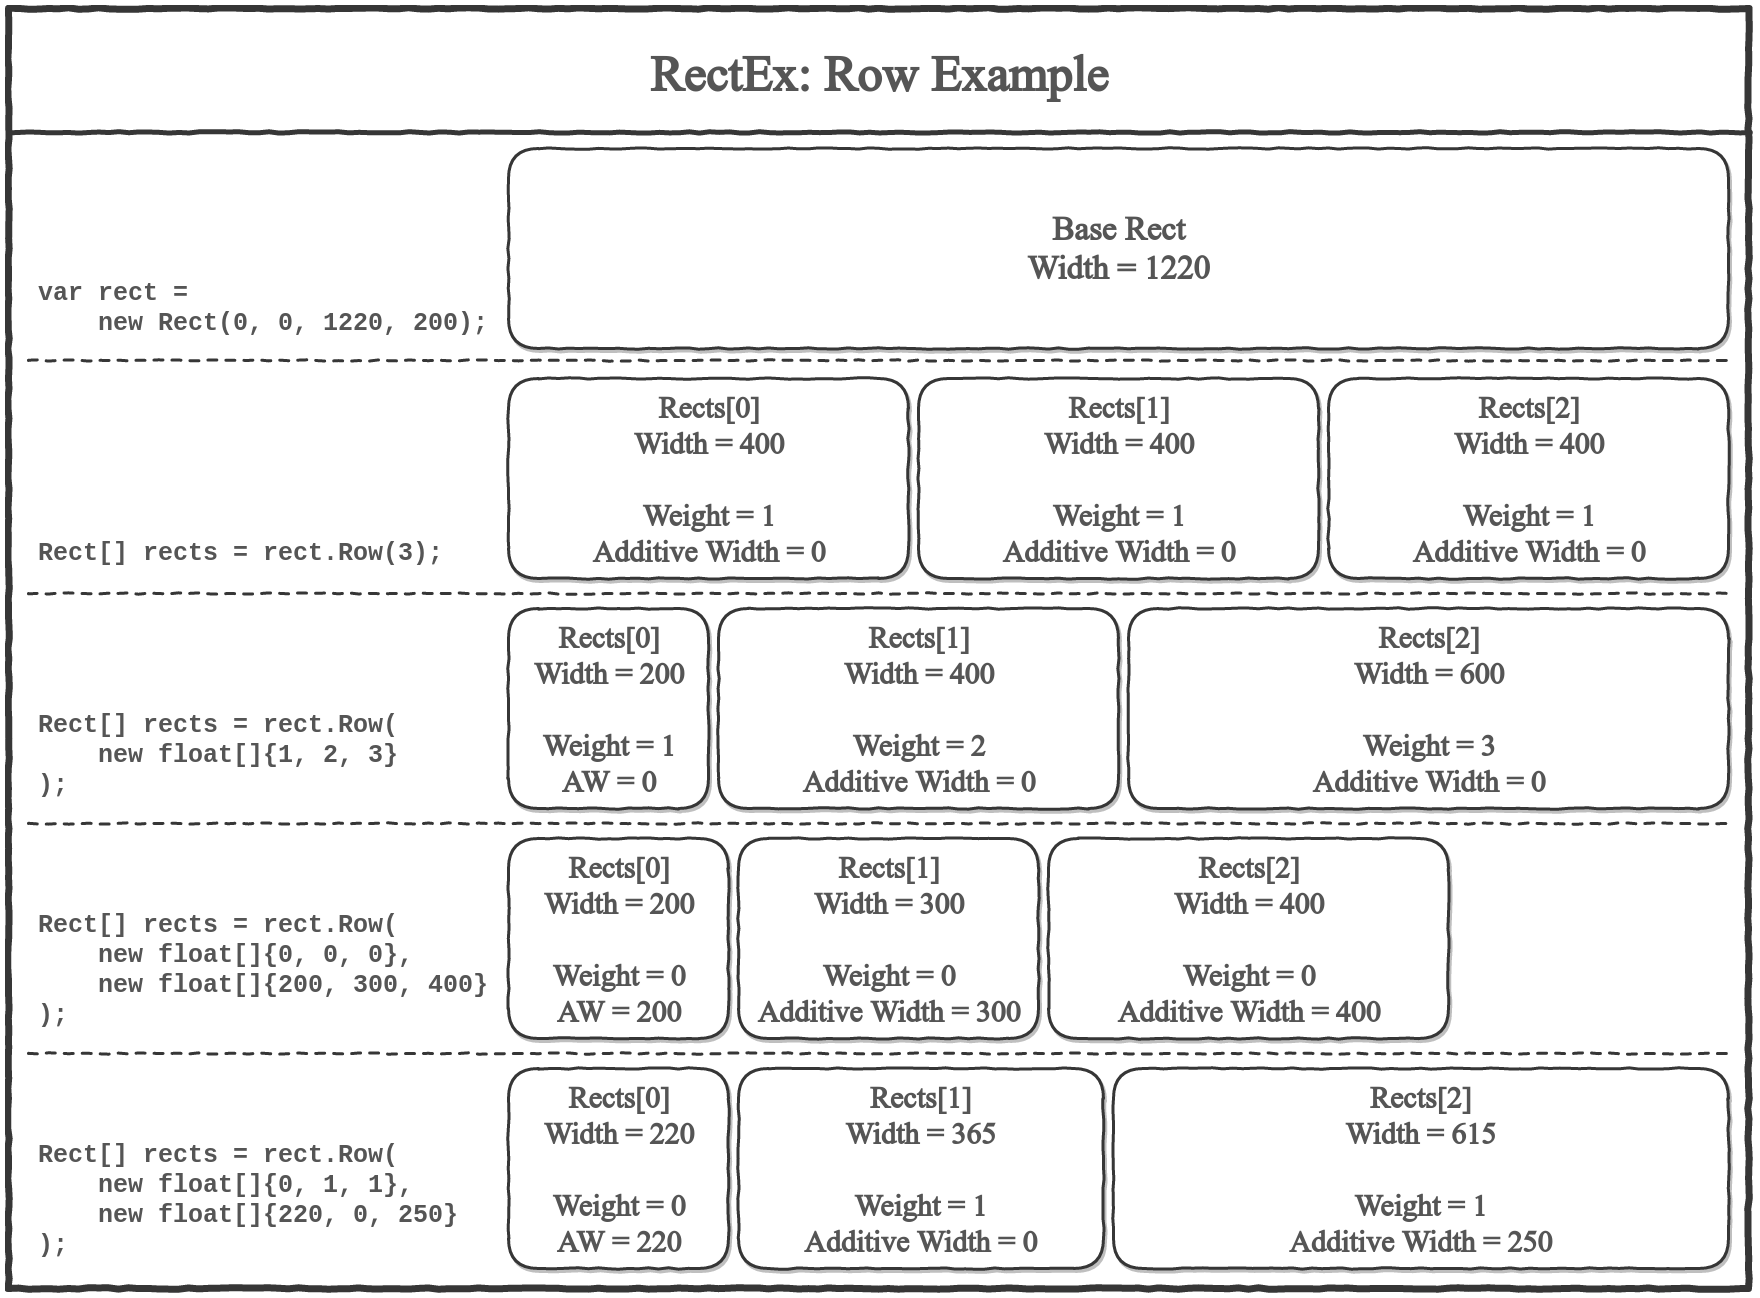
2番目の図は、単純に転置された最初の図です。行は列になります。 しかし、私は彼女を描く価値があると決めました。
入手先
現在のバージョン: v0.1.0
githubで試すことができます。 READMEは残りのメソッドについて説明しています。