私はRoman Gladkikhと申します。私はシベリア州立大学情報通信学部のスーパーコンピューティング分野の3年生です。 私はマイクロソフトの学生パートナーでもあります。 私の長年の趣味は、C#でWindows PhoneとUWPのアプリケーションを開発することです。
既定では、UWPアプリケーションはダークとライトの2つのテーマをサポートしています。 ハイコントラストテーマ(HighContrast)もあります。 通常、このセットはどのアプリケーションにも十分ですが、その場でアプリケーションのテーマをすばやく変更したい場合や、明暗に限定したくない場合はどうでしょうか?
この記事では、テーママネージャーの実装方法を説明します。 この資料は初心者を対象としていますが、専門家は興味があるかもしれません。 猫を歓迎します!
テーマリソース
UWPプラットフォームは、実行時に更新できるトピックへのリソースの参照を目的とする特別なXAMLマークアップ拡張機能をサポートしています。 トピックリソースは、システムのどのテーマがアクティブであるかに応じて異なる値を使用するリソースのセットです。
{ThemeResource ResourceName}
{StaticResource}マークアップ拡張機能との違いは、{ThemeResource}は、システムが現在使用しているトピックに応じて、メインの検索場所として異なる辞書を動的に使用できることです。 言い換えれば、{StaticResource}によって参照される値の分析は、アプリケーションの起動時に1回だけ発生しますが、{ThemeResource}は起動時およびシステムテーマが変更されるたびに発生します。
カスタムテーマリソースを定義するResourceDictionaryの例を検討してください。
<ResourceDictionary> <ResourceDictionary.ThemeDictionaries> <ResourceDictionary x:Key="Light"> <SolidColorBrush x:Key="MyBackgroundBrush" Color="#FFFFFFFF" /> </ResourceDictionary> <ResourceDictionary x:Key="Dark"> <SolidColorBrush x:Key="MyBackgroundBrush " Color="#FF232323" /> </ResourceDictionary> <ResourceDictionary x:Key="HighContrast"> <SolidColorBrush x:Key="MyBackgroundBrush " Color="#FF000000" /> </ResourceDictionary> </ResourceDictionary.ThemeDictionaries> </ResourceDictionary>
ThemeDictionariesセクションの親ResourceDictionaryで、子ライブラリーが宣言されます。これは、各トピックのリソースのセットです。 各ライブラリには、同じ名前で色の値が異なるブラシがあります。
合計で、たとえば{ThemeResource}を使用してブラシを参照する場合、四角形を塗りつぶしとしてこのブラシに設定し、システムで選択されたテーマに応じて、白、灰色、または黒の四角形を取得します。
テーマリソースには、ブラシだけでなく、文字列やその他のオブジェクトも含めることができます。 開発者がトピックのすべてのシステムリソースを理解できるように、Windows SDKにはすべてのリソースを含むXAMLファイルが含まれています。 C:\ Program Files(x86)\ Windows Kits \ 10 \ DesignTime \ CommonConfiguration \ Neutral \ UAP \\ Generic \ themeresources.xamlにあります。
独自のテーママネージャーを開発する方法は?
長所と短所を比較検討した後、システムのテーマに依存せずに、より多くのものが必要であり、それらをオンザフライで変更したいという結論に達しました。 これを実装する方法は?
UWPプラットフォームには{DynamicResource}マークアップ拡張機能がないため、WPFで利用できるため、通常の{Binding}バインディングで満足することになります。
開始するには、UwpThemeManagerという名前の空のUWPアプリケーションプロジェクトを作成します。 私がインストールした最小バージョンは、ターゲットのWindows 10 Creators UpdateであるWindows 10 Anniversary Updateです。
プロジェクトで、Theme.Dark.xamlおよびTheme.Light.xamlという名前の2つのResourceDictionary内にThemesフォルダーを作成します。
各ファイルで、ResourceDictionaryにBackgroundBrush、ForegroundBrush、ChromeBrushという名前の3つのブラシを追加します。 これらのファイルの内容は、ネタバレの下で利用可能です。
Theme.Dark.xaml
<ResourceDictionary xmlns="http://schemas.microsoft.com/winfx/2006/xaml/presentation" xmlns:x="http://schemas.microsoft.com/winfx/2006/xaml"> <SolidColorBrush x:Key="BackgroundBrush" Color="#FF1A1A1A" /> <SolidColorBrush x:Key="ForegroundBrush" Color="White" /> <SolidColorBrush x:Key="ChromeBrush" Color="#FF232323" /> </ResourceDictionary>
Theme.Light.xaml
<ResourceDictionary xmlns="http://schemas.microsoft.com/winfx/2006/xaml/presentation" xmlns:x="http://schemas.microsoft.com/winfx/2006/xaml"> <SolidColorBrush x:Key="BackgroundBrush" Color="White" /> <SolidColorBrush x:Key="ForegroundBrush" Color="Black" /> <SolidColorBrush x:Key="ChromeBrush" Color="#FFBFBFBF" /> </ResourceDictionary>
ここで、テーマのリソースをロードし、ブラシへのリンクの変更についてすべてのバインディングに通知する特別なクラスが必要です。 INotifyPropertyChangedインターフェイスを実装する封印されたThemeManagerクラスを作成します。
INotifyPropertyChangedの実装
public sealed class ThemeManager : INotifyPropertyChanged { public event PropertyChangedEventHandler PropertyChanged; private void OnPropertyChanged(string propertyName) => PropertyChanged?.Invoke(this, new PropertyChangedEventArgs(propertyName)); }
トピックを含む辞書へのパスを使用して、クラスにパブリック文字列定数を必ず追加してください。
public const string DarkThemePath = "ms-appx:///Themes/Theme.Dark.xaml"; public const string LightThemePath = "ms-appx:///Themes/Theme.Light.xaml";
クラスのコードに、ResourceDictionaryタイプのプライベートフィールドを追加します。これは、トピックの現在の値を持つ辞書になります。
private ResourceDictionary _currentThemeDictionary;
次に、XAMLからのバインド時のエラーを防ぐために、ブラシタイププロパティをThemeManagerクラスに追加する必要があり、Visual Studioのツールチップが機能しました。 混乱を避けるために、辞書でブラシに名前を付けるのと同じ方法でプロパティに名前を付けましょう。 また、便宜上、現在のトピックの名前を返す文字列プロパティCurrentThemeを追加します。
public string CurrentTheme { get; private set; } public Brush BackgroundBrush => _currentThemeDictionary[nameof(BackgroundBrush)] as Brush; public Brush ChromeBrush => _currentThemeDictionary[nameof(ChromeBrush)] as Brush; public Brush ForegroundBrush => _currentThemeDictionary[nameof(ForegroundBrush)] as Brush;
テーマを変更するとき、すべての{Binding}バインディングはブラシへのリンクが変更されたことを認識するため、各プロパティに対してPropertyChangedイベントを呼び出す必要があります。 このための特別なプライベートメソッドを作成しましょう。
プロパティ名のエラーを回避するために、キーワードnameofを使用します。このキーワードの呼び出しは、コンパイル時に、指定された要素の名前を持つ文字列定数に変換されます。
private void RaisePropertyChanged() { OnPropertyChanged(nameof(BackgroundBrush)); OnPropertyChanged(nameof(ChromeBrush)); OnPropertyChanged(nameof(ForegroundBrush)); OnPropertyChanged(nameof(CurrentTheme)); }
ここでの質問は、辞書にトピックをロードすることです。 LoadThemeとLoadThemeFromFileの2つのメソッドを作成しましょう。 最初のメソッドは、アプリケーションパッケージにあるテーマで辞書をロードします(このために、上記のDarkThemePath定数とLightThemePath定数を設定します)。 2番目の方法は、アプリケーションパッケージからではなく、任意のファイルからテーマを読み込みます(入力用にStorageFileを受け入れます)。
メソッドの実装には数行かかります。
public void LoadTheme(string path) { _currentThemeDictionary = new ResourceDictionary(); App.LoadComponent(_currentThemeDictionary, new Uri(path)); CurrentTheme = Path.GetFileNameWithoutExtension(path); RaisePropertyChanged(); } public async Task LoadThemeFromFile(StorageFile file) { string xaml = await FileIO.ReadTextAsync(file); _currentThemeDictionary = XamlReader.Load(xaml) as ResourceDictionary; CurrentTheme = Path.GetFileNameWithoutExtension(file.Path); RaisePropertyChanged(); }
ThemeManagerはほぼ準備ができており、コンストラクターにダークテーマの読み込みメソッドへの呼び出しを追加するだけです(デフォルトで行われます)。
public ThemeManager() { LoadTheme(DarkThemePath); }
すべて準備完了です! アプリケーションリソースセクションのApp.xamlでクラスのインスタンスを宣言し、App.xaml.csでこのインスタンスに静的リンクを追加します。
<Application x:Class="UwpThemeManager.App" xmlns="http://schemas.microsoft.com/winfx/2006/xaml/presentation" xmlns:x="http://schemas.microsoft.com/winfx/2006/xaml" xmlns:local="using:UwpThemeManager"> <Application.Resources> <ResourceDictionary> <local:ThemeManager x:Key="ThemeManager" /> </ResourceDictionary> </Application.Resources> </Application>
public static ThemeManager ThemeManager => (ThemeManager)App.Current.Resources["ThemeManager"];
完全なThemeManager.csコードがネタバレの下に表示されます。
ThemeManager.cs
using System; using System.ComponentModel; using System.IO; using System.Threading.Tasks; using Windows.Storage; using Windows.UI.Xaml; using Windows.UI.Xaml.Markup; using Windows.UI.Xaml.Media; namespace UwpThemeManager { public sealed class ThemeManager : INotifyPropertyChanged { public const string DarkThemePath = "ms-appx:///Themes/Theme.Dark.xaml"; public const string LightThemePath = "ms-appx:///Themes/Theme.Light.xaml"; public event PropertyChangedEventHandler PropertyChanged; public ThemeManager() { LoadTheme(DarkThemePath); } public string CurrentTheme { get; private set; } public Brush BackgroundBrush => _currentThemeDictionary[nameof(BackgroundBrush)] as Brush; public Brush ChromeBrush => _currentThemeDictionary[nameof(ChromeBrush)] as Brush; public Brush ForegroundBrush => _currentThemeDictionary[nameof(ForegroundBrush)] as Brush; public void LoadTheme(string path) { _currentThemeDictionary = new ResourceDictionary(); App.LoadComponent(_currentThemeDictionary, new Uri(path)); CurrentTheme = Path.GetFileNameWithoutExtension(path); RaisePropertyChanged(); } public async Task LoadThemeFromFile(StorageFile file) { string xaml = await FileIO.ReadTextAsync(file); _currentThemeDictionary = XamlReader.Load(xaml) as ResourceDictionary; CurrentTheme = Path.GetFileNameWithoutExtension(file.Path); RaisePropertyChanged(); } private void RaisePropertyChanged() { OnPropertyChanged(nameof(BackgroundBrush)); OnPropertyChanged(nameof(ChromeBrush)); OnPropertyChanged(nameof(ForegroundBrush)); OnPropertyChanged(nameof(CurrentTheme)); } private void OnPropertyChanged(string propertyName) => PropertyChanged?.Invoke(this, new PropertyChangedEventArgs(propertyName)); private ResourceDictionary _currentThemeDictionary; } }
テーママネージャーの使用
必要な準備をすべて行ったので、ThemeManagerの使用は非常に簡単です。 小さな例を考えてみましょう。
<Rectangle Fill="{Binding BackgroundBrush, Source={StaticResource ThemeManager}}"/>
この例では、Rectangle要素(rectangle)を宣言しました。この要素では、Fillプロパティ(fill)が、アプリケーションリソースにあるThemeManagerのBackgroundBrushプロパティに関連付けられています。
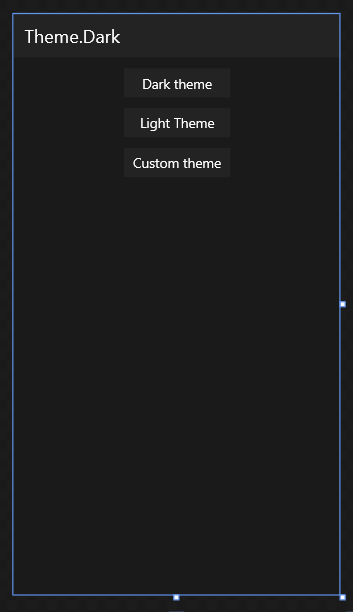
単純なMainPageページを作成します(すでに新しいプロジェクトにあります)。 最終ページは次のようになります。
ボタンやその他のコントロールのブラシに必要なバインディングを設定します。 ボタンのクリックイベントハンドラでは、他のトピックを読み込みます。
private void DarkThemeButton_Click(object sender, RoutedEventArgs e) => App.ThemeManager.LoadTheme(ThemeManager.DarkThemePath); private void LightThemeButton_Click(object sender, RoutedEventArgs e) => App.ThemeManager.LoadTheme(ThemeManager.LightThemePath); private async void CustomThemeButton_Click(object sender, RoutedEventArgs e) { var picker = new FileOpenPicker(); picker.FileTypeFilter.Add(".xaml"); var file = await picker.PickSingleFileAsync(); if (file != null) { try { await App.ThemeManager.LoadThemeFromFile(file); } catch (Exception ex) { var msg = new MessageDialog(ex.ToString(), ""); await msg.ShowAsync(); } } }
最初の2つのボタンについては、テーマを含むXAMLファイルへのパスを持つ定数を使用して、 ThemeManagerのLoadThemeメソッドを呼び出します。 最後のイベントハンドラー(カスタムテーマテキスト付きのボタン)は、ファイル選択ウィンドウを作成し、.xamlタイプのフィルターを示し、ユーザーに標準のファイル選択ウィンドウを表示します。 ユーザーがファイルを選択すると、ThemeManagerで実装したLoadThemeFromFileメソッドに渡されます。
テストのために、3番目のテーマファイルを作成し、デスクトップなどに配置します。 私のオプション:
Theme.Red.xaml
<ResourceDictionary xmlns="http://schemas.microsoft.com/winfx/2006/xaml/presentation" xmlns:x="http://schemas.microsoft.com/winfx/2006/xaml"> <SolidColorBrush x:Key="BackgroundBrush" Color="#FF1A1A1A" /> <SolidColorBrush x:Key="ForegroundBrush" Color="White" /> <SolidColorBrush x:Key="ChromeBrush" Color="#FF5A0000" /> </ResourceDictionary>
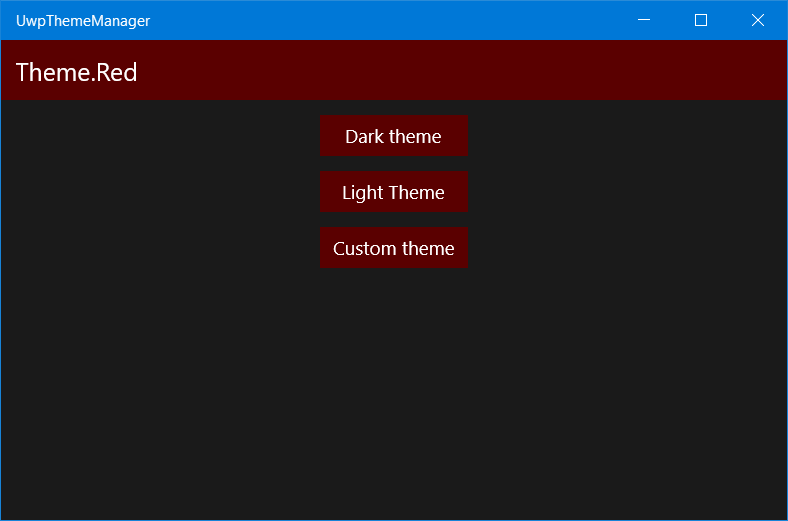
アプリケーションをコンパイルして実行します。 DarkテーマボタンとLightテーマボタンをクリックすると、アプリケーションの配色が自動的に変更されます。 [カスタムテーマ]ボタンをクリックして、Theme.Red.xamlファイルを開きます。 アプリケーションの配色が赤に変わります。
アプリケーションのスクリーンショット 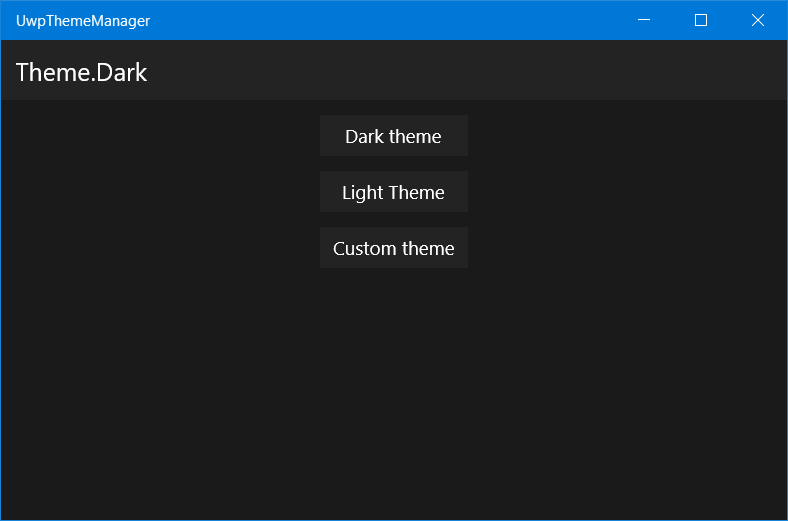
ネタバレの下のページレイアウトの完全なソースコード。
MainPage.xaml-バージョン1
<Page x:Class="UwpThemeManager.MainPage1" xmlns="http://schemas.microsoft.com/winfx/2006/xaml/presentation" xmlns:x="http://schemas.microsoft.com/winfx/2006/xaml" xmlns:d="http://schemas.microsoft.com/expression/blend/2008" xmlns:mc="http://schemas.openxmlformats.org/markup-compatibility/2006" mc:Ignorable="d"> <Grid Background="{Binding BackgroundBrush, Source={StaticResource ThemeManager}}"> <Grid.RowDefinitions> <RowDefinition Height="48" /> <RowDefinition /> </Grid.RowDefinitions> <Border Background="{Binding ChromeBrush, Source={StaticResource ThemeManager}}"> <TextBlock Text="{Binding CurrentTheme, Source={StaticResource ThemeManager}}" Foreground="{Binding ForegroundBrush, Source={StaticResource ThemeManager}}" Style="{StaticResource SubtitleTextBlockStyle}" VerticalAlignment="Center" Margin="12,0,0,0" /> </Border> <StackPanel Grid.Row="1" HorizontalAlignment="Center"> <Button Content="Dark theme" Background="{Binding ChromeBrush, Source={StaticResource ThemeManager}}" Foreground="{Binding ForegroundBrush, Source={StaticResource ThemeManager}}" Margin="0,12,0,0" HorizontalAlignment="Stretch" Click="DarkThemeButton_Click" /> <Button Content="Light Theme" Background="{Binding ChromeBrush, Source={StaticResource ThemeManager}}" Foreground="{Binding ForegroundBrush, Source={StaticResource ThemeManager}}" Margin="0,12,0,0" HorizontalAlignment="Stretch" Click="LightThemeButton_Click" /> <Button Content="Custom theme" Background="{Binding ChromeBrush, Source={StaticResource ThemeManager}}" Foreground="{Binding ForegroundBrush, Source={StaticResource ThemeManager}}" Margin="0,12,0,0" HorizontalAlignment="Stretch" Click="CustomThemeButton_Click" /> </StackPanel> </Grid> </Page>
落とし穴
背景、前景などの値を設定した場合 要素自体については、すべてが機能しますが、コントロールのスタイルで{Binding}を設定することはできません。 UWPでは、スタイルバインディングはサポートされていません。 これを回避する方法は? 添付されたDependencyPropertyが役立ちます!
添付プロパティ。 これは依存プロパティであり、使用されるオブジェクトのクラスでは宣言されませんが、その一部であるかのように動作します。 別のクラスで宣言され、静的メソッドとしてゲッターとセッターを持っています。 PropertyChangedイベントにハンドラーを追加できます。
Attachedプロパティの詳細については、 AndyDの記事( WPF:Using Attached Property and Behavior)を参照してください。
BackgroundプロパティとForegroundプロパティにAttachedプロパティを実装します。 これらは、BackgroundBindingHelperおよびForegroundBindingHelperと呼ばれる静的クラスです。 静的メソッドGetBackground(文字列を返す)とSetBackground、および値型文字列でDependencyPropertyを宣言します。
Visual Studioには、Attached Dependency Property用の特別なコードスニペットがあり、propaを入力してTabキーを押すと使用できます。
また、Background値が変更されたときにBindingを更新するプライベートBackgroundPathPropertyChangedハンドラーメソッドを追加します。
ForegroundBindingHelperも同様の方法で実装されます。
BackgroundBindingHelper
using Windows.UI.Xaml; using Windows.UI.Xaml.Controls; using Windows.UI.Xaml.Data; namespace UwpThemeManager.BindingHelpers { public static class BackgroundBindingHelper { public static string GetBackground(DependencyObject obj) => (string)obj.GetValue(BackgroundProperty); public static void SetBackground(DependencyObject obj, string value) => obj.SetValue(BackgroundProperty, value); public static readonly DependencyProperty BackgroundProperty = DependencyProperty.RegisterAttached("Background", typeof(string), typeof(BackgroundBindingHelper), new PropertyMetadata(null, BackgroundPathPropertyChanged)); private static void BackgroundPathPropertyChanged(DependencyObject obj, DependencyPropertyChangedEventArgs e) { var propertyPath = e.NewValue as string; if (propertyPath != null) { var backgroundproperty = Control.BackgroundProperty; BindingOperations.SetBinding(obj, backgroundproperty, new Binding { Path = new PropertyPath(propertyPath), Source = App.ThemeManager }); } } } }
ForegroundBindingHelper
using Windows.UI.Xaml; using Windows.UI.Xaml.Controls; using Windows.UI.Xaml.Data; namespace UwpThemeManager.BindingHelpers { public static class ForegroundBindingHelper { public static string GetForeground(DependencyObject obj) => (string)obj.GetValue(ForegroundProperty); public static void SetForeground(DependencyObject obj, string value) => obj.SetValue(ForegroundProperty, value); public static readonly DependencyProperty ForegroundProperty = DependencyProperty.RegisterAttached("Foreground", typeof(string), typeof(ForegroundBindingHelper), new PropertyMetadata(null, ForegroundPathPropertyChanged)); private static void ForegroundPathPropertyChanged(DependencyObject obj, DependencyPropertyChangedEventArgs e) { var propertyPath = e.NewValue as string; if (propertyPath != null) { var backgroundproperty = Control.ForegroundProperty; BindingOperations.SetBinding(obj, backgroundproperty, new Binding { Path = new PropertyPath(propertyPath), Source = App.ThemeManager }); } } } }
いいね! これで、スタイルでもブラシにバインドできます。 例として、ページ上のボタンのスタイルを作成します。
<Page.Resources> <Style x:Key="ButtonStyle" TargetType="Button"> <Setter Property="binding:BackgroundBindingHelper.Background" Value="ChromeBrush" /> <Setter Property="binding:ForegroundBindingHelper.Foreground" Value="ForegroundBrush" /> <Setter Property="Margin" Value="0,12,0,0" /> <Setter Property="HorizontalAlignment" Value="Stretch"/> </Style> </Page.Resources>
Setter.Propertyは、AttachedPropertyが提供するクラス名を指定します。 値は、ThemeManagerからのブラシを持つプロパティの名前を示します。
このスタイルをページ上のボタンに設定すると、Background要素とForeground要素を直接指定した場合と同様にすべてが機能します。 ネタバレの下のマークアップの最終ソースコード。
MainPage.xaml-バージョン2
<Page x:Class="UwpThemeManager.MainPage" xmlns="http://schemas.microsoft.com/winfx/2006/xaml/presentation" xmlns:x="http://schemas.microsoft.com/winfx/2006/xaml" xmlns:d="http://schemas.microsoft.com/expression/blend/2008" xmlns:mc="http://schemas.openxmlformats.org/markup-compatibility/2006" xmlns:binding="using:UwpThemeManager.BindingHelpers" mc:Ignorable="d"> <Page.Resources> <Style x:Key="ButtonStyle" TargetType="Button"> <Setter Property="binding:BackgroundBindingHelper.Background" Value="ChromeBrush" /> <Setter Property="binding:ForegroundBindingHelper.Foreground" Value="ForegroundBrush" /> <Setter Property="Margin" Value="0,12,0,0" /> <Setter Property="HorizontalAlignment" Value="Stretch"/> </Style> </Page.Resources> <Grid Background="{Binding BackgroundBrush, Source={StaticResource ThemeManager}}"> <Grid.RowDefinitions> <RowDefinition Height="48" /> <RowDefinition /> </Grid.RowDefinitions> <Border Background="{Binding ChromeBrush, Source={StaticResource ThemeManager}}"> <TextBlock Text="{Binding CurrentTheme, Source={StaticResource ThemeManager}}" Foreground="{Binding ForegroundBrush, Source={StaticResource ThemeManager}}" Style="{StaticResource SubtitleTextBlockStyle}" VerticalAlignment="Center" Margin="12,0,0,0" /> </Border> <StackPanel Grid.Row="1" HorizontalAlignment="Center"> <Button Content="Dark theme" Style="{StaticResource ButtonStyle}" Click="DarkThemeButton_Click" /> <Button Content="Light Theme" Style="{StaticResource ButtonStyle}" Click="LightThemeButton_Click" /> <Button Content="Custom theme" Style="{StaticResource ButtonStyle}" Click="CustomThemeButton_Click" /> </StackPanel> </Grid> </Page>
まとめると
単純な操作を使用して、システムマネージャーに依存せず、サードパーティのトピックの読み込みを含む任意の数のトピックで作業できるマネージャー用に独自のマネージャーを実装しました。
プロジェクトの完全なソースコードはGitHub: linkで入手できます。
記事をお楽しみください。 不正確または間違いを見つけたら、私に私用メッセージを書くことをheしてはいけない。
ハブラハブルの広大さでお会いしましょう!