こんにちはHabr! Andrei Catineanによる記事「 Exploring Android Nougat 7.1 App Shortcuts 」の無料翻訳に注目します。
Googleは、バージョン7.1(API 25)のAndroid Nougatをリリースしました。 内部にはいくつかの興味深い機能があります。 これらの追加機能の1つは、アプリのショートカットです。 この記事では、それらが何であるか、どのように機能するか、どのように実装できるかについて説明します。
最終結果は次のようになります。
アプリのショートカットとは何ですか、なぜ必要なのですか?
アプリケーションのショートカットは、ユーザーのホーム画面にアプリケーションの一般的なアクションまたはタスクを表示する手段です。 ユーザーは、プログラムの開始を長押しすることでショートカットを開くことができます。 技術的に言えば、アプリケーションショートカットはインテントを使用する簡単で高速な方法です。
これらには2つのタイプがあります。
- 静的:これらは、リソースファイルで静的に定義されたショートカットです。 ファイルを変更してアプリケーションをデプロイしない限り、変更できません。
- 動的:これらは、実行時に公開されるショートカットです。 アプリケーションを再デプロイせずに更新できます。
共通のタスクを提供することにより、追加のナビゲーションやアクティビティを介した不必要なナビゲーションなしに、ユーザーがアプリケーションの特定の部分にすばやく戻る機能を簡素化します。
ショートカットを追加する
アプリケーションへのショートカットの追加は非常に簡単です。 簡単な静的ショートカットを作成することから始めましょう。
静的ショートカット
この例では、Android Studioでプロジェクトを作成済みであることを前提としています。
AndroidManifest.xmlに移動し、次のメタデータタグをメインアクティビティに追加します。
<?xml version="1.0" encoding="utf-8"?> <manifest xmlns:android="http://schemas.android.com/apk/res/android" package="com.catinean.appshortcutsdemo"> <application android:allowBackup="true" android:icon="@mipmap/ic_launcher" android:label="@string/app_name" android:supportsRtl="true" android:theme="@style/AppTheme"> <activity android:name=".MainActivity"> <intent-filter> <action android:name="android.intent.action.MAIN" /> <category android:name="android.intent.category.LAUNCHER" /> <category android:name="android.intent.category.DEFAULT" /> </intent-filter> <meta-data android:name="android.app.shortcuts" android:resource="@xml/shortcuts" /> </activity> </application> </manifest>
メタデータタグでは、 android:リソースキーはres / xml / shortcuts.xmlで定義されたリソースに対応します。 ここで、すべての静的ショートカットを定義する必要があります。 アプリケーションから特定のアクティビティを開くものを追加しましょう。
以下の例では、ダミーのStaticShortcutActivityを作成しました。
<?xml version="1.0" encoding="utf-8"?> <shortcuts xmlns:android="http://schemas.android.com/apk/res/android"> <shortcut android:enabled="true" android:icon="@drawable/ic_static_shortcut" android:shortcutDisabledMessage="@string/static_shortcut_disabled_message" android:shortcutId="static" android:shortcutLongLabel="@string/static_shortcut_long_label" android:shortcutShortLabel="@string/static_shortcut_short_label"> <intent android:action="android.intent.action.VIEW" android:targetClass="com.catinean.appshortcutsdemo.StaticShortcutActivity" android:targetPackage="com.catinean.appshortcutsdemo" /> </shortcut> </shortcuts>
このファイルのルートタグは<shortcuts>
であり、複数の<shortcut>
ブロックが含まれていることがわかります。 ご想像のとおり、それぞれが静的なショートカットです。 ここでは、1つのショートカットについて、次のプロパティを設定できます。
- enabled :タイトルに示されているように、ショートカットが有効かどうか。 静的ショートカットを無効にすることにした場合、それをfalseに設定するか、単に
<shortcuts>
から削除することができます。 - icon :ショートカットの左側に表示されるアイコン。
- shortcutDisabledMessage :これは、ユーザーが無効なショートカットを起動しようとした場合にユーザーに表示される文字列です。 ご注意 トランスレータ:これは、ショートカットがデバイスのメイン画面から削除されていない場合に発生する可能性があります。
- shortcutLongLabel :これは、十分なスペースがあるときに表示されるショートカットの説明の長いバージョンです。
- shortcutShortLabel : ショートカットの簡単な説明。 このフィールドは必須です。 これは、ユーザーがホーム画面に表示するラベルテキストです。
- intent :ここで、クリックしたときにショートカットが開く意図(または複数の意図)を定義します。
このショートカットがアプリケーションのユーザーに表示される方法は次のとおりです。

シンプルでわかりやすいですが、これを実装すると、戻るボタンをクリックすると、ユーザーがホーム画面に戻ることがわかります。
代わりにアプリに切り替えてみてはどうですか? これを行うには、以前に作成したショートカットにいくつかのインテントタグを追加します。
<?xml version="1.0" encoding="utf-8"?> <shortcuts xmlns:android="http://schemas.android.com/apk/res/android"> <shortcut ...> <intent android:action="android.intent.action.MAIN" android:targetClass="com.catinean.appshortcutsdemo.MainActivity" android:targetPackage="com.catinean.appshortcutsdemo" /> <intent android:action="android.intent.action.VIEW" android:targetClass="com.catinean.appshortcutsdemo.StaticShortcutActivity" android:targetPackage="com.catinean.appshortcutsdemo" /> </shortcut> </shortcuts>
MainActivityをポイントすることで、余分な<intent>
を追加したことに注意してください 。 これは意図のバックスタックを作成し、最後の意図はショートカットで開かれます。 私たちの場合、 バックスタックはMainActivity→Static ShortcutActivityのように見えるため、クリックして戻ると、ユーザーはMainActivityに移動します。

静的ショートカットの追加は非常に簡単です。 ダイナミックに進みましょう。
動的なショートカット
その名前が示すように、動的ショートカットは、アプリケーションを再度開くことなく、実行時に変更できます。 ご想像のとおり、静的リソースを介して定義されていません( shortcuts.xml )、静的として、ただしコードで作成されます。
最初の動的ショートカットを追加しましょう! これには、 ShortcutManagerとShortcutInfo.Builderを使用する必要があります。 MainActivityで最初の動的ショートカットを作成します。
@Override protected void onCreate(Bundle savedInstanceState) { ... ShortcutManager shortcutManager = getSystemService(ShortcutManager.class); ShortcutInfo webShortcut = new ShortcutInfo.Builder(this, "shortcut_web") .setShortLabel("novoda.com") .setLongLabel("Open novoda.com web site") .setIcon(Icon.createWithResource(this, R.drawable.ic_dynamic_shortcut)) .setIntent(new Intent(Intent.ACTION_VIEW, Uri.parse("https://novoda.com"))) .build(); shortcutManager.setDynamicShortcuts(Collections.singletonList(webShortcut)); }
上記の例では、 shortcutManagerを使用してShortcutInfoを作成します。 ShortcutInfo.Builderを使用して、作成するショートカットのさまざまなプロパティを設定できます。 上記で使用するすべてのメソッドは、静的ショートカットと同じものに対応しています。 ただし、少しあいまいなプロパティの1つはラベル識別子で、これはStaticInfo.Builderのコンストラクターで2番目のパラメーターshortcut_webとして定義されています。 上記の例では、サイトを開くという意図を決定しました。 最後に、動的ショートカットをShortcutManagerに設定します。 ショートカットがどのように見えるか見てみましょう:

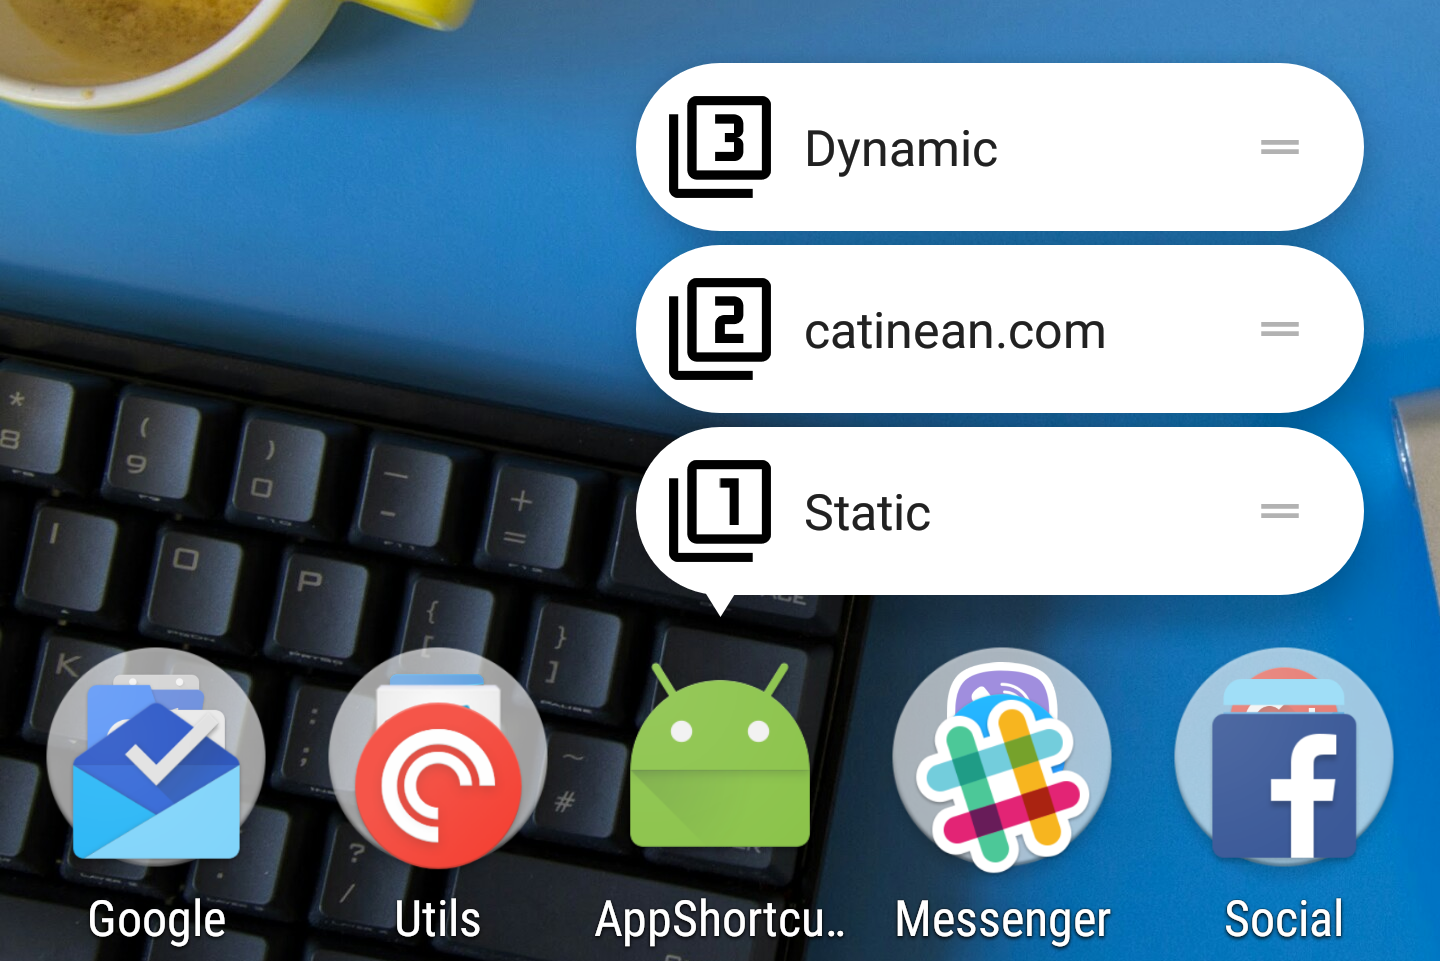
かっこいい! アプリケーションには、 静的と動的の 2つのクイックショートカットがあります。
アプリケーション内のアクティビティを示す別のものを追加して、そのためのバックスタックを作成する方法を見てみましょう。
@Override protected void onCreate(Bundle savedInstanceState) { ... ShortcutInfo dynamicShortcut = new ShortcutInfo.Builder(this, "shortcut_dynamic") .setShortLabel("Dynamic") .setLongLabel("Open dynamic shortcut") .setIcon(Icon.createWithResource(this, R.drawable.ic_dynamic_shortcut_2)) .setIntents( new Intent[]{ new Intent(Intent.ACTION_MAIN, Uri.EMPTY, this, MainActivity.class).setFlags(Intent.FLAG_ACTIVITY_CLEAR_TASK), new Intent(DynamicShortcutActivity.ACTION) }) .build(); shortcutManager.setDynamicShortcuts(Arrays.asList(webShortcut, dynamicShortcut)); }
ビルダでsetIntents()を作成してバックスタックを構築していることがわかります。
最初の意図はMainActivityです。 FLAG_ACTIVITY_CLEAR_TASKフラグを定義して、アプリケーションに関連付けられている既存のタスクをすべてクリアし、 MainActivityを現在のルートアクションにします。
- 2番目はDynamicShortcutActivity (作成した空のアクティビティ)に対応します。 これを行うには、 DynamicShortcutActivityで静的文字列として定義され、同じアクティビティに対してAndroidManifest.xmlで定義されたintent-filterアクション名と一致する特定のアクションをIntentに提供する必要があります。
<activity android:name=".DynamicShortcutActivity" android:label="Dynamic shortcut activity"> <intent-filter> <action android:name="com.catinean.appshortcutsdemo.OPEN_DYNAMIC_SHORTCUT" /> <category android:name="android.intent.category.DEFAULT" /> </intent-filter> </activity>
この順序で意図の配列を宣言したので、 DynamicShortcutActivityを開いた後にユーザーが戻ると、 MainActivityが開くことを保証します。
それはどのように見えますか:
ショートカットの注文
1つの静的ショートカットと2つの動的ショートカットがあるので、それらの順序をどのように設定できますか? ShortcutInfo.Builderメソッド、特にsetRank(int)を詳しく見ると、 動的なショートカットにカスタムランクを設定することで、表示される順序を制御できます。ランクが高いほど、ショートカットが高くなります。
例として、ラベル番号2(novoda.com)を一番上にしたいとします。 すでに追加されている一連の動的ショートカットを動的に変更できます。 MainActivityのボタンをクリックして、これを実行しましょう。
findViewById(R.id.main_rank_button).setOnClickListener(new View.OnClickListener() { @Override public void onClick(View view) { ShortcutInfo webShortcut = new ShortcutInfo.Builder(MainActivity.this, "shortcut_web") .setRank(1) .build(); ShortcutInfo dynamicShortcut = new ShortcutInfo.Builder(MainActivity.this, "shortcut_dynamic") .setRank(0) .build(); shortcutManager.updateShortcuts(Arrays.asList(webShortcut, dynamicShortcut)); } });
ボタンリスナーでは、以前に同じ識別子で追加した各ショートカットに対して新しいShortcutInfoを作成しますが、現在は、 shortcut_webでより高いランクを設定し、 shortcut_dynamicでより低いランクを設定します。 最後に、 updateShortcuts(List <ShortcutInfo>
)メソッドを使用してショートカットを更新します。

上記のgifから、静的ショートカットがリストの下部にあることがわかります。 重要な注意:静的ショートカットのランクは変更できません。 これらは、 shortcuts.xmlファイルで定義されている順序で表示されます。 静的ショートカットは1つしかないため、デフォルトのランクは0であり、変更できません。
追加ビット
setShortLabel(CharSequence)メソッドを詳しく見ると、 CharSequenceがパラメーターとして使用されていることがわかります。 これはどういう意味ですか? まあ、それは私たちが彼と少し遊ぶことができることを意味します:-)
上記で作成したボタンをクリックして、色を赤に変更するとします。 SpannableStringBuilderを作成し、 それにForegroundColorSpan色を設定し、 spanLabableStringBuilderをshortLabelとして渡すことができます( SpannableStringBuilderはCharSequenceを実装しているため)。
findViewById(R.id.main_rank_button).setOnClickListener(new View.OnClickListener() { @Override public void onClick(View view) { ForegroundColorSpan colorSpan = new ForegroundColorSpan(getResources().getColor(android.R.color.holo_red_dark, getTheme())); String label = "novoda.com"; SpannableStringBuilder colouredLabel = new SpannableStringBuilder(label); colouredLabel.setSpan(colorSpan, 0, label.length(), Spanned.SPAN_INCLUSIVE_INCLUSIVE); ShortcutInfo webShortcut = new ShortcutInfo.Builder(MainActivity.this, "shortcut_web") .setShortLabel(colouredLabel) .setRank(1) .build(); ... } });
まとめ
- アプリケーションのショートカットは、アプリケーションのアクティビティを表示し、ユーザーを引き付けるのに最適です。
- それらは静的または動的です。
- 静的ショートカットがインストールされており、アプリケーションを再デプロイするときにのみ更新できます
- 動的なショートカットはオンザフライで変更できます
- ショートカットごとにバックスタックアクティビティを作成できます。
- ラベルは並べ替えることができますが、適切なタイプのみです
- 静的ラベルは最初に追加されるため、常に下部にあります
- ショートカットの説明はCharSequenceを受け入れるため、それらを操作できます