こんにちは 私の名前はガブリエルです。私はTouch InstinctのAndroidリーダーです。
Googleは3月にConstraintLayoutリリースアップデートを公開しました。 前回のGoogle I / Oで発表しました。 それからほぼ1年が経ち、ConstraintLayoutはより良く、より速く、新しい機会を獲得しました。 たとえば、チェーン内の要素を結合する機能が登場したことは素晴らしいことです。これにより、LinearLayoutの代わりにConstraintLayoutを使用できます。
この記事では、ConstraintLayoutのすべての新機能と旧機能について説明します。 すぐに警告します-記事は長くなり、他の7つのパートはありません。 この記事にはConstraintLayoutビジュアルエディターに関する言葉はありません-XMLマークアップ(通常どおり)といくつかのコードのみです。
ナビゲーション:
1.プロジェクトに追加します
2.制約。 要素を互いにバインドします
3.ビューの寸法を設定する
4.アスペクト比に基づいてビューの寸法を設定します
5. ConstraintLayout内のビューの相対位置を設定します
6.機能スナップライン
7.ベースラインバインディング機能
8.チェーンを作成する
8.1。 スプレッドスタイル
8.2。 スタイルspread_inside
8.3。 スタイル満載
8.4。 加重スタイル
9.非表示の要素を考慮してインデントを指定します
10.ガイドラインを理解する
11.コードからConstraintLayoutパラメーターを構成します
12.アニメーションについて簡単に
13. ConstraintLayoutを使用する必要がありますか?
プロジェクトに追加する
- Android Studioのバージョンを2.3に更新します。
- ConstraintLayoutの最新バージョンがインストールされていることを確認します。これは、
Android Studio → Settings(Preferences) → Appearance & Behavior → System Settings → Android SDK → SDK Tools → Support Repository
。 - プロジェクトモジュールの
build.gradle
に依存関係を追加します。
dependencies { ... compile 'com.android.support.constraint:constraint-layout:1.0.2' ... }
これで、プロジェクトでConstraintLayoutを使用できます。
<android.support.constraint.ConstraintLayout android:id="@+id/my_first_constraint_layout" android:layout_width="match_parent" android:layout_height="match_parent"> <TextView android:id="@+id/some_constraint_layout_element" android:layout_width="wrap_content" android:layout_height="wrap_content" android:text="Hello world!"/> </android.support.constraint.ConstraintLayout>
制約。 要素を互いにバインドします
制約は、 ConstraintLayout内でビューが配置される行です。 制約は 、ConstraintLayout自体の側面またはConstraintLayout内の他のビューの側面に添付できます。 制約は垂直と水平に分けることができます。
水平方向の制約:
- 右側(右)、左側(左);
- 開始側(開始)、終了側(終了)。
垂直方向の制約:
- 上部(上部)、下部(下部);
- ベースライン(ベースライン)。
垂直方向と水平方向の制約は互いに関連していません。
ベースラインは要素のコンテンツの配置線であることを思い出させてください。 例TextView
これはテキストが書き込まれる行の行です。 ビューにベースラインの拘束が設定されている場合、要素のベースラインは、拘束が添付されているビューのベースラインのレベルになります。
まず、制約をビューの側面と考えるのが最も簡単です。 つまり、たとえば、ビューB
左側をビューA
右側にスナップすると、ビューB
はビューA
の右側に配置されますA
制約バインディングの一般的な属性形式は次のとおりです。
app:layout_constraint{X}_to{Y}Of="{Z}"
どこで:
- X-制約アンカービュー。
- Yは、接続されるビュー側です。
- Z-バインド先のidビュー、またはContraintLayoutのサイドにバインドする必要がある場合は
parent
バインディングの例:
<android.support.constraint.ConstraintLayout android:layout_width="match_parent" android:layout_height="wrap_content"> <!-- constraint view_1 ConstraintLayout. constraint view_1 — ConstraintLayout. constraint --> <TextView android:id="@+id/view_1" android:layout_width="wrap_content" android:layout_height="wrap_content" android:text="view_1" android:textSize="24sp" app:layout_constraintLeft_toLeftOf="parent" app:layout_constraintTop_toTopOf="parent"/> <!-- constraint view_2 view_1. Constraint view_2 — view_1. constraint , . constraint . --> <TextView android:id="@+id/view_2" android:layout_width="wrap_content" android:layout_height="wrap_content" android:text="view_2" android:textSize="14sp" app:layout_constraintLeft_toRightOf="@id/view_1" app:layout_constraintBaseline_toBaselineOf="@id/view_1"/> <!-- constraint view_3 view_1. constraint view_3 — view_1. constraint . --> <TextView android:id="@+id/view_3" android:layout_width="wrap_content" android:layout_height="wrap_content" android:text="view_3" android:textSize="14sp" app:layout_constraintTop_toBottomOf="@id/view_1" app:layout_constraintLeft_toRightOf="@id/view_1"/> <!-- constraint view_4 view_2. constraint view_4 — view_2. constraint . --> <TextView android:id="@+id/view_4" android:layout_width="wrap_content" android:layout_height="wrap_content" android:text="view_4" android:textSize="18sp" app:layout_constraintBottom_toBottomOf="@id/view_1" app:layout_constraintLeft_toRightOf="@id/view_2"/> </android.support.constraint.ConstraintLayout>

拘束力のある当事者の基本規則:
-
Start End
、Left Right
、Top Bottom
のみStart End
結び付けることができます。 つまり、たとえば、LeftをStartにバインドしたり、BaselineをTopにバインドしたりすることはできません。 -
Baseline
は、Baseline
他のビューにのみ添付できます。 - Start / Endをバインドするとき、Left / Rightのバインドを無視
- ベースラインバインディングのトップ/ボトムバインディングが無視される場合。
- ConstraintLayoutの外側からのビューを固定しないでください(例:
layout_constraintRight_toLeftOf="parent"
。 ConstraintLayoutはこのようなバインディングを処理しますが、その動作を予測することは困難です。
ビューの寸法を設定する
ビューの寸法を設定するには、必須のlayout_width
およびlayout_height
属性layout_width
layout_height
、オプションのlayout_constraintWidth_default
およびlayout_constraintHeight_default
属性layout_constraintWidth_default
layout_constraintHeight_default
ます。
layout_constraintWidth_default
およびlayout_constraintHeight_default
の値は、デフォルトでspread
設定されています。
ビューのサイズは次のように指定できます(たとえば、高さ)。
-
layout_height="100dp"
として示します。 ビューは指定されたサイズになります。 -
layout_height="wrap_content"
として示します。 サイズはビュー自体によって計算されますが、どのサイズでもかまいません。 -
layout_height="0dp"
+layout_constraintHeight_default="spread"
-match_constraint_spreadとして示します。 ビューのサイズは、拘束間の距離に等しくなります。 たとえば、高さは、上限と下限の距離です。 -
layout_height="0dp"
+layout_constraintHeight_default="wrap"
-match_constraint_wrapとして示します。 サイズはビュー自体によって計算されますが、制約を超えることはできません。
重要! match_parent
またはfill_parent
サイズのmatch_parent
fill_parent
禁止されています。 ビューのサイズがConstraintLayoutの寸法と一致するようにするには、ConstraintLayotの側面に制約をバインドし、match_constraint_spreadのサイズを使用します。
match_constraint_wrapまたはmatch_constraint_spreadが指定されている場合、次のことを考慮する価値があります。
- このタイプのサイズが正しく機能するためには、ビューには2つの制約境界が必要です。幅の場合は、
Left Right
またはStart End
です 高さ-Top Bottom
。 - ビューのサイズは制約を超えることはできません。
- 制約内で最小および最大ビューサイズを設定できます。 このために、属性
layout_constraintWidth_min
、layout_constraintHeight_min
、layout_constraintWidth_max
、layout_constraintHeight_max
ます。 - ビューに
Baseline
制約が設定されている場合、このタイプのサイズの高さを設定しないでください-要素の高さが正しく計算されない可能性があります。
他の種類のサイズについては、以下を考慮する価値があります。
- both_sizeまたはfixed_sizeが指定されている場合、要素は制約を超える可能性があります。 たとえば、「Constraints」セクションの例では、テキストビューで長いテキストを設定すると、ConstraintLayoutを超えてしまいます。
- ConstraintLayoutサイズは、fixed_size、any_size、match_constraint_wrapを使用したビューの影響を受けます。 ConstraintLayoutのサイズが誤って計算されていると思われる場合、そのようなサイズのビューの1つが原因である可能性があります。

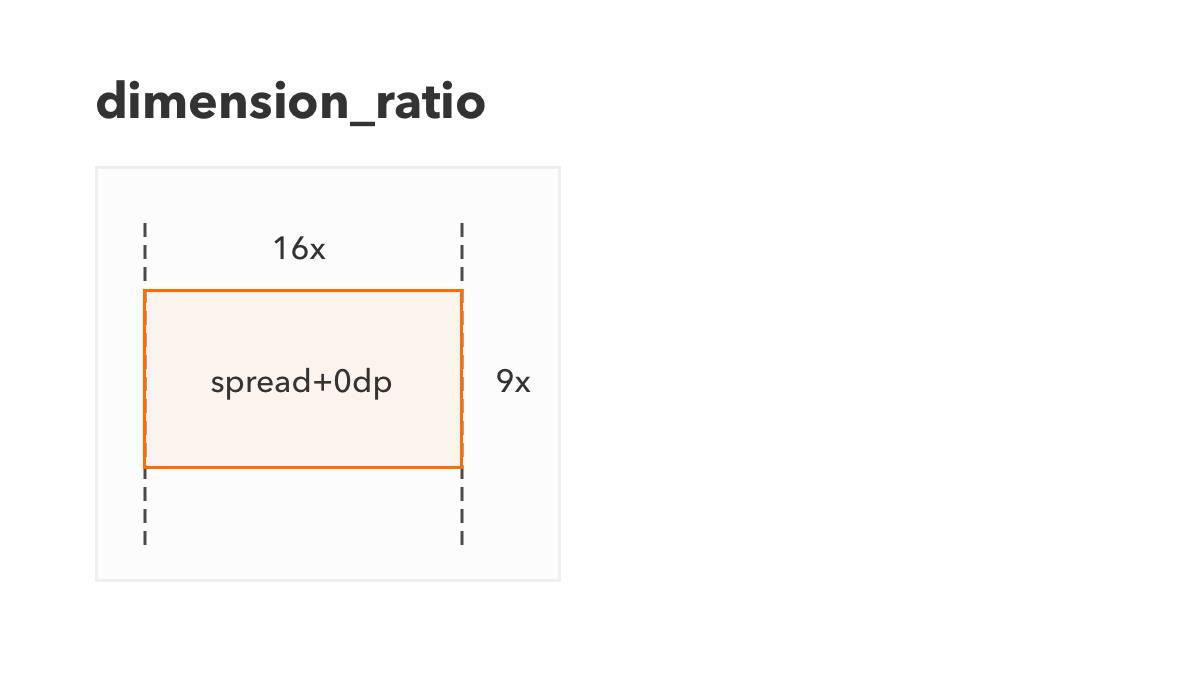
アスペクト比に基づいてビューの寸法を設定する
ConstraintLayoutを使用すると、特定のアスペクト比に基づいてビューの高さまたは幅を計算できます。 つまり、たとえば、アスペクト比が16:9
場合、高さが900dp
場合、幅は1600dp
として計算され1600dp
。
layout_constraintDimensionRatio
属性がこれを担当します。 アスペクト比は、テキスト16:9
または数値1.8
2つの形式で設定できます。 この場合、値の前に、比率の分子内にある辺の記号を指定できます。 たとえば、 H,16:9
は、16が高さ(H)に対応する値であり、9が幅(W)であることを意味します。
側面の少なくとも1つがmatch_constraint_wrapまたはmatch_constraint_spreadに設定されている場合にのみ、ビューサイズを計算するときにlayout_constraintDimensionRatio
の値が考慮されます。
例:
<android.support.constraint.ConstraintLayout android:layout_width="match_parent" android:layout_height="match_parent"> <!-- 16:9 constraints view ConstraintLayout. view ConstraintLayout, layout_width — match_constraint_spread. view , layout_height — any_size. --> <ImageView android:layout_width="0dp" android:layout_height="wrap_content" android:scaleType="centerCrop" app:layout_constraintDimensionRatio="16:9" app:layout_constraintLeft_toLeftOf="parent" app:layout_constraintTop_toTopOf="parent" app:layout_constraintRight_toRightOf="parent" app:layout_constraintBottom_toBottomOf="parent" android:background="@drawable/big_widescreen_image"/> </android.support.constraint.ConstraintLayout>
ConstraintLayout内のビューの相対位置を設定します
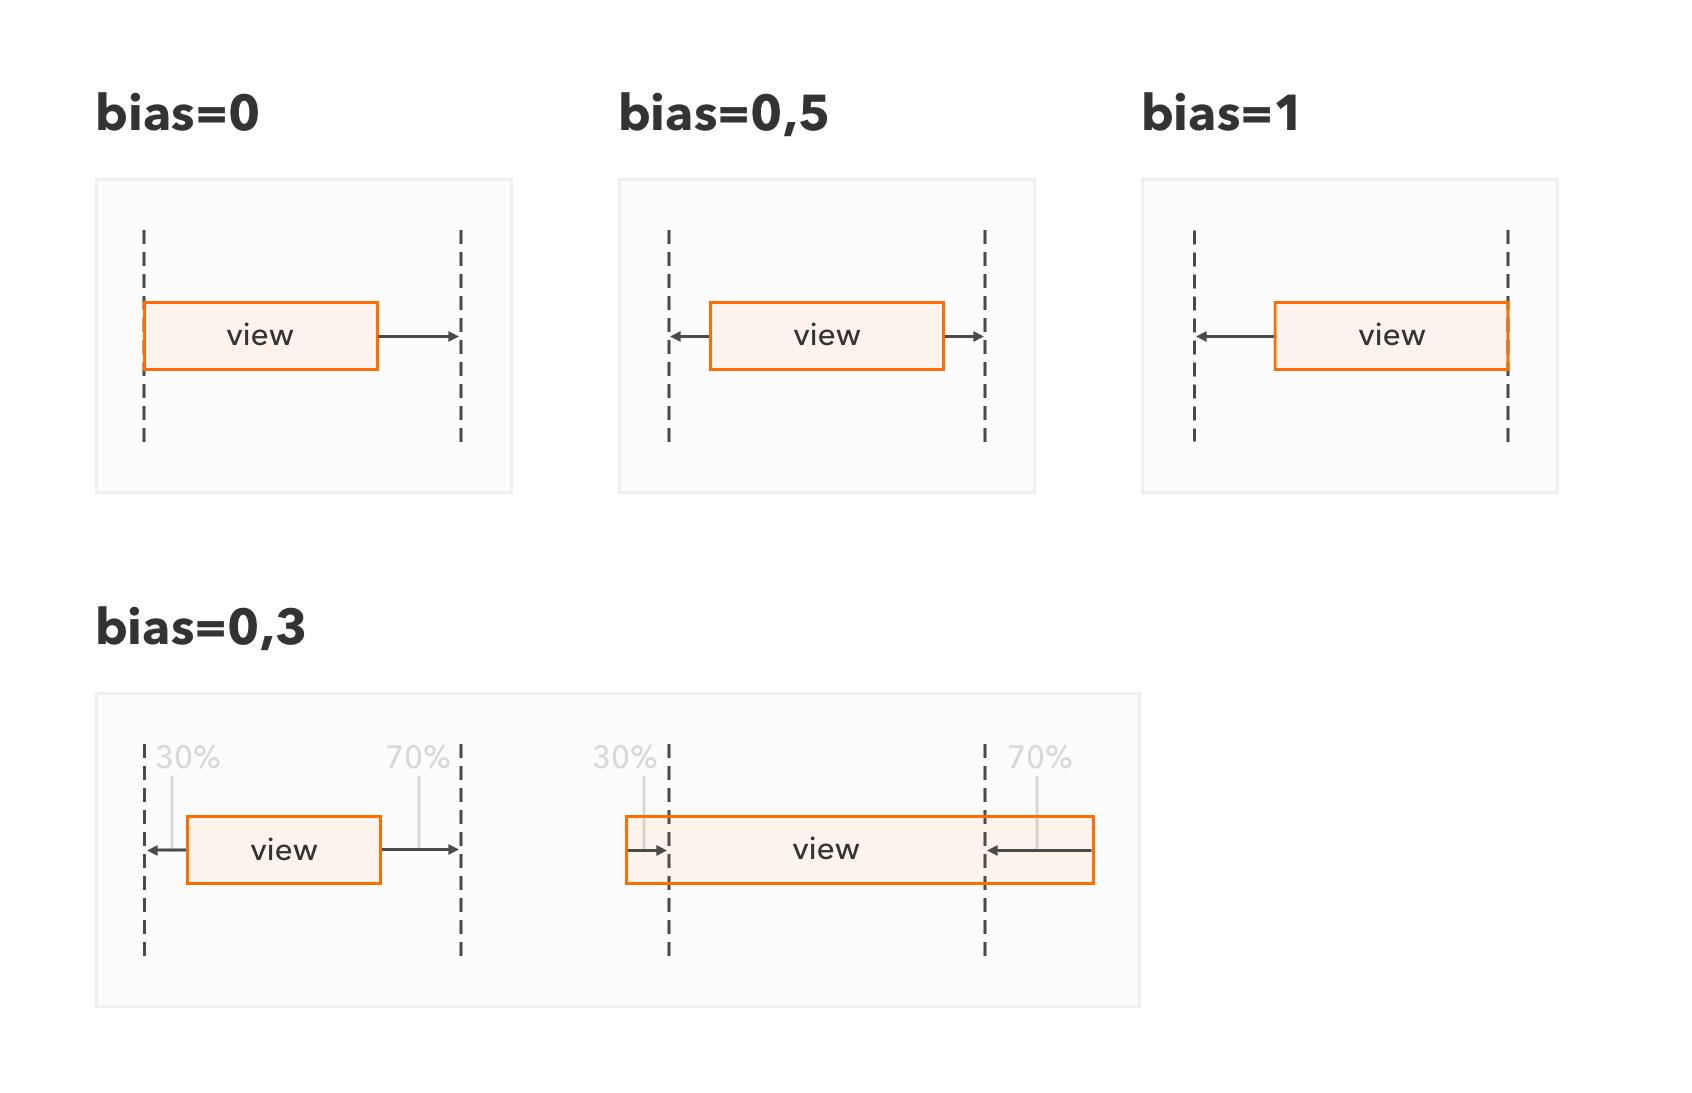
ビューに2つの水平拘束が付加されている場合、水平相対位置に設定できます。 同じことが垂直方向の制約にも当てはまります。
layout_constraintHorizontal_bias
属性は水平レイアウトを担当し、垂直レイアウトはlayout_constraintHorizontal_bias
を担当しlayout_constraintVertical_bias
。 相対位置は、0〜1の値で示されます。
本質的に、これはlayout_gravity
属性のより柔軟な代替です。 たとえば、水平配置の場合、 0は左端 、 0.5 は中央 、 1 は右端の位置を意味します。 デフォルトは0.5です。
ここで、たとえば、値を0.3に設定します。 これは、塗りつぶされていないビューの30%がビューの左側に、 70%が右側にあることを意味します。 ビューのサイズが制約間の距離のサイズよりも大きい場合、制約を超えるサイズの30%は制約の左側に、 70%は右側になります。
小さな重要な注意:マニフェストがRTL言語をサポートしている場合、「左」の代わりにlayout_constraintHorizontal_bias
には「最初から」、「右」の代わりに-最後から要素があります。 つまり、RTL言語をサポートするユーザーは、場所を「左」と「右」に明示的に設定しても機能しないことを考慮する必要があります。 少なくとも私はそのような機会を見つけませんでした。
例:
<android.support.constraint.ConstraintLayout android:layout_width="match_parent" android:layout_height="match_parent"> <!-- bias 0.3 (30% / ). bias — 1 (). Constraints . — match_constraint_wrap, — match_constraint_wrap. --> <TextView android:id="@+id/view_1" android:text="view_1" android:layout_width="0dp" android:layout_height="0dp" app:layout_constraintWidth_default="wrap" app:layout_constraintHeight_default="wrap" android:scaleType="centerCrop" app:layout_constraintHorizontal_bias="0.3" app:layout_constraintVertical_bias="1" app:layout_constraintLeft_toLeftOf="parent" app:layout_constraintRight_toRightOf="parent" app:layout_constraintTop_toTopOf="parent" app:layout_constraintBottom_toBottomOf="parent"/> </android.support.constraint.ConstraintLayout>
ラインスナップ機能
ConstraintLayoutのプレゼンテーション後、RelativeLayoutとよく比較されました。 しかし、実際には、要素の配置の計算は根本的に異なります。 RelativeLayoutでは、ビューは他のビューのどちら側にある必要があるかを単に示します-「左側」、「右側」など。 ConstraintLayoutでは、制約は他のビューの側面にスナップされ、ビューのレイアウトは制約の計算方法に依存します。
制約レイアウトの場合、この制約がバインドされているビューレイアウトが最初に計算されます。 ビューの場所については、指定されたすべての制約が最初に計算されます。 ビューと制約の循環依存関係は禁止されているため、実際には、ビューの制約と制約のビューの有向非循環依存グラフがConstraintLayout内に構築されます。 すべての計算は、グラフの独立した要素から順番に実行されます。
簡単にするために、ConstraintLayout内で垂直依存性と水平方向依存性の別々のグラフが構築されているかのように、垂直依存性と水平依存性を2つの独立したグループに分けることをお勧めします。
しかし、一般的に言えば、ビューの垂直パラメーターは、間接的に別のビューの水平パラメーターに依存する可能性があることを理解する価値があります。 たとえば、アスペクト比に基づいてサイズを計算します。ビューの幅が変わると、高さも変わります。 つまり、水平方向の制約の変更によりビューの幅が変わると、ビューの高さも変わります。
次に、垂直方向の制約を計算する奇妙な例を考えてみましょう。
<android.support.constraint.ConstraintLayout xmlns:android="http://schemas.android.com/apk/res/android" xmlns:app="http://schemas.android.com/apk/res-auto" android:layout_width="match_parent" android:layout_height="wrap_content"> <TextView android:id="@+id/view_A" android:layout_width="wrap_content" android:layout_height="wrap_content" android:text="View A" app:layout_constraintLeft_toLeftOf="parent" app:layout_constraintTop_toTopOf="parent"/> <TextView android:id="@+id/view_B" android:text="View B" android:layout_width="wrap_content" android:layout_height="0dp" app:layout_constraintTop_toBottomOf="@id/view_A" app:layout_constraintBottom_toTopOf="@id/view_A"/> <TextView android:id="@+id/view_C" android:text="View C" android:layout_width="wrap_content" android:layout_height="wrap_content" app:layout_constraintLeft_toRightOf="@id/view_A" app:layout_constraintTop_toBottomOf="@id/view_B"/> </android.support.constraint.ConstraintLayout>
結果:
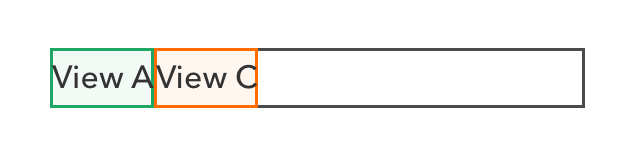
ビューA
、ConstraintLayoutの左側と上側に単純に接続されています。つまり、左上にあります。
ビューB
奇妙な方法でアタッチされます- Top(B)->bottom(A) Bottom(B)->top(A)
-その垂直拘束間の距離は実際には負です。 高さB
自体はmatch_constraint_spreadに設定されます。
ビューC
は、 A
の右にA
- Left(C)toRight(A)
-および(ある種の) B
Top(C)toBottom(B)
質問の水平配置では発生しません。 次に、垂直配置について説明します。
垂直計算のシーケンス:
-
C
を計算するにはC
その下限の制約を計算する必要があります。 - 下限
C
を計算するには、上側B
を計算する必要があります。 -
B
の上側を計算するには、下側と上側の制約を計算する必要があります。 - 下限と上限の制約
B
を計算するには、A
上限と下限を計算する必要があります。 - 単純に左上に位置し、寸法そのものを計算します。
垂直計算の結果:
-
A
wrap_contentの高さA
ため、A
の上側はConstraintLayoutの上側のレベルにあり、下側はテキストA
サイズによって計算されます。 - 上側の制約
B
A
の下側のレベルにあり、下側の制約はA
の上側に結び付けられています。つまり、ConstraintLayoutの上側のレベルにあります。 -
B
の高さはmatch_constraint_spreadであるため、B
の上側はA
の下側のレベルにあり、下側はConstraintLayoutの上側のレベルにあります。 これは奇妙ですが、実際には、高さB
は負です。 - 上側の制約
C
B
の下側に結び付けられています。つまり、ConstraintLayoutの上側のレベルにあります。 - その結果、
C
の上側はConstraintLayoutの上側のレベルにあり、下側はテキストC
サイズで計算されますA
wrap_contentの高さがあります。
一般的に、私の意見では、ビューが最終的にどこに配置されるかを理解するために、このような計算アルゴリズムを考慮する必要があります。
ベースラインバインディング機能
ベースラインによって固定されたビューは上下にバインドできません。つまり、上部と下部の制約は無視されます。 つまり、このようなビューでは、match_constraint_spreadまたはmatch_constraint_wrapのサイズを設定できません。
このことから、ベースラインが低いビューを高いビューに結び付ける必要があるということにはなりません。 そうしないと、高いビューがConstraintLayoutを超えたり、ConstraintLayoutのサイズが正しく計算されなかったりする可能性があります。
誤ったベースラインバインディングの例:
<android.support.constraint.ConstraintLayout android:layout_width="match_parent" android:layout_height="wrap_content"> <!-- 12sp --> <TextView android:id="@+id/left_view" android:layout_width="wrap_content" android:layout_height="wrap_content" android:text="Left view" android:textSize="12sp" app:layout_constraintLeft_toLeftOf="parent" app:layout_constraintTop_toTopOf="parent"/> <!-- 20sp, --> <TextView android:id="@+id/right_view" android:text="Right view" android:layout_width="wrap_content" android:layout_height="wrap_content" android:textSize="20sp" app:layout_constraintBaseline_toBaselineOf="@id/left_view" app:layout_constraintLeft_toRightOf="@id/left_view"/> </android.support.constraint.ConstraintLayout>
結果:
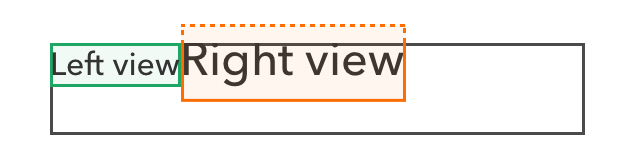
TextViewの高さがwrap_content
設定されているため、ConstraintLayoutの高さ(黒いフレーム内)は大きなTextViewの高さ(赤いフレーム内)とwrap_content
ます。
大きいTextViewのベースラインは、小さいTextViewのベースライン(緑色のフレーム内)に固定されているため、テキストは同じ行にあります。
ただし、大きなTextViewはConstraintLayoutの範囲外です。
チェーンを作成する
側面をバインドする場合、興味深いルールが1つあります.2つの要素の2つの側面を互いにLeft(B)toRight(A) Right(A)toLeft(B)
からLeft(B)toRight(A) Right(A)toLeft(B)
すると、要素がチェーンで選択され、特別なレイアウトルールがそれらに適用されます。
チェーンは、側面が互いに結び付けられている要素のセットです。 チェーンは、 ConstraintLayout
内の要素のバインディングに基づいて自動的に決定されます。 チェーンはその極端な要素のバインディングに基づいて配置され、チェーン内の要素は特定のスタイルのチェーンの規則に従って配置されます。 チェーンスタイルは、 layout_constraint{X}_chainStyle
で定義されlayout_constraint{X}_chainStyle
。Xは、水平チェーンの場合はHorizontal
、垂直チェーンの場合は垂直です。
チェーンの例: Right(A)toLeft(B) + Left(B)toRight(A)
はA
およびB
要素をチェーンにリンクし、 Left(A)toLeft(parent) + Right(B)toRight(parent)
チェーン全体をチェーンしますConstraintLayout
の外側の要素。
チェーンのスタイルとそのパラメーターは、チェーンのヘッド要素の属性(左端、初期、または最高)から取得されます。
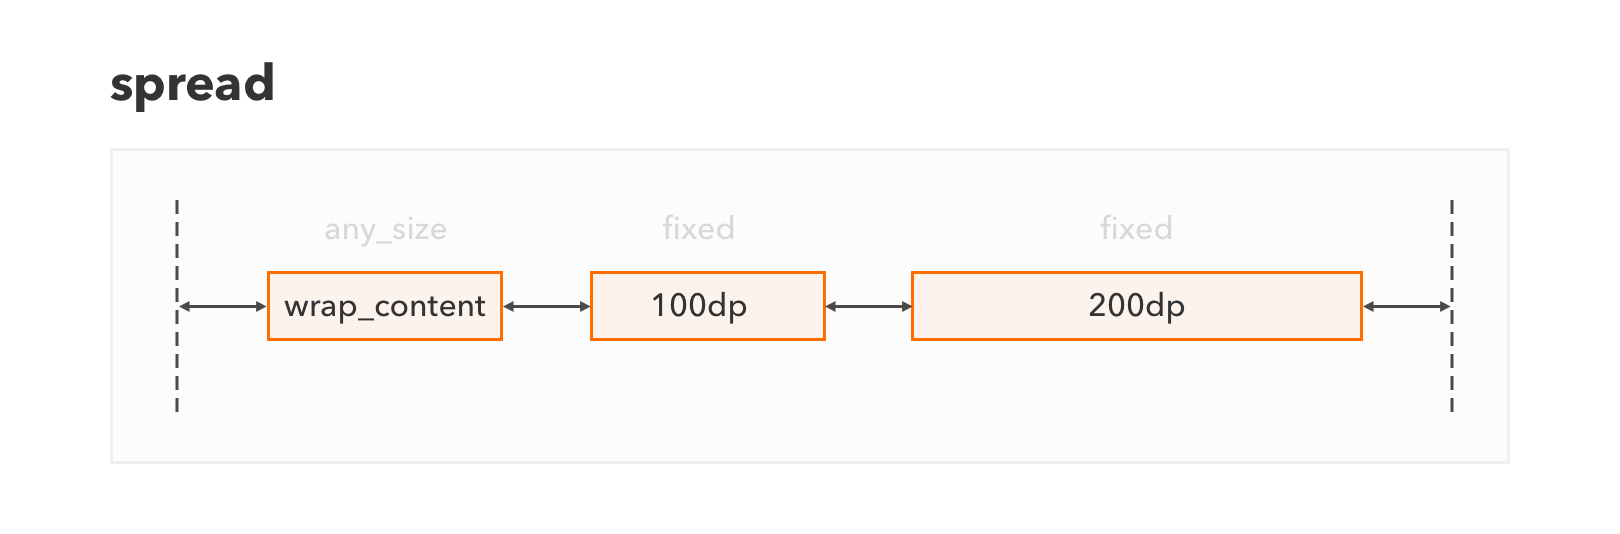
スプレッドスタイル
チェーンの要素は均等に分散されます。つまり、要素間のインデントと要素からチェーンの境界までのインデントは同じになります。 デフォルトで使用されます。
<android.support.constraint.ConstraintLayout android:layout_width="match_parent" android:layout_height="match_parent"> <!-- chainStyle — spread, --> <TextView android:id="@+id/view_1" android:layout_width="wrap_content" android:layout_height="wrap_content" android:text="view_1" app:layout_constraintLeft_toLeftOf="parent" app:layout_constraintRight_toLeftOf="@+id/view_2"/> <TextView android:id="@+id/view_2" android:layout_width="100dp" android:layout_height="wrap_content" android:text="view_2" app:layout_constraintLeft_toRightOf="@id/view_1" app:layout_constraintRight_toLeftOf="@+id/view_3"/> <TextView android:id="@+id/view_3" android:layout_width="200dp" android:layout_height="wrap_content" android:text="view_3" app:layout_constraintLeft_toRightOf="@id/view_2" app:layout_constraintRight_toRightOf="parent"/> </android.support.constraint.ConstraintLayout>
スタイルspread_inside
チェーンの要素はspread
スタイルと同じ方法で分散されますが、チェーンの境界からのインデントは常にゼロです。
<android.support.constraint.ConstraintLayout android:layout_width="match_parent" android:layout_height="match_parent"> <!-- ChainStyle — spread_inside --> <TextView android:id="@+id/view_1" app:layout_constraintHorizontal_chainStyle="spread_inside" android:layout_width="wrap_content" android:layout_height="wrap_content" android:text="view_1" app:layout_constraintLeft_toLeftOf="parent" app:layout_constraintRight_toLeftOf="@+id/view_2"/> <TextView android:id="@+id/view_2" android:layout_width="100dp" android:layout_height="wrap_content" android:text="view_2" app:layout_constraintLeft_toRightOf="@id/view_1" app:layout_constraintRight_toLeftOf="@+id/view_3"/> <TextView android:id="@+id/view_3" android:layout_width="200dp" android:layout_height="wrap_content" android:text="view_3" app:layout_constraintLeft_toRightOf="@id/view_2" app:layout_constraintRight_toRightOf="parent"/> </android.support.constraint.ConstraintLayout>

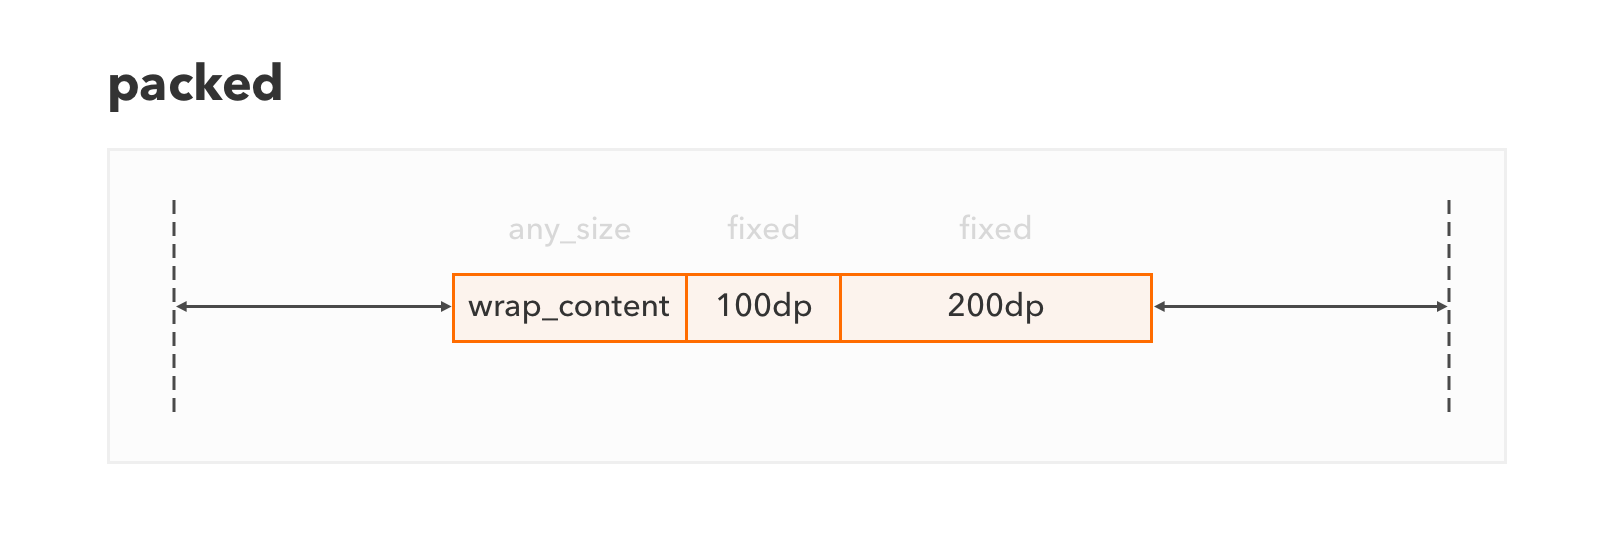
スタイル満載
要素は次々にグループに配置されます。 このスタイルを使用すると、 layout_constraint{*}_bias
属性を使用して、アクセス可能なスペースチェーン内の要素グループの相対位置を設定できます。 バイアス属性は、チェーンのヘッド要素で指定する必要があります。
<android.support.constraint.ConstraintLayout android:layout_width="match_parent" android:layout_height="match_parent"> <!-- ChainStyle — packed, bias — 0.3 (30% / ) --> <TextView android:id="@+id/view_1" app:layout_constraintHorizontal_chainStyle="packed" app:layout_constraintHorizontal_bias="0.3" android:layout_width="wrap_content" android:layout_height="wrap_content" android:text="view_1" app:layout_constraintLeft_toLeftOf="parent" app:layout_constraintRight_toLeftOf="@+id/view_2"/> <TextView android:id="@+id/view_2" android:layout_width="100dp" android:layout_height="wrap_content" android:text="view_2" app:layout_constraintLeft_toRightOf="@id/view_1" app:layout_constraintRight_toLeftOf="@+id/view_3"/> <TextView android:id="@+id/view_3" android:layout_width="200dp" android:layout_height="wrap_content" android:text="view_3" app:layout_constraintLeft_toRightOf="@id/view_2" app:layout_constraintRight_toRightOf="parent"/> </android.support.constraint.ConstraintLayout>

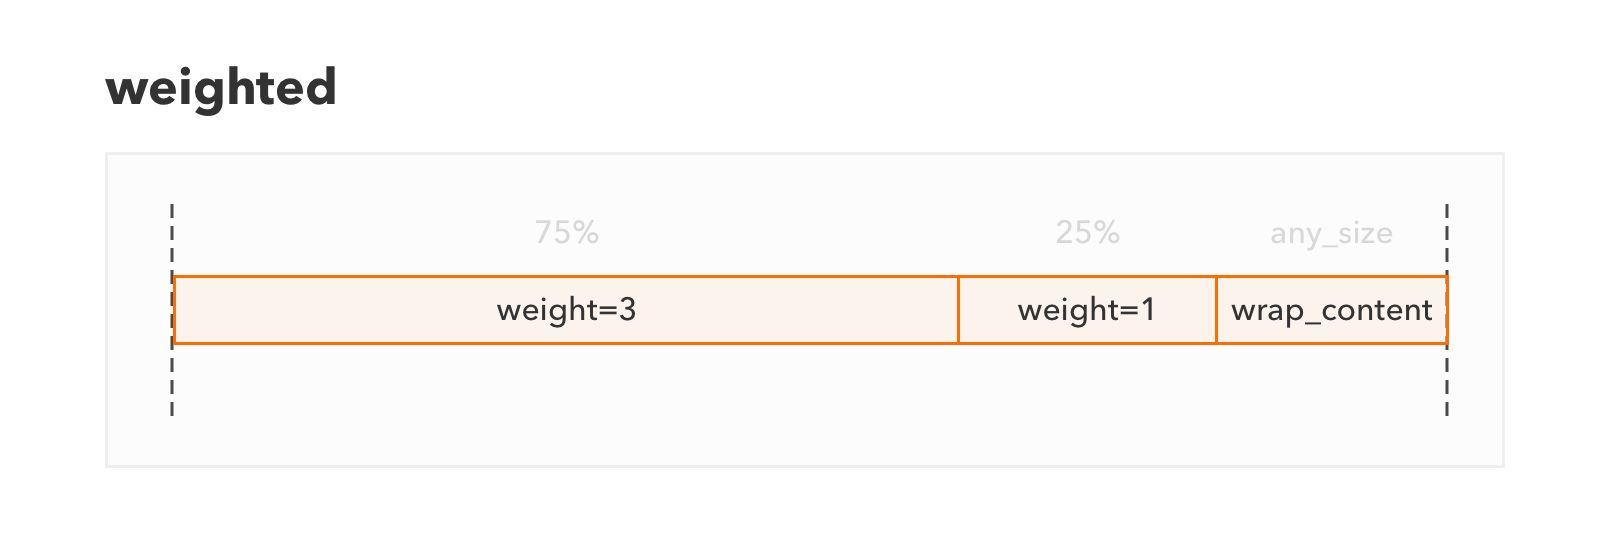
加重スタイル
LinearLayoutの動作と同様に、要素は重みに従って配置されます。 このスタイルが機能するには、ビューチェーンの1つがmatch_constraint_spreadである必要があります。 layout_constraintHorizontal_weight
およびlayout_constraintVertical_weight
属性は、要素の重みを示すために使用されます。
<android.support.constraint.ConstraintLayout android:layout_width="match_parent" android:layout_height="match_parent"> <!-- match_constraint_spread, weight=3, 3/4 --> <TextView android:id="@+id/view_1" android:layout_width="0dp" android:layout_height="wrap_content" app:layout_constraintHorizontal_weight="3" android:text="view_1" app:layout_constraintLeft_toLeftOf="parent" app:layout_constraintRight_toLeftOf="@+id/view_2"/> <!-- — match_constraint_spread, weight=1, 1/4 --> <TextView android:id="@+id/view_2" android:layout_width="0dp" android:layout_height="wrap_content" app:layout_constraintHorizontal_weight="1" android:text="view_2" app:layout_constraintLeft_toRightOf="@id/view_1" app:layout_constraintRight_toLeftOf="@+id/view_3"/> <!-- — any_size, , --> <TextView android:id="@+id/view_3" android:layout_width="wrap_content" android:layout_height="wrap_content" android:text="view_3" app:layout_constraintLeft_toRightOf="@id/view_2" app:layout_constraintRight_toRightOf="parent"/> </android.support.constraint.ConstraintLayout>
非表示の要素でインデントを指定する
インデントは、標準属性layout_margin{X}
で示されます。ここで、 Xはインデントの側面( Left/Right/Top/Bottom/Start/End
)です。 これらのパディングは、要素の側面ではなく、要素のスナップ線に適用されます。 これは、スナップ線が接続されている側からインデントされることを意味します。
非表示の要素、つまりVisibility
GONE
設定されている要素には、個別のルールが導入されています。 要素が非表示の場合、その側面からの通常のインデントは無視されますが、特別なgone-
ます この場合、計算ではその次元はゼロに等しいと見なされます。 Gone-
、属性layout_goneMargin{X}
で表されます。ここで、 Xはインデントの側面です。
つまり、要素A
要素B
の左に50dp
にインデントされ、左のインデントが左に50dp
に設定されているとします。 B
要素が非表示( GONE
)の場合、左側のA
要素のインデントは50dp
になり、 B
要素がVISIBLE
またはINVISIBLE
場合、左側のA
要素のインデントは10dp
ます。
例:
<android.support.constraint.ConstraintLayout android:layout_width="match_parent" android:layout_height="match_parent"> <TextView android:id="@+id/view_1" android:layout_width="wrap_content" android:layout_height="wrap_content" android:visibility="gone" android:text="view_1" app:layout_constraintLeft_toLeftOf="parent"/> <!-- constraint view_2 view_1. view_1 (gone), goneMarginLeft (50dp). --> <TextView android:id="@+id/view_2" android:layout_marginLeft="10dp" app:layout_goneMarginLeft="50dp" android:layout_width="wrap_content" android:layout_height="wrap_content" android:text="view_2" app:layout_constraintHorizontal_bias="0" app:layout_constraintLeft_toRightOf="@id/view_1" app:layout_constraintRight_toRightOf="parent"/> </android.support.constraint.ConstraintLayout>

Guidelines
Guideline — , , . view android.support.constraint.Guideline
. Guideline — android:orientation
. guideline , ConstraintLayout.
Guideline , view .
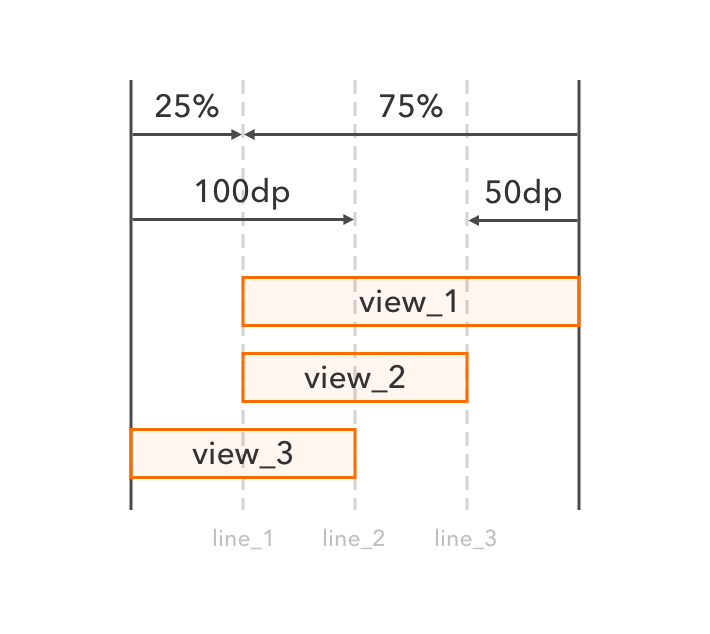
guideline :
-
layout_constraintGuide_begin
— (Left
,Start
) ConstraintLayout gudeline — ; -
layout_constraintGuide_end
— (Right
,End
) ConstraintLayout guideline — ; -
layout_constraintGuide_percent
— guideline ConstraintLayout gudeline — . 0 1.
<android.support.constraint.ConstraintLayout android:layout_width="match_parent" android:layout_height="match_parent"> <!-- guideline 25% --> <android.support.constraint.Guideline android:id="@+id/line_1" android:orientation="vertical" app:layout_constraintGuide_percent="0.25" android:layout_width="wrap_content" android:layout_height="wrap_content"/> <!-- guideline 100dp ConstraintLayout --> <android.support.constraint.Guideline android:id="@+id/line_2" android:orientation="vertical" app:layout_constraintGuide_begin="100dp" android:layout_width="wrap_content" android:layout_height="wrap_content"/> <!-- guideline 50dp ConstraintLayout --> <android.support.constraint.Guideline android:id="@+id/line_3" android:orientation="vertical" app:layout_constraintGuide_end="50dp" android:layout_width="wrap_content" android:layout_height="wrap_content"/> <TextView android:id="@+id/view_1" android:layout_width="0dp" android:layout_height="wrap_content" android:text="view_1" app:layout_constraintLeft_toLeftOf="@id/line_1" app:layout_constraintRight_toRightOf="parent"/> <TextView android:id="@+id/view_2" android:layout_width="0dp" android:layout_height="wrap_content" android:text="view_2" app:layout_constraintTop_toBottomOf="@id/view_1" app:layout_constraintLeft_toLeftOf="@id/line_1" app:layout_constraintRight_toRightOf="@id/line_3"/> <TextView android:id="@+id/view_3" android:layout_width="0dp" android:layout_height="wrap_content" android:text="view_3" app:layout_constraintTop_toBottomOf="@id/view_2" app:layout_constraintLeft_toLeftOf="parent" app:layout_constraintRight_toRightOf="@id/line_2"/> </android.support.constraint.ConstraintLayout>
ConstraintLayout
— android.support.constraint.ConstraintSet
.
ConstraintSet
:
-
ConstraintLayout
;
ConstraintLayout constraintLayout = LayoutInflater.from(context).inflate(R.layout.my_constraint_layout, null); ConstraintSet constraintSet = new ConstraintSet(); constraintSet.clone(constraintLayout);
-
*.xml
,ConstraintLayout
;
ConstraintSet constraintSet = new ConstraintSet(); constraintSet.clone(context, R.layout.my_constraint_layout);
-
ConstraintSet
.
ConstraintSet constraintSet = new ConstraintSet(); constraintSet.clone(constraintSet2);
ConstraintSet
ConstraintLayout
applyTo
.
final ConstraintLayout constraintLayout = (ConstraintLayout) findViewById(R.id.constr); ConstraintSet constraintSet = new ConstraintSet(); constraintSet.clone(constraintLayout); constraintSet.setHorizontalBias(R.id.sample_view, 0.5f); constraintSet.applyTo(constraintLayout);
, LayoutParams
requestLayout
. , ConstraintLayout
— android.support.constraint.ConstraintLayout.LayoutParams
.
ConstraintLayout
. ConstraintLayout
ViewGroup
, , : ValueAnimator
, TransitionManager
.
ConstraintLayout?
:
- , ;
- Android Studio ;
- , ;
- ,
ConstraintLayout
, :FrameLayout
,LinearLayout
,RelativeLayout
,GridLayout
,PercentRelativeLayout
; - Support Library, , , .
:
- , ;
- - — , ;
- , ;
- , ;
- views , layouts.
Touch Instinct , , . , RecyclerView
— , .
Google ConstraintLayout UI, RecyclerView CoordinatorLayout.