みなさんこんにちは。 今日はQMLに精通します。 私たちはそれが何であり、何と共に食べられるのかを学びます。 このテクノロジーを使用して小さなアプリケーションを作成しましょう。
小さな余談:
QML(Qt Meta Language)は、アプリケーション設計を作成するために設計された宣言的なJavaScriptベースのプログラミング言語です。 Qtに同梱されているユーザーインターフェイス開発環境であるQt Quickの一部です。
宣言型言語の例には、SQLおよびHTMLが含まれます。 QMLの詳細については、 ドキュメントをご覧ください。
最も単純なものから始めましょう:ウィンドウの作成。 次の内容を持つ2つのファイルbase.qmlとtest.pyを作成します。
base.qml
import QtQuick 2.0 Rectangle { // id:green_rectangle width: 250; height: 250 // color:"green" // border-radius radius: 7 }
test.py
import sys # QUrl Urls from PyQt5.QtCore import QUrl from PyQt5.QtWidgets import QApplication, QWidget # QQuickView QML . from PyQt5.QtQuick import QQuickView if __name__ == '__main__': app = QApplication(sys.argv) # QQuickView, UI view = QQuickView() view.setSource(QUrl('base.qml')) view.show() app.exec_() sys.exit()
test.pyファイルのコードは完全に理解できるはずですが、それでも問題が発生する場合は、PyQt5コースを受講することをお勧めします: https ://pythonworld.ru/gui/pyqt5-firstprograms.html
実際、これはqmlを操作する最も単純な例です。出力では、緑色で塗りつぶされたサイズが250X250のウィンドウが表示されます。

QMLでは、主要な可視要素はRectangle要素です。 Rectangle要素には、次のように設定できる要素の外観と位置を制御するためのプロパティがあります。
id: ( , ) x: y: ( px) width: height: ( ) color: ( ) border.color: ( ) border.width: ( ) radius: ( border-radius)
少し後で検討する他のプロパティ。
タスクを少し複雑にしましょう:「Hello World」という碑文の長方形があるウィンドウを作成します。
Rectangle { id:rec_main width: 300; height: 300 color:"#fff" radius: 7 Rectangle { id:rec_green width: 150; height: 150 color:"green" radius: 7 border.color: "#0000FF" border.width: 5 anchors.verticalCenter: parent.verticalCenter anchors.horizontalCenter: parent.horizontalCenter Text { id: helloText text: "Hello world!" anchors.verticalCenter: parent.verticalCenter anchors.horizontalCenter: parent.horizontalCenter font.pointSize: 10; font.bold: true } } }
次の結果が得られます。
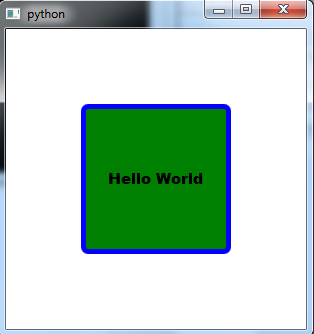
ここでは、親anchors.verticalCenter:parent.verticalCenter、anchors.horizontalCenter:parent.horizontalCenterを基準にして、オブジェクトを垂直方向および水平方向に中心に配置します。 Parentを使用すると、親に連絡できます。この場合、Textオブジェクトの親は、rec_greenというidのRectangleです。
一般に、QMLインターフェイスはオブジェクトの階層上に構築されることを理解する必要があります。 この場合、次のようになります。

彼らは碑文で長方形を作りました。 うーん...これは便利なインターフェースには似ていませんが、コンソールに「Hey Programmer」というメッセージを表示するボタンを追加しましょう。
コードを少し変更してみましょう。次のようになります。
import QtQuick 2.0 Rectangle { id:rec_white width: 300 height: 300 Rectangle { id:btn_green width: 80 height: 40 color:"green" radius: 7 border.color: "#0000FF" border.width: 1 anchors.verticalCenter: parent.verticalCenter anchors.horizontalCenter: parent.horizontalCenter Text { id: btn_green_label text: "Click me" anchors.horizontalCenter: parent.horizontalCenter anchors.verticalCenter: parent.verticalCenter } MouseArea { anchors.fill: parent onClicked: { console.log("Hey Programmer"); } } } }
その結果、以下が得られます。

ここでは、マウスで作業できるようにするMouseAreaオブジェクトを追加します。
anchors.fill:parent-親の領域全体が含まれることを示します。
onClicked-ボタンをクリックするイベント。 この場合、コンソールに出力する関数は「Hey Programmer」と呼ばれます。
これはおそらく、今日で終了します。 次の記事では、qmlをさらに詳しく調べます。
qmlを使用する利点はわからないかもしれませんが、このすばらしいツールをさらに詳しく知ると、その便利さと機能性が理解できます。
ご清聴ありがとうございました。 まだ質問がある場合は、コメントで質問してください。 この記事がお役に立てば幸いです。