-GooglePlayのアプリケーション (アルファテストモードでも公開)
-Unity3Dプラグイン用のGooglePlayGames
-Google Cloud Consoleへのアクセス
-Node.JSサーバー
-node.jsのGoogleApisモジュール:
npm install googleapis --save
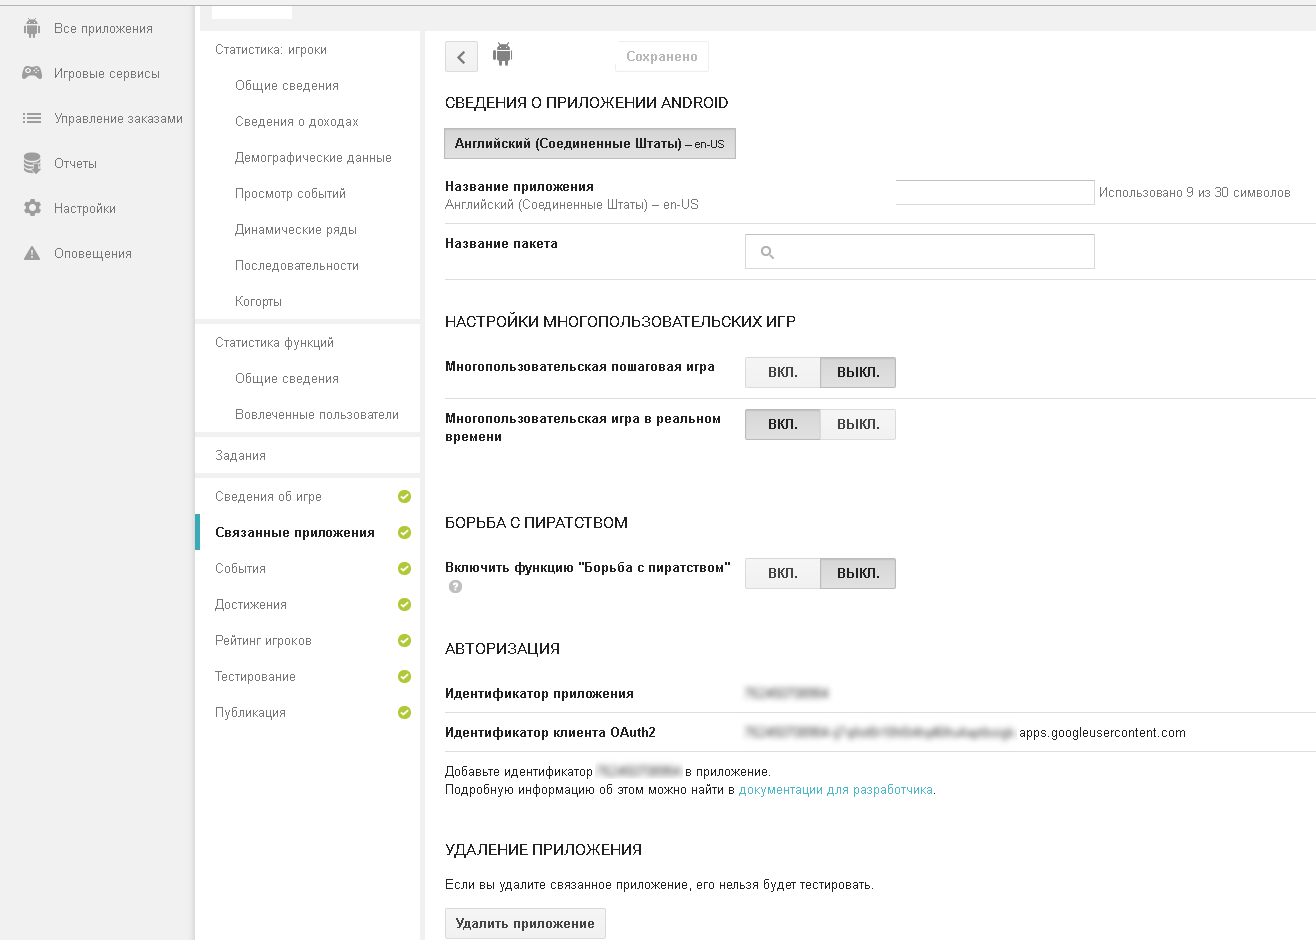
GooglePlayでアプリケーションがまだアルファ/ベータモードである場合は、テストするアカウントをテスターのリストに追加することを忘れないでください。 また、ゲームサービスでアプリケーションを接続する必要があります。
お客様
unity3dでGooglePlayForUnity3dプラグインを解凍します。 ウィンドウ/ GooglePlayGames /セットアップ/ Androidセットアップを開きます。
最初の2つのフィールドは変更しないでおくことができます。 リソース定義の詳細については、 GooglePlayコンソールの 「ゲームサービス、実績」セクションを参照してください。 少なくとも5つの実績を入力し(そうでない場合)、「リソースの取得」リンクを見つけます。 クリックして、Androidセクションを開き、リソース定義フィールドですべてをUnity3dにコピーします。

GooglePlus APIをオンにします。 [WebアプリクライアントID]フィールドに、XXXXXXX.apps.googleusercontent.comという形式の識別子を入力します。これは、GoogleCloudコンソールで取得できます(以下を参照)。
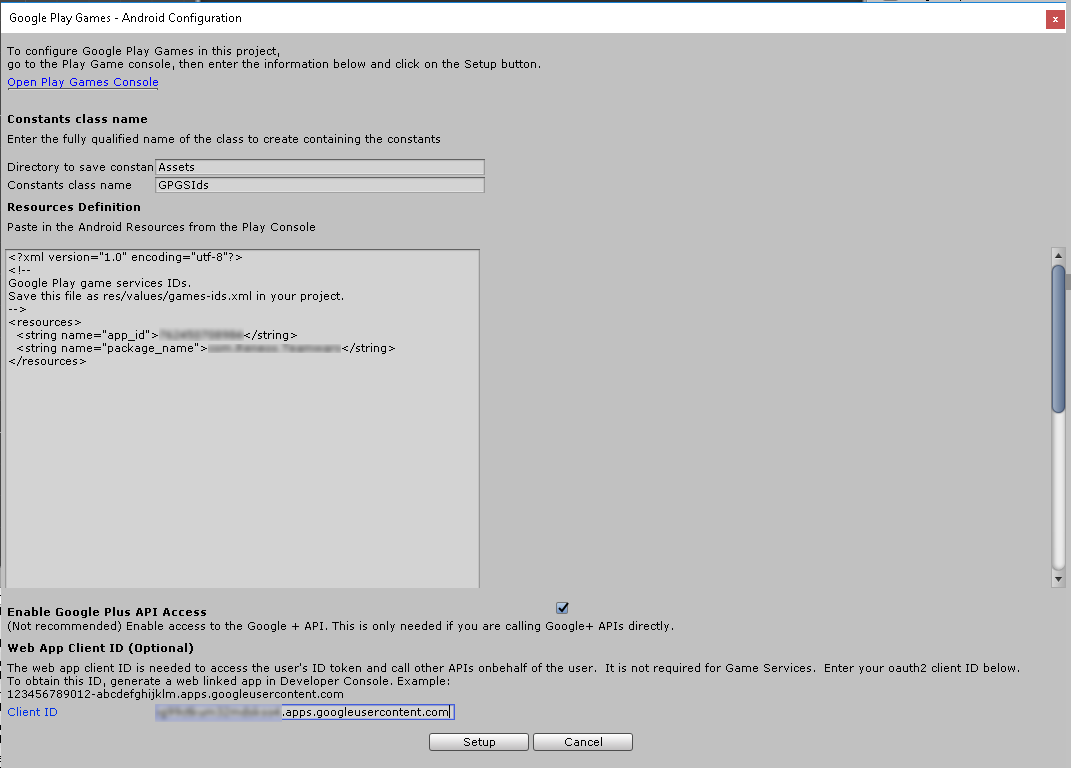
セットアップをクリックします。 ファイルバージョンを10.0.1から10.2.0に変更する要求が続く場合は、拒否して「保持」を選択することをお勧めします。
余談-プラグイン/ Androidフォルダーバージョン10.0.1以降にSDK(* .aar)ファイルがある場合-バージョン10.0.1に置き換える-SDKで見つけることができます(sdk \ extras \ google \ m2repository \ com \ google \ android \ gms \)は一時的なステップです-このバージョンでのみ。
次に、サーバートークンを受け取るクライアントGoogleAuth.csを追加します。
GoogleAuth.cs
using System; using System.Collections; using GooglePlayGames; using GooglePlayGames.BasicApi; using UnityEngine; public class GoogleAuth:MonoBehaviour { /// <summary> /// /// </summary> /// <param name="callback"></param> public void Auth(Action<string> callback) { InitAuth(() => { GetServerToken(callback); }); } private void InitAuth(Action callback) { var config = new PlayGamesClientConfiguration.Builder() .AddOauthScope("profile") .AddOauthScope("email") .Build(); PlayGamesPlatform.InitializeInstance(config); PlayGamesPlatform.Activate(); Social.localUser.Authenticate((success, str) => { if (success) callback(); else Debug.Log("Error on Social Authenticate: " + str); }); } private void GetServerToken(Action<string> callback) { StartCoroutine(ReadToken((serverToken,empty) => { callback(serverToken); })); } private IEnumerator ReadToken(Action<string, string> callback) { yield return null; if (!PlayGamesPlatform.Instance.IsAuthenticated()) // { PlayGamesPlatform.Instance.Authenticate((result, msg) => // { if (!result) { PlayGamesPlatform.Instance.Authenticate( (result2, msg2) => // googleplay { if (!result2) { PlayGamesPlatform.Instance.GetIdToken( val => // IdToken { StartCoroutine(ReadToken(callback)); }); } }, false); } }, true); } else { PlayGamesPlatform.Instance.GetServerAuthCode( (status, code) => // { if (status != CommonStatusCodes.Success || string.IsNullOrEmpty(code)) StartCoroutine(ReadToken(callback)); else callback(code, null); }); } } }
ステージ上の任意のGameObjectに添付します。
サーバートークンを取得するには、サーバートークンが含まれるコールバックを使用してAuthメソッドを呼び出す必要があります。 GoogleAuthクラスでエラーが発生した場所を確認できます。ユーザーにメッセージを表示したり、統計情報を送信したりできます。
AndroidManifest.xmlで、次を追加します。
<uses-permission android:name="android.permission.GET_ACCOUNTS"/> <uses-permission android:name="android.permission.USE_CREDENTIALS"/> <uses-permission android:name="android.permission.INTERNET"/> <uses-permission android:name="android.permission.ACCESS_NETWORK_STATE"/>
サーバー
GooglePlayのサーバー認証情報を含むファイルが必要です。 Google Cloudコンソール(https://console.cloud.google.com/apis/credentials?project= your_project_id)を開きます。
OAuth 2.0クライアント識別子セクションで、タイプが「Webアプリケーション」の識別子を見つけます。 識別子を開き、client-secret(apps.googleusercontent.com.jsonで終わるファイル)をダウンロードします。
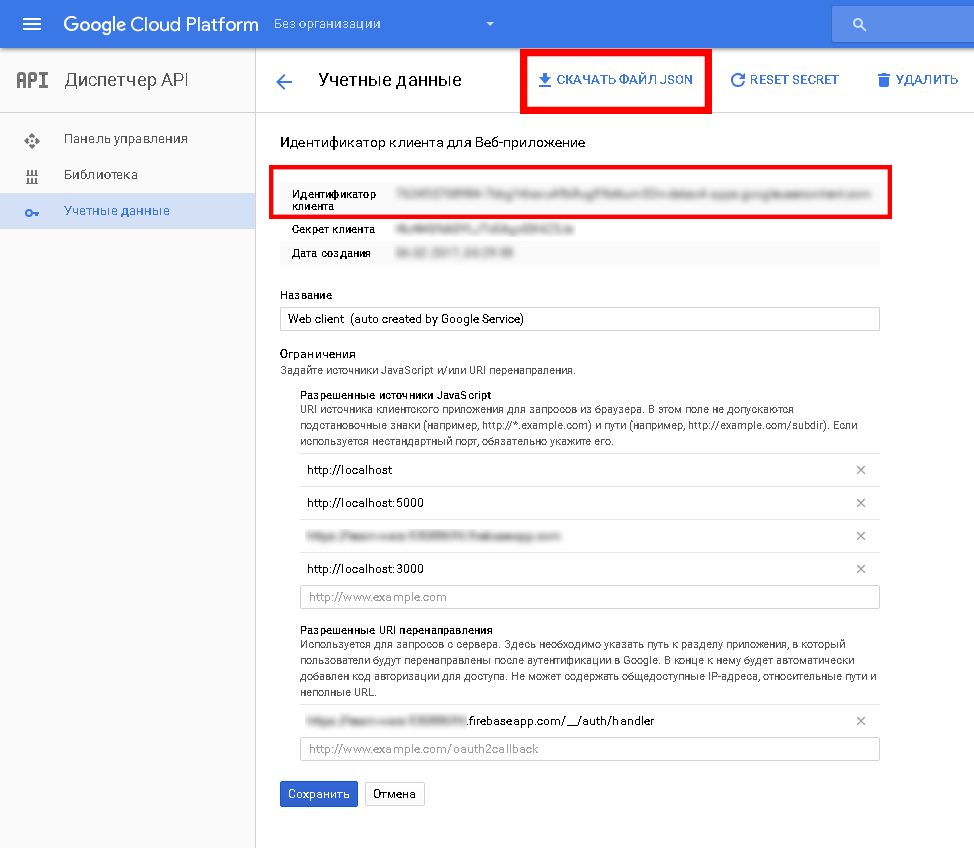
サーバーアプリケーションと共にフォルダーに保存します。 同じウィンドウで指定されたクライアント識別子は、GooglePlayGames-Android構成ウィンドウのクライアント部分(Unity3d)にコピーされ、以前は空白のままだった「Web App Client id」フィールドに貼り付けられます。
アプリケーションからサーバーに必要なデータをどのように配信するかはそれほど重要ではありません。ここで選択できます(エクスプレス、websocket、socket.ioなど)。
アプリケーションから受け取ったトークンをチェックするクラスを作成します。
GooglePlayAuth.js
"use strict"; const fs = require('fs'); const https = require("https"); const google = require('googleapis'); /** * GoogleCloud */ const _clientSecret = "client_secret.apps.googleusercontent.com.json"; const _userInfoUrl = "https://www.googleapis.com/games/v1/players/me"; let oauth2Client; /** * */ class GooglePlayAuth { /** * * @param callback */ static Init(callback) { fs.readFile(_clientSecret, function (err, content) { if (err) { callback(err); return; } const credentials = JSON.parse(content); oauth2Client = new google.auth.OAuth2(credentials.web.client_id, credentials.web.client_secret, credentials.web.redirect_uris[0]); callback(null); }); } /** * * @param serverToken * @param callback */ static Verify(serverToken,callback) { oauth2Client.getToken(serverToken, function (err, token) { if (err) { callback(`Error while retrieve access token: ${err}`); return; } oauth2Client.credentials = token; // require("https").get(`${_userInfoUrl}?access_token=${token.access_token}`, function (res) { res.on("data", function (d) { let userData = {}; try { userData = JSON.parse(d); } catch (er) { callback(`Error parse user data ${er}`); return; } if (userData.playerId == null) { callback(`Error read playerId: ${userData}`); return; } // - callback(null, userData); }); }).on("error", function (err) { callback(`Fail request: ${err}`); }); }); } } module.exports = GooglePlayAuth;
サーバーを起動するとき、GooglePlayAuth.Initを呼び出すことを忘れないでください。
クライアントアプリケーションから受信したサーバートークンはGooglePlayAuth.Verifyに送信され、コールバックでエラーまたはGoogleサービスから受信したユーザーデータが返されます。
ご清聴ありがとうございました!