まえがき
少し前まで、プロジェクトを開発していて、ちょっとしたトラブルに遭遇しました。 このプロジェクトは、Dribbble APIを介したデータの取得に関与していました。 画像を受け取ってRecyclerViewでソートしたとき、あるアクティビティから別のアクティビティに画像を転送する必要がありました。 このプロジェクトでは最新のソリューションを使用する必要があったため、CollapsingToolbarLayoutを使用してRecyclerViewのアイテムをクリックし、それに画像を貼り付けたときにすべてを実装することにしました。
私が話していることを明確にするために(「水を注ぐな」と読んでください)、例を挙げます。
このgifでわかるように、画像は白い背景にあり、実装した画像スクリム用でなければ、画像の名前「Happy Octopus」は表示されません(白い画像に白いフォント)。
それでは、実装に取り掛かりましょう。
実装
実際、いわゆる Image Scrimは、CollapsingToolbarLayout内の通常のView要素です。
1. CollapsingToolbarLayout内の画像の後に必要なレイアウトで、次のような2つのカスタムビューを作成します。
<android.support.design.widget.CollapsingToolbarLayout android:id="@+id/collapsing_toolbar" android:layout_width="match_parent" android:layout_height="wrap_content" android:fitsSystemWindows="true" app:contentScrim="?attr/colorPrimary" app:layout_scrollFlags="scroll|exitUntilCollapsed" app:expandedTitleTextAppearance="@style/TextAppearance.AppCompat.Large"> <ImageView android:id="@+id/image_shot" android:layout_width="match_parent" android:layout_height="@dimen/shot_image_height" android:background="@color/colorPrimary" android:scaleType="centerCrop" app:layout_collapseMode="parallax" /> <View android:layout_width="match_parent" android:layout_height="@dimen/text_scrim_height_top" android:background="@drawable/scrim_top" app:layout_collapseMode="pin"/> <View android:layout_width="match_parent" android:layout_height="88dp" android:layout_gravity="@dimen/text_scrim_height_bottom" android:layout_alignBottom="@+id/image_shot" android:background="@drawable/scrim_bottom"/>...
2. drawableで2つのファイルを作成します。これらのファイルは、上端と下端の画像からの影を担当し、それに応じて名前を付けます。
scrim_top.xml
<shape xmlns:android="http://schemas.android.com/apk/res/android"> <gradient android:angle="270" android:startColor="@color/translucent_scrim_top" android:centerColor="@color/translucent_scrim_top_center" android:endColor="@android:color/transparent"/> </shape>
scrim_bottom.xml
<shape xmlns:android="http://schemas.android.com/apk/res/android"> <gradient android:angle="90" android:startColor="@color/translucent_scrim_bottom" android:centerColor="@color/translucent_scrim_bottom_center" android:endColor="@android:color/transparent"/> </shape>
3.色に色を追加します。
<color name="translucent_scrim_top">#33000000</color> <color name="translucent_scrim_top_center">#26000000</color> <color name="translucent_scrim_bottom">#4D000000</color> <color name="translucent_scrim_bottom_center">#40000000</color>
色の透明度を使用すると、再生して、より滑らかな色を選択できます。
4.itudempl.xmlに次の行を追加します。
<dimen name="text_scrim_height_top">50dp</dimen> <dimen name="text_scrim_height_bottom">88dp</dimen>
tykeの方法では、上と下の端からのこれらのインデントが300 dpの画像に最適であることがわかりました。したがって、等辺の画像がある場合は、dpで遊ぶことができます。つまり、設計の原則に合わせます。
PSこの記事が役に立つことを願っています。 もしあれば、すべての質問に答えてうれしいです。
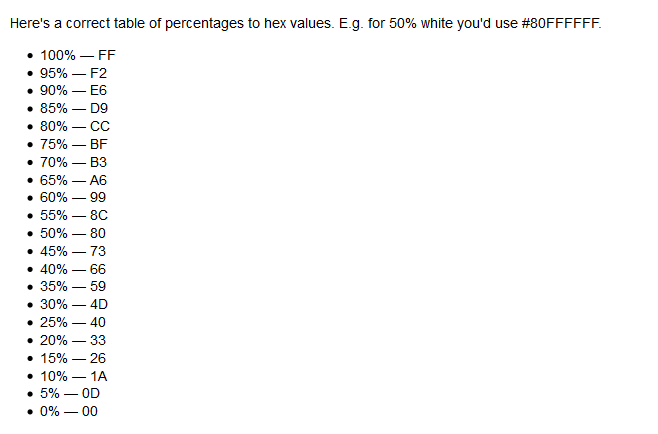
PPS次の色のアルファチャンネル付きの小さなプレートも、Image Scrimに必要な透明度を選択するのに役立ちます。