今日、FPGAとFrankieのデバッグボードに関する最新のシリーズがあります。 前のシリーズ1、2 。
 フランケンシュタインのボードを使用して、すでにラジオでトーンを送信しました 。 次に、サウンドと音楽を再生してみてください。
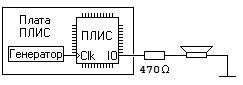
これを行うには、通常のスピーカーをFPGAに接続します。 25.175 MHzのジェネレーターがフランキーに接続されています。 この周波数を可聴周波数の範囲に分割してFPGAに適用すると、音が聞こえます。 私は、さまざまな音を得ることができます。
音質のテストは、家の中で最高のリスナー-マーシャになります。 60 KHzの周波数範囲-これは冗談ではありません! )))
配線図
サウンドを再生するには、コンストラクター「Expert」のスピーカーを使用します(移動中に別のスピーカーは見つかりませんでした)。 470オームの抵抗の抵抗器を介してスピーカーをFPGAピンに接続します。
シンプルな音
FPGAはバイナリカウンターに簡単に適合します。 したがって、フランキーでさえそのようなタスクに対処します。 たとえば、16ビットカウンターは0から65535までカウントします。25.175MHzと16ビットカウンターを使用すると、25175000/65536 = 384.14 Hzの周波数のサウンドを取得できます。
module epm7064_test(clk, audio); input wire clk; output wire audio; // 16 reg [15:0] counter; always @(posedge clk) counter <= counter+1; // assign audio = counter[15]; endmodule
最初のオクターブ(440 Hz)の「A」に注意してください
オーディオ範囲でランダムな周波数を取得しました。 これで、440 Hzに等しい周波数を取得できます。 これは、最初のオクターブの「A」音の周波数です。
これを行うには、クロック周波数を65536で除算する代わりに、クロック周波数の値を57216(27175000 Hz / 440 Hz)で除算する必要があります。
module epm7064_test(clk, audio); input wire clk; output wire audio; // 16 reg [15:0] counter; initial counter <= 16'd0; always @(posedge clk) begin if(counter==57216) begin counter <= 0; end else begin counter <= counter + 1'b1; end end assign audio = counter[15]; endmodule
しかし、この実装には問題があります。 周波数は440 Hzですが、信号のデューティサイクルは50%ではありません。 低レベルは0から32767のカウンター値で表示され、高レベルは32767から56817で表示されます。スピーカーがユニット内にいるのは時間の42%だけであることがわかります。 50%のデューティサイクルを取得する最も簡単な方法は、2で除算を追加することです。 つまり、最初に28608で、次に2です。
module epm7064_test(clk, audio); input wire clk; output audio; // 15 reg [14:0] counter; initial counter <= 15'd0; always @(posedge clk) begin if(counter==28608) begin counter <= 0; end else begin counter <= counter + 1'b1; end end reg audio; always @(posedge clk) if(counter==28608) audio <= ~audio; endmodule
もちろん、これは耳で区別することはほとんど不可能です。
コードをより柔軟にするために、clkdividerパラメーターを追加できます。 カウンターのカウントの方向を反対に変更することは、好みの問題です。 FPGAが使用するリソースに違いはありません。
module epm7064_test(clk, audio); input wire clk; output audio; parameter clkdivider = 25175000/440/2; reg [14:0] counter; initial counter <= 15'd0; always @(posedge clk) begin if(counter==0) begin counter <= clkdivider - 1'b1; end else begin counter <= counter - 1'b1; end end reg audio; always @(posedge clk) if(counter==0) audio <= ~audio; endmodule
救急車のサイレン
次に、2つの異なるトーンを交互に試してみましょう。 このために使用します
24ビットのカウンター(トーンと呼びましょう)、1.5 Hzのオーダーの周波数を取得します。
この信号を使用して、2つの周波数を切り替えます。
module epm7064_test(clk, audio); input wire clk; output audio; parameter clkdivider = 25175000/440/2; reg [14:0] counter; initial counter <= 15'd0; reg [23:0] tone; initial tone <= 24'd0; always @(posedge clk) tone <= tone+1; always @(posedge clk) begin if(counter==0) begin counter <= (tone[23] ? clkdivider-1 : clkdivider/2-1); end else begin counter <= counter - 1'b1; end end reg audio; always @(posedge clk) if(counter==0) audio <= ~audio; endmodule
では、警察のサイレンを作ってみましょう。 まず、トーンカウンターを変更して、周波数を2倍にする23ビットのみにするようにします(最上位ビットは、約3 Hzの周波数で変化します)。
次に、「のこぎり」を取得するためのトリックを考え出す必要があります。 トーンカウンタからビット15〜21を取得します。 次のようになります: tone[21:15]
。 これらの7ビットは0から127の値を与え、一定の速度で増加します。 値が127に達するとすぐに0にリセットされ、再び上昇し始めます。 減少する値を取得するために、これらのビットを反転できます。 次のようになります: (~tone[21:15])
。 これにより、値が127から0に下がり、すべてが繰り返されます。
徐々に成長し、その後徐々に減少する鋸を得るために、
tone[22]
ビットtone[22]
取得します。
wire [6:0] ramp = (tone[22] ? tone[21:15] : ~tone[21:15]); // , // "if tone[22]=1 then ramp=tone[21:15] else ramp=~tone[21:15]"
しかし、このようなノコギリは私たちのプロジェクトで使用する準備ができていません。
のこぎりの値は7'b0000000
から7'b0000000
まで7'b1111111
です。 既にサウンドを取得できる値を取得するために、ノコギリの単語の値に、左側にさらに2ビット'01'
、右側に6ビット'000000'
を追加します。
wire [14:0] clkdivider = {2'b01, ramp, 6'b000000};
したがって、15'b010000000000000から15'b010000000000000
の範囲、または15'b010000000000000
から15'b011111111000000
の16進数システム、または10進数の8192から15'b010000000000000
の範囲で絶えず変化するclkdivider値を取得します。25.175MHzのジェネレーター周波数では、 771 Hzから1537 Hz。
module epm7064_test(clk, audio); input wire clk; output audio; reg [14:0] counter; initial counter <= 15'd0; reg [23:0] tone; initial tone <= 24'd0; always @(posedge clk) tone <= tone+1; wire [6:0] ramp = (tone[22] ? tone[21:15] : ~tone[21:15]); wire [14:0] clkdivider = {2'b01, ramp, 6'b000000}; always @(posedge clk) begin if(counter==0) begin counter <= clkdivider; end else begin counter <= counter - 1'b1; end end reg audio; always @(posedge clk) if(counter==0) audio <= ~audio; endmodule
そして、簡単なサイレンが鳴りました。 しかし、実際のサイレンは、速度を高速から低速に変更します。 高速のこぎりのtone[21:15]
ビットと、より低い周波数ののこぎりのtone[24:18]
ビットを使用できます。
wire [6:0] fastsweep = (tone[22] ? tone[21:15] : ~tone[21:15]); wire [6:0] slowsweep = (tone[25] ? tone[24:18] : ~tone[24:18]); wire [14:0] clkdivider = {2'b01, (tone[27] ? slowsweep : fastsweep), 6'b000000};
これを行うには、トーンカウンターの容量を増やす必要があります。
module epm7064_test(clk, audio); input wire clk; output audio; reg [14:0] counter; initial counter <= 15'd0; reg [27:0] tone; initial tone <= 28'd0; always @(posedge clk) tone <= tone+1; wire [6:0] ramp = (tone[22] ? tone[21:15] : ~tone[21:15]); wire [6:0] fastsweep = (tone[22] ? tone[21:15] : ~tone[21:15]); wire [6:0] slowsweep = (tone[25] ? tone[24:18] : ~tone[24:18]); wire [14:0] clkdivider = {2'b01, (tone[27] ? slowsweep : fastsweep), 6'b000000}; always @(posedge clk) begin if(counter==0) begin counter <= clkdivider; end else begin counter <= counter - 1'b1; end end reg audio; always @(posedge clk) if(counter==0) audio <= ~audio; endmodule
メロディーを演奏する
そして、今度の新年に敬意を表して、クリスマスツリーに関する歌を演奏してみましょう。 この曲がどのように再生されるかを理解するために、 メモとビデオを探しましょう。
一連のノートを再生するには、適切なタイミングで目的のノートの番号を発行するシーケンサーを作成する必要があります。 このノート値を分周器の定数に変換して、対応するノートを取得します。
ビデオから判断すると、必要なのは1オクターブ+ 1だけです。原則として、すべてのノートは必要ありません。
また、曲で使用される7つのノートのみが必要です。 したがって、ノート番号を保存するには3ビットで十分です。 もちろん、音符の数ではなく、メロディーのトーンまたは周波数の数を言う方が正しいでしょう。
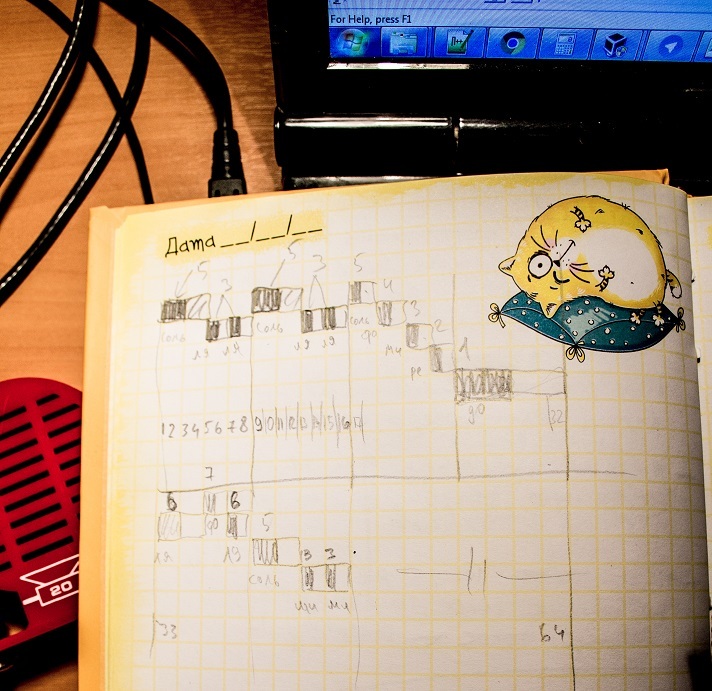
そのため、メロディにはノートがあります:before、re、mi、fa、salt、la、そして次のオクターブまで。 それに応じて番号を付けます。 シーケンスは次のとおりです。
5 3 3 5 3 3 5 4 3 2 1 (+1)
タイムチャートを描きます。
秘密の表形式プロセッサを使用して、音の周波数と分周器の値を計算し、それらをわずかに丸めます。
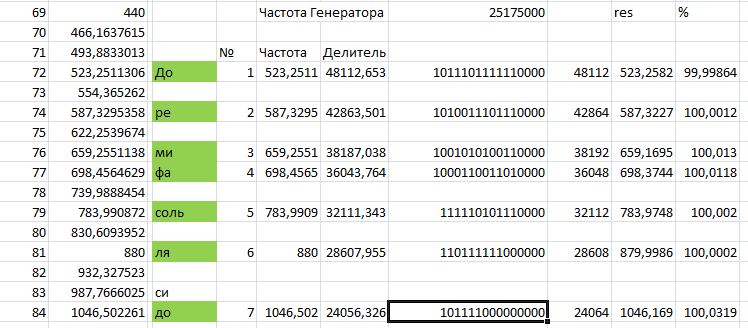
すべての計算が完了したので、ロジックを説明します。
ノート番号による分周器:
wire [15:0] clkdivider = (note_num == 0) ? 16'd0 : (note_num == 1) ? 16'b1011101111110000 : (note_num == 2) ? 16'b1010011101110000 : (note_num == 3) ? 16'b1001010100110000 : (note_num == 4) ? 16'b1000110011010000 : (note_num == 5) ? 16'b0111110101110000 : (note_num == 6) ? 16'b0110111111000000 : (note_num == 7) ? 16'b0101111000000000 : 16'd0;
絵から判断すると、64ステップで得られるシーケンサーです。 これを行うには、トーンカウンターの容量を増やします。
reg [27:0] tone; initial tone <= 28'd0; always @(posedge clk) tone <= tone + 1'b1; wire [5:0] step_num = tone[26:(26-5)]; // 6 0 63
シーケンサーのステップ番号からノート番号に変換します。
wire [2:0] note_num = (step_num == 0) ? 5 : // 1 (step_num == 1) ? 5 : // 2 (step_num == 2) ? 0 : // 3 (step_num == 3) ? 0 : // 4 (step_num == 4) ? 3 : // 5 (step_num == 5) ? 0 : // 6 (step_num == 6) ? 3 : // 7 (step_num == 7) ? 0 : // 8 (step_num == 8) ? 5 : // 9 (step_num == 9) ? 5 : // 10 (step_num ==10) ? 0 : // 11 (step_num ==11) ? 0 : // 12 (step_num ==12) ? 3 : // 13 (step_num ==13) ? 0 : // 14 (step_num ==14) ? 3 : // 15 (step_num ==15) ? 0 : // 16 ... . .
module epm7064_test(clk, audio); input wire clk; output audio; reg [15:0] counter; initial counter <= 16'd0; reg [27:0] tone; initial tone <= 28'd0; always @(posedge clk) tone <= tone + 1'b1; wire [5:0] step_num = tone[26:(26-5)]; wire [2:0] note_num = (step_num == 0) ? 5 : // 1 (step_num == 1) ? 5 : // 2 (step_num == 2) ? 0 : // 3 (step_num == 3) ? 0 : // 4 (step_num == 4) ? 3 : // 5 (step_num == 5) ? 0 : // 6 (step_num == 6) ? 3 : // 7 (step_num == 7) ? 0 : // 8 (step_num == 8) ? 5 : // 9 (step_num == 9) ? 5 : // 10 (step_num ==10) ? 0 : // 11 (step_num ==11) ? 0 : // 12 (step_num ==12) ? 3 : // 13 (step_num ==13) ? 0 : // 14 (step_num ==14) ? 3 : // 15 (step_num ==15) ? 0 : // 16 (step_num ==16) ? 5 : // 17 (step_num ==17) ? 0 : // 18 (step_num ==18) ? 4 : // 19 (step_num ==19) ? 0 : // 20 (step_num ==20) ? 3 : // 21 (step_num ==21) ? 0 : // 22 (step_num ==22) ? 2 : // 23 (step_num ==23) ? 0 : // 24 (step_num ==24) ? 1 : // 25 (step_num ==25) ? 1 : // 26 (step_num ==26) ? 1 : // 27 (step_num ==27) ? 1 : // 28 (step_num ==28) ? 0 : // 29 (step_num ==29) ? 0 : // 30 (step_num ==30) ? 0 : // 31 (step_num ==31) ? 0 : // 32 (step_num ==32) ? 6 : // 33 (step_num ==33) ? 6 : // 34 (step_num ==34) ? 0 : // 35 (step_num ==35) ? 0 : // 36 (step_num ==36) ? 7 : // 37 (step_num ==37) ? 0 : // 38 (step_num ==38) ? 6 : // 39 (step_num ==39) ? 0 : // 40 (step_num ==40) ? 5 : // 41 (step_num ==41) ? 5 : // 42 (step_num ==42) ? 0 : // 43 (step_num ==43) ? 0 : // 44 (step_num ==44) ? 3 : // 45 (step_num ==45) ? 0 : // 46 (step_num ==46) ? 3 : // 47 (step_num ==47) ? 0 : // 48 (step_num ==48) ? 5 : // 49 (step_num ==49) ? 0 : // 50 (step_num ==50) ? 4 : // 51 (step_num ==51) ? 0 : // 52 (step_num ==52) ? 3 : // 53 (step_num ==53) ? 0 : // 54 (step_num ==54) ? 2 : // 55 (step_num ==55) ? 0 : // 56 (step_num ==56) ? 1 : // 57 (step_num ==57) ? 1 : // 58 (step_num ==58) ? 1 : // 59 (step_num ==59) ? 1 : // 60 (step_num ==60) ? 0 : // 61 (step_num ==61) ? 0 : // 62 (step_num ==62) ? 0 : // 63 (step_num ==63) ? 0 : // 64 0; wire [15:0] clkdivider = (note_num == 0) ? 16'd0 : (note_num == 1) ? 16'b1011101111110000 : (note_num == 2) ? 16'b1010011101110000 : (note_num == 3) ? 16'b1001010100110000 : (note_num == 4) ? 16'b1000110011010000 : (note_num == 5) ? 16'b0111110101110000 : (note_num == 6) ? 16'b0110111111000000 : (note_num == 7) ? 16'b0101111000000000 : 16'd0; always @(posedge clk) begin if(counter==0) begin counter <= clkdivider; end else begin counter <= counter - 1'b1; end end reg audio; always @(posedge clk) if(counter==0) audio <= ~audio; endmodule
テストオーディションを始めましょう
私はマーシャが承認すると思う;)^ _ ^
結論
結局のところ、64セルのFPGAは、アラームサイレンのサウンドジェネレーターとして機能することができます。 小さなクリスマスツリーについてのメロディーを使用したプロジェクトでは、64個のうち61個のセルを取りました。 そしてこれは、例えば、音楽のドアベル(90年代!)などのリソースがまだあることを意味します。
ソースコード: https : //github.com/UA3MQJ/epm7064_audio
記事を書くとき、 fpga2fun - Music Boxの記事のアイデアとソースコードが使用されました 。