次に、アセットフォルダーの作成方法とフォントの追加方法について説明します。これをスキップできます。
アセットフォルダーの作成とフォントの追加
資産フォルダーは、フォントを含むさまざまなリソースを保存するために必要です。 mainのルートで手動で作成できます:
\ app \ src \ main \ asset
またはより簡単な方法で
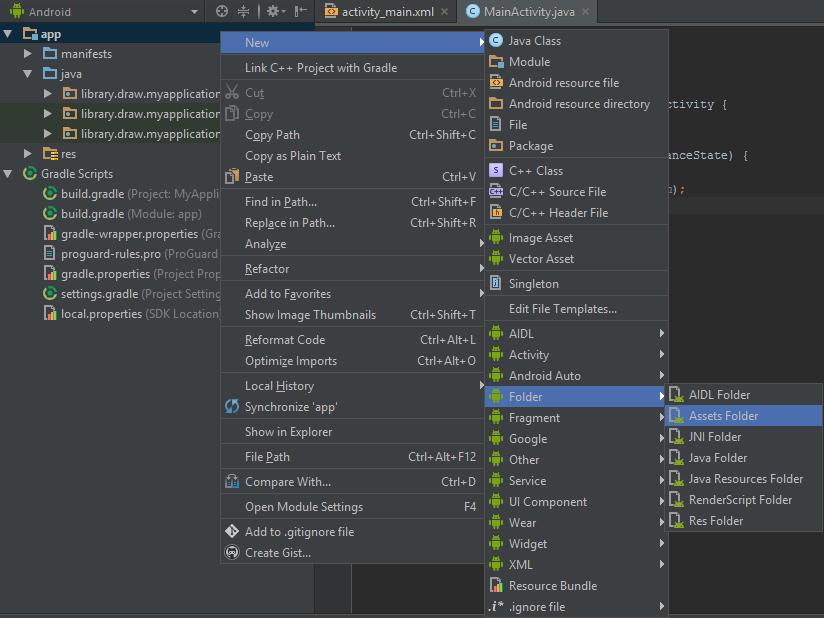
次に、アセットがネストをサポートしているため、.ttf形式のファイルをルートのアセットにドロップするか、fontsフォルダーを作成します。
\ app \ src \ main \ asset
またはより簡単な方法で
次に、アセットがネストをサポートしているため、.ttf形式のファイルをルートのアセットにドロップするか、fontsフォルダーを作成します。
したがって、TextViewのフォントの使用の実装に移りましょう。純粋な形式では、おおよそ次のようになります。
Typeface type = Typeface.createFromAsset(getAssets(),"fonts/font1.ttf"); myTextView.setTypeface(type);
5つ以上のTextViewになると、このプロセスは煩わしくなり始めます。 しかし、この設計を使用している開発者が遭遇する問題は、迷惑だけではありません。 実際には、フォントファイル自体の処理とTypefaceオブジェクトへの変換はかなり時間がかかるプロセスであるため、シートでこのようなデザインを使用すると、信じられないほどの不具合が発生します。
この問題を通常のシングルトンで解決することを提案します。 そして、同様のものを作成します。
public class SingletonFonts { private static Typeface font1; private static Typeface font2; private static Typeface font3; public Typeface getFont1() { return font1; } public Typeface getFont2() { return font2; } public Typeface getFont3() { return font3; } public static void setFont1(Typeface font1) { SingletonFonts.font1 = font1; } public static void setFont2(Typeface font2) { SingletonFonts.font2 = font2; } public static void setFont3(Typeface font3) { SingletonFonts.font3 = font3; } private static volatile SingletonFonts instance; private SingletonFonts() {} public static SingletonFonts getInstance(Context activity) { SingletonFonts localInstance = instance; if (localInstance == null) { synchronized (SingletonFonts.class) { localInstance = instance; if (localInstance == null) { instance = localInstance = new SingletonFonts(); } } setFont1(Typeface.createFromAsset(activity.getAssets(), "fonts/font1.ttf")); setFont2(Typeface.createFromAsset(activity.getAssets(), "fonts/font2.ttf")); setFont3(Typeface.createFromAsset(activity.getAssets(), "fonts/font3.ttf")); } return localInstance; } }
そして、次のようにシングルトンを使用してフォントをインストールします。
public class MainActivity extends AppCompatActivity { TextView textView1; TextView textView2; TextView textView3; @Override protected void onCreate(Bundle savedInstanceState) { super.onCreate(savedInstanceState); setContentView(R.layout.activity_main); textView1 = (TextView) findViewById(R.id.text_view_1); textView2 = (TextView) findViewById(R.id.text_view_2); textView3 = (TextView) findViewById(R.id.text_view_3); textView1.setTypeface(SingletonFonts.getInstance(this).getFont1()); textView2.setTypeface(SingletonFonts.getInstance(this).getFont2()); textView3.setTypeface(SingletonFonts.getInstance(this).getFont3()); } }
この設計を使用して、シートの遅延に関する2番目の問題を解決しましたが、最初の最も重要な問題ではなく、すべてのテキストフィールドを見つけてフォントを何度も設定し、個々のメソッドを記述し、神経細胞を失う必要があります。 別の問題は、プレビューでは、標準フォントであるため、そのフォントの幅、高さです。 ライブデバイスまたはエミュレータでのみ表示できますが、非常に便利ではありません。
上記の問題を紹介し、TextViewをブラックジャックとフォントで記述します。
まず、コンストラクターを使用して通常のTextViewから継承するクラスを作成します。
public class CustomFontsTextView extends TextView { public CustomFontsTextView(Context context) { super(context); } public CustomFontsTextView(Context context, AttributeSet attrs) { super(context, attrs); } public CustomFontsTextView(Context context, AttributeSet attrs, int defStyleAttr) { super(context, attrs, defStyleAttr); } public CustomFontsTextView(Context context, AttributeSet attrs, int defStyleAttr, int defStyleRes) { super(context, attrs, defStyleAttr, defStyleRes); } }
次に、valuesフォルダーにattrs.xmlファイルを作成します
attrs.xmlの作成
ここに行きましょう

attrs.xmlというファイルを作成します。作成後は次のようになります。
attrs.xmlというファイルを作成します。作成後は次のようになります。
<?xml version="1.0" encoding="utf-8"?> <resources> </resources>
その中に次のコードブロックを作成します。
// <declare-styleable name="CustomFontsTextView"> // . name = "fonts" - xml <attr name="fonts" format="enum"> <enum name="font1" value="0"/> <enum name="font2" value="1"/> <enum name="font3" value="2"/> </attr> </declare-styleable>
次に、 CustomFontsTextViewクラスに戻り、次のメソッドを記述します。
public class CustomFontsTextView extends TextView { public CustomFontsTextView(Context context) { super(context); } public CustomFontsTextView(Context context, AttributeSet attrs) { super(context, attrs); setFonts(attrs,context); } public CustomFontsTextView(Context context, AttributeSet attrs, int defStyleAttr) { super(context, attrs, defStyleAttr); setFonts(attrs,context); } public CustomFontsTextView(Context context, AttributeSet attrs, int defStyleAttr, int defStyleRes) { super(context, attrs, defStyleAttr, defStyleRes); setFonts(attrs,context); } private void setFonts(AttributeSet attributeSet, Context context){ TypedArray a = context.getTheme().obtainStyledAttributes( attributeSet, R.styleable.CustomFontsTextView, 0, 0); a.recycle(); int fonts = a.getInt(R.styleable.CustomFontsTextView_fonts,-1); SingletonFonts singltonFonts = SingletonFonts.getInstance(context); switch (fonts){ case (0): setTypeface(singltonFonts.getFont1()); break; case (1): setTypeface(singltonFonts.getFont2()); break; case (2): setTypeface(singltonFonts.getFont3()); break; } } }
それだけです。 次に、カスタム属性を使用できるようにプロジェクトを再構築する必要があります。 その後、アクティビティのxmlファイルに移動して、次のように記述します。
<?xml version="1.0" encoding="utf-8"?> <LinearLayout xmlns:android="http://schemas.android.com/apk/res/android" xmlns:tools="http://schemas.android.com/tools" xmlns:app="http://schemas.android.com/apk/res-auto" android:id="@+id/activity_main" android:layout_width="match_parent" android:layout_height="match_parent" android:orientation="vertical" tools:context="library.draw.myapplication.MainActivity"> <library.draw.myapplication.CustomFontsTextView android:layout_width="wrap_content" android:layout_height="wrap_content" android:layout_gravity="center_horizontal" android:layout_margin="16dp" app:fonts="font1" android:textSize="24sp" android:id="@+id/text_view_1" android:text="Hello World!" /> <library.draw.myapplication.CustomFontsTextView android:layout_width="wrap_content" android:layout_height="wrap_content" android:layout_gravity="center_horizontal" android:layout_margin="16dp" android:textSize="48sp" app:fonts="font2" android:id="@+id/text_view_2" android:text="Hello World!" /> <library.draw.myapplication.CustomFontsTextView android:layout_width="wrap_content" android:layout_height="wrap_content" android:layout_gravity="center_horizontal" android:layout_margin="16dp" android:textSize="24sp" app:fonts="font3" android:id="@+id/text_view_3" android:text="Hello World!" /> </LinearLayout>
プレビューでは、フォントが完全に完成したテキストフィールドが表示されます。
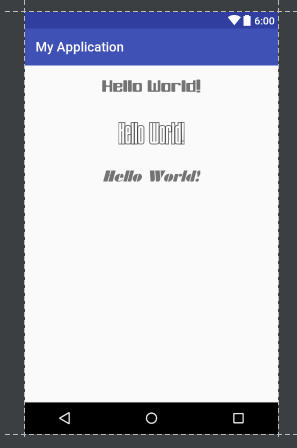
標準形式で、通常のTextViewのようなカスタムテキストフィールドにアクセスすることをお勧めします。
TextView textView = (TextView) findViewById(R.id.text_view_1);
ご清聴ありがとうございました。