この記事はEmrullah Luleci による記事の翻訳であり、その続きです。
下部画面( 以下、「下部画面/レイヤー」は下部シート要素-約Perとして理解されます )-画面の下部からポップアップし、追加コンテンツを表示するために使用されるコンポーネント。 この要素の詳細については、 材料設計専用の公式ウェブサイトをご覧ください。
依存関係
この要素を使用するには、プロジェクトに最新のサポートライブラリを追加します。
dependencies { // XXX compile 'com.android.support:appcompat-v7:XXX' compile 'com.android.support:design:XXX' }
AppCompatActivityから派生したクラスを作成します。
public class ButtonActivity extends AppCompatActivity { ... }
レイアウトを作成する
画面下部のコンテンツ
便宜上、レイアウトを使用します。 最下層のbottom_sheet.xmlでファイルに名前を付けます。
bottom_sheet.xml
<?xml version="1.0" encoding="utf-8"?> <LinearLayout xmlns:android="http://schemas.android.com/apk/res/android" xmlns:app="http://schemas.android.com/apk/res-auto" android:id="@+id/bottom_sheet" android:layout_width="match_parent" android:layout_height="340dp" android:background="@android:color/darker_gray" android:orientation="vertical" app:behavior_hideable="true" app:behavior_peekHeight="80dp" app:layout_behavior="android.support.design.widget.BottomSheetBehavior"> <TextView android:layout_width="match_parent" android:layout_height="80dp" android:background="@color/colorAccent" android:gravity="center" android:text="@string/bottom_sheet_peek" android:textColor="@android:color/white" /> <TextView android:layout_width="match_parent" android:layout_height="match_parent" android:gravity="center" android:text="@string/bottom_sheet_content" android:textColor="@android:color/white" /> </LinearLayout>
behavior_peekHeight:可視部分の高さを定義します。
behavior_hideable:下の画面を下にスワイプできるかどうかを決定します。
コンテナビュー
ルートビューとしてCoordinatorLayoutを作成します。 bottom_sheet.xmlの直接の子孫を追加します。 app_barおよびactivity_bottom_sheet_content要素は下の画面に直接関連していないため、これらを置換または削除できます。
レイアウト
<?xml version="1.0" encoding="utf-8"?> <android.support.design.widget.CoordinatorLayout xmlns:android="http://schemas.android.com/apk/res/android" xmlns:app="http://schemas.android.com/apk/res-auto" xmlns:tools="http://schemas.android.com/tools" android:layout_width="match_parent" android:layout_height="match_parent" tools:context="com.androidsample.BottomSheetActivity"> <!-- app bar --> <include layout="@layout/app_bar" /> <!-- --> <include layout="@layout/activity_bottom_sheet_content" /> <!-- --> <include layout="@layout/bottom_sheet" /> </android.support.design.widget.CoordinatorLayout>
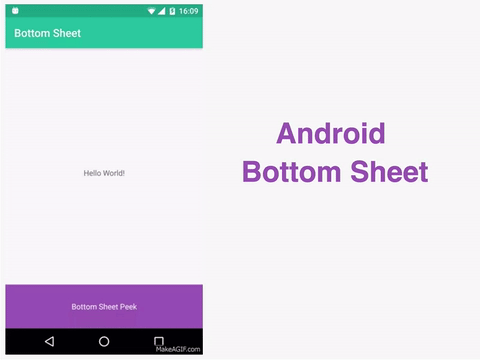
この段階で、下の画面は次のように機能するはずです。

動的制御
下画面の動作とプロパティも、Javaを使用して動的に制御できます。
ネタバレ
// LinearLayout llBottomSheet = (LinearLayout) findViewById(R.id.bottom_sheet); // BottomSheetBehavior bottomSheetBehavior = BottomSheetBehavior.from(llBottomSheet); // bottomSheetBehavior.setState(BottomSheetBehavior.STATE_COLLAPSED); bottomSheetBehavior.setState(BottomSheetBehavior.STATE_EXPANDED); bottomSheetBehavior.setState(BottomSheetBehavior.STATE_HIDDEN); // bottomSheetBehavior.setPeekHeight(340); // bottomSheetBehavior.setHideable(false); // bottomSheetBehavior.setBottomSheetCallback(new BottomSheetBehavior.BottomSheetCallback() { @Override public void onStateChanged(@NonNull View bottomSheet, int newState) { } @Override public void onSlide(@NonNull View bottomSheet, float slideOffset) { } });
下部画面へのアイテムの添付
ビューを下の画面に添付して、添付されたアイテムが下のレイヤーと同時に移動するようにすることもできます。
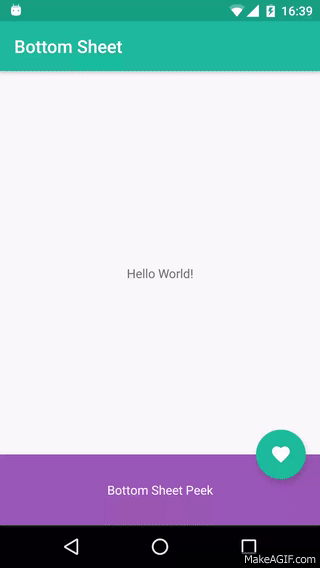
上記で作成したレイアウトにフローティングアクションボタンを追加します。 新しいコンポーネントは、 bottom_sheetと同様にCoordinatorLayoutの直下の子孫でなければなりません。 要素を下部画面にアタッチするには、下部画面ビューの idでapp:layout_anchorを、値top | endで app:layout_anchorGravityを追加する必要があります。
レイアウト
<?xml version="1.0" encoding="utf-8"?> <android.support.design.widget.CoordinatorLayout xmlns:android="http://schemas.android.com/apk/res/android" xmlns:app="http://schemas.android.com/apk/res-auto" xmlns:tools="http://schemas.android.com/tools" android:layout_width="match_parent" android:layout_height="match_parent" tools:context="com.androidsample.BottomSheetActivity"> <!-- app bar --> <include layout="@layout/app_bar" /> <!-- --> <include layout="@layout/activity_bottom_sheet_content" /> <!-- --> <include layout="@layout/bottom_sheet" /> <android.support.design.widget.FloatingActionButton android:layout_width="wrap_content" android:layout_height="wrap_content" android:layout_margin="@dimen/activity_vertical_margin" android:src="@drawable/ic_add_shopping_cart_white_24dp" android:theme="@style/PrimaryActionButton" app:layout_anchor="@+id/bottom_sheet" app:layout_anchorGravity="top|end" /> </android.support.design.widget.CoordinatorLayout>
これで、フローティングボタンが下画面の上部隅に固定され、移動します。
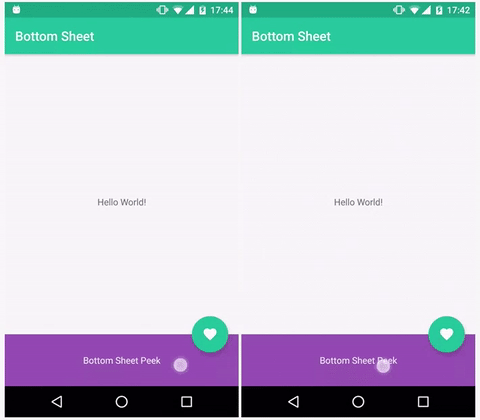
スクロール時にフローティングボタンを非表示にする
スクロール時にボタンを非表示にするには、下の画面にリスナーを追加し、ボタンを表示/非表示にする必要があります。 まず、必要なビューを見つけます。
ネタバレ
fab = findViewById(R.id.fab); View llBottomSheet = findViewById(R.id.bottom_sheet); // BottomSheetBehavior bottomSheetBehavior = BottomSheetBehavior.from(llBottomSheet); , , : // bottomSheetBehavior.setBottomSheetCallback(new BottomSheetBehavior.BottomSheetCallback() { @Override public void onStateChanged(@NonNull View bottomSheet, int newState) { } @Override public void onSlide(@NonNull View bottomSheet, float slideOffset) { fab.animate().scaleX(1 - slideOffset).scaleY(1 - slideOffset).setDuration(0).start(); } });
下の画面が完全に最小化された後にスクロールを開始して表示するときにボタンを非表示にするには、次を使用します。
ネタバレ
// bottomSheetBehavior.setBottomSheetCallback(new BottomSheetBehavior.BottomSheetCallback() { @Override public void onStateChanged(@NonNull View bottomSheet, int newState) { // // if (BottomSheetBehavior.STATE_DRAGGING == newState) { fab.animate().scaleX(0).scaleY(0).setDuration(300).start(); } else if (BottomSheetBehavior.STATE_COLLAPSED == newState) { fab.animate().scaleX(1).scaleY(1).setDuration(300).start(); } } @Override public void onSlide(@NonNull View bottomSheet, float slideOffset) { } });
両方のオプションの結果は次のとおりです。
以上です!