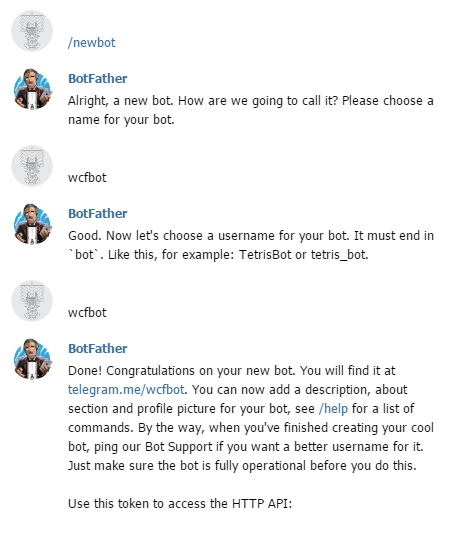
独自のボットを作成するのは非常に簡単です-電報に移動し、特別なボット@BotFatherを見つけて/ newbotコマンドを記述し、その指示に従うと、ボットのトークンが取得されます。
次に、ボットから更新を受信する方法を決定する必要があります。 Telegramには2つの方法があります-getUpdatesメソッドを使用するか、 Webhookを使用する。 最初の方法では、すべてが明確であり、2番目のオプションは私たちにとってより興味深いものです。 setWebhookメソッドを使用すると、 WebhookのURLを設定できます。これにより、すべての更新を送信する場所をTelegramサーバーに通知できます。 WCFサービスは単なるWebhookになります。
新しいWCFサービスアプリケーションプロジェクトを作成し、WcfBotという名前を付けます。 Telegramのドキュメントでは、更新ではJSONでシリアル化されたUpdateオブジェクトが取得されるため、このオブジェクトのクラスを新しいファイルに作成すると述べています。 Json2charpはこれを助けてくれました。
Update.cs
namespace WcfBot { public class From { public long id { get; set; } public string first_name { get; set; } public string last_name { get; set; } public string username { get; set; } } public class Chat { public long id { get; set; } public string first_name { get; set; } public string last_name { get; set; } public string username { get; set; } } public class ForwardFrom { public long id { get; set; } public string first_name { get; set; } public string last_name { get; set; } public string username { get; set; } } public class Audio { public string file_id { get; set; } public long duration { get; set; } public string performer { get; set; } public string title { get; set; } public string mime_type { get; set; } public long file_size { get; set; } } public class Thumb { public string file_id { get; set; } public long width { get; set; } public long height { get; set; } public long file_size { get; set; } } public class Document { public string file_id { get; set; } public Thumb thumb { get; set; } public string file_name { get; set; } public string mime_type { get; set; } public long file_size { get; set; } } public class Photo { public string file_id { get; set; } public long width { get; set; } public long height { get; set; } public long file_size { get; set; } } public class Sticker { public string file_id { get; set; } public string width { get; set; } public string height { get; set; } public Thumb thumb { get; set; } public long file_size { get; set; } } public class Video { public string file_id { get; set; } public long width { get; set; } public long height { get; set; } public long duration { get; set; } public Thumb thumb { get; set; } public string mime_type { get; set; } public long file_size { get; set; } } public class Voice { public string file_id { get; set; } public long duration { get; set; } public string mime_type { get; set; } public long file_size { get; set; } } public class Contact { public string phone_number { get; set; } public string first_name { get; set; } public string last_name { get; set; } public long user_id { get; set; } } public class Location { public double longitude { get; set; } public double latitude { get; set; } } public class NewChatParticipant { public long id { get; set; } public string first_name { get; set; } public string last_name { get; set; } public string username { get; set; } } public class LeftChatParticipant { public long id { get; set; } public string first_name { get; set; } public string last_name { get; set; } public string username { get; set; } } public class NewChatPhoto { public string file_id { get; set; } public long width { get; set; } public long height { get; set; } public long file_size { get; set; } } public class ReplyToMessage { public long message_id { get; set; } public From from { get; set; } public long date { get; set; } public Chat chat { get; set; } public ForwardFrom forward_from { get; set; } public long forward_date { get; set; } public object reply_to_message { get; set; } public string text { get; set; } public Audio audio { get; set; } public Document document { get; set; } public IList<Photo> photo { get; set; } public Sticker sticker { get; set; } public Video video { get; set; } public Voice voice { get; set; } public string caption { get; set; } public Contact contact { get; set; } public Location location { get; set; } public NewChatParticipant new_chat_participant { get; set; } public LeftChatParticipant left_chat_participant { get; set; } public string new_chat_title { get; set; } public IList<NewChatPhoto> new_chat_photo { get; set; } public bool delete_chat_photo { get; set; } public bool group_chat_created { get; set; } } public class Message { public long message_id { get; set; } public From from { get; set; } public long date { get; set; } public Chat chat { get; set; } public ForwardFrom forward_from { get; set; } public long forward_date { get; set; } public ReplyToMessage reply_to_message { get; set; } public string text { get; set; } public Audio audio { get; set; } public Document document { get; set; } public IList<Photo> photo { get; set; } public Sticker sticker { get; set; } public Video video { get; set; } public Voice voice { get; set; } public string caption { get; set; } public Contact contact { get; set; } public Location location { get; set; } public NewChatParticipant new_chat_participant { get; set; } public LeftChatParticipant left_chat_participant { get; set; } public string new_chat_title { get; set; } public IList<NewChatPhoto> new_chat_photo { get; set; } public bool delete_chat_photo { get; set; } public bool group_chat_created { get; set; } } public class Update { public long update_id { get; set; } public Message message { get; set; } } }
ここで、ServiceContract属性を持つIService1インターフェイスを含むIService1.csファイルを開きます。これはサービスコントラクトです。 サービス操作を追加し、この操作にWebInvoke属性を追加します。これにより、サービス操作が応答するHTTPメソッド、データが受信する形式、アクセスするURLが決まります。
IService1.cs
namespace WcfBot { [ServiceContract] public interface IService1 { [OperationContract] [WebInvoke(Method = "POST", RequestFormat = WebMessageFormat.Json, ResponseFormat = WebMessageFormat.Json, UriTemplate = @"/Update")] void GetUpdate(Update update); } }
次に、ファイルService1.svc.csを開き、クラスService1に操作の実装を追加します。
Service1.svc.cs
namespace WcfBot { public class Service1 : IService1 { public void GetUpdate(Update update) { } } }
次に、ボットに代わってメッセージへの応答を送信する必要があります。 Telegram.Botライブラリはこれを支援します。 それをインストールするには、パッケージマネージャーコンソールに移動し([ツール]-> [NuGetパッケージマネージャー]-> [パッケージマネージャーコンソール])、次のように記述します。
Install-Package Telegram.Bot
メソッドでは、テレグラムでボットを作成するときに与えられたトークンを使用してTelegram.Bot.Apiオブジェクトを初期化し、メッセージ「Hello」への応答を実装します。
Service1.svc.cs
namespace WcfBot { public class Service1 : IService1 { public void GetUpdate(Update update) { var Bot = new Telegram.Bot.Api("<token>"); if(update.message.text == "") { Bot.SendTextMessage(update.message.chat.id, "," + update.message.from.first_name); } } } }
動作に追加して、Web.config構成ファイルを編集します。
<endpointBehaviors> <behavior name="web"> <webHttp /> </behavior> </endpointBehaviors>
およびsystem.serviceModelで:
<services> <service name="WcfBot.Service1"> <endpoint binding="webHttpBinding" contract="WcfBot.IService1" behaviorConfiguration="web"></endpoint> </service> </services>
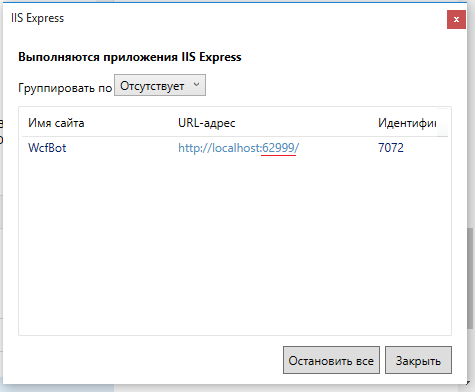
これでテストできます。 サービスを開始し、トレイに移動してIIS Expressを見つけ、右クリックして[すべてのアプリケーションを表示]をクリックし、サービスを見つけて、オンになっているポートを確認します
テレグラムサーバーがサービスにアクセスできるようにするには、localhostを共有する必要があります。 これらの目的には、 ngrokが適しています。
ngrokをダウンロードして解凍し、ngrok.exeを実行して次のコマンドを入力します。
ngrok http 1234 -host-header=”localhost: 1234 ”
1234の代わりに-サービスのポート。
その結果、ngrokはサービスへのURLを提供します。

TelegramはセキュアなHTTPSプロトコルのみをサポートしているため、httpsバージョンのリンクをコピーすることが重要です。 今では、ボットにメッセージの送信先アドレスを伝えるだけです。 これを行うには、リンクをブラウザのアドレスバーに移動するだけです。
https://api.telegram.org/bot <token> /setWebhook?url= <url> /Service1.svc/Update
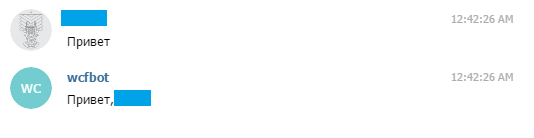
これですべてです。ボットに書き込み、実際に応答することを確認できます。
[ ソース ]