記事がhabrahabrで公開された後、 ここでは、この魅力的なギズモのないデザイナーの日常生活が見られなくなったという理由だけで、Framerで実験を続けることにしました。
新しいプロトタイプの目的はを再度ロードすることでしたが、別の形式で、何からもレイヤーをインポートせずに作成されました。 プロトタイプは、Framerの機能を説明し、コードで私の実験を説明するのに役立ちます。
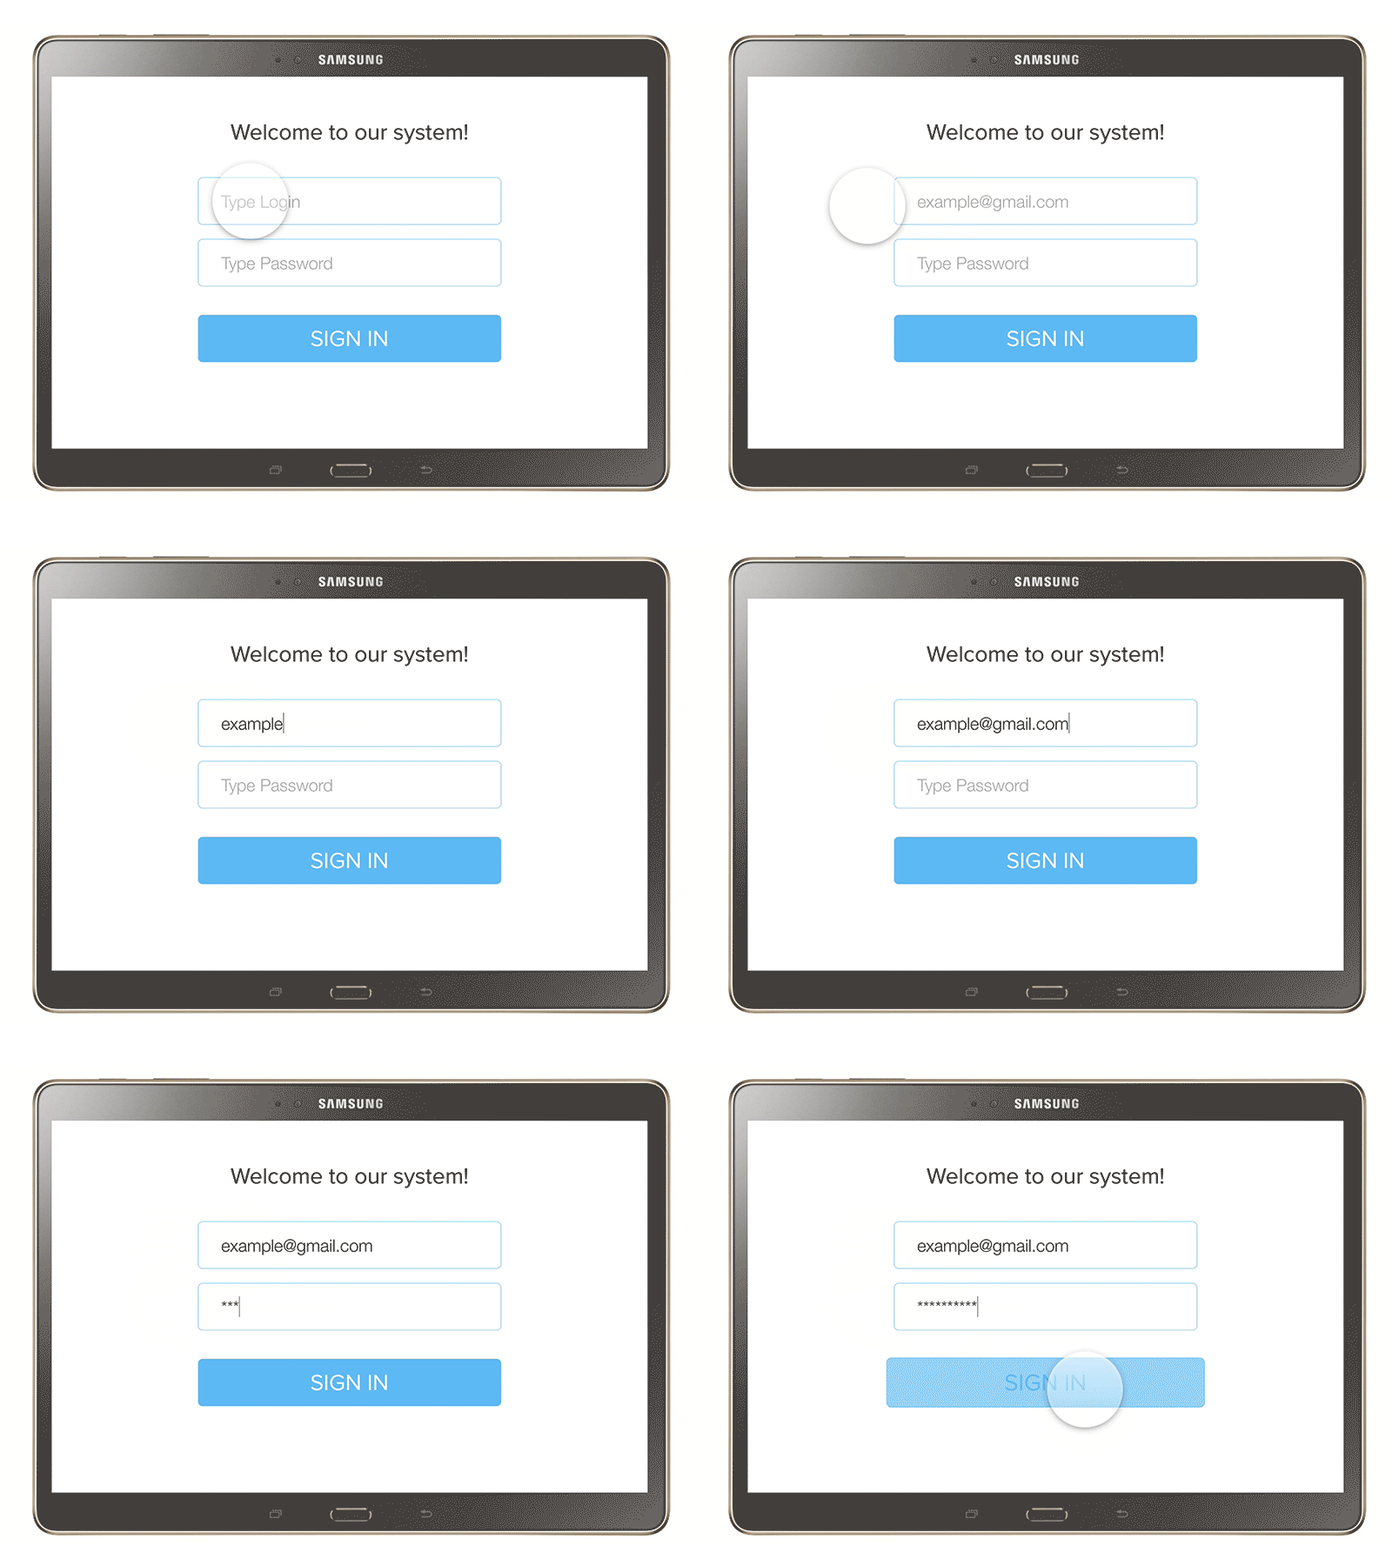
このチュートリアルで作成するものは次のとおりです。
単純なプロトタイプの3つの画面:
ログインおよびパスワード入力画面
起動画面
ようこそ画面
結果はここで見ることができます: http : //share.framerjs.com/s6q2nzb8xf3f/

Framerですべてのインターフェイス要素を一度に作成します(SketchまたはPhotoshopからレイヤーをインポートしません)。
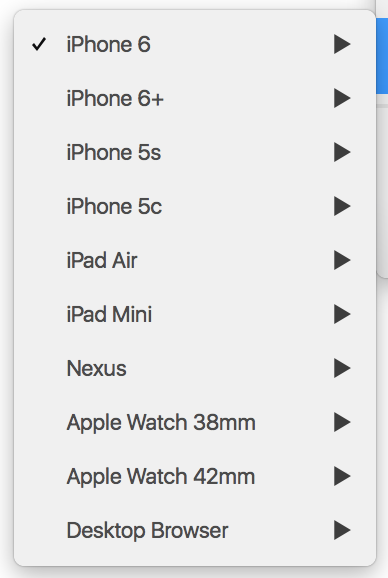
FramerのViewerリストにないデバイスのプロトタイプを作成しようとすると、タスクが複雑になります。 しかし、まず、どのデバイスがあるかを見てください。

ご覧のとおり、Samsung Galaxy Tabletはありません。 それを使用します。
プロトタイプの精度が重要な場合、Samsung Galaxy Tabletの写真をタブレットの自然なサイズ(2560 * 1600 px)に一致させる必要があります。
このチュートリアルでは、自然なサイズは重要ではなく、デバイスの画面に表示されるものも重要ではありません。
この写真を使いました 。
そのサイズ(1500 * 1000 px)。
パラメーターを作成します。
Framer.DeviceView.Devices["custom"] = "deviceType": "tablet" "screenWidth": 1258 "screenHeight": 784 "deviceImage":"http://www.androidheadlines.com/wp-content/uploads/2014/09/81WUwHeaVKL._SL1500_.jpg" "deviceImageWidth": 1500 "deviceImageHeight": 1000 Framer.Device.deviceType = "custom"
1258 * 784の画面サイズは、写真のデバイスの画面に表示されるものを完全にカバーするため、私たちに適しています。
「サインイン」画面の背景レイヤーを作成します。
Framer.DeviceView.Devices["custom"] = "deviceType": "tablet" "screenWidth": 1258 "screenHeight": 784 "deviceImage":"http://www.androidheadlines.com/wp-content/uploads/2014/09/81WUwHeaVKL._SL1500_.jpg" "deviceImageWidth": 1500 "deviceImageHeight": 1000 Framer.Device.deviceType = "custom"
これで、このレイヤーにログイン、パスワード、および「サインイン」ボタンのフィールドを描画できます。
フィールドにパスワードを入力してログインするには、InputField.coffeeモジュールをダウンロードする必要があります。 Jordan Robert Dobsonが作成したモジュールを使用しました。 こちらからダウンロードできます。
ダウンロード後、「modules」フォルダーに移動し、InputField.coffeeファイルをコピーして、プロジェクトの「modules」フォルダーに貼り付けます。

フレーマで、次のように書きます
Framer.DeviceView.Devices["custom"] = "deviceType": "tablet" "screenWidth": 1258 "screenHeight": 784 "deviceImage":"http://www.androidheadlines.com/wp-content/uploads/2014/09/81WUwHeaVKL._SL1500_.jpg" "deviceImageWidth": 1500 "deviceImageHeight": 1000 Framer.Device.deviceType = "custom"
これで、入力フィールドを作成できます。 パスワードフィールドから始めましょう。このフィールドは画面の中央にあります。
Password = new InputField width: 640 height: 100 color: "#212121" backgroundColor: "#fff" borderWidth: 1 borderColor: "#60B9F4" borderRadius: 10 fontSize: 36 fontFamily: "Proxima Nova" indent: 48 placeHolder: "Type Password" placeHolderFocus: "********" Password.center()
パラメーターでは、主な特性に加えて、カーソルを置いたときにフィールドに何を表示するかについても説明しました。この場合は、アスタリスクだけです:placeHolderFocus:“ ********”
次に、ログインフィールドのパラメーターを記述します。
Login = new InputField width: 640 height: 100 color: "#212121" y: Password.y - 130 backgroundColor: "#fff" borderWidth: 1 borderColor: "#60B9F4" borderRadius: 10 fontSize: 36 fontFamily: "Proxima Nova" indent: 48 placeHolder: "Type Login" placeHolderFocus: "example@gmail.com" Login.centerX()
ご覧のとおり、このフィールドをy = Password.y-130に設定します。つまり、Passwordフィールドの上に130 pxあり、中央のX座標に合わせます。
次に、パスワードフィールドの下に160ピクセル以下のボタンを作成します。
Button = new Layer width: 640 height: 100 borderWidth: 1 borderColor: "#60B9F4" borderRadius: 10 html: "SIGN IN" backgroundColor: "#60B9F4" y: Password.y + 160 Button.centerX() Button.style.color = "#fff" Button.style.fontSize = "48px" Button.style.fontFamily = "Proxima Nova" Button.style.lineHeight = "100px" Button.style.textAlign = "center"
この画面のタイトルを書きましょう。 たとえば、「システムへようこそ!」というフレーズ。
ヘッダーの特定の状態をさらに指定しないために、ヘッダーの親レイヤーであるsuperLayerを設定できます。 たとえば、[パスワード]フィールドになります。 これで、ヘッダーはその親レイヤーであるパスワードフィールドとともに状態を変更します。
Text = new Layer backgroundColor: null width: 640 html: "Welcome to our system!" color: "#212121" superLayer: Password y: - 240 Text.centerX() Text.style.fontSize = "48px" Text.style.fontFamily = "Proxima Nova" Text.style.textAlign = "center"
すでにユーザー名とパスワードをフィールドに入力できるので、「サインイン」ボタンをクリックします。 彼女のためにホバリングしましょう。
ホバー状態では、ボタンとその上の碑文の色が変わり、サイズがわずかに大きくなります。 色をスムーズに変更するには、最初にボタンをトランジションとスプリングカーブに設定します。
Button.style.transition = "background-color 1s ease" Button.states.animationOptions = curve: "spring(600,60,0)"
これで、onMouseOverイベントを記録できます。
Button.onMouseOver -> Button.style.backgroundColor = "white" Button.style.color = "#60B9F4" Button.scale = 1.05
ボタンを元の状態に戻すために、マウスをボタンから遠ざけると、逆のonMouseOutイベントを作成する必要があります。
Button.onMouseOut -> Button.style.backgroundColor = "#60B9F4" Button.style.color = "white" Button.scale = 1
最初の画面の準備ができました。

ボタンをクリックすると、次の起動画面が表示されます。
まず、ログイン画面とパスワード画面を削除する必要があります。 ボタンをクリックすると左に移動します。 画面要素の状態を設定します。
signInBackground.states.add Pressed: x: -2000 Button.states.add Pressed: x: -2000 Login.states.add Pressed: x: -2000 Password.states.add Pressed: x: -2000
これで、すべての要素に新しい状態が追加されました-それらの位置は、元の位置から2000ピクセル左にシフトします。 ご覧のように、Textレイヤーの親要素であるsignInBackgroundレイヤーと一緒に移動するため、Textレイヤーに個別の状態を設定しません。
イベントを作成する-ボタンをクリックします:
Button.on Events.Click, -> Button.states.switch("Pressed", time: .4, curve: "easy out") Password.states.switch("Pressed", time: .4, curve: "easy") Login.states.switch("Pressed", time: .4, curve: "easy") signInBackground.states.switch("Pressed", time: 1, curve: "easy out")
ここでは、各要素の状態が変化する時間も記述し、これらの変化の曲線を設定します。
ロード画面の作成を開始します。 2つの背景レイヤーが必要になります。 最初の青、2番目の白を作成します。
2番目のレイヤーでは、最初のレイヤーを親にします。
ブレンドモードを2番目のレイヤーであるスクリーン(mixBlendMode:“ screen”)に設定しましょう。
loadColor = new BackgroundLayer backgroundColor: "#60B9F4" backgroundLayer = new BackgroundLayer backgroundColor: "#fff" style: mixBlendMode : "screen" superLayer: loadColor
画面の中央にまったく同じ位置に、まったく同じ4つの円(0、1、2、3、4)を描画します。 それぞれを個別に描画しないように、配列を作成してタスクを簡素化します。
circles = [] for i in [0..3] circle = new Layer backgroundColor: "black" superLayer: backgroundLayer borderRadius: 100 width: 50 height: 50 blur: 20 name: "circle #{i}" circle.center() circles.push(circle)
backgroundLayerレイヤーをそれらの親レイヤーにします。 このレイヤーには異なるオーバーレイモード(画面)があり、親レイヤーは青い色のloadColorレイヤーであるため、円は青になりますが、backgroundColor: "black"に設定します。
たとえば、「黒」ではなく「赤」と書くと、ピンクに変わります。
また、円をぼやけたように(ぼかし:20)、円がスムーズに流れるようにしました。

しかし、ここで疑問が生じます。それは、それらが次々に流れ込むことを確認する方法ですが、同時にぼやけて見えません。
すべてが簡単に解決されます。 backgroundLayerが記述された場所に戻り、別の行を追加します-強いコントラストを設定します:
backgroundLayer = new BackgroundLayer backgroundColor: "#fff" style: mixBlendMode : "screen" superLayer: loadColor contrast: 10000
現在、円はぼやけたスポットではなく、円のように見えます。

円を動かしてみましょう。 これを行うには、アニメーションを作成します。
1つ目と2つ目のラウンドでは2つあり、円0と3は移動しません。
load1 = new Animation layer: circles[1] properties: x: circles[0].x - 180 time: .7 curve: "easy" load2 = new Animation layer: circles[2] properties: x: circles[0].x - 90 time: .7 curve: "easy"
ここで、最初の円(円[1])は、x座標のゼロ円から180 px離れています-x:circles [0] .x-180。2番目の円は、それぞれ90 pxです。
一方向の動きを作成しました-左に、今度は同じ動きを右に作成します。
load11 = new Animation layer: circles[1] properties: x: circles[0].x + 180 time: .7 curve: "easy" load22 = new Animation layer: circles[2] properties: x: circles[0].x + 90 time: .7 curve: "easy"
イベントに戻ります-[サインイン]ボタンをクリックして、新しいアニメーションを追加します。
Button.on Events.Click, -> Button.states.switch("Pressed", time: .4, curve: "easy out") Password.states.switch("Pressed", time: .4, curve: "easy") Login.states.switch("Pressed", time: .4, curve: "easy") signInBackground.states.switch("Pressed", time: 1, curve: "easy out") load1.start() Utils.delay .1, -> load2.start() Utils.delay .1, -> load2.on Events.AnimationEnd, -> load11.start() Utils.delay .1, -> load22.start() Utils.delay .1, ->
ご覧のように、円の各移動の間に、0.1秒の遅延を与えます(Utils.delay .1)。 右側への移動は、左側への移動が終了した後に発生します。 したがって、load2.on Events.AnimationEnd、-> ... ..を記述しました。これは-
load2が終了すると、load11とload22が開始されます。
アニメーションが永遠に続くように、ループを閉じて以下に追加します:
load22.on Events.AnimationEnd, -> load1.start() Utils.delay .1, -> load2.start() Utils.delay .1, ->
2番目の画面の準備ができました。
挨拶と色の変更を伴う3画面に移動します。
円0のアニメーションを作成します。このアニメーションでは、全画面に拡大します。
big = new Animation layer: circles[0] properties: borderRadius: 0 width: backgroundLayer.width height: backgroundLayer.height y:0 x: 0 blur: 0 curve: "spring(300, 30, 0)"
ここで、ボタンをクリックしてイベントの下部にこのアニメーションの開始を追加し、その前に2の遅延を作成します。
Utils.delay 2, -> big.start()
非表示のTextFinishレイヤーを描画します。これは「Hello!」という言葉です。
TextFinish = new Layer backgroundColor: null width: 640 y: 300 opacity: 0 html: "Hello!" color: "#fff" TextFinish.centerX() TextFinish.style.fontSize = "148px" TextFinish.style.fontFamily = "Proxima Nova" TextFinish.style.textAlign = "center" TextFinish.style.lineHeight = "154px"
3つの状態を追加します(1つは表示され、もう2つはHelloという単語がHelloとіに変わります)。
TextFinish.states.add activate: opacity:1 nactivate: html: "!" oactivate: html: "і!" TextFinish.states.animationOptions = time: .6, curve: "easy out"
TextFinishレイヤーの状態の変更をボタンのクリックイベントに追加します。 これで、イベント全体は次のようになります。
Button.on Events.Click, -> Button.states.switch("Pressed", time: .4, curve: "easy out") Password.states.switch("Pressed", time: .4, curve: "easy") Login.states.switch("Pressed", time: .4, curve: "easy") signInBackground.states.switch("Pressed", time: 1, curve: "easy out") load1.start() Utils.delay .1, -> load2.start() Utils.delay .1, -> load2.on Events.AnimationEnd, -> load11.start() Utils.delay .1, -> load22.start() Utils.delay .1, -> load22.on Events.AnimationEnd, -> load1.start() Utils.delay .1, -> load2.start() Utils.delay .1, -> Utils.delay 2, -> big.start() TextFinish.states.next()
最後の行-背景色の変更-が1つだけあります。 追加するには、2つの状態をloadColorレイヤーに追加します。
loadColor.states.add active: backgroundColor: "#f87b36" nactivate: backgroundColor: "#fa635f" loadColor.states.animationOptions = time: .6, curve: "easy"
そして、イベントに追加します。
loadColor.states.next()
できた!
Framerのおかげですべてのデザイナーが作成できるクールなものについて、私の話が明らかになることを願っています。 Framerについてのあなたの考えを聞いてうれしく思います。そして一般的に、あなたは思う-私たちがデザイナーのためのコーディングを始める時ですか?
これで終わりです。しかし、デザインのプロトタイピングに関する有用な資料(プログラミング)に関する記事を執筆し続けます。