アニメーターとは何ですか?
少し歴史。 Androidプラットフォームの発売以来、View Animationフレームワークが存在しました。 名前が示すように、アニメーションを対象としています。 しかし、2000年代の終わりのデバイスのパフォーマンスは非常に低かったので、誰も美しいアニメーションを本当に考えなかったため、フレームワークは便利で柔軟ではありませんでした。 4種類のアニメーション(TranslateAnimation、AlphaAnimation、ScaleAnimation、RotateAnimation)、それらを結合できるクラス(AnimationSet)、およびViewから継承されたクラスでのみ機能する機能のみがありました。
Android 3.0では、はるかに柔軟なProperty Animationフレームワークが導入されています。 使用可能なプロパティを変更したり、クラスを操作したりできます。 主なツールはアニメーターです。
アニメーターは、選択されたオブジェクトの値を時間に対して変更するように設計されたクラスの一種です。 大まかに言うと、これは特定のプロパティを初期値から終了値に変更する、指定された期間のストリームを制御するためのツールです。 アニメーションのこのような滑らかに変化するプロパティは、たとえば透明度です。
AnimatorクラスとView Animationのイデオロギー上の違いは、View Animationはオブジェクト自体を変更せずにオブジェクトの「表示」を変更することです(例外はsetFillAfter(true)を使用しますが、このフラグを使用するとアニメーションの最後でオブジェクトが変更されます)。 Animatorは、オブジェクト自体のプロパティを変更することを目的としています。
Animatorから継承したクラス
ValueAnimator(Animatorから継承)
最も単純なケースでは、このクラスを変数値のタイプ、初期値、および最終値に設定し、開始します。 これに応じて、アニメーションの開始、終了、繰り返し、キャンセルのイベントと、値を一時停止および変更するために個別に設定される2つのイベントを受け取ります。 変更のイベントはおそらく最も重要です。変更された値がその中に入り、その助けを借りてオブジェクトのプロパティを変更します。
アルファの変更を見てください:
ValueAnimator animator = ValueAnimator.ofFloat(0, 1); animator.addUpdateListener(new ValueAnimator.AnimatorUpdateListener() { @Override public void onAnimationUpdate(ValueAnimator animation) { view.setAlpha((Float) animation.getAnimatedValue()); } }); animator.start();
ObjectAnimator、ValueAnimatorから継承
これは、ValueAnimatorでの作業を簡素化するために設計されたクラスです。 これにより、changeイベントによって値を手動で変更する必要がありません。Animatorにオブジェクトを与え、scaleXなどの変更するフィールドを指定するだけです。 Java Reflictionを使用して、このフィールドのセッター(この場合はsetScaleX。次に、Animatorはこのフィールドの値を個別に変更します)を検索します。
ObjectAnimatorを使用すると、アルファの変更は次のようになります。
ObjectAnimator.ofFloat(view, View.ALPHA, 0, 1).start();
Viewクラスには、Animatorでアニメーション化するために特別に設計されたいくつかのプロパティがあります。
- 透明度(View.ALPHA)
- スケール(View.SCALE_X、View.SCALE_Y)
- 回転(View.ROTATION、View.ROTATION_X、View.ROTATION_Y)
- 位置(View.X、View.Y、View.Z)
- 表示部分の位置(View.TRANSLATION_X、View.TRANSLATION_Y、View.TRANSLATION_Z)
AnimatorSet(Animatorから継承)
これは、さまざまな方法でアニメーションを組み合わせることができるクラスです:同時または順次実行、遅延の追加など。
ViewPropertyAnimator
これは別のクラスです。 Animatorからは継承されませんが、ObjectAnimator for Viewと同じロジックを持ち、不必要なトラブルなしに任意のViewを簡単にアニメーション化するように設計されています。
これでアルファを変更できます:
view.animate().alphaBy(0).alpha(1).start();
アニメーターの使用を開始した方法
約1年前、要素をクリックするとアニメーションを作成するタスクに直面しました。 以下がその1つです。
アニメーションを作ったことがないというわけではありませんが、アウトソーシングでアニメーションが必要になることはめったにありません。 だから、私はAndroidのアニメーションをグーグルで検索しました。 最初の5つのリンクでは、アニメーションがどのように作成されるかについて詳細に説明したので、始めました。 最初の結果は次のとおりです。
アニメーションコード
public static void likeAnimation(@DrawableRes int icon, final ImageView imageView) { imageView.setImageResource(icon); imageView.setVisibility(View.VISIBLE); AlphaAnimation showAlphaAnimation = new AlphaAnimation(0.0f, 1.0f); showAlphaAnimation.setDuration(SHOW_DURATION); ScaleAnimation showScaleAnimation = new ScaleAnimation(0.2f, 1.4f, 0.2f, 1.4f, android.view.animation.Animation.RELATIVE_TO_SELF, 0.5f, android.view.animation.Animation.RELATIVE_TO_SELF, 0.5f); showScaleAnimation.setDuration(SHOW_DURATION); AnimationSet showAnimationSet = new AnimationSet(false); showAnimationSet.addAnimation(showAlphaAnimation); showAnimationSet.addAnimation(showScaleAnimation); showAnimationSet.setAnimationListener(new OnEndAnimationListener() { @Override public void onAnimationEnd(android.view.animation.Animation animation) { ScaleAnimation toNormalScaleAnimation = new ScaleAnimation(1.4f, 1.0f, 1.4f, 1.0f, android.view.animation.Animation.RELATIVE_TO_SELF, 0.5f, android.view.animation.Animation.RELATIVE_TO_SELF, 0.5f); toNormalScaleAnimation.setDuration(TO_NORMAL_DURATION); toNormalScaleAnimation.setAnimationListener(new OnEndAnimationListener() { @Override public void onAnimationEnd(android.view.animation.Animation animation) { AlphaAnimation hideAlphaAnimation = new AlphaAnimation(1.0f, 0.0f); hideAlphaAnimation.setDuration(HIDE_DURATION); ScaleAnimation hideScaleAnimation = new ScaleAnimation(1.0f, 0.2f, 1.0f, 0.2f, android.view.animation.Animation.RELATIVE_TO_SELF, 0.5f, android.view.animation.Animation.RELATIVE_TO_SELF, 0.5f); hideScaleAnimation.setDuration(HIDE_DURATION); AnimationSet hideAnimationSet = new AnimationSet(false); hideAnimationSet.setStartOffset(HIDE_DELAY); hideAnimationSet.addAnimation(hideAlphaAnimation); hideAnimationSet.addAnimation(hideScaleAnimation); hideAnimationSet.setAnimationListener(new OnEndAnimationListener() { @Override public void onAnimationEnd(android.view.animation.Animation animation) { imageView.setVisibility(View.GONE); } }); imageView.startAnimation(hideAnimationSet); } }); imageView.startAnimation(toNormalScaleAnimation); } }); imageView.startAnimation(showAnimationSet); }
コードリンク
コードはあいまいであることが判明したため、一連のアニメーションを作成するための別のアプローチを探すように促されました。 ソリューションはStackOveflowで見つかりました。 その考え方は、前のアニメーションの継続時間の合計に等しいシフトで、一連のアニメーションのAnimationSetに後続の各アニメーションを配置することです。 それは以前よりもはるかに良くなった:
AnimationSet
public static void likeAnimation(@DrawableRes int icon, final ImageView imageView) { imageView.setImageResource(icon); imageView.setVisibility(View.VISIBLE); AnimationSet animationSet = new AnimationSet(false); animationSet.addAnimation(showAlphaAnimation()); animationSet.addAnimation(showScaleAnimation()); animationSet.addAnimation(toNormalScaleAnimation()); animationSet.addAnimation(hideAlphaAnimation()); animationSet.addAnimation(hideScaleAnimation()); animationSet.setAnimationListener(new OnEndAnimationListener() { @Override public void onAnimationEnd(Animation animation) { imageView.setVisibility(View.GONE); } }); imageView.startAnimation(animationSet); } private static Animation showAlphaAnimation() { AlphaAnimation showAlphaAnimation = new AlphaAnimation(0.0f, 1.0f); showAlphaAnimation.setDuration(SHOW_DURATION); return showAlphaAnimation; } private static Animation showScaleAnimation() { ScaleAnimation showScaleAnimation = new ScaleAnimation( 0.2f, 1.4f, 0.2f, 1.4f, Animation.RELATIVE_TO_SELF, 0.5f, Animation.RELATIVE_TO_SELF, 0.5f); showScaleAnimation.setDuration(SHOW_DURATION); return showScaleAnimation; } private static Animation toNormalScaleAnimation() { ScaleAnimation toNormalScaleAnimation = new ScaleAnimation( 1.4f, 1.0f, 1.4f, 1.0f, Animation.RELATIVE_TO_SELF, 0.5f, Animation.RELATIVE_TO_SELF, 0.5f); toNormalScaleAnimation.setDuration(TO_NORMAL_DURATION); toNormalScaleAnimation.setStartOffset(SHOW_DURATION); return toNormalScaleAnimation; } private static Animation hideAlphaAnimation() { AlphaAnimation hideAlphaAnimation = new AlphaAnimation(1.0f, 0.0f); hideAlphaAnimation.setDuration(HIDE_DURATION); hideAlphaAnimation.setStartOffset(SHOW_DURATION + TO_NORMAL_DURATION + HIDE_DELAY); return hideAlphaAnimation; } private static Animation hideScaleAnimation() { ScaleAnimation hideScaleAnimation = new ScaleAnimation( 1.0f, 0.2f, 1.0f, 0.2f, Animation.RELATIVE_TO_SELF, 0.5f, Animation.RELATIVE_TO_SELF, 0.5f); hideScaleAnimation.setDuration(HIDE_DURATION); hideScaleAnimation.setStartOffset(SHOW_DURATION + TO_NORMAL_DURATION + HIDE_DELAY); return hideScaleAnimation; }
コードリンク
コードはより明確で読みやすくなりましたが、1つの「しかし」があります。このような単純なシーケンスでも、各アニメーションのシフトを追跡するのはかなり不便です。 さらにステップを追加すると、ほとんど不可能なタスクになります。 このアプローチのもう1つの重要な欠点は、アニメーションの奇妙な動作です。アニメーションオブジェクトのサイズは、何らかの理由で、通常のアニメーションのシーケンスよりも大きかったです。 それを理解する試みは何にもつながりませんでしたし、私は深く深くは行きませんでした-私はまだアプローチが好きではありませんでした。 しかし、私はこのアイデアを開発し、各ステップを個別のAnimatorSetに分割することにしました。 起こったことは次のとおりです。

AnimatorSetのAnimatorSet
public static void likeAnimation(@DrawableRes int icon, final ImageView imageView) { imageView.setImageResource(icon); imageView.setVisibility(View.VISIBLE); AnimationSet animationSet = new AnimationSet(false); animationSet.addAnimation(showAnimationSet()); animationSet.addAnimation(toNormalAnimationSet()); animationSet.addAnimation(hideAnimationSet()); animationSet.setAnimationListener(new OnEndAnimationListener() { @Override public void onAnimationEnd(Animation animation) { imageView.setVisibility(View.GONE); } }); imageView.startAnimation(animationSet); } private static AnimationSet showAnimationSet() { AlphaAnimation showAlphaAnimation = new AlphaAnimation(0.0f, 1.0f); ScaleAnimation showScaleAnimation = new ScaleAnimation( 0.2f, 1.4f, 0.2f, 1.4f, Animation.RELATIVE_TO_SELF, 0.5f, Animation.RELATIVE_TO_SELF, 0.5f); AnimationSet set = new AnimationSet(false); set.addAnimation(showAlphaAnimation); set.addAnimation(showScaleAnimation); set.setDuration(SHOW_DURATION); return set; } private static AnimationSet toNormalAnimationSet() { ScaleAnimation toNormalScaleAnimation = new ScaleAnimation( 1.4f, 1.0f, 1.4f, 1.0f, Animation.RELATIVE_TO_SELF, 0.5f, Animation.RELATIVE_TO_SELF, 0.5f); AnimationSet set = new AnimationSet(false); set.addAnimation(toNormalScaleAnimation); set.setDuration(TO_NORMAL_DURATION); set.setStartOffset(SHOW_DURATION); return set; } private static AnimationSet hideAnimationSet() { AlphaAnimation hideAlphaAnimation = new AlphaAnimation(1.0f, 0.0f); ScaleAnimation hideScaleAnimation = new ScaleAnimation( 1.0f, 0.2f, 1.0f, 0.2f, Animation.RELATIVE_TO_SELF, 0.5f, Animation.RELATIVE_TO_SELF, 0.5f); AnimationSet set = new AnimationSet(false); set.setDuration(HIDE_DURATION); set.addAnimation(hideAlphaAnimation); set.addAnimation(hideScaleAnimation); set.setStartOffset(SHOW_DURATION + TO_NORMAL_DURATION + HIDE_DELAY); return set; }
コードリンク
不適切なアニメーション、悪いアプローチ、すべてが悪いです。 もう一度Googleに目を向けると、Animationは既にレガシーコードであるという事実に遭遇しました。つまり、使用されていますが、時代遅れでサポートされていません。
アニメーションをまったく異なる方法で行う必要があることに気付きました。 そして、 Android開発者の広がりについて、私はAnimatorに出会いました。 それを使ってアニメーションを作成する試みは次のように見えました。

アニメーター
public static void likeAnimation(@DrawableRes int icon, final ImageView view) { if (view != null && !isAnimate) { AnimatorSet set = new AnimatorSet(); set.playSequentially( showAnimatorSet(view), toNormalAnimatorSet(view), hideAnimatorSet(view)); set.addListener(getLikeEndListener(view, icon)); set.start(); } view.animate().alphaBy(0).alpha(1).start(); } private static AnimatorListenerAdapter getLikeEndListener(final ImageView view, final int icon) { return new AnimatorListenerAdapter() { @Override public void onAnimationStart(Animator animation) { super.onAnimationStart(animation); isAnimate = true; view.setVisibility(View.VISIBLE); view.setImageResource(icon); view.setLayerType(View.LAYER_TYPE_HARDWARE, null); } @Override public void onAnimationEnd(Animator animation) { super.onAnimationEnd(animation); isAnimate = false; view.setVisibility(View.GONE); view.setImageDrawable(null); view.setLayerType(View.LAYER_TYPE_NONE, null); } }; } private static AnimatorSet showAnimatorSet(View view) { AnimatorSet set = new AnimatorSet(); set.setDuration(SHOW_DURATION).playTogether( ObjectAnimator.ofFloat(view, View.ALPHA, 0f, 1f), ObjectAnimator.ofFloat(view, View.SCALE_X, 0.2f, 1.4f), ObjectAnimator.ofFloat(view, View.SCALE_Y, 0.2f, 1.4f) ); return set; } private static AnimatorSet toNormalAnimatorSet(View view) { AnimatorSet set = new AnimatorSet(); set.setDuration(TO_NORMAL_DURATION).playTogether( ObjectAnimator.ofFloat(view, View.SCALE_X, 1.4f, 1f), ObjectAnimator.ofFloat(view, View.SCALE_Y, 1.4f, 1f) ); return set; } private static AnimatorSet hideAnimatorSet(View view) { AnimatorSet set = new AnimatorSet(); set.setDuration(HIDE_DURATION).playTogether( ObjectAnimator.ofFloat(view, View.ALPHA, 1f, 0f), ObjectAnimator.ofFloat(view, View.SCALE_X, 1f, 0.2f), ObjectAnimator.ofFloat(view, View.SCALE_Y, 1f, 0.2f) ); set.setStartDelay(HIDE_DELAY); return set; }
コードリンク
アニメーションは問題なく機能しました。つまり、検索は完了したと見なすことができます。 Animatorを使用するときの唯一のことは、特定のビューでAnimatorが既に実行されているかどうかを覚えることです。
アニメーターの詳細
私は、Animatorで何か面白いことを探し始めました。 一連の考えから、次のことがわかりました。
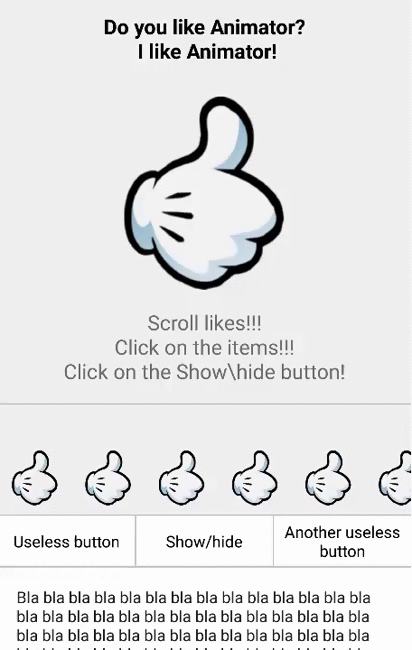
ボタンが押されると、4つのアニメーターが同時に実行されます。
同時起動
AnimatorSet showHideSet = new AnimatorSet(); showHideSet.playTogether( ScrollAnimatorUtils.translationYAnimator(translationY, footerButtons), ScrollAnimatorUtils.translationYAnimator(translationY, footerText), ScrollAnimatorUtils.scrollAnimator(startScroll, endScroll, scrollView), ScrollAnimatorUtils.alphaAnimator(1, 0, recyclerView) ); showHideSet.start();
1)リストフッターを下に移動します。
2)ボタンを下に移動します。
翻訳YAnimator
public static Animator translationYAnimator(final float start, int end, final View view, int duration) { ObjectAnimator animator = ObjectAnimator.ofFloat(view, View.TRANSLATION_Y, end); animator.setDuration(duration); animator.addListener(new AnimatorListenerAdapter() { @Override public void onAnimationEnd(Animator animation) { super.onAnimationEnd(animation); view.setTranslationY(start); } }); return animator; }
3)ScrollViewを一番下までスクロールします。
scrollAnimator
public static Animator scrollAnimator(int start, int end, final View view, int duration) { ValueAnimator scrollAnimator = ValueAnimator.ofInt(start, end); scrollAnimator.addUpdateListener(new ValueAnimator.AnimatorUpdateListener() { @Override public void onAnimationUpdate(ValueAnimator valueAnimator) { view.scrollTo(0, (int) valueAnimator.getAnimatedValue()); } }); scrollAnimator.setDuration(duration); scrollAnimator.addListener(getLayerTypeListener(view)); return scrollAnimator; }
4)recyclerViewにアルファ効果を課します。
alphaAnimator
public static Animator alphaAnimator(int start, int end, View view, int duration) { ValueAnimator alphaAnimator = ObjectAnimator.ofFloat(view, View.ALPHA, start, end); alphaAnimator.setDuration(duration); alphaAnimator.addListener(getLayerTypeListener(view)); return alphaAnimator; }
完全なコードへのリンク
これで、Animatorの簡単なレビューは終了です。 Animatorに関連する興味深いトリックを知っている場合は、コメントで記事を補足してください。
Githubのプロジェクトへのリンク: github.com/princeparadoxes/AnimationVsAnimator