
ホームサーバーのタスクは次のとおりです。
- イーサネットおよびWiFi経由でインターネットを配布する
- 広告ブロックリストの広告バナーをカットする
- Torネットワークリソースを表示する
- サーバーファイル機能を実行する(NFSおよびSAMBA)
- 私の仕事へのトンネルを上げる
- 異なるプロトコルを使用してファイルをダウンロードする
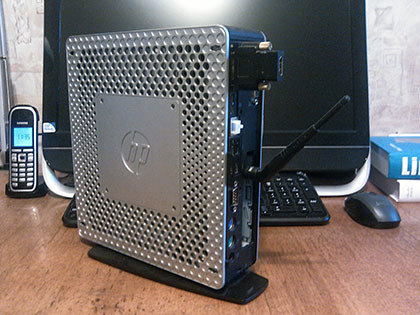
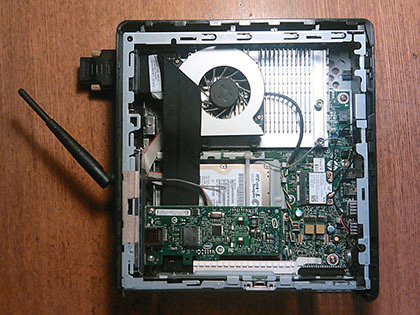
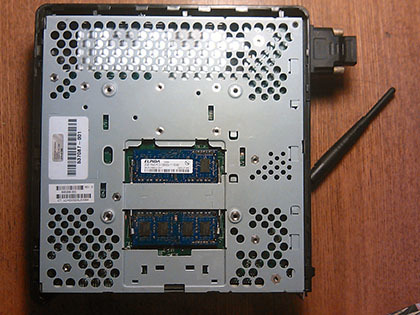
鉄について少し説明します。 シンクライアントは、AMD Dual-Core T56N 1.65 GHzプロセッサーとRadeon HD 6320ビデオチップ上に構築されています。また、このモデルの大きな利点は次のとおりです。
完全なサーバー構成は次のとおりです。
- AMDデュアルコアT56N 1.65 GHzプロセッサー
- AMD A55Eチップセット
- Radeon HD 6320グラフィックス
- メモリ2 x 2Gb SO-DIMM 1600Mhz PC3-12800 Elpida DDR3EBJ20UF8BDU0-GN-F
- 最初のBroadcom BCM57781ギガビットイーサネットイーサネットアダプター
- 2番目のIntel 82574Lギガビットイーサネットイーサネットアダプター
- ワイヤレスWiFiアダプターIntel Advanced-N 6230
- HDD Seagate ST500LT012-9WS142
「はい、高価です!」のようなコメントを予想して、購入したすべてのコンポーネントをリストし、それらのコストを示します。 無料のクラシファイド広告の有名なサイトで、すべてが取得されました。
- HP t610 Plusシンクライアント-3500 摩擦。
- メモリー2 x 2Gb SO-DIMM 1600Mhz- 1500 rub
- Intel Advanced-N 6230 WiFiアダプター-300摩擦。
- Intelイーサネットアダプター82574L- 400摩擦。
合計:5700こする。
以下はいくつかの写真です。
写真 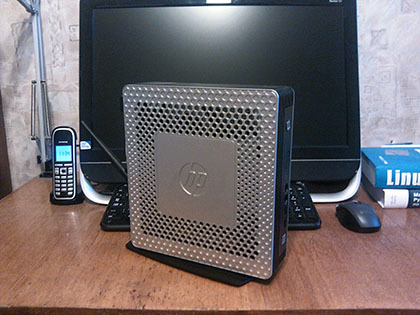
オペレーティングシステムのインストールについては説明しません。インターネットには詳細なマニュアルがたくさんありますので、すぐに始めましょう。
ネットワーク設定
NetworkManagerを無効にして、設定が上書きされないようにします。
systemctl stop NetworkManager systemctl mask NetworkManager systemctl stop NetworkManager-wait-online.service systemctl mask NetworkManager-wait-online.service
どのインターフェイスがシステムで定義され、カスタマイズ可能かを確認します。
ip a
enp5s0、wlp2s0、enp1s0、およびwwp6s0u1i1の4つのインターフェイスを使用できます。 enp5s0およびwlp2s0インターフェイスはbr0で結合され、ローカルネットワークを調べます。 enp1s0およびwwp6s0u1i1インターフェースは外を見ています。
ブリッジインターフェイスを作成およびカスタマイズします。
vi /etc/sysconfig/network-scripts/ifcfg-br0
DEVICE="br0" NAME="br0" TYPE="Bridge" ONBOOT="yes" BOOTPROTO="static" BROADCAST=192.168.2.255 IPADDR=192.168.2.1 NETMASK=255.255.255.0 NETWORK=192.168.2.0 NM_CONTROLLED="no" IPV6INIT="no" NOZEROCONF="yes" ZONE="internal"
ローカルネットワークを調べるイーサネットインターフェイスを設定し、ブリッジに追加します。
vi /etc/sysconfig/network-scripts/ifcfg-enp5s0
DEVICE="enp5s0" NAME="enp5s0" TYPE="Ethernet" ONBOOT="yes" BOOTPROTO="none" HWADDR="XX:XX:XX:XX:XX:XX" NM_CONTROLLED="no" DEFROUTE="yes" PEERDNS="yes" PEERROUTES="yes" IPV4_FAILURE_FATAL="no" IPV6INIT="no" BRIDGE="br0"
WiFiインターフェイスを構成します。
vi /etc/sysconfig/network-scripts/ifcfg-wlp2s0
DEVICE="wlp2s0" NAME="wlp2s0" TYPE="Ethernet" ONBOOT="yes" BOOTPROTO="none" HWADDR="XX:XX:XX:XX:XX:XX" NM_CONTROLLED="no" DEFROUTE="yes" PEERDNS="yes" PEERROUTES="yes" IPV4_FAILURE_FATAL="no" IPV6INIT="no" BRIDGE="br0"
インターネット上に見えるインターフェイスを設定します。
vi /etc/sysconfig/network-scripts/ifcfg-enp1s0
DEVICE="enp1s0" TYPE="Ethernet" HWADDR="XX:XX:XX:XX:XX:XX" NM_CONTROLLED="no" BOOTPROTO="dhcp" DNS1=127.0.0.1 DNS2=127.0.0.1 DNS3=127.0.0.1 ONBOOT="yes" IPV4_FAILURE_FATAL="no" IPV6INIT="no" NOZEROCONF="yes" ZONE="external"
bridge-utilsをインストールして、ブリッジをサポートします。
yum install bridge-utils
ネットワーク管理サービスを再起動します。
systemctl restart network.service
4Gインターネット
現在、有線インターネットを使用する機会がないため、アクセスにはSTICKで接続されたHuawei 4Gモデムを使用します。
操作するには、次のパッケージをインストールする必要があります。
4Gインターフェイスを構成します。
インターフェイスをオンまたはオフにするときに、インターネットをアクティブまたは非アクティブにするスクリプトを作成します。
インターフェイスを上げて確認します。
操作するには、次のパッケージをインストールする必要があります。
yum install usb_modeswitch usb_modeswitch-data
4Gインターフェイスを構成します。
vim /etc/sysconfig/network-scripts/ifcfg-wwp6s0u1i1
DEVICE="wwp6s0u1i1" NAME="wwp6s0u1i1" TYPE="Ethernet" ONBOOT="yes" BOOTPROTO="dhcp" HWADDR="XX:XX:XX:XX:XX:XX" NM_CONTROLLED="no" DNS1=127.0.0.1 DNS2=127.0.0.1 DNS3=127.0.0.1 NOZEROCONF="yes" IPV4_FAILURE_FATAL="no" IPV6INIT="no" ZONE="external"
インターフェイスをオンまたはオフにするときに、インターネットをアクティブまたは非アクティブにするスクリプトを作成します。
vim /sbin/ifup-pre-local
#!/bin/bash # PREUP="/etc/sysconfig/network-scripts/pre-up-${1:6}" if [ -x $PREUP ]; then exec $PREUP fi
vim /sbin/ifdown-pre-local
#!/bin/bash # PREDOWN="/etc/sysconfig/network-scripts/pre-down-$1" if [ -x $PREDOWN ]; then exec $PREDOWN fi
vim /etc/sysconfig/network-scripts/pre-up-wwp6s0u1i1
#!/bin/bash # echo -en 'AT^NDISDUP=1,1,"internet.yota"\r\n' > /dev/ttyUSB0
vim /etc/sysconfig/network-scripts/pre-down-wwp6s0u1i1
#!/bin/bash # echo -en 'AT^NDISDUP=1,0,"internet.yota"\r\n' > /dev/ttyUSB0
インターフェイスを上げて確認します。
ifup wwp6s0u1i1 ip a
DNSmasq
DHCPおよびDNSサーバーを構成します。
vi /etc/dnsmasq.conf
log-queries log-dhcp log-facility=/var/log/dnsmasq.log conf-dir=/etc/dnsmasq.d
DHCPを構成します。
vi /etc/dnsmasq.d/dhcp.conf
dhcp-authoritative dhcp-option=1,255.255.255.0 dhcp-option=2,192.168.2.1 dhcp-option=28,192.168.2.255 dhcp-option=42,192.168.2.1 dhcp-range=192.168.2.11,192.168.2.254,24h dhcp-host=2c:35:f8:41:6e:68,192.168.2.2,PC
DNSを構成します。
vi /etc/dnsmasq.d/dns.conf
listen-address=127.0.0.1,192.168.2.1 interface=br0 except-interface=enp1s0,wwp6s0u1i1, tun0 domain-needed bogus-priv strict-order no-resolv proxy-dnssec server=127.0.0.1#5353 # DNSCrypt #server=77.88.8.88 server=/onion/127.0.0.1#5300 # tor address=/router/192.168.2.1 #no-hosts addn-hosts=/etc/dnsmasq.hosts
一部のアプリケーションでは、マイクロソフトのテレメトリサイトと広告をブロックします。
vi /etc/dnsmasq.hosts
dnsmasq.hosts
############### microsoft spy ##################
127.0.0.1 vortex.data.microsoft.com
127.0.0.1 vortex-win.data.microsoft.com
127.0.0.1 telecommand.telemetry.microsoft.com
127.0.0.1 telecommand.telemetry.microsoft.com.nsatc.net
127.0.0.1 oca.telemetry.microsoft.com
127.0.0.1 oca.telemetry.microsoft.com.nsatc.net
127.0.0.1 sqm.telemetry.microsoft.com
127.0.0.1 sqm.telemetry.microsoft.com.nsatc.net
127.0.0.1 watson.telemetry.microsoft.com
127.0.0.1 watson.telemetry.microsoft.com.nsatc.net
127.0.0.1 redir.metaservices.microsoft.com
127.0.0.1 choice.microsoft.com
127.0.0.1 choice.microsoft.com.nsatc.net
127.0.0.1 df.telemetry.microsoft.com
127.0.0.1 reports.wes.df.telemetry.microsoft.com
127.0.0.1 wes.df.telemetry.microsoft.com
127.0.0.1 services.wes.df.telemetry.microsoft.com
127.0.0.1 sqm.df.telemetry.microsoft.com
127.0.0.1 telemetry.microsoft.com
127.0.0.1 watson.ppe.telemetry.microsoft.com
127.0.0.1 telemetry.appex.bing.net
127.0.0.1 telemetry.urs.microsoft.com
127.0.0.1 telemetry.appex.bing.net:443
127.0.0.1 settings-sandbox.data.microsoft.com
127.0.0.1 vortex-sandbox.data.microsoft.com
127.0.0.1 survey.watson.microsoft.com
127.0.0.1 watson.live.com
127.0.0.1 watson.microsoft.com
127.0.0.1 statsfe2.ws.microsoft.com
127.0.0.1 corpext.msitadfs.glbdns2.microsoft.com
127.0.0.1 compatexchange.cloudapp.net
127.0.0.1 cs1.wpc.v0cdn.net
127.0.0.1 a-0001.a-msedge.net
127.0.0.1 statsfe2.update.microsoft.com.akadns.net
127.0.0.1 sls.update.microsoft.com.akadns.net
127.0.0.1 fe2.update.microsoft.com.akadns.net
127.0.0.1 65.55.108.23
127.0.0.1 65.39.117.230
127.0.0.1 23.218.212.69
127.0.0.1 134.170.30.202
127.0.0.1 137.116.81.24
127.0.0.1 diagnostics.support.microsoft.com
127.0.0.1 corp.sts.microsoft.com
127.0.0.1 statsfe1.ws.microsoft.com
127.0.0.1 pre.footprintpredict.com
127.0.0.1 204.79.197.200
127.0.0.1 23.218.212.69
127.0.0.1 i1.services.social.microsoft.com
127.0.0.1 i1.services.social.microsoft.com.nsatc.net
127.0.0.1 feedback.windows.com
127.0.0.1 feedback.microsoft-hohm.com
127.0.0.1 feedback.search.microsoft.com
################ skype&yuotube #################
127.0.0.1 pubads.g.doubleclick.net
127.0.0.1 static.doubleclick.net
127.0.0.1 devads.skypeassets.net
127.0.0.1 devapps.skype.net
127.0.0.1 qawww.skypeassets.net
127.0.0.1 qaapi.skype.net
127.0.0.1 preads.skypeassets.net
127.0.0.1 preapps.skype.net
127.0.0.1 static.skypeassets.com
127.0.0.1 serve.plexop.net
127.0.0.1 preg.bforex.com
127.0.0.1 ads1.msads.net
127.0.0.1 flex.msn.com
127.0.0.1 apps.skype.com
127.0.0.1 api.skype.com
127.0.0.1 cdn.mbstatic.org
127.0.0.1 marathonbet.com
127.0.0.1 megogo.net
127.0.0.1 adselector.ru
127.0.0.1 pluso.ru
127.0.0.1 flash.begun.ru
127.0.0.1 ad.adriver.ru
vim /etc/resolv.conf
nameserver 127.0.0.1
dnsmasqサービスをアクティブにして再起動します。
systemctl enable dnsmasq.service systemctl start dnsmasq.service
DNSCrypt
DNSCryptをTorと組み合わせて使用すると、生活が簡素化されます。
yum localinstall https://dl.dropboxusercontent.com/u/2709550/HP%20t610%20PLUS/dnscrypt-proxy-1.6.0-1.el7.centos.x86_64.rpm
構成ファイルで、ポート番号をdnsmasq構成で指定されたものに変更します。
vim /etc/sysconfig/dnscrypt-proxy
DNSCRYPT_LOCALPORT=5353
dnscryptサービスをアクティブにして再起動します
systemctl enable dnscrypt-proxy.service systemctl start dnscrypt-proxy.service
EPEL
追加のEPELリポジトリを接続します。
yum localinstall http://mirror.yandex.ru/epel/7/x86_64/e/epel-release-7-5.noarch.rpm yum update
追加のパッケージをインストールします。
yum install bash-completion vim mc iftop wget smartmontools hdparm tmux
新しいユーザーを作成します。
useradd -G wheel user passwd user
カーネルで転送をオンにします。
echo "net.ipv4.ip_forward=1" > /etc/sysctl.d/forwarding.conf sysctl --system
selinuxポリシーを変更します。
vim /etc/selinux/config SELINUX=permissive
コンソールを色付けします。
vim /root/.bashrc
# .bashrc # User specific aliases and functions alias rm='rm -i' alias cp='cp -i' alias mv='mv -i' alias tmuxx='tmux attach || tmux new' # Source global definitions if [ -f /etc/bashrc ]; then . /etc/bashrc fi NORMAL="\[\e[0m\]" RED="\[\e[1;31m\]" GREEN="\[\e[1;32m\]" BLUE="\[\e[1;34m\]" export PS1="[$GREEN\u$RED@$BLUE\H]$NORMAL\w# "
tmuxを構成します。
vim ~/.tmux.conf
setw -g c0-change-trigger 10 setw -g c0-change-interval 250 set -g set-titles on set -g set-titles-string "tmux.#I.#W" set -g base-index 1 set -g history-limit 5000 set -g bell-action any setw -g monitor-activity on set -g visual-activity on bind-key k confirm kill-window bind-key K confirm kill-server set -g terminal-overrides 'xterm*:smcup@:rmcup@' set -g display-time 2000
SSHでの長いログインを排除します。
vim /etc/ssh/sshd_config
GSSAPIAuthentication no UseDNS no
rc.localをアクティブにし、ハードドライブのスリープモードを無効にします(サービス寿命が延長されます)。
chmod a+x /etc/rc.local vim /etc/rc.d/rc.local hdparm -B 255 /dev/sda hdparm -S 0 /dev/sda
追加のディレクトリを作成します。
mkdir /home/store mkdir /home/www mkdir /home/backup
NTP
NTP同期を設定します。
yum install ntp
vim /etc/sysconfig/ntpd SYNC_HWCLOCK=yes
driftfile /var/lib/ntp/drift logfile /var/log/ntp.log restrict 127.0.0.1 restrict ::1 restrict 192.168.2.0 mask 255.255.255.0 nomodify notrap server ntp1.stratum2.ru iburst server ntp2.stratum2.ru iburst server ntp3.stratum2.ru iburst server ntp4.stratum2.ru iburst server ntp5.stratum2.ru iburst
systemctl enable ntpd.service
systemctl start ntpd.service
時間を同期します。
systemctl stop ntpd.service && ntpdate ntp1.stratum2.ru && systemctl start ntpd.service
Hostapd
Hostapdをインストールして、WiFIを整理します。 このパッケージはnoscan.patchでコンパイルされます 。
yum localinstall https://dl.dropboxusercontent.com/u/2709550/HP%20t610%20PLUS/Hostapd/hostapd-2.4-3.el7.centos.x86_64.rpm
ここでは、インターフェイス、SSID、およびパスワードを示します。
vim /etc/hostapd/hostapd.conf
hostapd.conf
interface=wlp2s0 bridge=br0 driver=nl80211 logger_syslog=-1 logger_syslog_level=2 logger_stdout=-1 logger_stdout_level=2 ctrl_interface=/var/run/hostapd ctrl_interface_group=wheel ##### IEEE 802.11 related configuration ####################################### ssid=Home country_code=RU hw_mode=g channel=5 macaddr_acl=0 auth_algs=1 ignore_broadcast_ssid=0 wmm_enabled=1 ##### IEEE 802.11n related configuration ###################################### ieee80211n=1 ht_capab=[HT40-][HT40+][SHORT-GI-40][DSSS_CCK-40] noscan=1 ##### WPA/IEEE 802.11i configuration ########################################## wpa=2 wpa_passphrase=qwerty1234 wpa_key_mgmt=WPA-PSK #wpa_pairwise=CCMP rsn_pairwise=CCMP #wpa_group_rekey=600
サービスをアクティブにして開始します。
systemctl enable hostapd.service systemctl start hostapd.service
トランスミッション
トレントクライアント送信をインストールします。
yum install transmission-daemon transmission-cli
systemctl enable transmission-daemon.service systemctl start transmission-daemon.service systemctl stop transmission-daemon.service
ファイルをダウンロードするためのWebインターフェイスとディレクトリへのアクセスを設定します。 すべての変更は、サービスの停止時に行う必要があります。そうしないと、設定は保存されません。
vim /var/lib/transmission/.config/transmission-daemon/settings.json
settings.json
{ "alt-speed-down": 50, "alt-speed-enabled": false, "alt-speed-time-begin": 540, "alt-speed-time-day": 127, "alt-speed-time-enabled": false, "alt-speed-time-end": 1020, "alt-speed-up": 50, "bind-address-ipv4": "0.0.0.0", "bind-address-ipv6": "::", "blocklist-enabled": false, "blocklist-url": "http://www.example.com/blocklist", "cache-size-mb": 4, "dht-enabled": true, "download-dir": "/home/store/ ", "download-queue-enabled": true, "download-queue-size": 5, "encryption": 1, "idle-seeding-limit": 30, "idle-seeding-limit-enabled": false, "incomplete-dir": "/home/store/Torrent", "incomplete-dir-enabled": false, "lpd-enabled": false, "message-level": 2, "peer-congestion-algorithm": "", "peer-id-ttl-hours": 6, "peer-limit-global": 200, "peer-limit-per-torrent": 50, "peer-port": 51413, "peer-port-random-high": 65535, "peer-port-random-low": 49152, "peer-port-random-on-start": false, "peer-socket-tos": "default", "pex-enabled": true, "port-forwarding-enabled": true, "preallocation": 1, "prefetch-enabled": 1, "queue-stalled-enabled": true, "queue-stalled-minutes": 30, "ratio-limit": 2, "ratio-limit-enabled": false, "rename-partial-files": true, "rpc-authentication-required": false, "rpc-bind-address": "0.0.0.0", "rpc-enabled": true, "rpc-password": " ", "rpc-port": 9091, "rpc-url": "/transmission/", "rpc-username": " ", "rpc-whitelist": "127.0.0.1", "rpc-whitelist-enabled": false, "scrape-paused-torrents-enabled": true, "script-torrent-done-enabled": false, "script-torrent-done-filename": "", "seed-queue-enabled": false, "seed-queue-size": 10, "speed-limit-down": 100, "speed-limit-down-enabled": false, "speed-limit-up": 100, "speed-limit-up-enabled": false, "start-added-torrents": true, "trash-original-torrent-files": false, "umask": 0, "upload-slots-per-torrent": 14, "utp-enabled": true }
systemctl start transmission-daemon.service
アリア2
マルチプロトコルダウンロードマネージャーをインストールします。
yum install aria2.x86_64
mkdir /etc/aria2 touch /etc/aria2/aria2.conf touch /etc/aria2/session.lock touch /var/log/aria2.log && chown nobody:nobody /var/log/aria2.log chown nobody:nobody /etc/aria2 -R
systemdのサービスを作成します。
vim /lib/systemd/system/aria2.service
[Unit] Description=Aria2 User Service by %u After=network.target [Service] Type=forking User=nobody Group=nobody ExecStart=/usr/bin/aria2c --conf-path=/etc/aria2/aria2.conf --log=/var/log/aria2.log [Install] WantedBy=multi-user.target
設定ファイルを編集し、ダウンロード用のディレクトリとリモートコントロール用のRPCキーを設定します。
vim /etc/aria2/aria2.conf
daemon=true continue=true enable-rpc rpc-allow-origin-all=true rpc-listen-all=true # openssl rand -hex 15 rpc-secret=616d343b1465b51ca65675b2bfef98 dir=/home/store/Download save-session=/etc/aria2/session.lock input-file=/etc/aria2/session.lock dht-file-path=/etc/aria2/dht.dat disable-ipv6=true log-level=warn
firewalldのプリセットを作成します。
vim /etc/firewalld/services/aria2.xml
<?xml version="1.0" encoding="utf-8"?> <service> <short>aria2</short> <description>aria2 command-line download utility</description> <port protocol="tcp" port="6800"/> </service>
cd /etc/firewalld/services restorecon aria2.xml chmod 640 aria2.xml
サービスをアクティブにして開始します。
systemctl enable aria2.service systemctl start aria2.service
Aria2 WebUI
aria2のWebインターフェイスをインストールして設定します。
wget https://codeload.github.com/ziahamza/webui-aria2/zip/master -O webui-aria2.zip && unzip webui-aria2.zip -d /home/www/ && mv /home/www/webui-aria2-master /home/www/webui-aria2 && chown nobody:nobody /home/www/webui-aria2 -R
vim /home/www/webui-aria2/configuration.js
configuration.js
angular .module('webui.services.configuration', []) .constant('$name', 'Aria2 WebUI') // name used across the entire UI .constant('$titlePattern', 'active: {active} - waiting: {waiting} - stopped: {stopped} — {name}') .constant('$pageSize', 11) // number of downloads shown before pagination kicks in .constant('$authconf', { // default authentication configuration, never fill it in case the webui is hosted in public IP as it can be compromised host: '192.168.2.1', path: '/jsonrpc', port: 6800, encrypt: false, auth: { // either add the token field or the user and pass field, not both. token: '616d343b1465b51ca65675b2bfef98' /*-----------------------------*/ // user: '*YOUR_USERNAME*', // pass: '*YOUR_SECRET_PASS*' }, directURL: '' // If supplied, links will be created to enable direct download from the aria2 server, requires appropriate webserver to be configured }) .constant('$enable', { torrent: true, // bittorrent support only enabled if supported by aria2 build, set to false otherwise to permanently disable it metalink: true, // metalink support only enabled if supported by aria2 build, set to false to permanently disable it sidebar: { // configuration related to the sidebar next to the list of downloads show: true, // set to false to completely hide the sidebar. Other elements inside will be automatically hidden stats: true, // set to false to hide the global statistic section (contains the speed graph for now) filters: true, // set to false to hide the Download Filters starredProps: true // only shown when at least one property is added to the starred list, set to false to permanently hide the Quick Access Settings inside the sidebar } }) .constant('$starredProps', [ // default list of Quick Access Properties. Can be overridden by making modification through the Global Settings dialog // go to Global Settings dialog to see their description 'dir', 'conf-path', 'auto-file-renaming', 'max-connection-per-server' ]) .constant('$downloadProps', [ // Similar to starred Quick Access properties but for adding new downloads. // go to Advance Download Options when adding a new download to view the list of possible options 'http-user', 'http-passwd', 'pause', 'dir', 'max-connection-per-server' ]) .constant('$globalTimeout', 1000) // interval to update the individual downloads ;
vim /usr/local/bin/aria2-webui
aria2-webui
コードはここにあります 。
#!/usr/bin/env python import os import posixpath import urllib import BaseHTTPServer from SimpleHTTPServer import SimpleHTTPRequestHandler # modify this to add additional routes ROUTES = ( ## [url_prefix , directory_path] ['', '/home/www/webui-aria2'], # empty string for the 'default' match # ['/media', '/var/www/media'] ) class RequestHandler(SimpleHTTPRequestHandler): def translate_path(self, path): """translate path given routes""" # set default root to cwd root = os.getcwd() # look up routes and set root directory accordingly for pattern, rootdir in ROUTES: if path.startswith(pattern): # found match! path = path[len(pattern):] # consume path up to pattern len root = rootdir break # normalize path and prepend root directory path = path.split('?',1)[0] path = path.split('#',1)[0] path = posixpath.normpath(urllib.unquote(path)) words = path.split('/') words = filter(None, words) path = root for word in words: drive, word = os.path.splitdrive(word) head, word = os.path.split(word) if word in (os.curdir, os.pardir): continue path = os.path.join(path, word) return path if __name__ == '__main__': BaseHTTPServer.test(RequestHandler, BaseHTTPServer.HTTPServer)
コードはここにあります 。
chmod 755 /usr/local/bin/aria2-webui
systemdサービスを作成します。
vim /lib/systemd/system/aria2-webui.service
[Unit] Description=Aria2 WebUI After=network.target After=aria2.service [Service] Type=simple User=nobody Group=nobody ExecStart=/usr/local/bin/aria2-webui [Install] WantedBy=multi-user.target
サービスをアクティブにして開始します。
systemctl enable aria2-webui.service systemctl start aria2-webui.service
firewalldのプリセットを作成します。
vim /etc/firewalld/services/aria2-webui.xml
<?xml version="1.0" encoding="utf-8"?> <service> <short>Aria2-WebUI</short> <description>WebUI for Aria2</description> <port protocol="tcp" port="8000"/> </service>
cd /etc/firewalld/services restorecon aria2-webui.xml chmod 640 aria2-webui.xml
Openvpn
必要に応じて、openvpnをインストールして構成します。
yum install openvpn
vim /etc/openvpn/client.conf
client dev tun proto tcp remote xxx.xxx.xxx.xxx 1194 resolv-retry infinite nobind tun-mtu 1500 tun-mtu-extra 32 mssfix 1450 persist-key persist-tun ca /etc/openvpn/keys/ca.crt cert /etc/openvpn/keys/home.crt key /etc/openvpn/keys/home.key #tls-auth /etc/openvpn/keys/ta.key 1 #comp-lzo verb 3
systemctl enable openvpn@client systemctl start openvpn@client systemctl status -l openvpn@client
NFS
Linuxマシンからアクセスするためのnfsサポートをインストールして構成します。
yum install nfs-utils
vim /etc/idmapd.conf
Domain = router.local
vim /etc/exports
/home/store 192.168.2.0/24(rw,sync,no_root_squash,no_subtree_check)
サービスをアクティブにして開始します。
systemctl start rpcbind nfs-server systemctl enable rpcbind nfs-server
確認します。
exportfs
ボーナス
これらは、AndroidでTVセットトップボックスをロードするときに、NFCボールを自動的にマウントするためのスクリプトです。
Android 4.4
Android 4.2
Android 4.4
#!/system/bin/sh S_MOUNT="NFS" T_MOUNT="store" IP="192.168.2.1" # Make sure networking is up before mounting while : do check_if_up=($(netcfg | grep -e eth0 -e wlan0 | busybox awk '{print $2}')) if [[ (${check_if_up[0]} = UP) || (${check_if_up[1]} = UP) ]]; then break fi sleep 1 done sleep 1 if [ ! -d /data/media/0/${S_MOUNT} ] ; then mkdir /data/media/0/${S_MOUNT} fi sleep 30 su --mount-master -c busybox mount -o rw,nosuid,nodev,nolock,rsize=32768,wsize=32768,intr,noatime -t nfs ${IP}:/home/${T_MOUNT} /data/media/0/${S_MOUNT}
Android 4.2
#!/system/bin/sh S_MOUNT="NFS" T_MOUNT="store" IP="192.168.2.1" # Make sure networking is up before mounting while : do check_if_up=($(netcfg | grep -e eth0 -e wlan0 | busybox awk '{print $2}')) if [[ (${check_if_up[0]} = UP) || (${check_if_up[1]} = UP) ]]; then break fi sleep 1 done sleep 1 if [ ! -d /mnt/${S_MOUNT} ] ; then mkdir /mnt/${S_MOUNT} fi sleep 30 busybox mount -o rw,nolock ${IP}:/home/${T_MOUNT} /mnt/${S_MOUNT}
サンバ
Windowsマシンからアクセスするためのsambaサポートをインストールして構成します。
yum install samba mv /etc/samba/smb.conf /etc/samba/smb.conf.orig
vim /etc/samba/smb.conf
smb.conf
[global] workgroup = WORKGROUP server string = ROUTER netbios name = ROUTER interfaces = lo br0 hosts allow = 127. 192.168.2. bind interfaces only = yes security = USER map to guest = Bad User guest account = nobody encrypt passwords = true passdb backend = tdbsam load printers = no show add printer wizard = no printcap name = /dev/null disable spoolss = yes unix charset = UTF8 socket options = TCP_NODELAY IPTOS_LOWDELAY SO_RCVBUF=65536 SO_SNDBUF=65536 [store] comment = all path = /home/store browseable = no read only = no guest ok = yes writable = yes create mask = 0777 directory mask = 0777 available = yes public = yes
サービスをアクティブにして開始します。
systemctl enable smb.service systemctl start smb.service
イカ
squidプロキシキャッシングサーバーをインストールして構成します。
squidはbio.ccのパッチでコンパイルされており、証明書をスプーフィングすることなくHTTPSリソースを透過的にフィルタリングできます。
詳細はこちらをご覧ください 。
また、イカでは、広告をカットし、torを介して一部のサイトへのリクエストをラップします。
Squidリポジトリを追加しますが、squid squid-helpersパッケージのインストールは禁止します。
vim /etc/yum.repos.d/Squid.repo
[squid] name=Squid repo for CentOS Linux - $basearch #IL mirror baseurl=http://www1.ngtech.co.il/repo/centos/$releasever/$basearch/ failovermethod=priority enabled=1 gpgcheck=0 # Exclude=squid squid-helpers
yum update
Squidをダウンロードしてインストールします。
yum localinstall https://dl.dropboxusercontent.com/u/2709550/HP%20t610%20PLUS/Squid/squid-3.5.8-4.el7.centos.x86_64.rpm yum localinstall https://dl.dropboxusercontent.com/u/2709550/HP%20t610%20PLUS/Squid/squid-helpers-3.5.8-4.el7.centos.x86_64.rpm
cd /etc/squid mkdir ssl_cert chown squid:squid ssl_cert chmod 700 ssl_cert cd ssl_cert openssl req -new -newkey rsa:1024 -days 365 -nodes -x509 -keyout squidCA.pem -out squidCA.pem
/usr/lib64/squid/ssl_crtd -c -s /var/lib/ssl_db chown squid:squid -R /var/lib/ssl_db
vim /etc/squid/squid.conf
squid.conf
visible_hostname router.local #---------------------------------------------------------------- mime_table /etc/squid/mime.conf global_internal_static on icon_directory /usr/share/squid/icons #---------------------------------------------------------------- acl localnet src 192.168.2.0/24 acl office_hours time 00:00-24:00 #---------------------------------------------------------------- acl SSL_ports port 443 # https acl SSL_ports port 563 # snews acl SSL_ports port 873 # rsync #---------------------------------------------------------------- acl Safe_ports port 21 # ftp acl Safe_ports port 25 # smtp acl Safe_ports port 70 # gopher acl Safe_ports port 80 # http acl Safe_ports port 210 # wais acl Safe_ports port 280 # http-mgmt acl Safe_ports port 443 # https acl Safe_ports port 488 # gss-http acl Safe_ports port 591 # filemaker acl Safe_ports port 631 # cups acl Safe_ports port 777 # multiling http acl Safe_ports port 873 # rsync acl Safe_ports port 901 # SWAT acl Safe_ports port 1025-65535 # unregistered ports acl purge method PURGE acl CONNECT method CONNECT #---------------------------------------------------------------- acl windowsupdate dstdomain windowsupdate.microsoft.com acl windowsupdate dstdomain .update.microsoft.com acl windowsupdate dstdomain download.windowsupdate.com acl windowsupdate dstdomain redir.metaservices.microsoft.com acl windowsupdate dstdomain images.metaservices.microsoft.com acl windowsupdate dstdomain c.microsoft.com acl windowsupdate dstdomain www.download.windowsupdate.com acl windowsupdate dstdomain wustat.windows.com acl windowsupdate dstdomain crl.microsoft.com acl windowsupdate dstdomain sls.microsoft.com acl windowsupdate dstdomain productactivation.one.microsoft.com acl windowsupdate dstdomain ntservicepack.microsoft.com #----------------------------------------------------------------- acl onion_domain dstdomain .onion acl tor_url dstdom_regex -i "/etc/squid/tor.url" #----------------------------------------------------------------- cache_peer 127.0.0.1 parent 8118 0 no-query no-digest default cache_peer_access 127.0.0.1 allow onion_domain cache_peer_access 127.0.0.1 allow tor_url cache_peer_access 127.0.0.1 deny all #----------------------------------------------------------------- http_access allow windowsupdate localnet #----------------------------------------------------------------- never_direct allow onion_domain never_direct allow tor_url always_direct deny onion_domain always_direct deny tor_url always_direct allow all #---------------------------------------------------------------- sslproxy_cert_error allow all sslproxy_flags DONT_VERIFY_PEER acl blocked ssl::server_name "/etc/squid/denied_https.conf" acl step1 at_step SslBump1 ssl_bump peek step1 ssl_bump terminate blocked ssl_bump splice all sslcrtd_program /usr/lib64/squid/ssl_crtd -s /var/lib/ssl_db -M 4MB #---------------------------------------------------------------- acl js urlpath_regex -i \.js(\?.*)?$ acl adblock-android dstdomain "/etc/squid/adblock-android.conf" acl adblock url_regex "/etc/squid/adblock.acl" acl badsites dstdomain "/etc/squid/denied-sites.conf" #---------------------------------------------------------------- http_access deny !Safe_ports http_access deny CONNECT !SSL_ports http_access deny localnet adblock-android http_access deny localnet adblock http_access allow localhost localnet Safe_ports #---------------------------------------------------------------- http_access allow localnet CONNECT http_access allow localnet office_hours #---------------------------------------------------------------- deny_info TCP_RESET adblock js deny_info http://192.168.2.1:3128/squid-internal-static/icons/null.gif adblock #---------------------------------------------------------------- http_access deny all #---------------------------------------------------------------- icp_access allow localnet icp_access deny all #---------------------------------------------------------------- http_port 192.168.2.1:3127 options=NO_SSLv3:NO_SSLv2 http_port 192.168.2.1:3128 intercept options=NO_SSLv3:NO_SSLv2 https_port 192.168.2.1:3129 intercept ssl-bump options=ALL:NO_SSLv3:NO_SSLv2 connection-auth=off cert=/etc/squid/ssl_cert/squidCA.pem #---------------------------------------------------------------- access_log stdio:/var/log/squid/access.log squid cache_log /var/log/squid/cache.log cache_store_log stdio:/var/log/squid/store.log pid_filename /var/run/squid.pid debug_options ALL,1 #---------------------------------------------------------------- refresh_pattern ^ftp: 1440 20% 10080 refresh_pattern ^gopher: 1440 0% 1440 refresh_pattern -i (/cgi-bin/|\?) 0 0% 0 refresh_pattern (Release|Package(.gz)*)$ 0 20% 2880 refresh_pattern . 0 20% 4320 acl shoutcast rep_header X-HTTP09-First-Line ^ICY\s[0-9] acl apache rep_header Server ^Apache #---------------------------------------------------------------- hosts_file /etc/hosts coredump_dir /var/spool/squid error_directory /usr/share/squid/errors/ru-ru cache_mgr wmlex@yandex.ru cache_dir ufs /var/spool/squid 2000 48 256 shutdown_lifetime 5 seconds
広告ブロックファイルをダウンロードする
wget -P /etc/squid/ https://dl.dropboxusercontent.com/u/2709550/HP%20t610%20PLUS/Squid/adblock-android.conf wget -P /etc/squid/ https://dl.dropboxusercontent.com/u/2709550/HP%20t610%20PLUS/Squid/adblock.acl wget -P /usr/share/squid/icons/ https://dl.dropboxusercontent.com/u/2709550/HP%20t610%20PLUS/Squid/null.gif touch /etc/squid/denied_https.conf touch /etc/squid/tor.url
vim /etc/squid/tor.url
config.privoxy.org check.torproject.org/?lang=ru
vim /etc/squid/mime.conf
null.gif$ image/gif null.gif - image +download +view
systemctl enable squid.service squid -z systemctl restart squid.service
vim /etc/firewalld/services/squid.xml
<?xml version="1.0" encoding="utf-8"?> <service> <short>Suid</short> <description>Squid caching proxy server</description> <port protocol="tcp" port="3127"/> <port protocol="tcp" port="3128"/> <port protocol="tcp" port="3129"/> </service>
cd /etc/firewalld/services restorecon squid.xml chmod 640 squid.xml
Tor
torをインストールして、.onionドメインおよび他のサイトにアクセスします。 torはsquidで直接動作できないため、privoxyをインストールして設定する必要もあります。
vim /etc/yum.repos.d/torproject.repo
[tor] name=Tor repo enabled=1 baseurl=https://deb.torproject.org/torproject.org/rpm/el/7/$basearch/ gpgcheck=1 gpgkey=https://deb.torproject.org/torproject.org/rpm/RPM-GPG-KEY-torproject.org.asc repo_gpgcheck=1 [tor-source] name=Tor source repo enabled=0 autorefresh=0 baseurl=https://deb.torproject.org/torproject.org/rpm/el/7/SRPMS gpgcheck=1 gpgkey=https://deb.torproject.org/torproject.org/rpm/RPM-GPG-KEY-torproject.org.asc repo_gpgcheck=1
vim /etc/yum.repos.d/epel.repo
epelリポジトリからパッケージのインストールを除外します。
Exclude=tor
yum update yum install tor privoxy
vim /etc/tor/tor-rpm-defaults-torrc
# You probably want to edit torrc file instead of this one. # These are just fallback variables for --defaults-torrc Tor option. # DataDirectory /var/lib/tor PidFile /var/run/tor/tor.pid RunAsDaemon 1 User _tor SocksPort 9050 SocksListenAddress 127.0.0.1 #ControlSocket /var/run/tor/control #ControlSocketsGroupWritable 1 CookieAuthentication 1 Log notice file /var/log/tor/tor.log ExcludeNodes {ru}, {ua}, {by} VirtualAddrNetworkIPv4 10.192.0.0/10 DNSPort 5300 DNSListenAddress 127.0.0.1 AutomapHostsOnResolve 1
privoxyを構成します。
vim /etc/privoxy/config
confdir /etc/privoxy logdir /var/log/privoxy logfile privoxy.log actionsfile match-all.action # Actions that are applied to all sites and maybe overruled later on. actionsfile default.action # Main actions file actionsfile user.action # User customizations filterfile default.filter filterfile user.filter # User customizations listen-address 127.0.0.1:8118 forward-socks5t / 127.0.0.1:9050 . max-client-connections 4096 toggle 1 enable-remote-toggle 0 enable-remote-http-toggle 0 enable-edit-actions 0 enforce-blocks 0 buffer-limit 4096 enable-proxy-authentication-forwarding 0 forwarded-connect-retries 0 accept-intercepted-requests 0 allow-cgi-request-crunching 0 split-large-forms 0 keep-alive-timeout 5 tolerate-pipelining 1 socket-timeout 300
サービスをアクティブにして起動します。
systemctl enable tor systemctl restart tor systemctl enable privoxy.service systemctl start privoxy.service
Rsync
バックアップツールとしてrsyncを構成します。 バックアップは外付けハードドライブに保存されます。
rsyncをインストールする
yum install rsync
外付けドライブのUUIDを決定する
ls -l /dev/disk/by-uuid lrwxrwxrwx. 1 root root 10 12 15:22 2ae0e5f5-6db7-4934-8c57-b02116349d44 -> ../../dm-0 lrwxrwxrwx. 1 root root 10 12 15:22 8848008a-f651-4d8f-b46c-0a7e727b52e3 -> ../../sda1 lrwxrwxrwx. 1 root root 10 12 15:22 a597c3c3-4ste-42a7-b559-d75ea9de2e5f -> ../../sdb1 lrwxrwxrwx. 1 root root 10 12 15:22 bc63643a-929b-4a59-b13a-5ba1873e9022 -> ../../dm-1 lrwxrwxrwx. 1 root root 10 12 15:22 e3727ab9-2256-4954-b8ff-3109bb720231 -> ../../dm-2
fstabにエントリを追加します
vim /etc/fstab
UUID=a597c3c3-4ste-42a7-b559-d75ea9de2e5f /home/backup ext3 defaults 0 0
バックアップファイルを保存するためのフォルダーを作成する
mkdir /home/backup/local mkdir /home/backup/remote
rsyncdを構成する
vim /etc/rsyncd.conf
構成では、リモートとローカルの2つの仮想ディレクトリを定義します。 ローカルディレクトリにはローカルマシンからのみアクセスし、ネットワーク10.10.3.0/24からはリモートでアクセスするため、認証が必要です。
# /etc/rsyncd: configuration file for rsync daemon mode # See rsyncd.conf man page for more options. # configuration example: uid = nobody gid = nobody use chroot = yes max connections = 2 pid file = /var/run/rsyncd.pid exclude = lost+found/ transfer logging = yes timeout = 900 ignore nonreadable = yes dont compress = *.gz *.tgz *.zip *.z *.Z *.rpm *.deb *.bz2 [remote] path = /home/backup/remote comment = Rsync file storage log file = /var/log/rsyncd/remote.log hosts allow = 10.10.3.0/24 read only = no list = yes auth users = remote secrets file = /etc/rsyncd.secrets [local] path = /home/backup/local comment = Rsync file storage log file = /var/log/rsyncd/local.log hosts allow = localhost read only = no list = yes
リモートディレクトリにアクセスするためのパスワードを作成します
vim /etc/rsyncd.secrets
remote:backup
必要な権利を設定します
chown root.root /etc/rsyncd.* chmod 600 /etc/rsyncd.* chown nobody.nobody /home/backup -R
サービスを有効化して開始します
systemctl enable rsyncd.service systemctl start rsyncd.service
cronでルールを作成する
crontab -e
このルールに基づいて、「ダウンロード」フォルダーを除く「ストア」フォルダーのすべてのコンテンツは、毎日23:00に「ローカル」フォルダーと同期されます。
0 23 * * * rsync -av --delete --exclude='Download/' /home/store/ localhost::local
ファイアウォール
ファイアウォールを構成します。
firewall-cmd --set-default-zone=internal firewall-cmd --permanent --zone=external --add-icmp-block=echo-reply firewall-cmd --permanent --zone=external --add-icmp-block=destination-unreachable firewall-cmd --permanent --zone=external --add-icmp-block=echo-request firewall-cmd --permanent --zone=external --add-icmp-block=time-exceeded firewall-cmd --permanent --zone=external --add-icmp-block=parameter-problem firewall-cmd --permanent --zone=external --change-interface=enp1s0 firewall-cmd --permanent --zone=external --add-masquerade # 4G firewall-cmd --direct --permanent --passthrough ipv4 -t mangle -A POSTROUTING -o wwp6s0u1i1 -j TTL --ttl-set 64 firewall-cmd --permanent --zone=external --change-interface=wwp6s0u1i1 firewall-cmd --permanent --zone=internal --change-interface=br0 firewall-cmd --permanent --zone=internal --add-masquerade firewall-cmd --permanent --zone=internal --add-port=9091/tcp firewall-cmd --permanent --zone=internal --add-service=samba firewall-cmd --permanent --zone=internal --add-service=dns firewall-cmd --permanent --zone=internal --add-service=dhcp firewall-cmd --permanent --zone=internal --add-service=tftp firewall-cmd --permanent --zone=internal --add-service=rsyncd firewall-cmd --permanent --zone=internal --add-service=nfs firewall-cmd --permanent --zone=internal --add-service=ntp firewall-cmd --permanent --zone=internal --add-service=mountd firewall-cmd --permanent --zone=internal --add-service=rpc-bind firewall-cmd --permanent --zone=internal --add-service=ssh firewall-cmd --permanent --zone=internal --add-service=aria2 firewall-cmd --permanent --zone=internal --add-service=aria2-webui firewall-cmd --permanent --zone=internal --add-service=squid firewall-cmd --permanent --zone=internal --add-forward-port=port=80:proto=tcp:toport=3128:toaddr=192.168.2.1 firewall-cmd --permanent --zone=internal --add-forward-port=port=443:proto=tcp:toport=3129:toaddr=192.168.2.1 firewall-cmd --reload
firewall-cmd --list-all-zones
systemctl restart network.service systemctl restart firewalld.service
UPD .