
こんにちは
実装段階でのエラーのコストが開発段階での修正コストの数百および数千倍を超える世界では、「これを自動的にテストするにはどうすればよいか」という質問に対する答えを常に探す必要があります。 しかし、それでもなんとか面白いアイデアを見つけることができたので、私の意見を皆さんと共有したいと思います。
この記事では、JavaFXフォームでコンポーネントを見つける方法、それらのプロパティを確認する方法、それらをクリックする方法などを説明します。 これは、JavaFXアプリケーションのテストの自動化へのエントリポイントの最低限必要なセットです。
1.ソースデータ
ライブラリのセット:guava、testFx、hamcrest、およびJUnit。
基本的に、アプリケーション自体のロジックについては説明しません。これは、簡単に作成できる計算機であると言えます。ブラックボックスのように、できるだけ長く作業を続けます。 それでも、アプリケーションランチャークラス自体から始めます。
public class CalculatorApp extends Application { private static Optional<Callback<Parent>> callback = Optional.empty(); public static void main(String[] args) { launch(args); } @Override public void start(Stage primaryStage) throws Exception { BorderPane root = new BorderPane(); root.setCenter(new Calculator()); Scene scene = new Scene(root); primaryStage.setScene(scene); primaryStage.show(); callback.ifPresent(o -> o.call(root)); } public static void onLoad(Callback<Parent> r) { CalculatorApp.callback = Optional.of(r); } }
コールバックが必要な理由は、後ほど明らかになります。 今のところ、彼について知る必要があるだけです。
public interface Callback<T> { void call(T arg); }
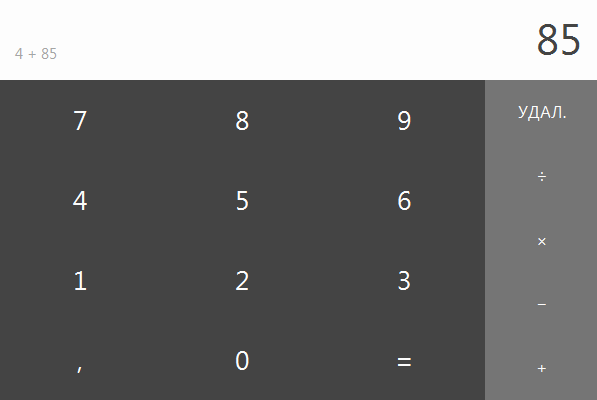
ランチャーに加えて、推測できるように、Calculator.java-コントローラー、Calculator.fxml-階層全体、レイアウトなどのコンポーネント、Calculator.css-視覚化のコンポーネントで使用されるスタイルがあります。 最終的に、計算機は次のようになります。
2.テストの初期化
public class FirstTest { private static GuiTest controller; @BeforeClass public static void setUpClass() { CalculatorApp.onLoad(r -> { controller = new GuiTest() { @Override protected Parent getRootNode() { return r; } }; }); FXTestUtils.launchApp(CalculatorApp.class); try { Thread.sleep(1000); } catch (InterruptedException e) { e.printStackTrace(); } } ...
TestFXを使用してテストを自動化するには、多くの便利なメソッドを含む抽象クラスであるGuiTest()が必要です。 Parent getRootNode()を実装する必要があります。 コールバックは、実際のルートをGuiTest実装に渡します。 これは、TestFXが実際に行うコンポーネント階層を再帰的に歩くのに十分です。 ライブラリのソースコードを調べることを強くお勧めします。多くの興味深いことがあり、その動作の原理はすぐに明らかになります。
FXTestUtils.launchApp(CalculatorApp.class);
待つ必要はありません-アプリケーションがロードされるのをよりスマートに待つことができますが、簡単にするためにThread.sleep(1000)があります。
3.メソッド
まず、エンジンにDELETEを押すように教える必要があります。 Beforeで使用する場合:
private void clear() { controller.click("."); }
はい、それはとても簡単です-これは唯一の方法です。 実際、マウスはスムーズに動き、クリックします。 将来の可愛さの不必要な時間の浪費を避けるために、目的のノードにイベントを直接投げることに進むことができます(ただし、ビデオをダイナミクスで表示するために遅いバージョンを残します)。 そして、イベントのスローは次のように行われます。
Event.fireEvent(your_node, new MouseEvent(MouseEvent.MOUSE_CLICKED, 0, 0, 0, 0, MouseButton.PRIMARY, 1, true, true, true, true, true, true, true, true, true, true, null));
合計で、達成したこと-計算機のフィールドのクリーニング(リセット)があり、各テストの前に実行します。
@Before public void beforeTest() { clear(); }
同様に、電卓で目的の番号を呼び出すメソッドを実装します。
public void click(int digit) { String numStr = Integer.toString(digit); for (int i = 0; i < numStr.length(); i++) { controller.click(String.valueOf(numStr.charAt(i))); } }
次に、さまざまなコントロールをクリックするより興味深いバージョンを示します。 タスクは、+、-、*、/、=をクリックすることを学ぶことです。 fxmlを見て、これらのコンポーネントがどのようにユニークであるかを理解しましょう。
<Label fx:id="eq"... <Label fx:id="divide"... <Label fx:id="multiply"... <Label fx:id="subtract"... <Label fx:id="add"...
Calculator.fxmlの完全版をご覧ください
<?xml version="1.0" encoding="UTF-8"?> <?import java.net.*?> <?import javafx.scene.control.*?> <?import java.lang.*?> <?import javafx.scene.layout.*?> <fx:root maxHeight="-Infinity" maxWidth="-Infinity" minHeight="-Infinity" minWidth="-Infinity" prefHeight="400.0" prefWidth="600.0" styleClass="root" type="GridPane" xmlns="http://javafx.com/javafx/8" xmlns:fx="http://javafx.com/fxml/1"> <columnConstraints> <ColumnConstraints hgrow="SOMETIMES" minWidth="10.0" percentWidth="27.0" prefWidth="100.0" /> <ColumnConstraints hgrow="SOMETIMES" minWidth="10.0" percentWidth="27.0" prefWidth="100.0" /> <ColumnConstraints hgrow="SOMETIMES" minWidth="10.0" percentWidth="27.0" prefWidth="100.0" /> <ColumnConstraints hgrow="SOMETIMES" minWidth="10.0" percentWidth="19.0" prefWidth="100.0" /> </columnConstraints> <rowConstraints> <RowConstraints minHeight="10.0" percentHeight="25.0" prefHeight="30.0" vgrow="SOMETIMES" /> <RowConstraints minHeight="10.0" percentHeight="25.0" prefHeight="30.0" vgrow="SOMETIMES" /> <RowConstraints minHeight="10.0" percentHeight="25.0" prefHeight="30.0" vgrow="SOMETIMES" /> <RowConstraints minHeight="10.0" percentHeight="25.0" prefHeight="30.0" vgrow="SOMETIMES" /> <RowConstraints minHeight="10.0" percentHeight="25.0" prefHeight="30.0" vgrow="SOMETIMES" /> </rowConstraints> <children> <StackPane maxHeight="1.7976931348623157E308" maxWidth="1.7976931348623157E308" GridPane.columnSpan="4"> <children> <TextField fx:id="input" alignment="CENTER_RIGHT" focusTraversable="false" maxHeight="1.7976931348623157E308" maxWidth="1.7976931348623157E308" styleClass="input" text="0" GridPane.columnSpan="4" /> <Label fx:id="description" styleClass="operation" StackPane.alignment="BOTTOM_LEFT" /> </children> </StackPane> <Label alignment="CENTER" maxHeight="1.7976931348623157E308" maxWidth="1.7976931348623157E308" onMouseClicked="#handleClick" text="3" GridPane.columnIndex="2" GridPane.rowIndex="3" /> <Label alignment="CENTER" maxHeight="1.7976931348623157E308" maxWidth="1.7976931348623157E308" onMouseClicked="#handleClick" text="9" GridPane.columnIndex="2" GridPane.rowIndex="1" /> <Label alignment="CENTER" maxHeight="1.7976931348623157E308" maxWidth="1.7976931348623157E308" onMouseClicked="#handleClick" text="2" GridPane.columnIndex="1" GridPane.rowIndex="3" /> <Label alignment="CENTER" maxHeight="1.7976931348623157E308" maxWidth="1.7976931348623157E308" onMouseClicked="#handleClick" text="1" GridPane.rowIndex="3" /> <Label alignment="CENTER" maxHeight="1.7976931348623157E308" maxWidth="1.7976931348623157E308" onMouseClicked="#handleClick" text="5" GridPane.columnIndex="1" GridPane.rowIndex="2" /> <Label alignment="CENTER" maxHeight="1.7976931348623157E308" maxWidth="1.7976931348623157E308" onMouseClicked="#handleClick" text="8" GridPane.columnIndex="1" GridPane.rowIndex="1" /> <Label alignment="CENTER" maxHeight="1.7976931348623157E308" maxWidth="1.7976931348623157E308" onMouseClicked="#handleClick" text="4" GridPane.rowIndex="2" /> <Label alignment="CENTER" maxHeight="1.7976931348623157E308" maxWidth="1.7976931348623157E308" onMouseClicked="#handleClick" text="7" GridPane.rowIndex="1" /> <Label alignment="CENTER" maxHeight="1.7976931348623157E308" maxWidth="1.7976931348623157E308" onMouseClicked="#handleClick" text="," GridPane.rowIndex="4" /> <Label fx:id="eq" alignment="CENTER" maxHeight="1.7976931348623157E308" maxWidth="1.7976931348623157E308" onMouseClicked="#handleEq" text="=" GridPane.columnIndex="2" GridPane.rowIndex="4" /> <Label alignment="CENTER" maxHeight="1.7976931348623157E308" maxWidth="1.7976931348623157E308" onMouseClicked="#handleClick" text="0" GridPane.columnIndex="1" GridPane.rowIndex="4" /> <Label alignment="CENTER" maxHeight="1.7976931348623157E308" maxWidth="1.7976931348623157E308" onMouseClicked="#handleClick" text="6" GridPane.columnIndex="2" GridPane.rowIndex="2" /> <GridPane styleClass="operations" GridPane.columnIndex="3" GridPane.rowIndex="1" GridPane.rowSpan="4"> <columnConstraints> <ColumnConstraints hgrow="SOMETIMES" minWidth="10.0" prefWidth="100.0" /> </columnConstraints> <rowConstraints> <RowConstraints minHeight="10.0" prefHeight="30.0" vgrow="SOMETIMES" /> <RowConstraints minHeight="10.0" prefHeight="30.0" vgrow="SOMETIMES" /> <RowConstraints minHeight="10.0" prefHeight="30.0" vgrow="SOMETIMES" /> <RowConstraints minHeight="10.0" prefHeight="30.0" vgrow="SOMETIMES" /> <RowConstraints minHeight="10.0" prefHeight="30.0" vgrow="SOMETIMES" /> </rowConstraints> <children> <Label alignment="CENTER" maxHeight="1.7976931348623157E308" maxWidth="1.7976931348623157E308" onMouseClicked="#clear" text="." /> <Label fx:id="divide" alignment="CENTER" maxHeight="1.7976931348623157E308" maxWidth="1.7976931348623157E308" onMouseClicked="#handleOperationSelect" text="÷" GridPane.rowIndex="1" /> <Label fx:id="multiply" alignment="CENTER" maxHeight="1.7976931348623157E308" maxWidth="1.7976931348623157E308" onMouseClicked="#handleOperationSelect" text="×" GridPane.rowIndex="2" /> <Label fx:id="subtract" alignment="CENTER" maxHeight="1.7976931348623157E308" maxWidth="1.7976931348623157E308" onMouseClicked="#handleOperationSelect" text="−" GridPane.rowIndex="3" /> <Label fx:id="add" alignment="CENTER" maxHeight="1.7976931348623157E308" maxWidth="1.7976931348623157E308" onMouseClicked="#handleOperationSelect" text="+" GridPane.rowIndex="4" /> </children> </GridPane> </children> <stylesheets> <URL value="@../../../style/base.css" /> <URL value="@../../../style/skin.css" /> <URL value="@Calculator.css" /> </stylesheets> </fx:root>
一意のfx:idがあり、これを使用します。 便宜上、操作を含む列挙を作成します。
public enum Operation { ADD, SUBTRACT, MULTIPLY, DIVIDE, EQ; }
次に、org.hamcrest.Matcherの実装を作成します。 操作をコンストラクターに渡し、それを小文字に変換して、入力に来るオブジェクトと比較します。
public class OperationMatcher implements Matcher<Node> { private Operation operation; public OperationMatcher(Operation operation) { this.operation = operation; } @Override public boolean matches(Object item) { if (item instanceof Labeled) { String expected = operation.toString().toLowerCase(); String id = ((Labeled)item).getId(); if (id != null) { if (expected.equals(id.toLowerCase())) { return true; } } } return false; } ...
もちろん、私はここで多くの余分なことを書きましたが、これはアイテムが主にノードであり、さまざまなチェックとキャストが適用可能であることを示すためだけです。 これで、GuiTestメソッドを使用できます。
パブリックGuiTestクリック(Matcherマッチャー、MouseButton ...ボタン)、つまり、メソッドを作成します。
private void perform(Operation operation) { Matcher<Node> matcher = new OperationMatcher(operation); controller.click(matcher, MouseButton.PRIMARY); }
したがって、結果を確認するだけです。 つまり、ラベル(操作)とtextField(入力)を見つけるために...マッチャーの記述を禁止する人はいません-GuiTestには当然、マッチャーの検索メソッドがあります。
ただし、別の方法、つまり、styleClassによる検索(簡単にするためにスリープを再度挿入します-レンダリングを待つ必要があります):
public void checkDescriptionField(String expectedText) throws InterruptedException { Thread.sleep(200); Node result = controller.find(".operation"); String actualText = ((Labeled) result).getText(); Assert.assertEquals(expectedText.trim(), actualText.trim()); } public void checkInputField(String expectedText) throws InterruptedException { Thread.sleep(200); Node result = controller.find(".input"); String actualText = ((TextField) result).getText(); Assert.assertEquals(expectedText.trim(), actualText.trim()); }
足し算と引き算の最も簡単なテストを書く時です。
@Test public void testADD() throws InterruptedException { int digit1 = random.nextInt(1000); int digit2 = random.nextInt(1000); click(digit1); checkDescriptionField(String.valueOf(digit1)); checkInputField(String.valueOf(digit1)); perform(Operation.ADD); click(digit2); checkDescriptionField(digit1 + " + " + digit2); checkInputField(String.valueOf(digit2)); perform(Operation.EQ); checkInputField(String.valueOf(digit1 + digit2) + ",00"); } @Test public void testSubstract() throws InterruptedException { int digit1 = random.nextInt(1000); int digit2 = random.nextInt(1000); click(digit1); checkDescriptionField(String.valueOf(digit1)); checkInputField(String.valueOf(digit1)); perform(Operation.SUBTRACT); click(digit2); checkDescriptionField(digit1 + " − " + digit2); checkInputField(String.valueOf(digit2)); perform(Operation.EQ); checkInputField(String.valueOf(digit1 - digit2) + ",00"); }
単純化のために "、00"-Formatterを介して何をする必要があるかが明確であり、Thread.sleepをwaitに置き換えて、スローイベントをクリックする必要があることは明らかです。テストが実行されます。 しかし、これはすでにtestFX機能の範囲を超えています。
ところで、第3バージョンのTestFXについてお話しました-ほんの数週間前に、 アルファバージョン4.0.1がリリースされました 。 testfx-legacyの部分は特に興味深いものですが、ソースについてさらに深く掘り下げるときにこのことについて書きます。この記事は英語でここに公開します 。
以下に書かれたテストを実行する約束のビデオ: