
Pythonにはテストを作成するための多くのツールがあり、それらの選択は明らかではありません。 PyTestの興味深い使用法を説明し、その[長所|短所|暗黙の機能]について説明します。 記事では、自動テストの簡単で理解しやすいレポートを作成するのに役立つAllureの使用の詳細な例を見つけるでしょう。 また、例ではマッチャーを記述するためのフレームワーク-Python用Hamcrestが使用されます。 最終的に、現在テストツールを探している人が、上記の例に基づいて、環境で機能テストを迅速に実装できることを願っています。 既に何らかのツールを使用している人は、新しいアプローチ、ユースケース、概念を学ぶことができます。
歴史的に、私たちのプロジェクトには、相互作用の複雑なパターンを持つテクノロジー動物園全体があります。 同時に、APIと機能は成長しているだけなので、統合テストを実装する必要があります。
自動化エンジニアとして、最適なテストプロセスを確立するには、テストを作成するための最も便利で柔軟なツールが必要です。 Pythonが選ばれたのは、習得が簡単で、そのコードが通常読みやすく、最も重要なこととして、豊富な標準ライブラリと多くの拡張パッケージを備えているためです。
機能テスト用のツールのリストを見た後、あなたは無意識のうちにst迷に陥り、どのツールを選択するかを考え、テストをすばやく記述し、サポートに問題がないようにし、新しい従業員を簡単に訓練してそれを使用するようにします。
かつて実験する機会があり、その選択は有望なPyTestフレームワークにかかっていました。 それからそれはまだそれほど普及しておらず、少数の人々がそれを使用しました。 APIを使用せずに、フィクスチャを使用し、通常のPythonモジュールの形式でテストを記述するというコンセプトが気に入りました。 その結果、PyTestが起動し、次のような多くの機能を備えた非常に柔軟なソリューションができました。
- テスト自体から補助機能を分離できるテスト関数への引数形式のフィクスチャ。
- 組み込みアサート。エラーを便利な方法で表示します。
- pytest.mark.parametrizeは、コードを複製せずに異なるデータセットでテストを実行します。
- テストにマークを付けて、落下テストをマークしたり、長時間実行されているテストを強調表示して個別に実行したりする機能。
- --junit-xml引数を使用したJUnitレポートのサポートに加えて、異なる形式のレポートを生成する機能。
ここで、PyTestでのフィクスチャ、パラメータ化、マーキングの仕組みについて詳しく説明します。 PyHamcrestフレームワークを使用してマッチャーを記述し、Allureを使用して結果レポートを作成する方法。
テストを書く
備品
常識では、 フィクスチャはテストが実行されるスタンドの固定状態です。 これは、システムを特定の状態にするアクションにも適用されます。
pytestフィクスチャでは、
@pytest.fixture.
デコレータでラップされた関数
@pytest.fixture.
関数自体は、必要な瞬間(テストクラス、モジュール、または関数の前)に実行され、返された値がテスト自体で利用できるようになります。 同時にフィクスチャーは他のフィクスチャーを使用できます。さらに、現在のセッション、モジュール、クラス、または関数内の特定のフィクスチャーの有効期間を決定できます。 これらは、テストをモジュール化するのに役立ちます。 また、統合をテストするときは、隣接するテストライブラリからそれらを再利用します。 柔軟性と使いやすさは、 pytestを選択するための主要な基準の一部でした。 フィクスチャを使用するには、その名前をテストのパラメーターとして指定する必要があります。
必要なときに備品が助けになります:
- テストデータを生成します。
- テストスタンドを準備します。
- スタンドの動作を変更します。
-
setUp/tearDown
ます。 - サービスログまたは
crashdump
収集します。 - システムエミュレーターまたはスタブを使用する
- などなど。
テストサーバー
次の例では、 FlaskでWebサーバーの機能をテストし、ポート
8081
で接続を待機し、
GET
要求を受信するテストについて説明します。 サーバーは
text
パラメーターから1行を取得し、応答で各単語をその反転単語に変更します。 クライアントがそれを受け入れる方法を知っている場合、Jsonが返されます。
import json from flask import Flask, request, make_response as response app = Flask(__name__) @app.route("/") def index(): text = request.args.get('text') json_type = 'application/json' json_accepted = json_type in request.headers.get('Accept', '') if text: words = text.split() reversed_words = [word[::-1] for word in words] if json_accepted: res = response(json.dumps({'text': reversed_words}), 200) else: res = response(' '.join(reversed_words), 200) else: res = response('text not found', 501) res.headers['Content-Type'] = json_type if json_accepted else 'text/plain' return res if __name__ == "__main__": app.run(host='0.0.0.0', port=8081)
テスト対象のサーバーのテストを作成し、指定されたポートでの存在を確認します。 サーバーが存在することを確認してください。 これを行うには、ソケットモジュールを使用します。 テスト後にソケットを準備して閉じるフィクスチャを作成します。
import pytest import socket as s @pytest.fixture def socket(request): _socket = s.socket(s.AF_INET, s.SOCK_STREAM) def socket_teardown(): _socket.close() request.addfinalizer(socket_teardown) return _socket def test_server_connect(socket): socket.connect(('localhost', 8081)) assert socket
ただし、
setUP/tearDown
を実装してオブジェクトを返すコンテキストマネージャとしてフィクスチャを表す新しい
yield_fixture
デコレータを使用することをお
setUP/tearDown
します。
@pytest.yield_fixture def socket(): _socket = s.socket(s.AF_INET, s.SOCK_STREAM) yield _socket _socket.close()
yield_fixture
を使用すると、より簡潔で
yield_fixture
見えます。 フィクスチャのデフォルトの有効期間は
scope=function
ことに注意してください。 これは、各テストをそのパラメーターで実行すると、フィクスチャーの新しいインスタンスが発生することを意味します。
テスト用の
Server
フィクスチャを作成し、テストするWebサーバーの場所を記述します。 静的情報を保存するオブジェクトを返すので、毎回生成する必要はないため、
scope=module
設定し
scope=module
。 このフィクスチャが生成する結果はキャッシュされ、現在のモジュールが起動するたびに存在します:
@pytest.fixture(scope='module') def Server(): class Dummy: host_port = 'localhost', 8081 uri = 'http://%s:%s/' % host_port return Dummy def test_server_connect(socket, Server): socket.connect(Server.host_port) assert socket
scope=session
および
scope=class
class-フィクスチャの有効期間もあります。 また、
scope=
値の低いフィクスチャレベルの高いフィクスチャを使用することはできません。
autouse
使用
autouse
チャの使用に注意して
autouse
。 それらはデータを感知できないほど変更する可能性があるため、危険です。 それらを柔軟に使用するには、呼び出されたテストに必要なフィクスチャを確認できます。
@pytest.yield_fixture(scope='function', autouse=True) def collect_logs(request): if 'Server' in request.fixturenames: with some_logfile_collector(SERVER_LOCATION): yield else: yield
とりわけ、フィクスチャはテストクラスを指すことができます。 次の例には、テストベンチでテストが時間を変更するクラスがあります。 たとえば、各テストの後に、時間が現在に更新される必要があります。 次の例では、
Service
フィクスチャはテスト中のサービスのオブジェクトを返し、日付と時刻を変更できる
set_time
メソッドを持っています。
@pytest.yield_fixture def reset_shifted_time(Service): yield Service.set_time(datetime.datetime.now()) @pytest.mark.usefixtures("reset_shifted_time") class TestWithShiftedTime(): def test_shift_milesecond(self, Service): Service.set_time() assert ... def test_shift_time_far_far_away(self, Service): Service.set_time() assert ...
通常、状況に固有の小さな器具はテストモジュール内に記述されます。 しかし、フィクスチャが多くのテストスイートで一般的になると、通常はpytestの特別なファイルconftest.pyに移動されます。 このファイルにフィクスチャが記述されると、すべてのテストでフィクスチャが表示されるようになり、
import
する必要はありません。
仲人
明らかに、チェックなしのテストは誰にも必要ありません。 pytestを使用するとき、
assert
などのマッチャーを使用して、最も簡単な方法でチェックを行うことができます。 Assertは、記述されているステートメントを検証する標準のPythonステートメントです。 「1つのテストで
assert
つの
assert
」というルールを順守します。 データの準備やサービスを目的の状態にする手順に影響を与えることなく、特定の機能をテストできます。 テストでエラーを引き起こす可能性のあるデータを準備する手順を使用する場合、別のテストを作成することをお勧めします。 この構造を使用して、システムの予想される動作を説明します。
エラーが検出された場合、テストで人間が読める起動レポートが必要です。 そして最近では、 pytestは非常に有益
assert
をサポートし始めました。 もっと複雑なものが必要になるまで、それらを使用することをお勧めします。
たとえば、次のテスト:
def test_dict(): assert dict(foo='bar', baz=None).items() == list({'foo': 'bar'}.iteritems())
エラーの場所に関する詳細な回答を返します。
E assert [('foo', 'bar...('baz', None)] == [('foo', 'bar')] E Left contains more items, first extra item: ('baz', None)
Flaskでテストサーバーをテストするテストでは、
test_server_connect
メソッド内のテストを書き換えて、特定の
exception
予期されていないことをより正確に判断し
exception
。 これを行うには、 PyHamcrestフレームワークを使用します 。
from hamcrest import * SOCKET_ERROR = s.error def test_server_connect(socket, Server): assert_that(calling(socket.connect).with_args(Server.host_port), is_not(raises(SOCKET_ERROR)))
PyHamcrestでは、組み込みのマッチャーを組み合わせることができます。
has_property
と
contains_string,
をこのよう
contains_string,
組み合わせる
has_property
contains_string,
使いやすい単純なマッチャーが得られます。
def has_content(item): return has_property('text', item if isinstance(item, BaseMatcher) else contains_string(item)) def has_status(status): return has_property('status_code', equal_to(status))
次に、チェックされた値を変更し、次に指定された一致に渡すマッチャーを作成する必要があります。 これを行うために、クラス属性に基づいてそのようなマッチャーを形成する
BaseModifyMatcher
クラスを
description
ます:
description
マッチの説明、
BaseModifyMatcher
チェックされた値のfunction-modifier、
instance
修飾子に期待されるクラスのタイプ:
from hamcrest.core.base_matcher import BaseMatcher class BaseModifyMatcher(BaseMatcher): def __init__(self, item_matcher): self.item_matcher = item_matcher def _matches(self, item): if isinstance(item, self.instance) and item: self.new_item = self.modify(item) return self.item_matcher.matches(self.new_item) else: return False def describe_mismatch(self, item, mismatch_description): if isinstance(item, self.instance) and item: self.item_matcher.describe_mismatch(self.new_item, mismatch_description) else: mismatch_description.append_text('not %s, was: ' % self.instance) \ .append_text(repr(item)) def describe_to(self, description): description.append_text(self.description) \ .append_text(' ') \ .append_description_of(self.item_matcher)
テスト対象のサーバーは、
text
パラメーターで渡された反転ワードから応答を生成することがわかっています。
BaseModifyMatcher
を使用して、通常の単語のリストを受け取り、それに応じて反転した単語の行を期待するゲーマーを作成します。
rom hamcrest.core.helpers.wrap_matcher import wrap_matcher reverse_words = lambda words: [word[::-1] for word in words] def contains_reversed_words(item_match): """ Example: >>> from hamcrest import * >>> contains_reversed_words(contains_inanyorder('oof', 'rab')).matches("foo bar") True """ class IsStringOfReversedWords(BaseModifyMatcher): description = 'string of reversed words' modify = lambda _, item: reverse_words(item.split()) instance = basestring return IsStringOfReversedWords(wrap_matcher(item_match))
BaseModifyMatcher
を使用する次のプレーヤーは、json行をチェックします。
import json as j def is_json(item_match): """ Example: >>> from hamcrest import * >>> is_json(has_entries('foo', contains('bar'))).matches('{"foo": ["bar"]}') True """ class AsJson(BaseModifyMatcher): description = 'json with' modify = lambda _, item: j.loads(item) instance = basestring return AsJson(wrap_matcher(item_match))
テスト中のFlask サーバーをテストするテストに、さらに2つのテストを追加します。これらのテストは、さまざまなリクエストに応じてサーバーが生成するものをチェックします。 これを行うには、上記の
has_status
、
has_content
および
contains_reversed_words
has_content
を使用します。
def test_server_response(Server): assert_that(requests.get(Server.uri), all_of(has_content('text not found'), has_status(501))) def test_server_request(Server): text = 'Hello word!' assert_that(requests.get(Server.uri, params={'text': text}), all_of( has_content(contains_reversed_words(text.split())), has_status(200) ))
Hamcrestについては、 Habréで読むことができます。 should-dslにまだ注意を払う価値があります。
パラメータ化
多くの異なるパラメーターを使用して同じテストを実行する場合、テストデータのパラメーター化が役立ちます。 パラメーター化の助けを借りて、テストで繰り返しコードが使用されます。 オプションのリストを視覚的に強調すると、読みやすさが向上し、サポートが強化されます。 フィクスチャは、システムの説明、準備、または目的の状態への移行を行います。 パラメータ化は、テストケースを記述するさまざまなテストパラメータのセットを形成するために使用されます。
PyTestでは、特別な
@pytest.mark.parametrize
デコレーターを使用してテストをパラメーター化する必要があります。 1つのパラメーター化で複数のパラメーターを指定できます。 パラメーターが複数のパラメーター化に分割されている場合、それらは乗算されます。
テスト内に静的データを保持することは良い習慣ではありません。 Flaskでテストサーバーをチェックするサンプルテストでは、
test_server_request
メソッドをパラメーター化して、
text
パラメーターのオプションを説明する価値があります。
@pytest.mark.parametrize('text', ['Hello word!', ' 440 005 ', 'one_word']) def test_server_request(text, Server): assert_that(requests.get(Server.uri, params={'text': text}), all_of( has_content(contains_reversed_words(text.split())), has_status(200) ))
クライアントがサポートしている場合、
json
応答を確認するのを忘れていました。 通常のパラメーターの代わりにオブジェクトを使用してテストを書き換えます。 一致は、応答のタイプによって異なります。 試合にはもっとわかりやすい名前を付けることをお勧めします。
class DefaultCase: def __init__(self, text): self.req = dict( params={'text': text}, headers={}, ) self.match_string_of_reversed_words = all_of( has_content(contains_reversed_words(text.split())), has_status(200), ) class JSONCase(DefaultCase): def __init__(self, text): DefaultCase.__init__(self, text) self.req['headers'].update({'Accept': 'application/json'}) self.match_string_of_reversed_words = all_of( has_content(is_json(has_entries('text', contains(*reverse_words(text.split()))))), has_status(200), ) @pytest.mark.parametrize('case', [testclazz(text) for text in 'Hello word!', ' 440 005 ', 'one_word' for testclazz in JSONCase, DefaultCase]) def test_server_request(case, Server): assert_that(requests.get(Server.uri, **case.req), case.match_string_of_reversed_words)
py.test -v test_server.py
を使用してこのようなパラメーター化されたテストを実行すると、レポートが取得されます。
$ py.test -v test_server.py ============================= test session starts ============================= platform linux2 -- Python 2.7.3 -- py-1.4.20 -- pytest-2.5.2 -- /usr/bin/python plugins: timeout, allure-adaptor collected 8 items test_server.py:26: test_server_connect PASSED test_server.py:89: test_server_response PASSED test_server.py:109: test_server_request[case0] PASSED test_server.py:109: test_server_request[case1] PASSED test_server.py:109: test_server_request[case2] PASSED test_server.py:109: test_server_request[case3] PASSED test_server.py:109: test_server_request[case4] PASSED test_server.py:109: test_server_request[case5] PASSED ========================== 8 passed in 0.11 seconds ===========================
このようなレポートでは、特定の起動でどのパラメーターが使用されたかは完全に理解できません。
出力をより明確にするために、
Case
クラスに
__repr__
メソッドを実装し、
idparametrize
補助デコレータを記述する必要があります。この
Case
、
idparametrize
デコレータの
ids=
追加パラメータを使用します。
def idparametrize(name, values, fixture=False): return pytest.mark.parametrize(name, values, ids=map(repr, values), indirect=fixture) class DefaultCase: def __init__(self, text): self.text = text self.req = dict( params={'text': self.text}, headers={}, ) self.match_string_of_reversed_words = all_of( has_content(contains_reversed_words(self.text.split())), has_status(200), ) def __repr__(self): return 'text="{text}", {cls}'.format(cls=self.__class__.__name__, text=self.text) class JSONCase(DefaultCase): def __init__(self, text): DefaultCase.__init__(self, text) self.req['headers'].update({'Accept': 'application/json'}) self.match_string_of_reversed_words = all_of( has_content(is_json(has_entries('text', contains(*reverse_words(text.split()))))), has_status(200), ) @idparametrize('case', [testclazz(text) for text in 'Hello word!', ' 440 005 ', 'one_word' for testclazz in JSONCase, DefaultCase]) def test_server_request(case, Server): assert_that(requests.get(Server.uri, **case.req), case.match_string_of_reversed_words)
$ py.test -v test_server.py ============================= test session starts ============================= platform linux2 -- Python 2.7.3 -- py-1.4.20 -- pytest-2.5.2 -- /usr/bin/python plugins: ordering, timeout, allure-adaptor, qabs-yadt collected 8 items test_server.py:26: test_server_connect PASSED test_server.py:89: test_server_response PASSED test_server.py:117: test_server_request[text="Hello word!", JSONCase] PASSED test_server.py:117: test_server_request[text="Hello word!", DefaultCase] PASSED test_server.py:117: test_server_request[text=" 440 005 ", JSONCase] PASSED test_server.py:117: test_server_request[text=" 440 005 ", DefaultCase] PASSED test_server.py:117: test_server_request[text="one_word", JSONCase] PASSED test_server.py:117: test_server_request[text="one_word", DefaultCase] PASSED ========================== 8 passed in 0.12 seconds ===========================
idparametrize
デコレータ
idparametrize
を見て、
fixture
パラメータに注意を払うと、
fixture
パラメータ化できることがわかります。 次の例では、実IPとローカルIPの両方でサーバーが正しく応答することを確認します。 これを行うには、
Server
フィクスチャを少し調整して、パラメーターを取得できるようにする必要があります。
from collections import namedtuple Srv = namedtuple('Server', 'host port') REAL_IP = s.gethostbyname(s.gethostname()) @pytest.fixture def Server(request): class Dummy: def __init__(self, srv): self.srv = srv @property def uri(self): return 'http://{host}:{port}/'.format(**self.srv._asdict()) return Dummy(request.param) @idparametrize('Server', [Srv('localhost', 8081), Srv(REAL_IP, 8081)], fixture=True) @idparametrize('case', [Case('Hello word!'), Case('Hello word!', json=True)]) def test_server_request(case, Server): assert_that(requests.get(Server.uri, **case.req), case.match_string_of_reversed_words)
マーキング
マーキングを使用すると、エラーの原因としてテストをマークしたり、テストをスキップしたり、 ユーザー定義のラベルを追加したりできます 。 これはすべて、必要なテスト、ケース、またはパラメーターをグループ化またはマークするためのメタデータです。 グループ化の場合、多かれ少なかれ重要なテストがあるため、この機能を使用してテストとクラスに重大度を示します。
pytestでは 、特別な
@pytest.mark.MARK_NAME
デコレーターを使用して、テストとテストパラメーターをマークできます。 たとえば、各テストパックには数分以上かかる場合があります。 したがって、最初に重要なテストを実行してから、残りを実行したいと思います。
@pytest.mark.acceptance def test_server_connect(socket, Server): assert_that(calling(socket.connect).with_args(Server.host_port), is_not(raises(SOCKET_ERROR))) @pytest.mark.acceptance def test_server_response(Server): assert_that(requests.get(Server.uri), all_of(has_content('text not found'), has_status(501))) @pytest.mark.P1 def test_server_404(Server): assert_that(requests.get(Server.uri + 'not_found'), has_status(404)) @pytest.mark.P2 def test_server_simple_request(Server, SlowConnection): with SlowConnection(drop_packets=0.3): assert_that(requests.get(Server.uri + '?text=asdf'), has_content('fdsa'))
このようなマーキングのあるテストは、CIで使用できます。 たとえば、Jenkinsでは、
multi-configuration project
作成できます。 このタスクの[
Configuration Matrix
セクションで、
User-defined Axis
を
['acceptance', 'P1', 'P2', 'other']
を含む
TESTPACK
として定義し
User-defined Axis
。 このタスクはテストを順番に実行し、
acceptance
テストが最初に実行され、それらの成功した実行が他のテストを実行するための条件になります。
#!/bin/bash PYTEST="py.test $WORKSPACE/tests/functional/ $TEST_PARAMS --junitxml=report.xml --alluredir=reports" if [ "$TESTPACK" = "other" ] then $PYTEST -m "not acceptance and not P1 and not P2" || true else $PYTEST -m $TESTPACK || true fi
別のタイプのラベル付けは、テストを
xfail
としてマークすること
xfail
。 テスト全体をマークすることに加えて、テストパラメーターをマークできます。 そのため、次の例では、ipv6にアドレス
host='::1',
指定すると、サーバーは応答しません。 この問題を解決するには、サーバーコードで
0.0.0.0
代わりに
::
を使用します。 テストがこの状況にどのように反応するかを確認するために、まだ修正しません。 さらに、オプションの
reason
パラメーターで理由を説明できます。 このテキストは、起動レポートに表示されます。
@pytest.yield_fixture def Server(request): class Dummy: def __init__(self, srv): self.srv = srv self.conn = None @property def uri(self): return 'http://{host}:{port}/'.format(**self.srv._asdict()) def connect(self): self.conn = s.create_connection((self.srv.host, self.srv.port)) self.conn.sendall('HEAD /404 HTTP/1.0\r\n\r\n') self.conn.recv(1024) def close(self): if self.conn: self.conn.close() res = Dummy(request.param) yield res res.close() SERVER_CASES = [ pytest.mark.xfail(Srv('::1', 8081), reason='ipv6 desn`t work, use `::` instead of `0.0.0.0`'), Srv(REAL_IP, 8081), ] @idparametrize('Server', SERVER_CASES, fixture=True) def test_server(Server): assert_that(calling(Server.connect), is_not(raises(SOCKET_ERROR)))
テストとパラメーターは、タグ
pytest.mark.skipif()
でマークできます。 特定の条件を使用してこれらのテストをスキップできます。
実行とデバッグ
打ち上げ
テストを実行するには多くの方法があります。
py.test
コマンドを使用するか、
python -m pytest
として
python -m pytest
。
pytestを開始するとき
- ディレクトリまたはファイルパスを指すコマンドライン引数を使用してテストの収集を開始します。
-
norecursedirs
パラメーターに遭遇するまで、ディレクトリ内を再帰的に参照し続けます。 -
test_*.py
一致するすべてのファイルtest_*.py
*_test.py
または*_test.py
; -
__init__
メソッドを持たないTest
で始まる名前のクラス。 - 名前が
test_
でtest_
クラスの関数またはメソッド。
1つの場所でテストを実行するためのすべてのパラメーターを保存できる特別なtoxテストランナーについて言及したいと思います。 これを行うには、テストとともにルートフォルダーに
tox.ini
を書き込みます。
[tox] envlist=py27 [testenv] deps= builders pytest pytest-allure-adaptor PyHamcrest commands= py.test tests/functional/ \ --junitxml=report.xml \ --alluredir=reports \ --verbose \ {posargs}
そして、1つのコマンドでテストが
tox
:
tox
。 彼は
.tox
フォルダーに
virtualenv
を作成し、
virtualenv
にテストを実行するために必要な依存関係を
.tox
、最終的にconfig ファイルで指定されたパラメーターでpytestを実行します 。
あるいは、テストをpython用のモジュールとしてフォーマットする場合、
python setup.py test
実行できます。 これを行うには、 ドキュメントに従って
setup.py
を調整する必要があります 。
アリュールに関する上記の例のように、docstringを指定することにより、 pytestを使用してドキュメントを確認できます。 幸い、 pytestにはdoctest、pep8、 unittest 、noseの
py.test --pep8 --doctest-modules -v --junit-xml report.xml self_tests/ ft_lib/
ます:
py.test --pep8 --doctest-modules -v --junit-xml report.xml self_tests/ ft_lib/
さらに、 pytestはUnitTestおよび鼻テストを実行できることに注意してください。
デバッグ
通常のコードと同様に、テストにはデバッグが必要です。 通常、テストが
ERROR
ステータスで失敗した理由がスタックトレースでまだ不明な場合に使用されます。 pytestにはこれに対するいくつかのアプローチがあります。
- PyCharmのプラグイン。
- テストの任意の場所に
pytest.set_trace()
記述するpytest.set_trace()
、指定した場所のpdb
ですぐにフォールアウトできます。 - IDEで簡単にデバッグを構成できます。
-
--pdb
使用し--pdb
。これは、エラーが発生したときにデバッガーを起動します。 - または
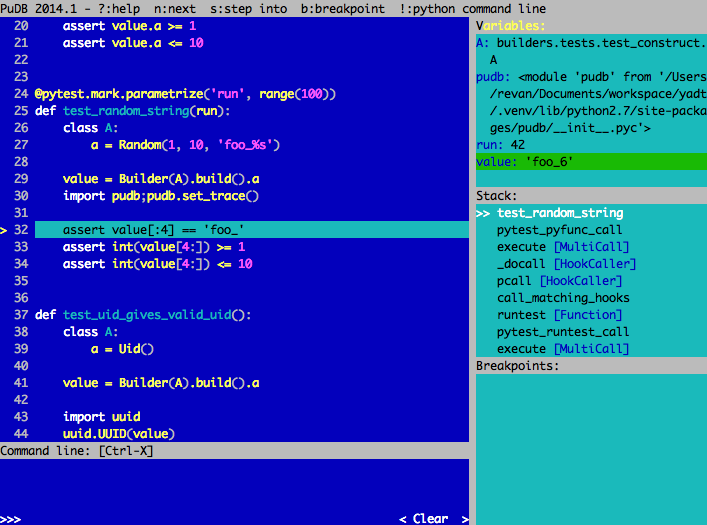
import pudb;pudb.set_trace()
を疑わしい場所の前にimport pudb;pudb.set_trace()
覚えておくべき主なことは、-s
パラメーターをテスト起動行に追加することです)。
テストのデバッグに役立つPytestオプション:
-
-k
ある種の個別のテストを実行する必要がある場合。 2つのテストを実行する場合、または追加のフィルターを使用する場合は、このパラメーターの新しい構文を確認する必要があることに注意してください。py.test -k "prepare or http and proxy" tests/functional/
; -
-x
最初のテストが失敗した場合にテストを停止する必要がある場合。 -
--collect-only
は、テスト用に生成されたパラメーターの正確性と数、および実行されるテストのリストを確認する必要がある場合(--collect-only
と同様)。 -
--no-magic
は魔法があることを示唆しています:)
結果分析
結果のレポートは、成功したテスト、失敗したテスト、失敗したテストに関するデータのセットです。 落ちたテストは、システムの状態、システムをそのような結果に導くステップ、テストが落ちたパラメーター、およびこれらのパラメーターを使用するときにシステムに期待されることを記述する必要があります。 : , , , , : smoke functional , . , .
pytest JUnit , Jenkins-CI . , Allure , .
pytest :
- PASSED — , , ;
- FAILED — , ,
assert
; - ERROR — , ., ;
- SKIPPED — ,
depends
pytest.mark.skip[if]
; - xfail — ,
assert
; - XPASS — ,
xfail
. , , , .
Allure PyTest , Allure PyTest . , :
- Step' ;
- description docstring;
- attachment', ;
- .
Step' , , . , . -.
Attachment' — , . , -, . Step'.
type
. attachemnt' :
txt
,
html
,
xml
,
png
,
jpg
,
json
.
error_if_wat
, ,
ERROR_CONDITION
.
Server
.
allure.step
.
socket
.
requests
.
allure.attach
. docstring , , .
import allure ERROR_CONDITION = None @pytest.fixture def error_if_wat(request): assert request.getfuncargvalue('Server').srv != ERROR_CONDITION SERVER_CASES = [ pytest.mark.xfail(Srv('::1', 8081), reason='ipv6 desn`t work, use `::` instead of `0.0.0.0`'), Srv('127.0.0.1', 8081), Srv('localhost', 80), ERROR_CONDITION, ] @idparametrize('Server', SERVER_CASES, fixture=True) def test_server(Server, error_if_wat): assert_that(calling(Server.connect), is_not(raises(SOCKET_ERROR))) """ Step 1: Try connect to host, port, and check for not raises SOCKET_ERROR. Step 2: Check for server response 'text not found' message. Response status should be equal to 501. """ with allure.step('Try connect'): assert_that(calling(Server.connect), is_not(raises(SOCKET_ERROR))) with allure.step('Check response'): response = requests.get(Server.uri) allure.attach('response_body', response.text, type='html') allure.attach('response_headers', j.dumps(dict(response.headers), indent=4), type='json') allure.attach('response_status', str(response.status_code)) assert_that(response, all_of(has_content('text not found'), has_status(501)))
py.test --alluredir=/var/tmp/allure/ test_server.py
.
, , , Ubuntu:
sudo add-apt-repository ppa:yandex-qatools/allure-framework sudo apt-get install yandex-allure-cli allure generate -o /var/tmp/allure/output/ -- /var/tmp/allure/
/var/tmp/allure/output
.
index.html
.
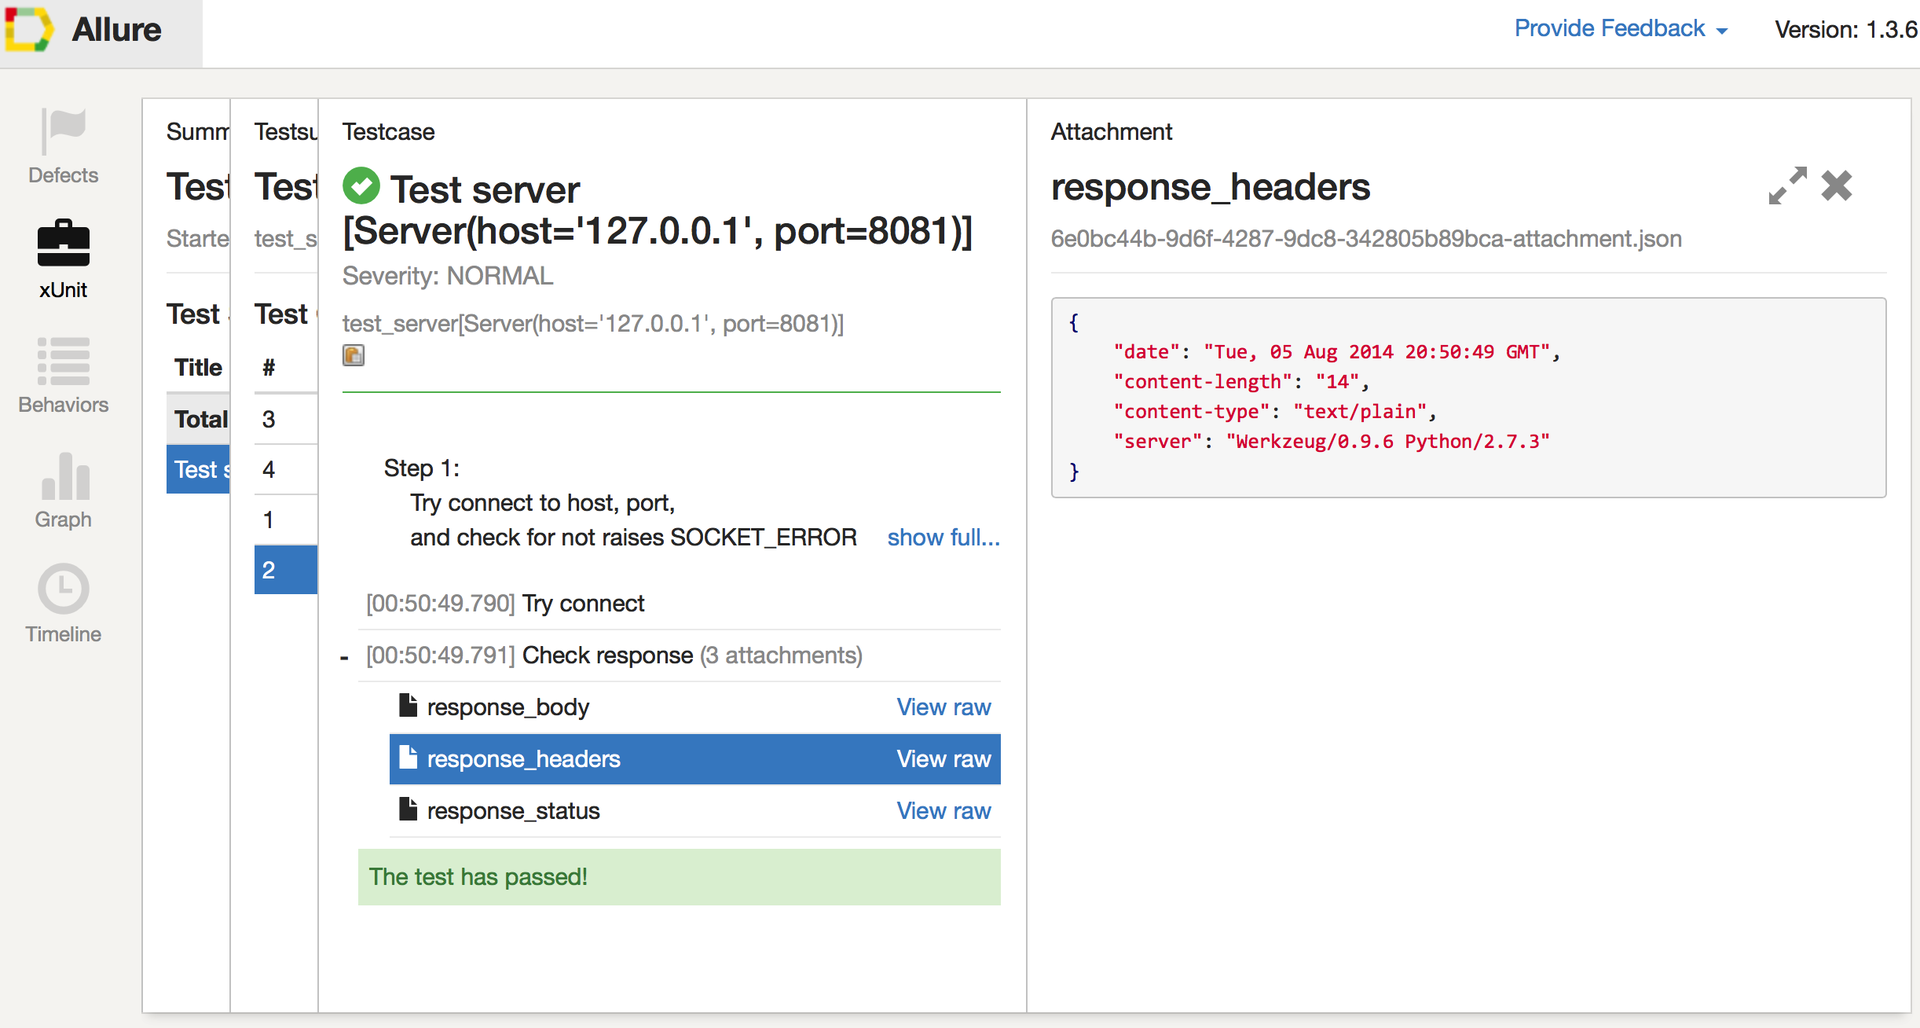 allure passed with headers
, , allure javascript .
, , :
- PyTest-localserver , .
- PyTest-timeout , .
- PyTest-xdist — musthave, .
- PyTest-capturelog ,
logging
. - PyTester , . pytest .
- PyTest-httpretty
uri
, .pytest-localserver
- PyTest-ordering — . - .
- PyTest-incremental , , , , . Jenkins.
, PyTest . .