このチュートリアルでは、Web.config構成ファイルでの作業を見ていきます。 これはxmlファイルであり、プログラム設定を保存します。
このファイルが何で構成されているかをさらに詳しく考えてみましょう。
- configSection 。 このセクションは、どのクラスがさらに宣言されたセクションを処理するかを担当します。 属性名で構成されます-これはタグ、次に宣言されたセクション、およびタイプ-それが属するクラスです。
- connectionStrings 。 このセクションでは、データベース接続を初期化するために文字列を操作します。
- appSettings 。 タイプキー/値のパラメーターのセクション。
- system.web、system.webServer 。 Webアプリケーションのパラメーターセクション。
- ランタイム。 ランタイム調整セクション。 DLL間の依存関係を定義します。
- 残りのセクション。 configSectionで宣言されたパラメーターを持つ他のセクション。
IConfig(および実装)。
リポジトリのように、コンフィギュレーターをサービスとして作成します。 グローバルフォルダー(/Global/Config/IConfig.cs)にIConfigおよびConfig実装を作成します。
public interface IConfig { string Lang { get; } }
と
public class Config : IConfig { public string Lang { get { return "ru"; } } }
RegisterServices(/App_Start/NinjectWebCommon.cs)に行を追加します。
kernel.Bind<IConfig>().To<Config>().InSingletonScope();
BaseControllerへの出力:
[Inject] public IConfig Config { get; set; }
ここで、コントローラーの初期化で、ストリームのCultureInfoを再割り当てします(/Controllers/BaseController.cs):
protected override void Initialize(System.Web.Routing.RequestContext requestContext) { try { var cultureInfo = new CultureInfo(Config.Lang); Thread.CurrentThread.CurrentCulture = cultureInfo; Thread.CurrentThread.CurrentUICulture = cultureInfo; } catch (Exception ex) { logger.Error("Culture not found", ex); } base.Initialize(requestContext); }
そして、Index.cshtml(/Areas/Default/Views/Home/Index.cshtml)に日付出力を追加します。
@DateTime.Now.ToString("D")
結論が得られます。
そして、これをWeb.Configと本当に関連付けます。 appSettingsのWeb.configに次の行を追加します。
<add key="Culture" value="ru" />
Config.cs(/Global/Config/Config.cs):
public string Lang { get { return ConfigurationManager.AppSettings["Culture"] as string; } }
開始-結果は同じですが、今度はWeb.configの値をfrに変更します。
<add key="Culture" value="fr" />
日付を取得します。
mardi 5 mars 2013
いいね! さらにいくつかの言語で試すことができます。 略語のリストはこちらhttp://msdn.microsoft.com/en-us/goglobal/bb896001.aspx
独自のConfigSectionタイプを作成する
このパートでは、独自のConfigSectionの作成について説明します。 この章では、ファイルのアップロードとプレビューの作成を実装します。 次のデータが必要です。まず、拡張子に対するMIMEタイプの依存関係、およびファイルアイコン(ダウンロードなど):
- 拡大
- MIMEタイプ
- 大きなアイコン
- 小さなアイコン
次に、プレビューを作成するためのデータ:
- プレビュータイトル(例:UserAvatarSize)
- 幅
- 身長
どちらのタイプも同じ方法で実行されるため、どちらか一方の作成のみを記述します。 プレビューを作成するには、IconSizeにします。 最初に行うことは、ConfigurationElement(/Global/Config/IconSize.cs)によって継承されるクラスを作成することです。
public class IconSize : ConfigurationElement { [ConfigurationProperty("name", IsRequired = true, IsKey = true)] public string Name { get { return this["name"] as string; } } [ConfigurationProperty("width", IsRequired = false, DefaultValue = "48")] public int Width { get { return (int)this["width"]; } } [ConfigurationProperty("height", IsRequired = false, DefaultValue = "48")] public int Height { get { return (int)this["height"]; } } }
さらに詳しく考えてみましょう。
- ConfigurationPropertyは名前で構成され、これは文字列の属性名です
- IsRequired-必須かどうか
- IsKey-キーです(データベースの主キーとして)
- DefaultValue-デフォルト値
次のステップでは、コレクションクラス(多くの要素があるため)とセクション(/Global/Config/IconSize.cs)を作成します。
public class IconSizesConfigSection : ConfigurationSection { [ConfigurationProperty("iconSizes")] public IconSizesCollection IconSizes { get { return this["iconSizes"] as IconSizesCollection; } } } public class IconSizesCollection : ConfigurationElementCollection { protected override ConfigurationElement CreateNewElement() { return new IconSize(); } protected override object GetElementKey(ConfigurationElement element) { return ((IconSize)element).Name; } }
Web.configで、次を追加します。
<iconConfig> <iconSizes> <add name="Avatar173Size" width="173" height="176" /> … </iconSizes> </iconConfig>
次に、configSectionのこのセクションの解析クラスを宣言する必要があります。
<section name="iconConfig" type="LessonProject.Global.Config.IconSizesConfigSection, LessonProject" />
タイプの説明では、それが含まれているdll(
LessonProject
)の名前を指定する必要があることに注意してください。 これは重要ですが、単体テストでカバーされます。
メール設定
smtp-mailを操作するための設定用の単一の構成を作成しましょう。 必要なもの:
- SmtpServer。 サーバー名
- SmtpPort ポート、通常25番目。
- SmtpUserName。 ログイン
- SmtpPassword。 パスワード
- SmtpReply。 Reply-to行の返信先アドレス。
- SmtpUser。 From行のユーザー名。
- EnableSsl。 はい/いいえ、Sslで作業を使用するかどうか。
ファイル(/Global/Config/MailSetting.cs):
public class MailSetting : ConfigurationSection { [ConfigurationProperty("SmtpServer", IsRequired = true)] public string SmtpServer { get { return this["SmtpServer"] as string; } set { this["SmtpServer"] = value; } } [ConfigurationProperty("SmtpPort", IsRequired = false, DefaultValue="25")] public int SmtpPort { get { return (int)this["SmtpPort"]; } set { this["SmtpPort"] = value; } } [ConfigurationProperty("SmtpUserName", IsRequired = true)] public string SmtpUserName { get { return this["SmtpUserName"] as string; } set { this["SmtpUserName"] = value; } } [ConfigurationProperty("SmtpPassword", IsRequired = true)] public string SmtpPassword { get { return this["SmtpPassword"] as string; } set { this["SmtpPassword"] = value; } } [ConfigurationProperty("SmtpReply", IsRequired = true)] public string SmtpReply { get { return this["SmtpReply"] as string; } set { this["SmtpReply"] = value; } } [ConfigurationProperty("SmtpUser", IsRequired = true)] public string SmtpUser { get { return this["SmtpUser"] as string; } set { this["SmtpUser"] = value; } } [ConfigurationProperty("EnableSsl", IsRequired = false, DefaultValue="false")] public bool EnableSsl { get { return (bool)this["EnableSsl"]; } set { this["EnableSsl"] = value; } } }
Web.configに追加します。
<section name="mailConfig" type="LessonProject.Global.Config.MailSetting, LessonProject" />
と
<mailConfig SmtpServer="smtp.gmail.com" SmtpPort="587" SmtpUserName="lxndrpetrov" SmtpPassword="**********" SmtpReply="lxndrpetrov@gmail.com" SmtpUser="test" EnableSsl="true" />
これをすべてIConfig.csおよびConfig.cs(/Global/Config/IConfig.cs)に追加します。
public interface IConfig { string Lang { get; } IQueryable<IconSize> IconSizes { get; } IQueryable<MimeType> MimeTypes { get; } MailSetting MailSetting { get; } }
と
public IQueryable<IconSize> IconSizes { get { IconSizesConfigSection configInfo = (IconSizesConfigSection)ConfigurationManager.GetSection("iconConfig"); return configInfo.IconSizes.OfType<IconSize>().AsQueryable<IconSize>(); } } public IQueryable<MimeType> MimeTypes { get { MimeTypesConfigSection configInfo = (MimeTypesConfigSection)ConfigurationManager.GetSection("mimeConfig"); return configInfo.MimeTypes.OfType<MimeType>().AsQueryable<MimeType>(); } } public MailSetting MailSetting { get { return (MailSetting)ConfigurationManager.GetSection("mailConfig"); } }
また、登録時に、またはパスワードを思い出させるときにメールを送信する必要があるテンプレートであるMailTemplatesを追加します。
簡単なファイルアップロード
次に、ファイルをサーバーにアップロードする標準的な例を見てみましょう。このメソッドは二度と使用しません。 対話用のSimpleFileViewクラス(/Models/Info/SimpleFileView.cs):
public class SimpleFileView { public HttpPostedFileBase UploadedFile { get; set; } }
ファイルを受信するためのクラス名に注意してください。 そのため、SimpleFileControllerコントローラー(/Areas/Default/Controllers/SimpleFileController.cs)を作成します。
public class SimpleFileController : DefaultController { [HttpGet] public ActionResult Index() { return View(new SimpleFileView()); } [HttpPost] public ActionResult Index(SimpleFileView simpleFileView) { return View(simpleFileView); } }
ビューを追加します。
@model LessonProject.Models.Info.SimpleFileView @{ ViewBag.Title = "Index"; Layout = "~/Areas/Default/Views/Shared/_Layout.cshtml"; } <h2>Index</h2> @using (Html.BeginForm("Index", "SimpleFile", FormMethod.Post, new {enctype = "multipart/form-data", @class = "form-horizontal" })) { <fieldset> <div class="control-group"> <label class="control-label" for="Email"> :</label> <div class="controls"> @Html.TextBox("UploadedFile", Model.UploadedFile, new { type = "file", @class = "input-xlarge" }) @Html.ValidationMessage("UploadedFile") </div> </div> <div class="form-actions"> <button type="submit" class="btn btn-primary"> Upload</button> </div> </fieldset> }
フォーム属性のenctypeとTextBox属性の型に注意してください(実際、型はまだパスワード、チェックボックス、ラジオですが、@ Htmlクラスには対応するメソッドがあります)。 大量の情報をロードするには、Enctypeを「multipart / form-data」に設定する必要があります。
ダウンロードして確認してください。 ファイルは安全にアップロードされます。InputStreamを特定のファイルに保存するだけです。 しかし、今のところは残して、欠点を考慮しましょう。
最初の欠点は、すべてのブラウザでファイル選択フォームが異なって見えることです:
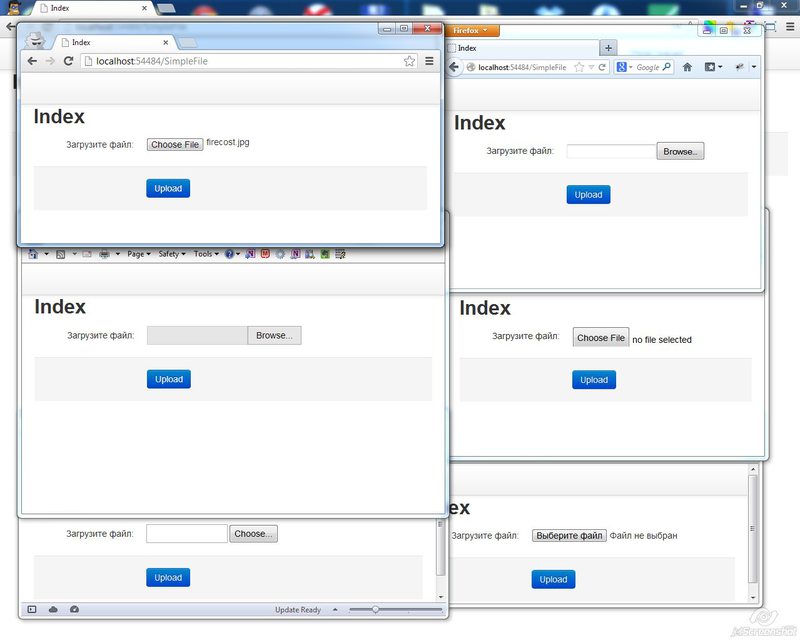
もちろん、デザイナーはファイルがSafariでダウンロードされ、顧客がChromeとIEで確認し、開発者に「どのようなイニシアチブか」と尋ね始めます。
2番目の欠点は、フォームが検証に合格しなかった場合、これらのフィールドを再度選択する必要があることです。 つまり そのような形式があります:
- 名
- 姓
- メール
- 生年月日
- 写真撮影
- パスポートの最初のスプレッドの写真
- パスポートの第2スプレッドの写真
- 登録済みのパスポート写真
- パスワード
- もう一度パスワード
- キャプチャ
そして、突然パスワードを間違って入力したか、キャプチャを間違って入力したか、パスポートの2番目のターンの写真が大きすぎるか、rawフォーマットからjpegに追い越すのを忘れました。
そのため、写真、登録、キャプチャを再入力する必要があります。 当然、これはユーザーフレンドリーではなく、顧客を困らせます(さらに、デザイナーは美しく塗装されていますが、惨めに見えます)。
Ajaxを使用してファイルをアップロードする
ファイルのアップロードの動作を決定します。
- ユーザーは「ダウンロード」をクリックします。
- ファイル選択フォームが開きます
- ユーザーがファイルを選択
- ファイルがロードされているか、何かが間違っていることを示すエラーが発行されます
- フォームが検証に合格しなくても、ファイルはロードされたままであり、再度ダウンロードする必要はありません。
これはajaxロードと呼ばれ、fineuploaderを使用します( http://fineuploader.com/ )。 ライブラリは有料ですが、ソースをダウンロードして収集します(バンドルがあります!)。 リンク( https://github.com/valums/file-uploader)でソースをダウンロードします 。 jsファイルを/ Scripts / fine-uploaderフォルダーに移動します。 cssファイルを/ Contentに、画像を/ Content / imagesに移動します。 画像のfineuploader.cssでURLを正しく書き換えます。
.qq-upload-spinner { display: inline-block; background: url("images/loading.gif"); width: 15px; height: 15px; vertical-align: text-bottom; } .qq-drop-processing { display: none; } .qq-drop-processing-spinner { display: inline-block; background: url("images/processing.gif"); width: 24px; height: 24px; vertical-align: text-bottom; }
BundleConfig.cs(/App_Start/BundleConfig.cs)のファイルを初期化します。
bundles.Add(new ScriptBundle("~/bundles/fineuploader") .Include("~/Scripts/fine-uploader/header.js") .Include("~/Scripts/fine-uploader/util.js") .Include("~/Scripts/fine-uploader/button.js") .Include("~/Scripts/fine-uploader/ajax.requester.js") .Include("~/Scripts/fine-uploader/deletefile.ajax.requester.js") .Include("~/Scripts/fine-uploader/handler.base.js") .Include("~/Scripts/fine-uploader/window.receive.message.js") .Include("~/Scripts/fine-uploader/handler.form.js") .Include("~/Scripts/fine-uploader/handler.xhr.js") .Include("~/Scripts/fine-uploader/uploader.basic.js") .Include("~/Scripts/fine-uploader/dnd.js") .Include("~/Scripts/fine-uploader/uploader.js") .Include("~/Scripts/fine-uploader/jquery-plugin.js") ); bundles.Add(new StyleBundle("~/Content/css/fineuploader") .Include("~/Content/fineuploader.css"));
コントローラーFileController.cs(/Areas/Default/Controllers/FileController.cs)を作成します。
public class FileController : DefaultController { [HttpGet] public ActionResult Index() { return View(); } public ActionResult Upload(HttpPostedFileWrapper qqfile) { return Json(new { result = "ok", success = true}); } }
action-uploadメソッドはqqfile文字列値を受け入れます。その理由を以下で説明します。 次に、インデックスのビューを作成します。 これを行うには:
- ボタンを作成し、クリックするとファイルをダウンロードします。
- ファイルがアップロードされ、プレビューが作成されます。
- ファイルシステムに保存されたファイルとプレビュー
- メソッドは、Json応答を介してファイルとプレビューがアップロードされたリンクを返します
- ファイルをダウンロードできなかった場合、適切なエラーが発行されます
- JSON結果を処理し、ファイルとプレビューが読み込まれたことを通知します
- フォームの検証とデータベースへの書き込みは不要です。
インデックスの表示:
@{ ViewBag.Title = "Index"; Layout = "~/Areas/Default/Views/Shared/_Layout.cshtml"; } @section styles { @Styles.Render("~/Content/css/fineuploader") } @section scripts { @Scripts.Render("~/bundles/fineuploader") @Scripts.Render("~/Scripts/default/file-index.js") } <h2>Index</h2> <fieldset> <div class="control-group"> <label class="control-label" for="Text"> Image </label> <div class="controls"> <div id="UploadImage"> Upload </div> </div> </div> <div> <img src="" alt="" id="ImagePreview" /> </div> </fieldset>
id = UploadImageのボタン。 処理するfile-index.jsファイルを追加します(/Scripts/default/file-index.js):
function FileIndex() { _this = this; this.ajaxFileUpload = "/File/Upload"; this.init = function () { $('#UploadImage').fineUploader({ request: { endpoint: _this.ajaxFileUpload }, }).on('error', function (event, id, name, reason) { //do something }) .on('complete', function (event, id, name, responseJSON) { alert(responseJSON); }); } } var fileIndex = null; $().ready(function () { fileIndex = new FileIndex(); fileIndex.init(); });
ダウンロードを処理します。
public ActionResult Upload(HttpPostedFileWrapper qqfile) { var extension = Path.GetExtension(qqfile.FileName); if (!string.IsNullOrWhiteSpace(extension)) { var mimeType = Config.MimeTypes.FirstOrDefault(p => string.Compare(p.Extension, extension, 0) == 0); // if (mimeType.Name.Contains("image")) { // var filePath = Path.Combine("/Content/files", qqfile.FileName); qqfile.SaveAs(Server.MapPath(filePath)); return Json(new { success = true, result = "error", data = new { filePath } }); } } return Json(new { error = " ", success = false }); }
ファイルフォルダーをコンテンツに追加します-これがユーザーデータフォルダーになります。 コードを分析しましょう:
- qqfileを取得します(ここでは何も変更しないでください。このパラメーターはfineuploaderによるものです)。
- それから拡張機能を取得します。
- 拡張により、mimeTypeを見つけます。 .jpg、.gif、.pngの場合、「image / ...」タイプのMIMEタイプを取得します。 したがって、このファイルをダウンロードできることを確認します。
- 次に、ファイル名を使用して、Server.MapPathを使用して/ Content / filesフォルダー(事前に作成した)への絶対パスを作成します。
- 次に、SaveAsを使用してファイルを保存します。
- json data.filePathでファイル名を返します。
すべてがロードされているかどうかを確認し、プレビューの作成に進みます。
プレビュー作成
まず、mime-type = "image \ ..."を少しごまかしました。これらには、ブラウザでサポートされていないbmpおよびtiffファイルが含まれているためです。
だから、LessonProject.Tools(PreviewCreator.cs)プロジェクトでPreviewCreatorクラスを作成しましょう。
public static class PreviewCreator { public static bool SupportMimeType(string mimeType) { switch (mimeType) { case "image/jpg": case "image/jpeg": case "image/png": case "image/gif": return true; } return false; } }
FileController.cs(/Areas/Default/Controller/FileController.cs)で置き換えます:
if (mimeType != null && PreviewCreator.SupportMimeType(mimeType.Name))
PreviewCreatorにはプレビューを作成するための多くの機能があるため、画像を作成するためのさまざまなオプションをリストし、そのうちの1つを詳細に分析します。 すべてのプレビューがjpeg形式で作成されることを考慮する価値があります。 それで、オプションは何ですか:
- カラーと黒と白のオプション。 グレースケールパラメーターで制御(デフォルト= false)
- プレビュー (
CreateAndSavePreview
)元の画像がプレビューサイズよりも小さい場合、画像は白いキャンバスの中央に配置されます。 サイズに関して、初期サイズが垂直方向(ポートレート形式の正方形)である場合-上部を切り取ります。 比率がサイズに対して水平方向の場合、中央を切り取ります。 - アバター (
CreateAndSaveAvatar
)元の画像がプレビューサイズより小さい場合、画像は単に保存されます。 サイズに関して、初期サイズが垂直方向(ポートレート形式の正方形)である場合、高さを減らします。 比率がサイズに対して水平方向の場合、中央を切り取ります。 - 画像 (
CreateAndSaveImage
)画像が最大サイズよりも小さい場合は、元のままにします。 画像が境界線に収まらない場合は、最大サイズを超えないように縮小して保存します。 - サイズ別。 (
CreateAndSaveFitToSize
)画像がサイズより小さい場合、必要なサイズに拡大されます。 もちろん、品質が低下します。 - 作物。 (
CropAndSaveImage
)標準パラメーターに加えて、画像をトリミングするための座標が送信されます。
プレビューを作成して(
CreateAndSavePreview
)、構成から寸法を取得してAvatarSizeプレビュー(/Areas/Default/Controllers/FileController.cs)を作成します。
var filePreviewPath = Path.Combine("/Content/files/previews", qqfile.FileName); var previewIconSize = Config.IconSizes.FirstOrDefault(c => c.Name == "AvatarSize"); if (previewIconSize != null) { PreviewCreator.CreateAndSavePreview(qqfile.InputStream, new Size(previewIconSize.Width, previewIconSize.Height), Server.MapPath(filePreviewPath)); } return Json(new { success = true, result = "error", data = new { filePath, filePreviewPath } });
始めます。 ダウンロード。 ファイルをロードする必要があり、プレビューが作成されます。
ここで、file-index.js(/Scripts/default/file-index.js)で処理を行います。
$('#UploadImage').fineUploader({ request: { endpoint: _this.ajaxFileUpload }, }) .on('error', function (event, id, name, reason) { //do something }) .on('complete', function (event, id, name, responseJSON) { $("#ImagePreview").attr("src", responseJSON.data.filePreviewPath); });
これで、ファイルがプレビューとともにロードされます。 また、大きなファイルのパスを個別に転送し、たとえば非表示フィールドに記録して、将来データベースに文字列として保存することもできます。
この設計で間違っているのは、次の2つの問題です。
- ファイルは上書きできますが、これは拡張子のみを使用してファイル名を個別に割り当てるか、少しのソルトを追加することで解決します
- ファイルはデータベースに関係なくダウンロードできます。 これは、テーブルごとにファイルが個別のフォルダーに書き込まれ、検索を実行して未記録のものを削除することで解決できます。
リンクによるファイルの取得
別のファイルアップロード方法があります。 ファイルはインターネット上で自由にハングアップし、そのパスを指定し(たとえば、facebookでログインする場合)、リンクを使用してこのファイルを既に保存します。
これは次のように行われます。
var webClient = new WebClient(); var bytes = webClient.DownloadData(url); var ms = new MemoryStream(bytes);
urlはファイルへのパスです。 HttpWebRequestを使用するとより複雑になる可能性があります。
public ActionResult Export(string uri) { HttpWebRequest webRequest = (HttpWebRequest)WebRequest.Create(uri); webRequest.Method = "GET"; webRequest.KeepAlive = false; webRequest.PreAuthenticate = false; webRequest.Timeout = 1000; var response = webRequest.GetResponse(); var stream = response.GetResponseStream(); var previewIconSize = Config.IconSizes.FirstOrDefault(c => c.Name == "AvatarSize"); var filePreviewPath = Path.Combine("/Content/files/previews", Guid.NewGuid().ToString("N") + ".jpg"); if (previewIconSize != null) { PreviewCreator.CreateAndSavePreview(stream, new Size(previewIconSize.Width, previewIconSize.Height), Server.MapPath(filePreviewPath)); } return Content("OK"); }
ここで、ファイルはGuid.NewGuidの生成を通じて設定されます。 私たちはチェックします:
http://localhost/File/Export?uri=https://st.free-lance.ru/users/chernikov/upload/sm_f_81850beffd0d0c89.jpg
ファイルがアップロードされ、処理されました。 すべてが最高です!
PreviewCreatorデバッガーを使用して、そこですべてがどのように機能するかを理解することをお勧めします。
すべてのソースはhttps://bitbucket.org/chernikov/lessonsにあります