アピエクスプローラー
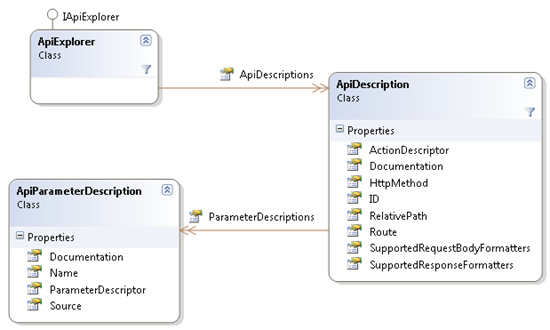
このクラスの主な目的は、ApiDescription要素のコレクションを生成することです。 これは、静的ルートチェックとコントローラー内で利用可能なアクションによって行われます。 各ApiDescription要素は、サービスを通じて利用可能なAPIを記述します。 簡略図(図1)でわかるように、ApiDescriptionにはHttpMethod、RelativePath、Documentationなどの基本情報が含まれています。 ただし、それに加えて、 ApiDescriptor要素が含まれています。これは、対応するアクションに関するすべてを知っているWebAPIコアの一部です。 この要素を使用して、アクション名、戻り値の型、ユーザー属性などの広範な情報にアクセスできます。 同様に、 ParameterDescriptor要素を使用して、このAPIの予想されるパラメーターを調べることができます。

図1 ApiDescriptionクラス図
ヘルプページを生成する方法を見てみましょう。
APIヘルプページの生成
簡単にするために、ASP.NET MVCとともにRESTサービスを使用すると仮定します。 以下の「その他の実装」セクションで、他の実装のアイデアを見ることができます。
例
たとえば、標準の「Web API」テンプレートを使用します。

図2。 Web APIプロジェクトの選択
デフォルトでは、このテンプレートにはHomeController MVCコントローラーとValuesController Web APIが含まれています。 ヘルプページを表示するために、HomeControllerのIndexアクションを変更しましょう。
ステップ1.ビューでApiExplorerを使用する
次の2行のコードをインデックスアクションに追加します。
public ActionResult Index() { var apiExplorer = GlobalConfiguration.Configuration.Services.GetApiExplorer(); return View(apiExplorer); }
ステップ2. APIを表示するビューをセットアップする
Index.cshtmlでは、IApiExplorerモデルタイプを指定できます。
@model System.Web.Http.Description.IApiExplorer
次に、Model.ApiDescriptionsのすべての要素を調べて、サポートされているHTTPメソッド、相対URL、アクションの説明、予想されるパラメーターを表示できます。
@foreach (var api in Model.ApiDescriptions) { <li> <h5>@api.HttpMethod @api.RelativePath</h5> <blockquote> <p>@api.Documentation</p> @if (api.ParameterDescriptions.Count > 0) { <h6>Parameters</h6> <ul> @foreach (var parameter in api.ParameterDescriptions) { <li>@parameter.Name: @parameter.Documentation (@parameter.Source)</li> } </ul> } </blockquote> </li> }
もちろん、必要に応じてHTMLマークアップをカスタマイズできます。 以下は、プレゼンテーションの完全なコードです。
@model System.Web.Http.Description.IApiExplorer <div id="body"> <section class="featured"> <div class="content-wrapper"> <hgroup class="title"> <h1>ASP.NET Web API Help Page</h1> </hgroup> </div> </section> <section class="content-wrapper main-content clear-fix"> <h3>APIs</h3> <ul> @foreach (var api in Model.ApiDescriptions) { <li> <h5>@api.HttpMethod @api.RelativePath</h5> <blockquote> <p>@api.Documentation</p> @if (api.ParameterDescriptions.Count > 0) { <h6>Parameters</h6> <ul> @foreach (var parameter in api.ParameterDescriptions) { <li>@parameter.Name: @parameter.Documentation (@parameter.Source)</li> } </ul> } </blockquote> </li> } </ul> </section> </div>
これで、アプリケーションを起動すると、次のページに利用可能なREST APIの説明が表示されます(図3)。

図3 Webドキュメントページ
よく見ると、APIの説明は単に「Documentation for XYZ」と書かれていますが、これは当然あまり役に立ちません。 役に立つ情報を追加しましょう。
ステップ3.ドキュメントの追加
APIのドキュメントを生成するとき、ApiExplorerは必要な情報を提供するためにIDocumentationProviderを要求します。 IDocumentationProviderは、APIアクションを文書化するための情報を取得する独自の方法を定義できる抽象メカニズムです。 これにより、必要なソースから情報を抽出する独自のIDocumentationProviderを実装できます。 以下に、コメントを文書化するC#から情報を抽出するIDocumentationProviderの実装例を示します。
public class XmlCommentDocumentationProvider : IDocumentationProvider { XPathNavigator _documentNavigator; private const string _methodExpression = "/doc/members/member[@name='M:{0}']"; private static Regex nullableTypeNameRegex = new Regex(@"(.*\.Nullable)" + Regex.Escape("`1[[") + "([^,]*),.*"); public XmlCommentDocumentationProvider(string documentPath) { XPathDocument xpath = new XPathDocument(documentPath); _documentNavigator = xpath.CreateNavigator(); } public virtual string GetDocumentation(HttpParameterDescriptor parameterDescriptor) { ReflectedHttpParameterDescriptor reflectedParameterDescriptor = parameterDescriptor as ReflectedHttpParameterDescriptor; if (reflectedParameterDescriptor != null) { XPathNavigator memberNode = GetMemberNode(reflectedParameterDescriptor.ActionDescriptor); if (memberNode != null) { string parameterName = reflectedParameterDescriptor.ParameterInfo.Name; XPathNavigator parameterNode = memberNode.SelectSingleNode(string.Format("param[@name='{0}']", parameterName)); if (parameterNode != null) { return parameterNode.Value.Trim(); } } } return "No Documentation Found."; } public virtual string GetDocumentation(HttpActionDescriptor actionDescriptor) { XPathNavigator memberNode = GetMemberNode(actionDescriptor); if (memberNode != null) { XPathNavigator summaryNode = memberNode.SelectSingleNode("summary"); if (summaryNode != null) { return summaryNode.Value.Trim(); } } return "No Documentation Found."; } private XPathNavigator GetMemberNode(HttpActionDescriptor actionDescriptor) { ReflectedHttpActionDescriptor reflectedActionDescriptor = actionDescriptor as ReflectedHttpActionDescriptor; if (reflectedActionDescriptor != null) { string selectExpression = string.Format(_methodExpression, GetMemberName(reflectedActionDescriptor.MethodInfo)); XPathNavigator node = _documentNavigator.SelectSingleNode(selectExpression); if (node != null) { return node; } } return null; } private static string GetMemberName(MethodInfo method) { string name = string.Format("{0}.{1}", method.DeclaringType.FullName, method.Name); var parameters = method.GetParameters(); if (parameters.Length != 0) { string[] parameterTypeNames = parameters.Select(param => ProcessTypeName(param.ParameterType.FullName)).ToArray(); name += string.Format("({0})", string.Join(",", parameterTypeNames)); } return name; } private static string ProcessTypeName(string typeName) { //handle nullable var result = nullableTypeNameRegex.Match(typeName); if (result.Success) { return string.Format("{0}{{{1}}}", result.Groups[1].Value, result.Groups[2].Value); } return typeName; } }
その後、独自のIDocumentationProviderを接続する必要があります。 これを行う最も簡単な方法は、HttpConfigurationを使用することです。 XmlCommentDocumentationProviderは、コメント付きのXMLファイルの場所を知る必要があることに注意してください。
var config = GlobalConfiguration.Configuration; config.Services.Replace(typeof(IDocumentationProvider), new XmlCommentDocumentationProvider(HttpContext.Current.Server.MapPath("~/App_Data/MyApp.xml")));
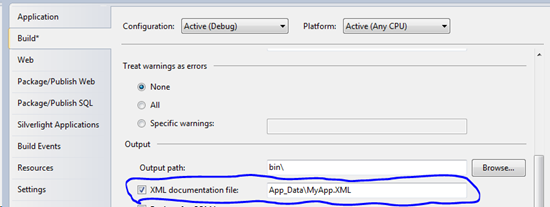
XMLドキュメントファイルの生成がプロジェクト設定に含まれていることを確認できます(図4)。

図4 ドキュメントファイル生成オプションの設定
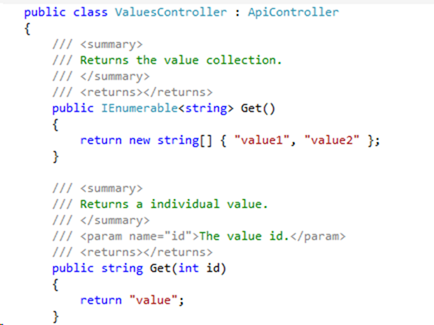
その後、コードにドキュメントコメントが含まれていることを確認します。

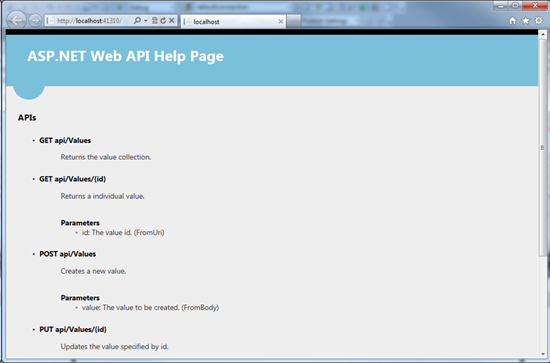
結論として、プロジェクトを再度実行し、コードのドキュメントがREST APIのWebドキュメントページで利用可能になったことを確認します(図5)。

図5 メソッドのドキュメントWebページ
ドキュメントからのコントローラー/アクションの例外
何らかの理由で、APIドキュメント生成からコントローラーまたはアクションを除外する必要がある場合があります。 これを行うには、特別なApiExplorerSettingsAttribute属性を使用できます。
public class ValuesController : ApiController { [ApiExplorerSettings(IgnoreApi = true)] public void MySpecialAction() { } }
コントローラに使用できます:
[ApiExplorerSettings(IgnoreApi = true)] public class MySpecialController : ApiController {
その他の実装
上記で示したのは、Webドキュメントページを実装する1つの方法にすぎません。 しかし、他の多くの方法が存在する可能性があります。たとえば、ここでは別のアイデアがあります。
- 独自のApiController実装(例:HelpController)を作成します。 コントローラー内には、APIに関する情報を(任意の形式で)返すGETアクションがあります。 内部では、HelpControllerはApiExplorerとそれを介して利用可能なすべての情報を使用します。 このアプローチの利点は、セルフホストモードとWebサービスの両方で機能することです。
翻訳者のメモ
この記事では、ASP.NET WebAPIに追加される将来の機能について説明します。 WebAPIリポジトリから必要なパッケージをインストールすることにより、今日試すことができます