 属性の使用に関するほとんどのソース[ 1、2 ] 彼らは、「メタデータまたは宣言的情報をコードに関連付ける効果的な方法を提供する」ことを、リフレクションを使用して得ることができると言います[ 3 ] 。 この記事のフレームワークでは、属性の使用の応用例を示します。新しいビジネスオブジェクトを追加/編集するフォームの必須フィールドの完了を確認します。
より詳細にクリックする前に、いくつかの警告があります。
1.属性をすでに使用している場合は、興味がないかもしれません。
2.デモを作成するとき、属性に関する資料の認識を促進するために、大幅な簡素化が行われました(たとえば、MVVMの拒否)。
それでは始めましょう。 上記で引用したように、「属性は、メタデータまたは宣言的情報をコードに関連付ける効率的な方法を提供します。」 この同じメタデータとは何ですか? ほとんどの場合、これはクラス、プロパティ、またはメソッドに関する単なる追加情報であり、クラス、プロパティ、またはメソッドの動作に影響を与えません。 しかし、外部では、アプリケーションオブジェクトはこの情報を受け取り、何らかの方法で処理できます。 属性の使用の顕著な例の1つは、NonSerializedAttribute属性[ 4 ]です。 。 この属性を使用すると、クラスのフィールドにマークを付けることができ、マークする前とまったく同じように機能します。 ただし、.Netインフラストラクチャで既に利用可能なシリアライザーを使用することにした場合、このフィールドは出力シーケンスに入りません。
さて、属性について少し話しました。リンクを読みたい人は、実際に例に移りましょう。
例として、人々のリストを維持する簡単なタスクを考えてみましょう。 個人に関する情報を保存するには、次のようなクラスを使用します。
public class Person { [DisplayAttribute(Name="")] [RequiredAttribute()] public string LastName { get; set; } [Display(Name = "")] [Required()] public string FirstName { get; set; } [Display(Name = "")] public string Patronym { get; set; } }
この例では、次の2つの点に注意してください。
1.属性 "suffix"を使用する場合:属性、書き込みはできません。
2.姓と名にはRequiredAttribute属性が付いていますが、ミドルネームは付いていません。
あなたと私がPersonクラスのオブジェクトを作成しようとする場合、どんなに不快に聞こえるかにかかわらず、空のLastNameフィールドとFirstNameフィールドを使用してオブジェクトを作成できます。 この属性はクラスの動作にまったく影響しません。 なぜ彼は? そして、ユーザーを追加/編集する形で使用して、ユーザーがこれらのフィールドに入力するまで編集を終了できないようにします。
アプリケーションの一般的なビューは次のようになります。
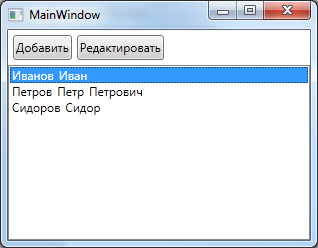
人間のプロパティを編集するには、UserControlを使用します(以下のフォームだけではありません)。
<UserControl x:Class="AttributeExample.PersonEditor" xmlns="http://schemas.microsoft.com/winfx/2006/xaml/presentation" xmlns:x="http://schemas.microsoft.com/winfx/2006/xaml"> <StackPanel> <TextBlock Text="" /> <TextBox Text="{Binding LastName,UpdateSourceTrigger=Explicit}" /> <TextBlock Text="" /> <TextBox Text="{Binding FirstName,UpdateSourceTrigger=Explicit}" /> <TextBlock Text="" /> <TextBox Text="{Binding Patronym,UpdateSourceTrigger=Explicit}" /> </StackPanel> </UserControl>
csでは、このUserControlのファイルは上昇しません。 外部イベントによってソースにバインディングが適用されることに気づきましたか? [ 5 ]
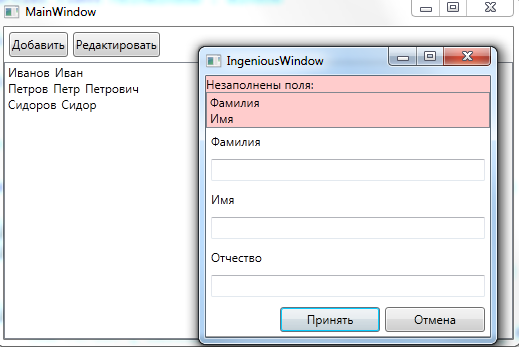
現時点では、このオブジェクトのプロパティを編集するためのビジネスオブジェクトとコンポーネントを記述するクラスが既にあります。 ビジネスオブジェクトを編集するためのコンポーネントを表示し、必要なフィールドの完全性を確認できるユニバーサルウィンドウを作成し、すべてが正しく入力されると、ビジネスオブジェクトのフィールドに視覚コンポーネントのバインドを適用します。
フォームを作成します。
<Window x:Class="AttributeExample.IngeniousWindow" xmlns="http://schemas.microsoft.com/winfx/2006/xaml/presentation" xmlns:x="http://schemas.microsoft.com/winfx/2006/xaml" Title="IngeniousWindow" MinWidth="300" SizeToContent="WidthAndHeight" > <Window.Resources> <Style TargetType="Button"> <Setter Property="Grid.Row" Value="2" /> <Setter Property="HorizontalAlignment" Value="Right" /> <Setter Property="Width" Value="100" /> </Style> </Window.Resources> <Grid> <Grid.RowDefinitions> <RowDefinition Height="auto" /> <RowDefinition Height="1*" /> <RowDefinition Height="35" /> </Grid.RowDefinitions> <!-- --> <StackPanel x:Name="spErrors" Visibility="Collapsed" Background="#FFCCCC"> <TextBlock Text=" :" /> <ListView x:Name="lvProperties" Background="#FFCCCC" /> </StackPanel> <!-- --> <ContentPresenter Grid.Row="1" x:Name="cpEditor" /> <!-- --> <Button Margin="5" x:Name="btCancel" Content="" Click="btCancel_Click" /> <Button Margin="5,5,110,5" x:Name="btApply" Content="" Click="btApply_Click" /> </Grid> </Window>
コンストラクターを編集します。
public partial class IngeniousWindow : Window { FrameworkElement _controlForShow = null; public IngeniousWindow(FrameworkElement p_controlForShow) { InitializeComponent(); _controlForShow = p_controlForShow; cpEditor.Content = p_controlForShow; } }
キャンセルボタンにハンドラーを追加します。
private void btCancel_Click(object sender, RoutedEventArgs e) { DialogResult = false; }
この例で最も興味深いボタンハンドラはacceptです。
private void btApply_Click(object sender, RoutedEventArgs e) { List<string> requiredPropertyNames = new List<string>(); // TextBox c List<TextBox> textBoxes = GetChildTextBoxes(_controlForShow); List<BindingExpression> expressions = new List<BindingExpression>(); // - Type buisnesObjectType = _controlForShow.DataContext.GetType(); // , foreach (var item in textBoxes) { // Binding BindingExpression expression = item.GetBindingExpression(TextBox.TextProperty); if (expression != null) { expressions.Add(expression); // PropertyInfo property = buisnesObjectType.GetProperty(expression.ParentBinding.Path.Path); // Attribute attr = property.GetCustomAttribute(typeof(RequiredAttribute)); if (attr != null && string.IsNullOrWhiteSpace(item.Text)) { // , TextBox , string propertyName = property.Name; Attribute description = property.GetCustomAttribute(typeof(DisplayAttribute)); if (description != null) { propertyName = (description as DisplayAttribute).Name; } requiredPropertyNames.Add(propertyName); } } } // , Binding if (requiredPropertyNames.Count == 0) { foreach (var exp in expressions) { exp.UpdateSource(); } DialogResult = true; } else { // , lvProperties.ItemsSource = requiredPropertyNames; spErrors.Visibility = Visibility.Visible; } }
コメントですべてを詳細に説明した唯一のメソッド、GetChildTextBoxes、私はそれを与えないようです、それはビジュアルツリーを介して実行され、すべてのTextBoxesを選択します。 気にする人は、 ソースをダウンロードすることでそれを見ることができます。
それだけです メインフォームのハンドラーをボタンの追加と編集に固定します。
private void btAdd_Click(object sender, RoutedEventArgs e) { Person person = new Person(); PersonEditor editor = new PersonEditor() { DataContext = person }; IngeniousWindow window = new IngeniousWindow(editor); if (window.ShowDialog().Value) { _people.Add(person); } } private void btEdit_Click(object sender, RoutedEventArgs e) { if (lvPeople.SelectedItem != null) { Person person = lvPeople.SelectedItem as Person; PersonEditor editor = new PersonEditor() { DataContext = person }; IngeniousWindow window = new IngeniousWindow(editor); window.ShowDialog(); } }
さて、これはどのように見えるかです:


誰かがテキスト内のリンクを見なかった場合、ソースはここからダウンロードできます (もしあれば、VS 11のプロジェクト)。
追伸好奇心reader盛な読者は、「そして、帽子の絵はどこにありますか?」と尋ねるかもしれません。 さて、これはこのサインのような属性があるように見えるヒントですが、そうではないように思います。
ソース:
1. MSDN- テキストの 属性(C#およびVisual Basic)
2. dotsite-属性とC# でのテキストへの 使用
3. MSDN- テキストへの リフレクション(C#およびVisual Basic)
4. MSDN-NonSerializedAttribute-クラス からテキスト
5. MSDN-Binding.UpdateSourceTrigger- テキストの プロパティ