
In a previous article, I talked about how to make a mobile application with a map. In the continuation of the series "on the knee" I will share with you the tools for implementing floor plans.
The initial statement of the problem in a simplified form: I want to be able to visualize the floor diagram in your mobile application and be able to show the location of a specific organization on it. I would also like to see the user's location, but here the problem is in the technical plane - you need equipment that will allow you to get the coordinates of the device indoors. So we leave this aspect outside the scope of the article and focus on the software part.
Below I will show you several options with which you can implement the requirements described above. It all depends on what data you have and what exactly the application should be able to do. And we will start with the simplest.
First option. Ready API with data
The first option that we will consider is the use of a ready-made widget from 2GIS. API description can be viewed on api.2gis.ru. It will suit you if the building you are interested in is already presented in 2GIS, and the floors have already been drawn in the building. That is, in terms of data, everything has already been done. And most importantly, you are ready for online, as this option will work exclusively with the Internet.
To display the floors in this case, practically nothing is required of you at all. Implementation of execution as a web widget, which you just need to put in the WebView.
<WebView android:layout_width="match_parent" android:layout_height="match_parent" android:id="@+id/am_webview" android:layout_marginTop="160dp" />
This is the container in which we will place our widget. We initialize it as follows:
webView = findViewById(R.id.am_webview) webView.settings.javaScriptEnabled = true webView.settings.useWideViewPort = true webView.settings.loadWithOverviewMode = true //webView.settings.setSupportZoom(true) //webView.settings.displayZoomControls = true //webView.settings.builtInZoomControls = true webView.loadUrl("file:///android_asset/map_api.html") webView.webViewClient = object : WebViewClient() { override fun onPageFinished(view: WebView, url: String) { super.onPageFinished(view, url) val js = "initMap('13933647002593772');" // The Dubai Mall webView.evaluateJavascript(js, ValueCallback { }) } }
We configure the webView itself, be sure to enable JavaScript, javaScriptEnabled = true, since we will interact with the widget through it. If necessary, you can turn on scrollbars and zoom buttons (see the commented code), but it doesn’t work out very well, so I do not recommend it.
The most important thing is loading HTML with our widget webView.loadUrl ("file: ///android_asset/map_api.html") and subscribing to events, if necessary. In the example above, after loading the map, we call the initMap method defined in map_api.html, passing in the identifier of the building for which we want to show the floors.
HTML is pretty simple code. The DG.FloorsWidget.init method is called , into which a json object containing the data to initialize is passed. As the container, specify the id with which we have declared a div in the HTML markup above. Adjust the width, height. And in initData we pass the building in the complexId tag, and additional widget display parameters, which can be found in the API documentation. The identifier, by the way, can be seen in response to the search query, which 2GIS sends when you click on the building you are interested in 2gis.ru. In my example, I used the Dubai Mall. But no one bothers to indicate any other building with floors.
Finishing touch. In order to move to a specific company, call the showFirm method, passing the company ID
webView.loadUrl("javascript:showFirm('$firmId')")
It's pretty simple. A ready-made implementation example can be viewed on Github .

Pros of the considered option:
- ready-made data with floor plans and company data;
- ready-made lightweight implementation on webview;
- ready search according to 2GIS.
Minuses:
- Internet required;
- basic knowledge of HTML and JavaScript is required;
- only 2GIS data and only those buildings that already have floors.
The second option. Floor plan as a picture
If the option with ready data and API does not suit you, you can use the following.
In this case, you will need a floor plan in the form of a picture, say, jpeg or png. If interactivity of the type “poked into the picture - opened the object card” is required, then geocoding will also be necessary, which will need to be implemented independently. If you snap to global coordinates, then the picture should be correctly scaled and one of the corners should be pulled to the real coordinates, so that you can calculate the displacements from it. We will not dwell on this issue in detail, I hope everything is clear here.
The most important thing is to show this picture in the application. And for this, the TileView library is ideal for us. In fact, this library allows, in principle, to display map tiles. But it also suits us, as it provides the ability to move and zoom, center in a specified position, display markers, coordinate transformation and the ability to subscribe to various events.
In order for the library to work as efficiently as possible, the original image needs to be prepared by cutting it into tiles. There is a fairly simple instruction for this . I recommend a script at the end of the specified page that will create 4 tilesets. We add the obtained result into assets and display our image in the activity with a simple code:
tileView.setSize(floorWidth, floorHeight) tileView.setShouldRenderWhilePanning(true) tileView.addDetailLevel(1f, "tiles/floors1/1000/%d_%d.jpg") tileView.addDetailLevel(0.500f, "tiles/floors1/500/%d_%d.jpg") tileView.addDetailLevel(0.250f, "tiles/floors1/250/%d_%d.jpg") tileView.addDetailLevel(0.125f, "tiles/floors1/125/%d_%d.jpg") tileView.defineBounds(0.0, 0.0, floorWidth.toDouble(), floorHeight.toDouble()) tileView.setScaleLimits(0f, 5f) tileView.setMinimumScaleMode(ZoomPanLayout.MinimumScaleMode.FIT)
Everything, the display is ready. You can subscribe to events and add the necessary logic. For example, a marker can be displayed like this:
tileView.setMarkerAnchorPoints(-0.5f, -0.5f) tileView.addMarker(imageView, x, floorHeight - y, null, null)
A complete example is available at Github .

Pros:
- the ability to do completely offline;
- relatively simple data preparation, floor plan in the form of a picture.
Minuses:
- lack of dynamic styling.
The third option. Vector data
This option is the most advanced and the most difficult. It assumes that you have prepared vector data, that is, floors completely drawn in the vector. You will need several types of objects. Areas of organizations, parking lots, food courts, stages, skating rinks and so on. Linear objects - mainly walls, flow directions. Point objects: inputs / outputs, elevators, ATMs and the like.
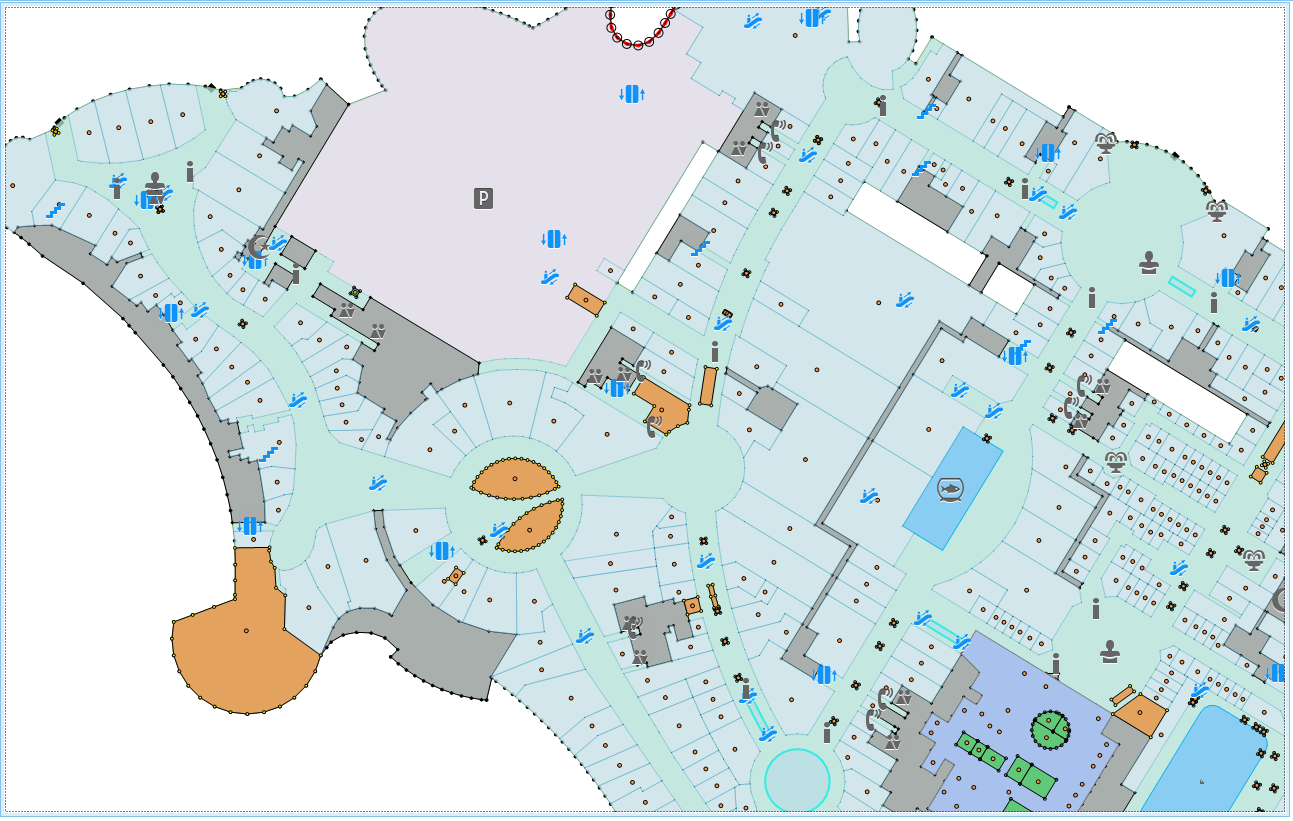
Here's what a floor plan looks like in Fiji, the internal 2GIS system:
Well, for their visualization, the vector engine, which I talked about in the previous article , mapsforge-vtm is suitable for us.
To demonstrate the approach, I prepared test data: a set of squares and lines for several floors using the example of a building on the sunny island of Cyprus. For preparation, I took the original geometry of the building and cut it into pieces corresponding to the components of the geometry, solely for simplicity. As you know, the most difficult part is the preparation of quality data. The rest is a matter of technology. You will need buttons for switching floors, prepared styles for rendering different squares and lines, and an overlay for rendering them.
See the full code here .
The FloorData class contains the test geodata code for our floors, and the FloorsManager class is designed to render them.
In the constructor, we define styles for squares and walls:
styles.put(ObjectType.Floor, org.oscim.layers.vector.geometries.Style.builder() .fillColor(Color.GRAY) .build());
And in the drawFloor method, we determine the logic for adding objects to layers on the map:
public void drawFloor(int floorId) { hideFloors(); indoorLayer = new CustomVectorLayer(this.map); List<GeoData> geoObjects = this.floorData.getFloorData(floorId); for (GeoData geo: geoObjects) { indoorLayer.add(geo.getGeometry(), styles.get(geo.getObjectType())); } this.map.layers().add(indoorLayer); indoorLayer.update(); }
Everything is elementary here. Create a new layer indoorLayer , add pre-prepared floor data with the necessary styles to it and add the layer to the map this.map.layers (). Add (indoorLayer) .
It remains to add buttons to switch floors. To do this, there is a FloorPickerControl based on the RecyclerView , which does just what you need. Let's not waste time on it, see source.
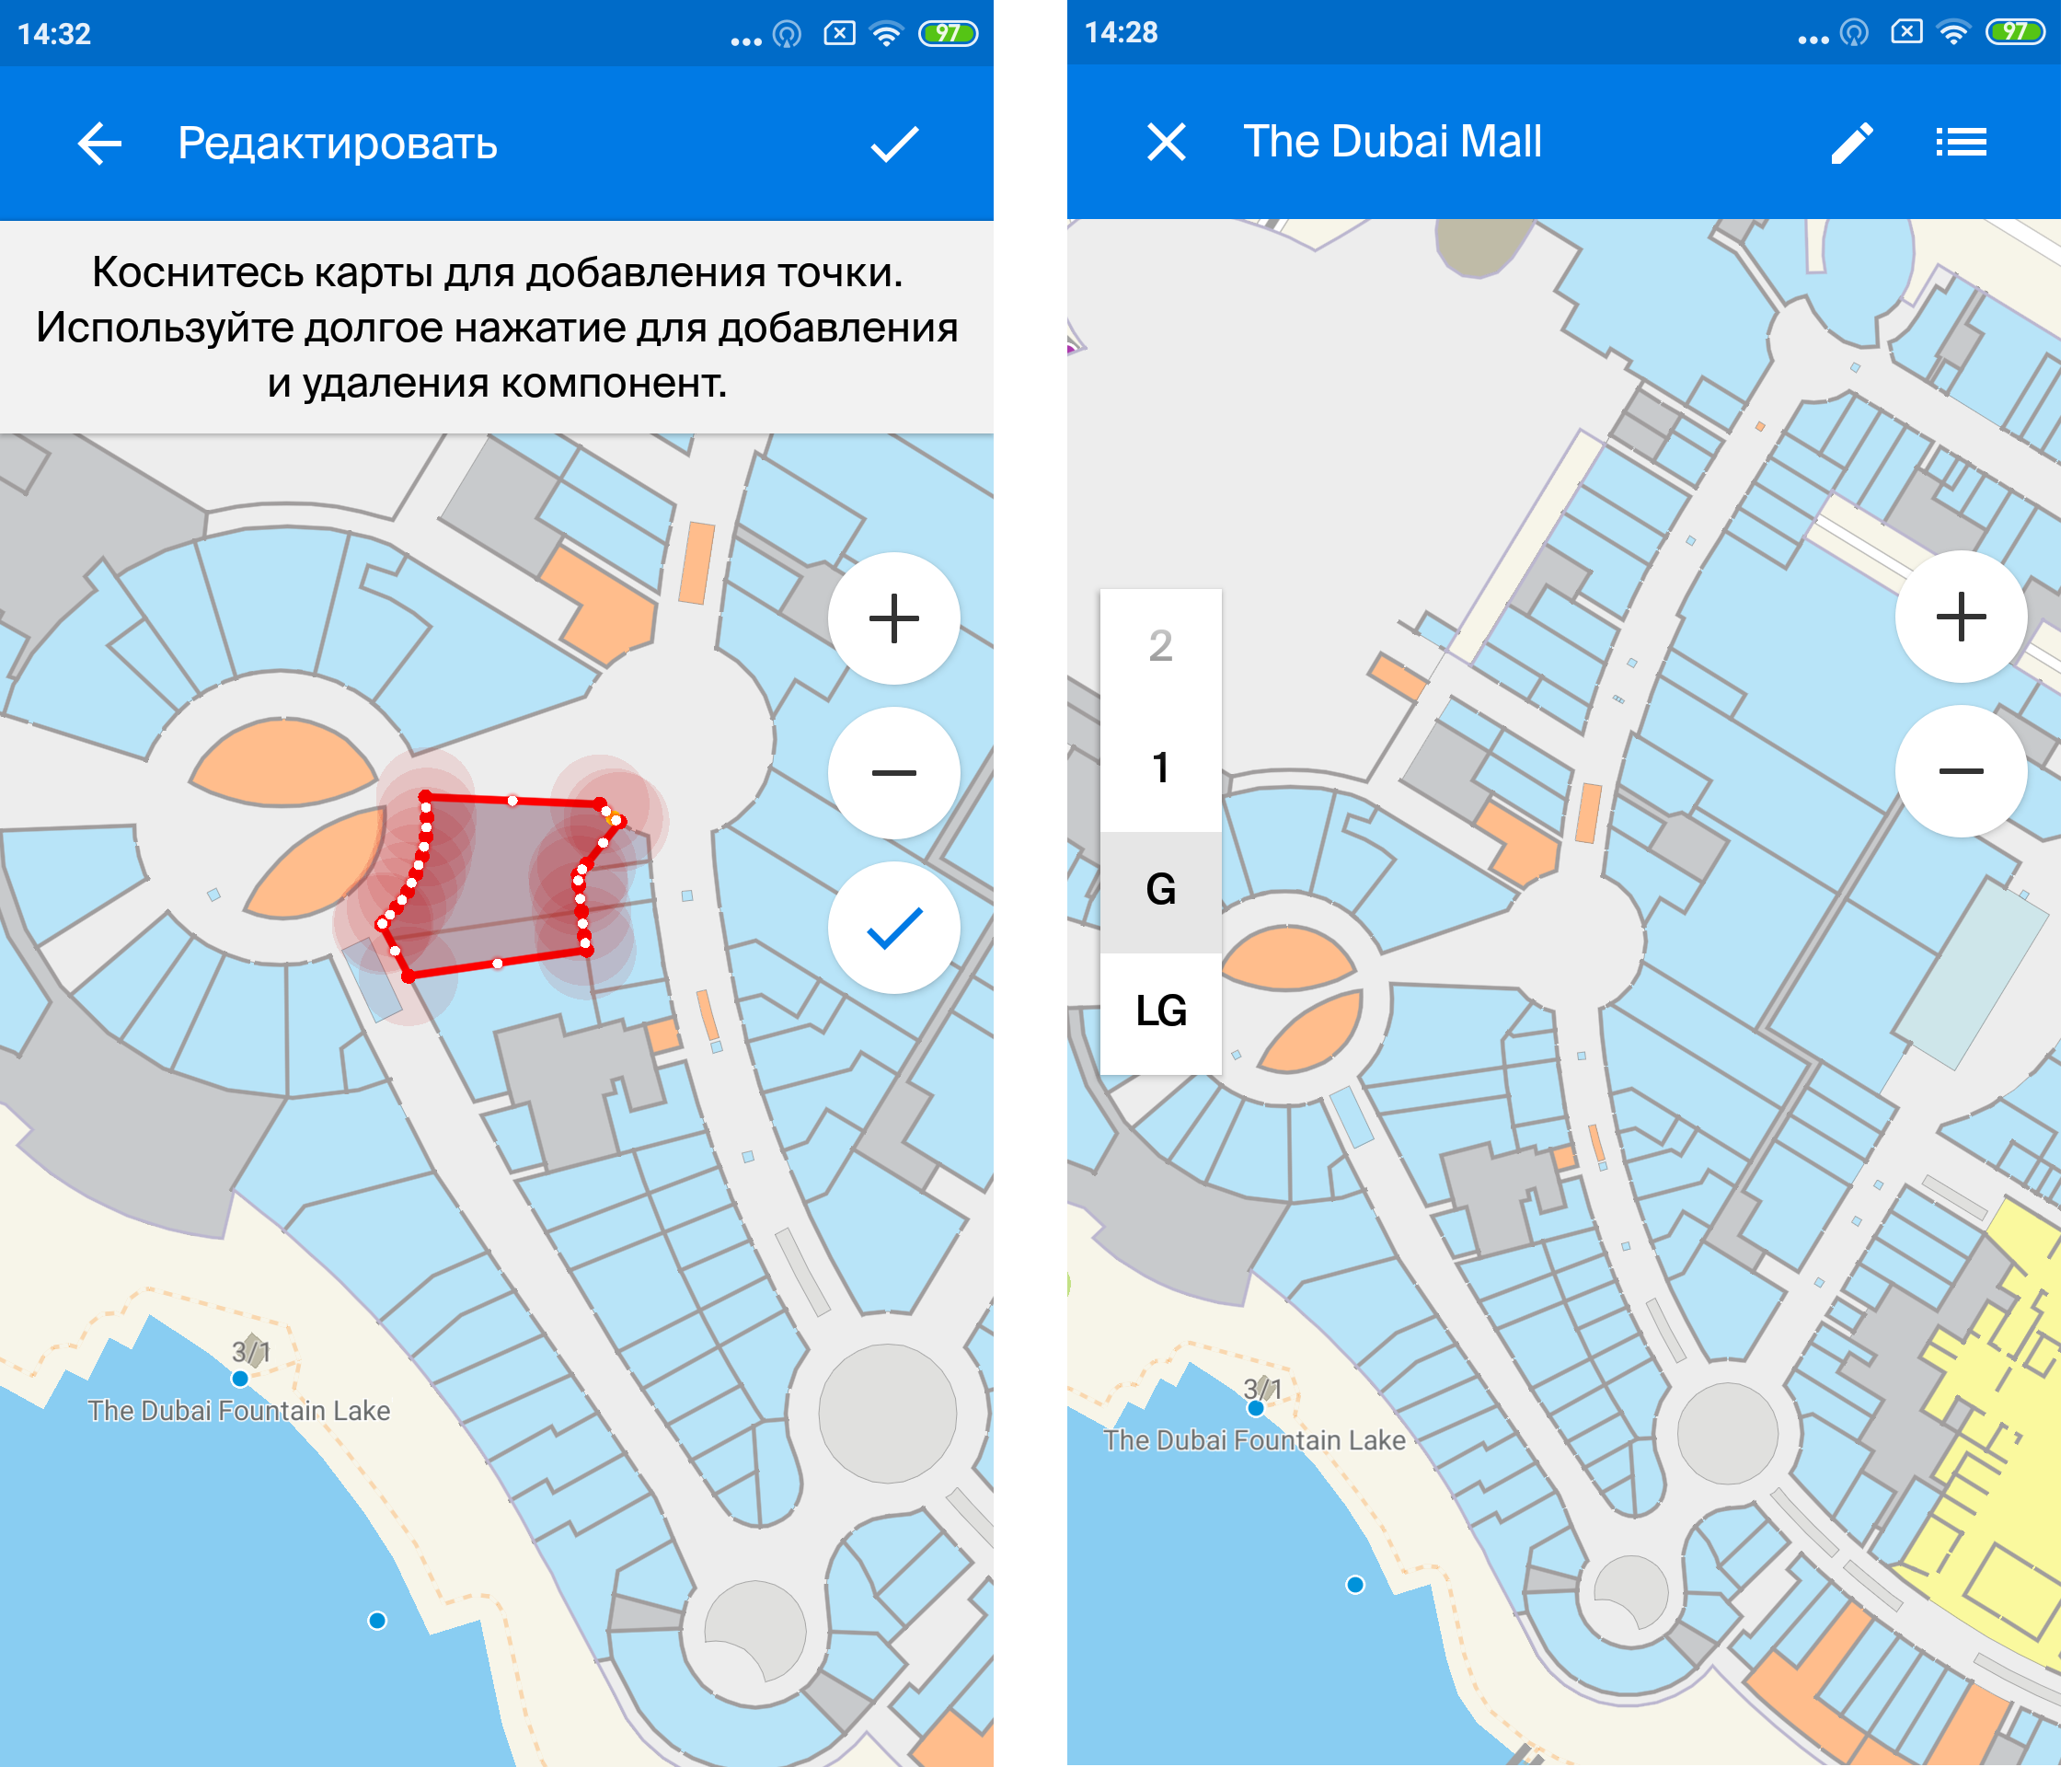
And here is the Dubai Mall in our application. It also implemented editing of geo objects.
Pros:
- again, the ability to do completely offline;
- high-quality picture;
- the possibility of a variety of dynamic stylization;
- the ability to implement a data editor.
Minuses:
- complex data preparation.
At the end of the article I want to say that the task of displaying floor plans in the application is not as terrible as it might seem at first glance. You have several options with your pros and cons, from which you can choose the most suitable for solving your problem.
All references in one place:
Article about the map in the mobile
API 2GIS
2GIS API Example
TileView Library
TileView example
Mapsforge-vtm example