Various cases of data loss and a set of optimal actions that without deep knowledge of the file system device using automatic recovery programs will help you return your information without outside help are considered.
But before you start any independent actions, you need to carefully read all the materials in the article, and only then analyze the state of your hard drive so that your attempts do not become the last in the life of the drive, and so that you do not deprive yourself of the last hope for recovery data you need.
CONTENT
Part One: Diagnostics
1. Visual inspection
2. Test run
3. Preparation for testing
4. Testing
5. Sectoral copy
Part Two: Data Recovery.
6. Data recovery methods
7. Typical cases and recommended actions
8. File Integrity Check
9. Frequent user errors
By agreeing to follow the further instructions, you acknowledge that no one except yourself is responsible for the possible failure of the drive and the permanent loss of data. A set of measures is aimed at reducing the likelihood of an adverse outcome, but does not insure against it by 100%.
Diagnostics
1. Visual inspection
Inspect the drive for deformations, missing or burned out elements on the controller board, and check the integrity of the connectors. If any serious damage or burned out elements are detected, it is strongly recommended that you do not try to supply power to such a drive in order to avoid exacerbating the problem.
Using screwdrivers (usually Torx - T5, T6, T9), loosen the screws that secure the controller board and check the condition of the pads on the controller board.
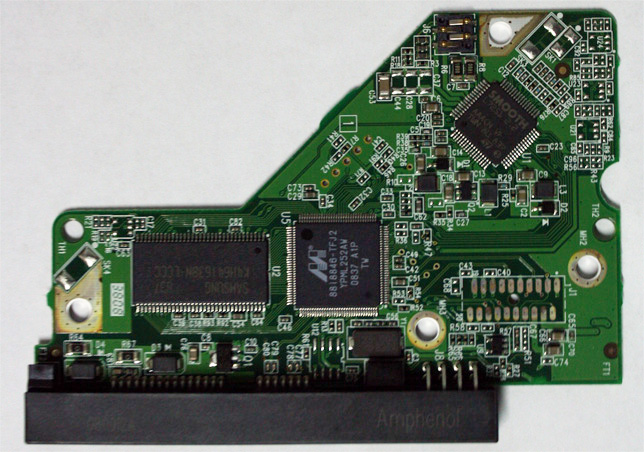
Fig. 2 there is an oxide film on the pads
In the presence of oxides, you can try to remove them from the contact pads with an ordinary eraser. You can work with the eraser only on flat areas, as in the figure. In other cases, such an action does not apply.
Fig. 3 cleared pads.
If any damage to the board is detected, then you should not try to substitute the controller board from a similar drive in modern hard drives, as in modern devices in the ROM there may be various adaptive parameters on the board that are formed during the production cycle and are unique to each drive. In relatively rare cases, other people's parameters can threaten damage to the hard drive.
If you have a soldering station, you need to transfer the MCU, EEPROM, NV-RAM, NAND (depending on what is on board the controller board and which of this necessarily needs to be transferred) and after such adaptation use a donor controller. It is worth noting that for the adaptation of many controllers it will be enough to transfer only the EEPROM chip.
When selecting a card, first look at the etched PCB number. Further evaluate the coincidence of the markings of the MCU and the VCM & SM of the controller. If the markings of the MCU and the VCM & SM of the controller are different on the original board and the donor board, it is highly likely that the potential donor board is not suitable. Within the same family, different versions of the boards may exist, and in some cases they may be compatible with certain reservations, but do not try to find out at home.
Attempting to substitute an improper controller board (with a different number on the PCB) may result in burnout of the preamplifier.
If a multimeter is available, check the 5V and 12V circuits for a short circuit. Also check the resistance of the motor windings. If there is a guaranteed serviceable exactly the same drive (the manufacturer, model range, revision of the controller board), then you can check whether the same number of pins in the switch block will ring to the ground, and also compare the resistances. With serious differences, we can conclude that the preamplifier switch is faulty, and this will stop any independent attempts to further restore data.
2. Test run
Make sure that your test system is in good working order, in order to avoid making incorrect diagnoses and if you did not find any external reasons preventing an attempt to start, then connect the interface cable and power cable to the corresponding connectors and turn on the power supply.
If you know that the drive was hit or dropped in working order, or before it came to you, began to make knocking sounds, refrain from trying to turn it on.
In these cases, mandatory opening of the hard drive in a laminar box (or clean room) and a rigorous examination using a microscope are required.

Fig. 4 connecting cables to hard drives.
After power-up, the drive should begin to rotate the shaft. In some cases, this may not happen with perfectly functional drives, if for some reason a requirement to submit a spin up command has been added to the drive settings.
When the shaft rotates, a slight noise from the air flow appears. In some drives it is barely audible so you can arm yourself with a stethoscope (or keep the drive close to your ear in compliance with all safety rules to prevent short circuits).
If instead of air noise a series of cyclical buzzing sounds, quiet squeaks or sounds remotely similar to telephone beeps is heard, then most likely the drive cannot start the rotation of the motor shaft. The reasons for this may be the following: BMG sticking outside the parking ramp (zone), engine shaft jamming, malfunction of the VCM & SM controller chip.
If you have a suitable donor drive, you can check the version with a malfunction of the VCM & SM controller if you are ready to perform the necessary adaptations of the donor board described in the “visual inspection” paragraph.
In cases of BMG sticking outside the parking ramp, independent actions based on YouTube videos usually lead to the formation of additional scratches on the surfaces of the plates or to the tearing off of the sliders. Even if you manage to bring BMG relatively successfully to the parking ramp, the polymer coating defects formed at the place where the sliders stuck, micro-scratches from the sliders received during BMG output, coupled with offline scanning procedures and dust from the untreated air, are unlikely to allow you to read a significant amount data in the vast majority of cases before the development of further irreversible degradation processes. How the data recovery process occurs in such cases in a profile company can be found in this article “Data Recovery from Seagate FreeAgent Go External Hard Drive”
When the motor shaft is jammed, it is usually necessary to transfer a packet of disks into the pressure block of the donor drive. Such an event at home without proper preparation and lack of necessary tools in 99.9% of cases will be doomed to failure.
If there is no sound when power is applied and the drive does not start to rotate the shaft, then the following diagnoses are possible: the controller board is faulty, the preamplifier switch is faulty, the BMG is faulty.
After the drive begins to rotate the shaft, it must calibrate, read the firmware and, after initializing the translation system, become ready. If, instead of calibration, cyclical knocking sounds, rattle, or some other loud sounds are heard, disconnect the drive immediately. The cause of such phenomena may be: a malfunction of the BMG or a preamplifier switch, a malfunction of the VCM & SM controller chip.
The microprograms of some drives interrogate the preamplifier switch before the motor shaft is unwound, and in cases of detecting an incorrect response or overwhelming resistance for any of the heads, an emergency stop of the initialization process is performed. Unfortunately, not all microprograms sufficiently control the health of the device itself and allow attempts to start a frankly problematic hard drive. BMG transplantation is recommended to be carried out in a laminar box with a clean air flow and a specialized tool. In addition, you need to know how to select a donor in order to choose it with a suitable revision of the preamplifier switch, a head map and close adaptive parameters. Just the coincidence of the manufacturer and the model does not guarantee that the drive is a suitable donor. Even if it is possible to independently select a donor and perform a transplant procedure, it is unlikely that a serious amount of data will be read due to the attendant problems.
What actions can be taken if the controller board is faulty is indicated in the Visual Inspection section.
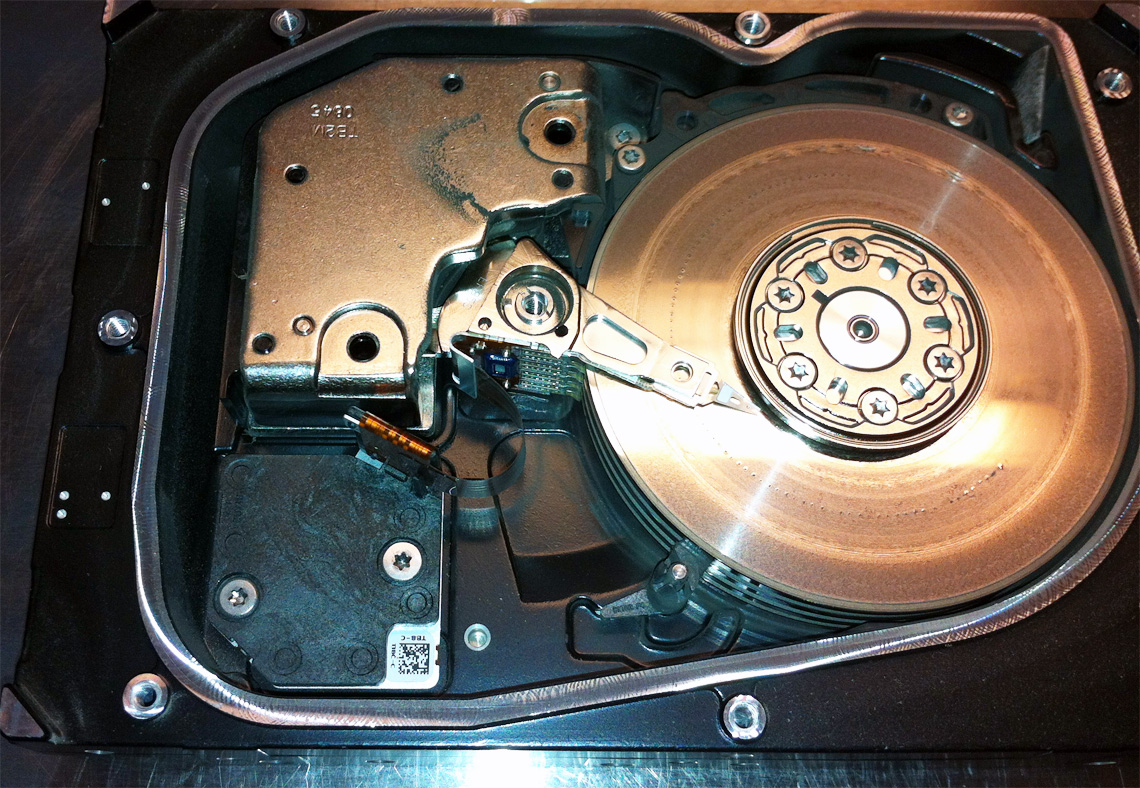
Fig. 5 heavily scratched surface of the plate (multiple cuts).
It is important to understand that with every attempt to turn on a drive with a faulty BMG, there are risks of further destruction of the plate surfaces, which can lead to the complete impossibility of data recovery.
If the drive does not make any suspicious sounds, then after completing all the initialization procedures, it should be ready. From this moment, the drive should be ready for data exchange via the interface, and if it is connected to the port of the motherboard of the PC, it should answer the passport request from the BIOS. If everything is in order with the BIOS connection and settings, but the disk remains invisible to the PC, then most likely there are problems in the drive's firmware that prevent it from being ready.
If the drive gives incorrect passport data, for example, only the model name and zero capacity, or the model name is not quite the same as it should be, the serial number is missing, then this indicates that the initialization procedures were unsuccessful and there are problems in the firmware. In such cases, it is usually impossible to independently solve the problem without the use of professional software and hardware systems.
A separate exception is the case of Seagate 7200.11 (Moose family) with which some problems could be solved using the RS232-TTL adapter and a conventional terminal, but here you need to understand that without understanding the microcode problem there are risks to significantly aggravate the situation.
It is strongly discouraged to apply the methodology to other families, as it will lead to a recount of the translator, which in the vast majority of cases will be incorrect and access to the user area will be up to the first point of discrepancy. Data recovery in this case is significantly complicated.
If all the fields in the passport given by the drive are correct except for the capacity, then you need to check if this is a consequence of the BIOS error of some motherboards that, using HPA control commands, cut off almost 1TB instead of cutting a small piece of the LBA range to save a copy of the BIOS.

Fig. 6 passport capacity of a 1Tb drive after incorrect development of the BIOS mat. Gigabyte boards
To solve this problem, you can use HDAT2 or similar free diagnostic software, with which you can return the original passport capacity of the drive, as well as disable the ability to control HPA in DCO to avoid relapse of the problem.
3. Preparation for testing
When testing disks outside professional complexes, it is important to prepare the operating system in advance. It is necessary to prohibit automatic mounting of disk volumes in order to prevent the operating system from being unattended.
On Windows, for this, with administrator privileges, you need to run diskpart and run the automount disable command. If a potentially problematic disk was previously connected to this OS, then you must remove the mount options from the registry with the automount scrub command. For these settings to take effect, a restart is recommended.
It is also necessary to prepare diagnostic software. Under Windows, you can use the free PC3000 DiskAnalyzer in which, in addition to the diagnostic function, it is possible to create a sector-by-sector copy. It is also advisable to have a bootable USB flash drive with HDAT2.
It is not necessary to use only this software for diagnostics. You can use any other analogs, with the exception of some non-free software for too gullible users, in whose advertising such slogans may sound “... unique program for regeneration of physically damaged hard disk drives. It does not hide bad sectors, it really restores them! ” With very high-profile statements in fact, such software has very modest capabilities that do not exceed the capabilities of free software, and the ideology of working with defects is more focused on the final killing of the drive than on help in further obtaining data.
If the boot time of the OS has increased several times when the drive is connected, even when the automatic mounting of volumes is disabled, it is recommended that you stop any activities to avoid exacerbating the problem.
A significant increase in OS boot time when connecting a potentially problematic hard drive is a very characteristic sign that surface defects occur on the surfaces of drive plates. OS boot delays occur due to calls to bad sectors and attempts by the firmware to perform offline scanning procedures that are too tough for her.
After successfully loading the OS, go to the device manager and make sure that your drive is in the list of devices. If it is not there, then make sure that the driver for the controller to which it is connected is installed and if the controller itself is turned off in the device list. If everything is in order with the driver and OS setup, and the drive did not appear in the OS or appeared and disappeared after a while, then this usually indicates a wide range of malfunctions. The most probable ones are controller board malfunctions, drive firmware hanging, or the drive goes into emergency mode, in which it stops responding normally to most commands.
To clarify the diagnosis, you can try to download DOS and use the HDAT2 to see the SMART settings. If there are signs of defect formation (nonzero values of attribute 5 and 197 (C5) in the fields of unnormalized values), then we can conclude that without interfering with the firmware settings at home, nothing can be done. If there are no signs of defect formation, then the cause of the freezes may lie in the incorrect operation of the controller board. In this case, you can try to use the controller board from the donor drive.
4. Testing
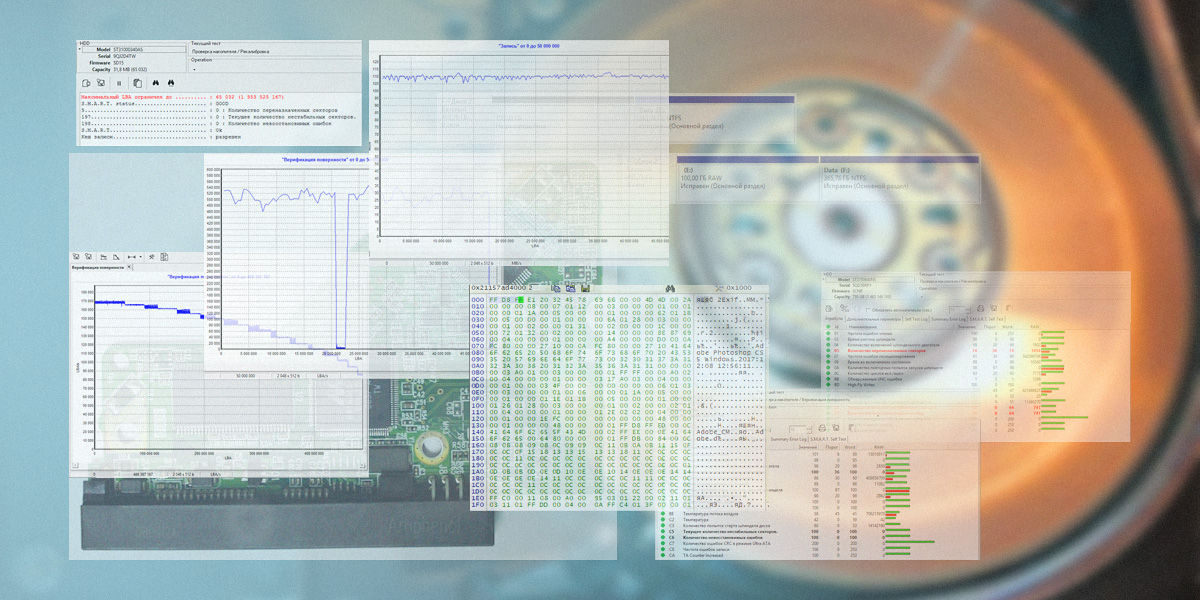
After going through the previous steps and not noticing good reasons for stopping the process, you can proceed to further assess the state of the drive. Most drives released this century have introduced SMART technology, which monitors the status of the drive and captures various events during its operation. Read more about the implementation of this technology in the HDD and what parameters it is desirable to control during the operation of disks in our article “What is SMART and how to read it” .
Using the diagnostic software, you need to request SMART parameters
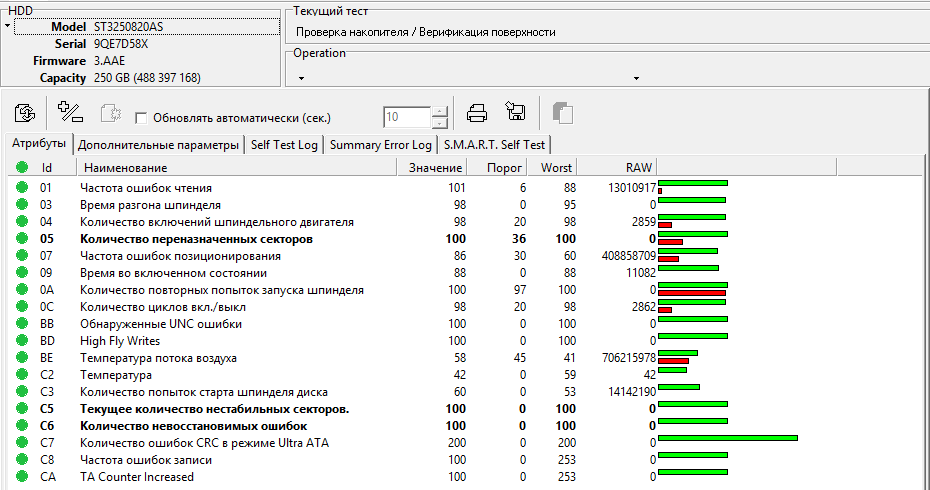
Fig. 7 SMART attributes of a healthy hard drive
It is important to evaluate indicators for attributes 5 and 197 (C5). If the values in the RAW column are zero or the indicators of problems are single, then it is necessary to proceed to further testing.
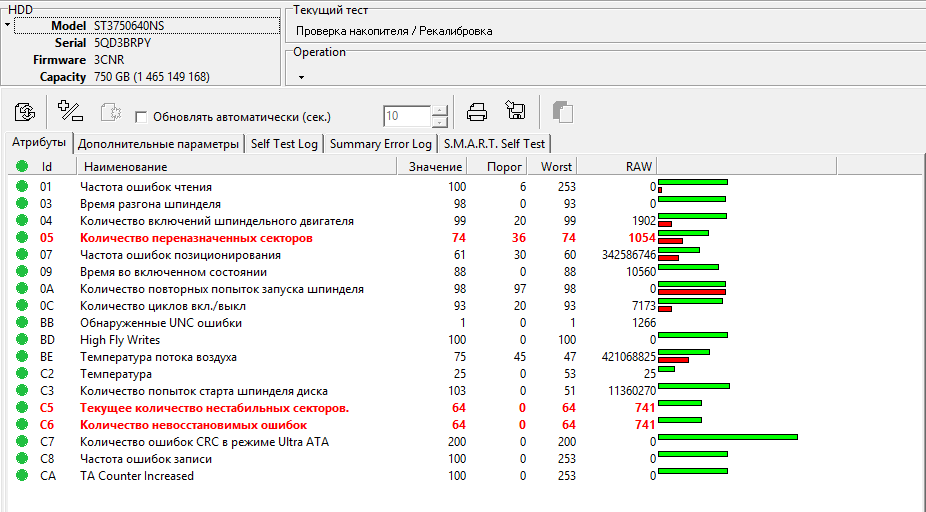
Fig. 8 SMART attributes of a severely defective drive
If the number of candidates for defects is three or four-digit, then in most cases, further attempts to test the surface or scan with automatic data recovery utilities will aggravate the problem until it is completely impossible to obtain data.
To obtain data in such cases, it is important to intervene in the drive firmware settings and disable offline scanning procedures, SMART logging in order to save the drive from engaging in background processes that can greatly reduce the life of a problem device. Unfortunately, in simple ways, without a deep knowledge of the architecture of the firmware of drives and without professional complexes, this cannot be done. The next task is to assess the condition of each of the heads separately and to localize the main defective zones. Linear reading with repeated repetitions on defective areas in such cases is contraindicated as too dangerous.
Even if the drive works correctly at first glance and, according to the SMART readings, there are no signs of defects on it, this is not a guarantee that they do not exist. Therefore, it is necessary to complete the final stage of testing and perform surface verification.
It is important to continuously monitor the scanning process. If strange sounds appear or large zones with reading errors are detected, immediately interrupt the process and turn off the drive in order to avoid irreversible consequences.
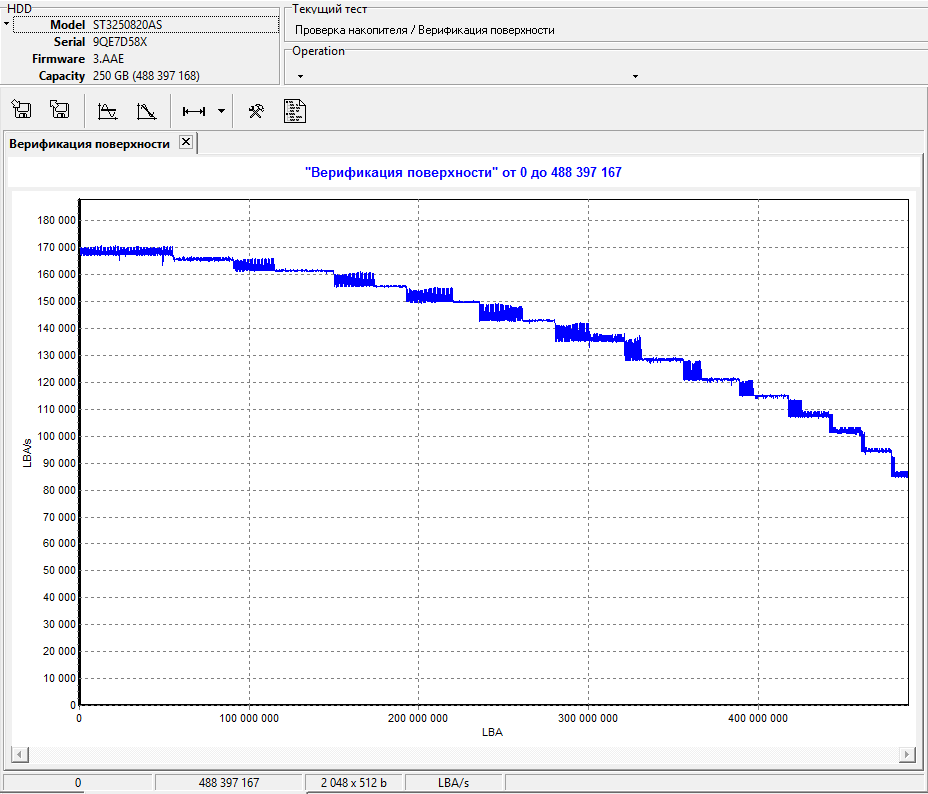
Fig. 9 scanned disk scan
If the result of a disk scan is a monotonously decreasing speed graph and no read errors are recorded, then the drive can be considered healthy and go to the next section.
In discs with a large media cache and translation that differs from the classical one (as a rule, in discs with tiled recording (SMR),) the graph may be of a different shape. Various attacks are possible.
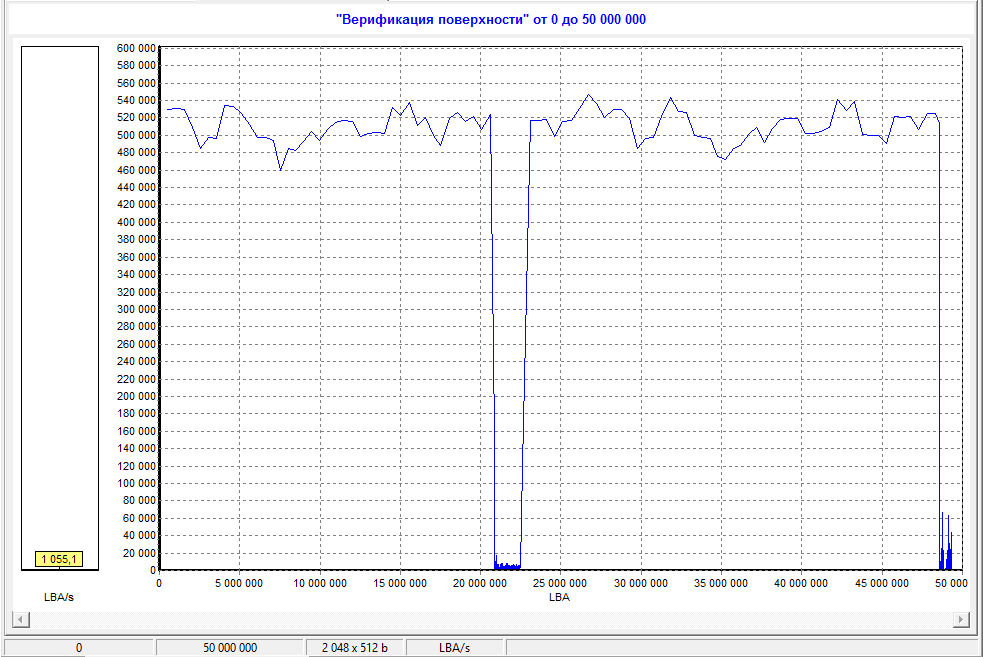
Fig. 10 graph scanning a disk with a problem head
If cyclic “slow” zones are detected during disk verification, then this is a characteristic sign of a not entirely operational head. No need to wait for defects to be detected and immediately stop testing.
In such a situation, one does not have to wait for anything good with independent attempts to extract data. With a high probability, the drive will not survive the attempt to create a sector-by-sector copy by the means available to the user.
In cases where defect formation was detected in the SMART attributes 5 and 197 (C5), or point defects were detected during the verification process, it is necessary to create a copy of the disk
5. Sectoral copy
If, according to the test results, the drive is working and no problems are detected, then you can not create a sector-by-sector copy and work with the original disk. But in order to avoid various kinds of accidents, it is strongly recommended not to skip this step and continue to work only with a copy.
With a working hard drive or a disk with a small number of defects, it makes no difference which tool you use, it is important that it creates a full copy. It is also important not to try to use the options of some programs for creating a compressed image, since then you will most likely be able to work only within the capabilities of the software that created such an image.
In Windows, you can use the following programs: WinHex, DMDE, PC3000 DiskAnalyzer, R-studio and others.
On Linux, the capabilities of the regular dd command are enough
Not all software is free, but in many ways the capabilities of the trial / demo version will be enough to create a copy of the drive.
As an example, we use WinHex to clone a disk.
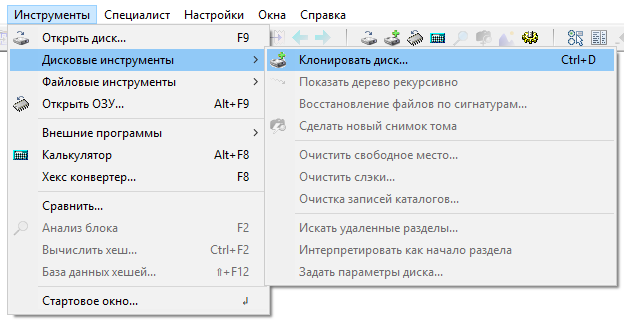
Fig. 11 options in WinHex menu for disk cloning
On the "Tools" tab, select the "Disk Tools" option in the pop-up window, select "Clone Disk" or simply press Ctrl + D.
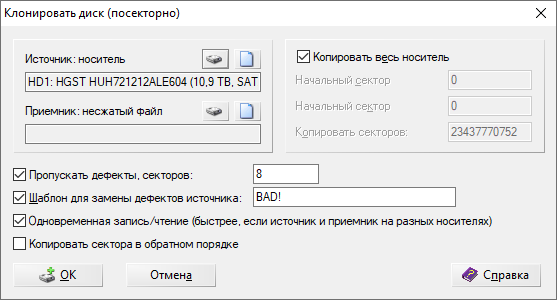
Fig. 12 clone settings
From the source, select the drive you want to clone.
A receiver can be a disk of a similar or larger volume, and it is also possible to clone into a file image.
Make sure there is enough free space on the destination disk.
In the copy settings, it is desirable to use the option “skip defects, sectors”.
If your drive with a sector with a physical sector size of 4096 bytes, but is broadcast on the OS with a virtual size of 512 bytes, you must set the value to 8 to avoid unnecessary attempts to read the problem sector.
“Template for replacing source defects” - indicate a searchable word or phrase that will fill the sector in a copy in place of unread sectors from the source. In the future, it will be convenient to find damaged files.
When creating a copy, you must always monitor the process. If there are abnormal sounds, the drive freezes, or a larger number is found than during the initial testing, immediately stop the process and turn off the drive to avoid irreversible consequences.
In professional data recovery tools, such as DataExtractor, there are significantly greater opportunities for setting up a data copy script, as well as drive status monitoring, which significantly increases the chances of successful extraction if you have a competent specialist.
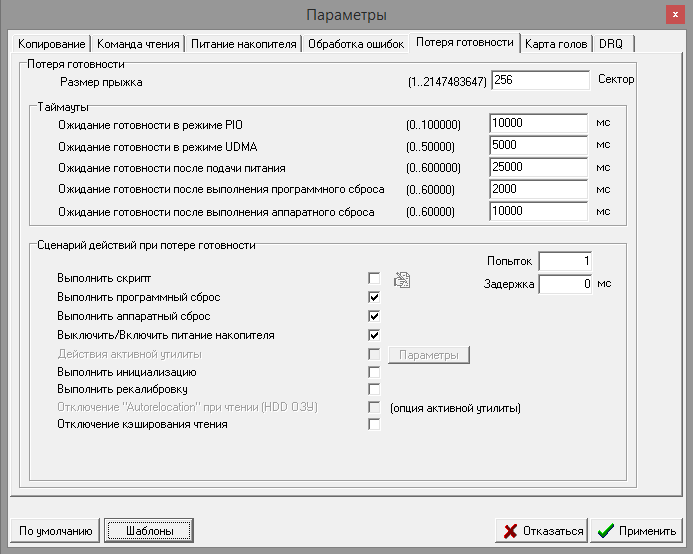
Fig. 13 settings for professional complex reactions with reading problems
Data recovery
6. Recovery methods
Today, there are many automatic data recovery programs that do not require any specialized knowledge from the user and involve receiving data almost in one click with the mouse. But this approach in many cases will not give the maximum possible result or it will be lost in the mass of garbage options.
For effective data recovery program it is best to narrow your search. To do this, it is desirable to indicate the scan area and the type of file system you are looking for. Such a refinement may discard a lot of variants of previous file systems, as well as reduce the likelihood of incorrect interpretation of detected file system metadata.
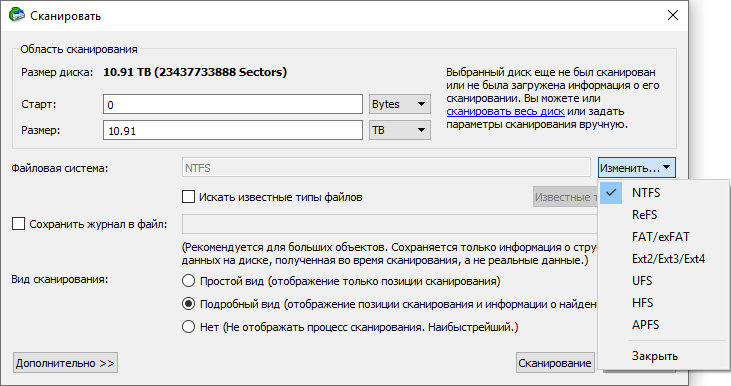
Fig. 14 R-studio setup example to search for metadata of the desired file system
File system metadata is a structure that describes the location of files, their names, attributes, access rights to them, logs, etc.
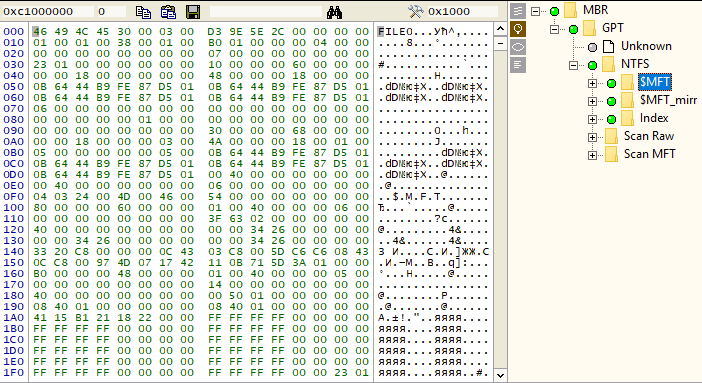
Fig. 15 Example metadata. MFT recording fragment (Master File Table in NTFS)
Not in all cases, automatic recovery programs accurately calculate the starting point in relation to the found metadata, and also do not always correctly filter out the data of different file systems, in connection with which it is possible to erroneously calculate the location for all files, moreover, various garbage interpretations increase the estimated amount of data , sometimes many times more than the capacity of the drive itself.
In professional complexes, there are tools for creating virtual volumes of various file systems with manually specified parameters, as well as tools for finding metadata with the ability to drop out excess objects manually.
In cases where the necessary metadata of the file system no longer exists or is incorrect, it is necessary to apply the method of searching for regular expressions specific to certain types of files.
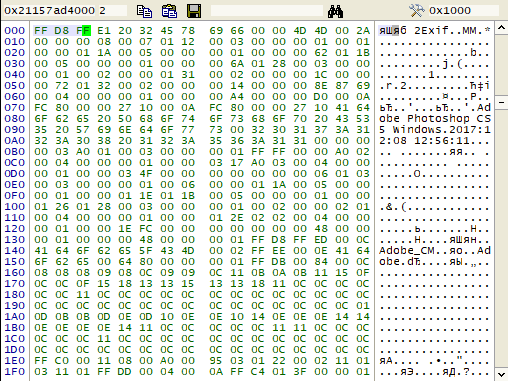
Fig. 16 0xFF 0xD8 0xFF regular expression typical for JPG files
Automatic recovery programs that search by this method for the most part have the following disadvantages: there is no directory structure and original file names, file structure analysis is not performed and the integrity of the found file is not sufficiently controlled, therefore There is a lot of junk data that cannot be used, for many types of files the correct size is not calculated.
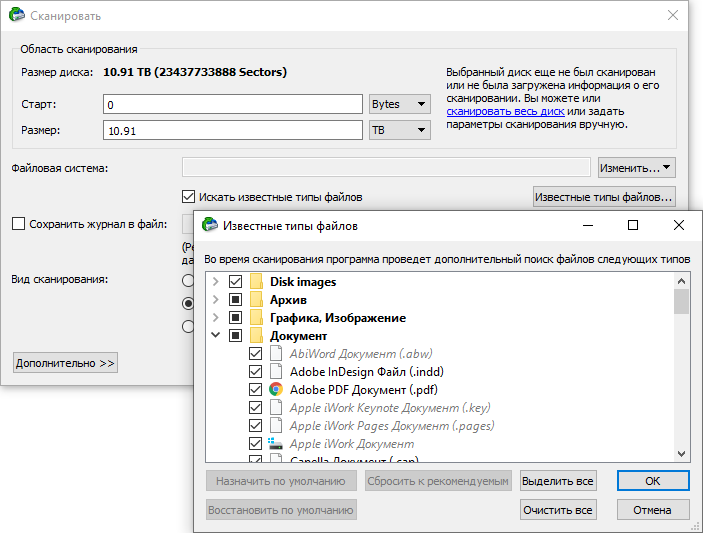
Fig. 17 R-Studio settings for searching regular expressions of files you need
7. Typical cases and recommended actions
Damage to the file system
As a result of malfunctions of PC components, incorrect operation of the OS, sudden blackout while writing to disk, hard drive malfunctions, file system metadata may be corrupted. With many types of damage, the OS will not be able to mount a volume with a damaged file system.

Fig. 18 damaged file system metadata (unrecognized RAW file system)
In these cases, the method of searching for file system metadata within an existing partition is quite effective. With minor damage, you can get a result close to 100%. This recommendation is relevant for most different file systems.
Of course, there are cases when, as a result of failures, a large amount of metadata of the current file system is corrupted. Then, if the first option has not worked out, you need to use the regular expression analysis method to find the files you need.
The specialist’s work is different in that he assesses the nature of the damage to the metadata and if they are not destroyed, but are distorted, manual corrections are possible in the hex editor.
Delete a file or group of files.
Erroneous data deletion is a fairly common case. The consequences of this action are highly dependent on the type of file system, as well as on relatively new disks, on the ideology of the firmware of the device itself.
If files were deleted on a partition with the NTFS file system, the express search in various utilities would be the best search method, in which key structures (MFT, Index, Logfile) are quickly scanned without a full scan of the partition. If the necessary file records and the space occupied by these files are not overwritten by other data, then you can quickly get the files of interest.

Fig. 19 after scanning with $ MFT, violet entries are highlighted as deleted.
If you didn’t find or damaged the necessary data during a quick scan, you can perform a full section scan, but most likely the result will not change in a serious way, and there will be nothing left to look for regular expressions.
In the specialist’s arsenal, a tool is available for constructing a map of unallocated space and further analysis exclusively in these areas, which removes existing data from the recovery result. This significantly saves the user time when further searching for the necessary files in a variety of nameless data.
If the files are deleted on the partition with the FAT16, FAT32 file system, then you can use metadata analysis and get some of the data with the original names. In the case of SFN, the first character in the file name will be missing, if the file was with a long name, then its full name will be in the LFN record. In the case of deleting fragmented files, data recovery using automatic recovery programs will not be successful, since when deleting in the FAT table, the record about the chain of clusters belonging to the file is deleted. Also in FAT32, in some cases, in addition to deleting the file chain in both copies of the table, the first SFN character and the upper two bytes in the number of the first cluster occupied by the file are deleted in the directory. Most automatic recovery utilities that analyze metadata will not determine the correct file position.
Restoring fragmented files is usually a rather complicated job, which is very poorly automated. Automation methods can be developed for a specific type of structure. Most often, the task is reduced to manual low-performance analysis to find the necessary fragments. An example of such work can be evaluated in the article “Restoring the 1C Enterprise (DBF) Database after Formatting”
If the metadata analysis methods did not lead to finding the necessary data or the necessary files could not be opened, then the method of searching for regular expressions remains. Perhaps some of the files can be detected.
If files are deleted on a partition with the HFS +, Ext 2, Ext3, Ext4 file system, then, unfortunately, it is useless to analyze metadata. Other than the search for regular expressions, there is nothing else left.
Deleting a section with data
If one or several partitions were deleted by mistake in the Disk Management snap-in, then for a user who wants to recover data, it will be recommended to start automatic recovery utilities with a full scan of the entire device. It is also advisable to take into account the position of existing sections in order to exclude obviously wrong options in the found.

Fig. 20 remote section
By a specialist, such work is performed relatively quickly by searching for boot sectors, superblocks in expected places. Based on the found, the exact positions of the beginning of the sections and their length are calculated.
You can also try to use DMDE or similar utilities, which can relatively quickly find signs of the beginning of a section, and try to display the file system of the found section.
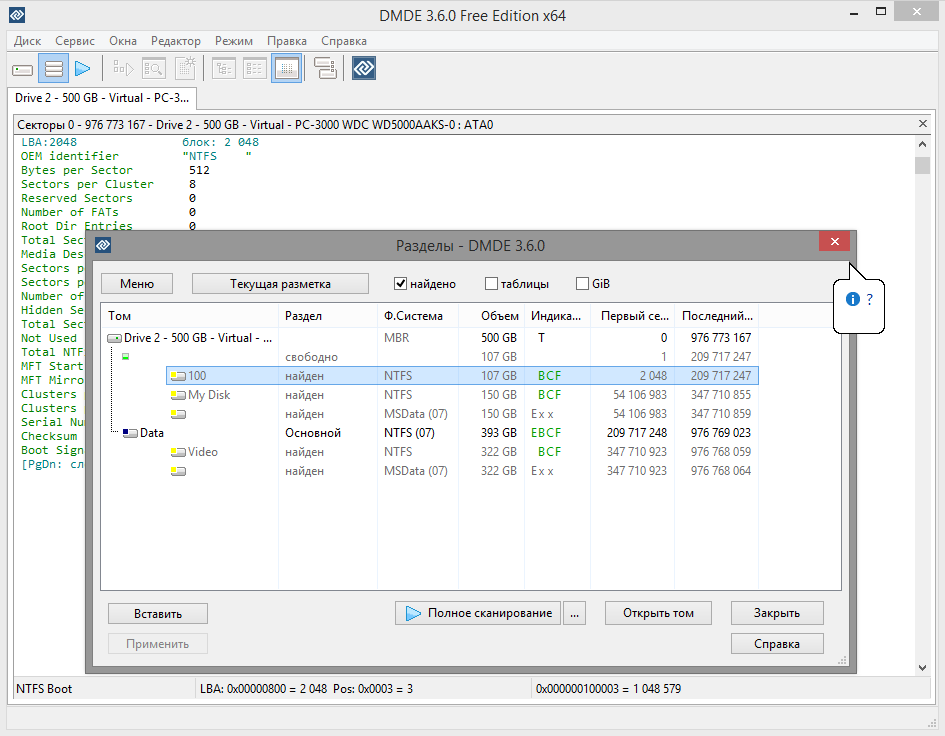
Fig. 21 result of quick partition search using DMDE
Formatted data partition.
In such cases, the recommended action scenario strongly depends on the type of file system that was before formatting the partition, and which file system was used after formatting.
, FAT32 c 8, FAT 32 64, FAT 8 , , FAT. 100%. FAT32 , , . .
FAT32, NTFS, ($MFT, $Bitmap, $Logfile), , , .
, NTFS FAT32. FAT NTFS. , FAT.
But if the user does not want to delve into the nuances of the location of the metadata of various file systems, then a logical step would be to launch the automatic data recovery utility in the metadata search mode. And if insufficient data is received, apply the regular expression search method.
The data section is formatted and partially overwritten with other data.
As often happens, the user can format the section and start filling it with other data, and only then realize that the old section had important information. In such cases, there can be no definite recommendation. Everything very much depends on how much (quantitatively and by volume) new data were recorded, as well as where these data were located. Depending on the conditions, the result can be from 0 to close to 100%. In absentia, this is unpredictable.
In many cases, with a large overlap of the data area, it makes sense to start with a method of searching for regular expressions for the desired file types, in order to understand whether there are still signs of the existence of the necessary data, and if they are found, search the file system metadata.
, . . jpg (, - ) , Exif jpeg , .

Fig. 22 result of sorting JPG files found by regular expression search
Abnormal termination of resizing, moving or merging partitions.
In cases of abnormal termination of disk managers' procedures for resizing a partition, moving it, or merging several partitions, you will have to figure out which steps were taken and at what stage the operation was stopped in order to get the maximum possible result.
Given the complexity and the number of possible variations, we consider only the universal option for a user who needs a result with a minimum number of actions. The object to be analyzed is to select the entire drive in order to guarantee coverage of all data locations. Use the metadata search method and copy all data options for the found file systems. There is a high probability that in each of the options different sets of files will be correct. The search for regular expressions by given file types is also important, since in such cases of data loss, partial loss of information about file names and location is possible.
8. Checking the integrity of recovered data
It is important to understand that displaying file names in the data recovery program or the number of regular expressions found does not guarantee that everything found will be usable. Therefore, an equally important stage after data recovery by the automatic recovery program is a check of the integrity of the data itself.
Unfortunately, a universal free tool for checking the integrity of a large number of different files does not exist. But individually, you can find free software that can control certain types of files. For example, many archivers will allow you to check the serviceability of archives, MP3Diag utility can check the health of mp3 files, ImageMagick can be used to test jpg files.
The main disadvantage of many free file integrity checking utilities is that they do not guarantee full file verification. And massive errors are possible.
For many types of files, the user has no choice but to visually evaluate the integrity of the data by opening the files one by one in the respective applications.
In professional complexes, there is a set of tools that allows you to partially control the health of files, which saves the result of data recovery from a large number of junk files.
In addition to eliminating garbage, it is necessary to catch files damaged by defects. If you created a sector-by-sector copy filling in the unread sectors pattern, then the issue of finding damaged files can be easily resolved by searching the text string “BAD! BAD! BAD! BAD!” In the files (in our example, the “BAD!” Placeholder was used). After finding, it is necessary to check the degree of damage, as some file formats may not suffer much from the loss of a small piece of data, and some may be completely unusable.
9. Frequent user errors.
Various attempts to “treat” defects using popular diagnostic tools in the hope that this will return access to data are one of the main mistakes of many users. Attempts to hide defects on a drive with a damaged polymer on the surface of the wafers usually result in filing the wafers, rather than gaining access to the data. For this reason, not knowing the nature of the defects on the surface, it is strongly recommended that you do not perform any service operations on the disk before receiving data. After successfully recovering information, you can try to service the drive, and if you are lucky, then maybe the drive will be suitable for further operation in not very critical tasks.
Often, defects fall on file system metadata. In these cases, when trying to mount a damaged volume, the OS freezes for a long time. When a problematic drive is connected, the OS boot time can stretch for tens of minutes. One of the most unfortunate ideas for solving this problem is to format the problem section. Newly created metadata can be written correctly, and the problem of long loading of the OS will be solved, but the task of data recovery will become more complicated, and the quality of the recovery result can be severely affected.
Copying data detected by the utility to the same partition from which files are being restored. In this case, usually it all ends with the user receiving garbage instead of data, and the next attempt to restore the data will already have a much worse result. If you follow the instructions in this article, then you will be insured against such an error.
The integrity check of the recovered data is not performed and the contents of the original drive with its copy are destroyed. In this case, there is a risk of remaining with a bunch of folders filled with the erroneous result of an attempt to restore data without the ability to get a high-quality result.
Wrong choice of tools and techniques for data recovery, in connection with which the result is much worse than it could be.
I hope this set of measures will help you decide whether the situation with your drive allows for independent attempts to restore data and whether you are ready to perform this set of relatively simple actions listed in this article.
Previous post: Going through the throes or a long history of one data recovery attempt