
In this series of articles, we will go through the full cycle of creating the client part of the application and write a small library of components using the modern technology stack.I am writing this article for beginning Frontend developers who want to create their first JavaScript project and show it to the whole world. For this series of articles, I have chosen the basic stack that can be found in most modern projects. In order not to get bored, you can always add something of your own, so I recommend that you write your own implementation and publish the results of work on GitHub while reading the article. Surely you have a dozen technologies, libraries, frameworks, tools that you want to try, and the development of such a pet project is a great option to try something new.
Acquaintance with the project
The main idea of the project that we will implement is to write a React component library with TypeScript, document and visualize it with a Storybook, and publish it as a package in npm. We will also configure linters, add tests for Jest, and automate the testing process using Travis CI. Perhaps during the work something else will be added, do not hesitate to comment and propose your solutions.
The article will be divided into several parts so that we can examine in detail each stage of the project.
Beginning of work
To get started, we need to create a repository on GitHub for our project:
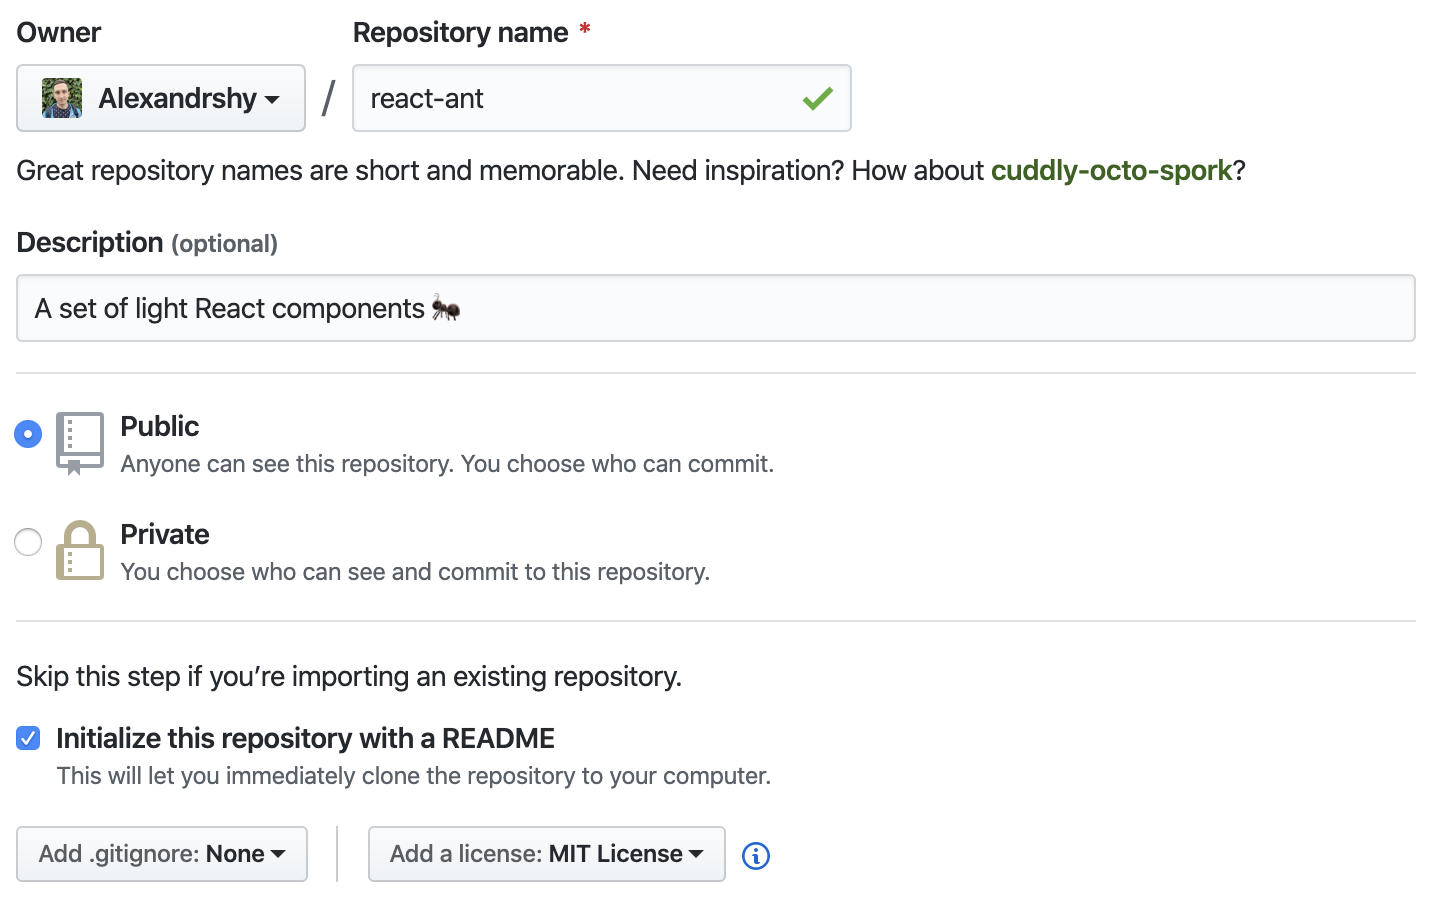
This is how the window for creating my new repository looks. You need to come up with a name and a short description of your repository. For all my pet projects, I always choose the public type of repository, but now GitHub provides the opportunity to create a private repository for free if your team is no more than three people. I also immediately added a MIT license - this is the simplest and most common version of the license for Open Source projects, if you are interested in learning more about licenses, you can see this site created by GitHub.
Now clone the new repository. GitHub suggests cloning using SSH or HTTPS. I usually use the second method.
git clone https://github.com/Alexandrshy/react-ant.git
If you see messages about successful unpacking, then cloning was successful.
We also need to immediately cache the password, if you do not do it the next time you try to do git push, git fetch, git clone, you will need to enter a username and password ( more on this ).
git config --global credential.helper osxkeychain
Let's move on to creating the package.json file. To do this, run the command:
npm init -y
After running the command in the repository, you can see the package.json file with some filled fields, mine looks like this:
{ "name": "react-ant", "version": "1.0.0", "description": "A set of light React components ", "main": "index.js", "scripts": { "test": "echo \"Error: no test specified\" && exit 1" }, "repository": { "type": "git", "url": "git+https://github.com/Alexandrshy/react-ant.git" }, "keywords": [], "author": "", "license": "ISC", "bugs": { "url": "https://github.com/Alexandrshy/react-ant/issues" }, "homepage": "https://github.com/Alexandrshy/react-ant#readme" }
We’ll make small changes right away:
"keywords": [ "react", "css", "UI" ], "author": { "name": "Alex", "email": "alexandrshy@gmail.com", "url": "https://github.com/Alexandrshy" }, "license": "MIT",
I think everything is clear here, but for a more detailed configuration, you may need this documentation .
We will be returning to the package.json configuration as we work on the project. But now it's time to make the first commit.
git status git add package.json git commit -m "Init npm package" git push
In a nutshell, what we did: we checked the change history, indexed the modified package.json, committed with a simple and clear commit message, and then put our changes into a remote repository. Now package.json and information about the new commit have appeared in our repository. You can use the IDE or GUI to work with Git, but I am more comfortable doing everything in the console.
Linter
To keep your code cleaner (this is especially important if several people are working on the project), you definitely need a tool to analyze and identify errors. In my projects, I use ESLint to test JavaScript code. It is easy to install and highly customizable.
Install ESLint:
npm i -D eslint
Set up the configuration file:
./node_modules/.bin/eslint --init
You can configure ESLint manually or use a predefined rule set. I like the guide from Airbnb . I used the following settings:
? How would you like to use ESLint? To check syntax, find problems, and enforce code style ? What type of modules does your project use? JavaScript modules (import/export) ? Which framework does your project use? React ? Does your project use TypeScript? Yes ? Where does your code run? Browser ? How would you like to define a style for your project? Use a popular style guide ? Which style guide do you want to follow? Airbnb (https://github.com/airbnb/javascript) ? What format do you want your config file to be in? JavaScript
Since we plan to use TypeScript, I immediately selected this item in the dialog box, due to which I got a Cannot find module 'typescript' error, which is logical because we haven't installed TypeScript yet, let's fix this right away:
npm i typescript npm i -D @typescript-eslint/parser
After installation, you will see the eslintrc configuration file. It is already configured, but if during development you want to add or change some rules, it will come to your aid.
To test ESLint, let's create an index.ts file and save the following code there:
var a console .log('a = ' + a) a = 100
And run the check:
./node_modules/.bin/eslint index.ts
Great, a 5-line code has 7 errors and 1 warning. And immediately ESLint offers me to automatically fix these errors, let's try to do this:
./node_modules/.bin/eslint index.ts --fix
And we get this code, without errors and with one warning about using console.log:
var a; console .log(`a = ${a}`); a = 100;
As you can see the automatic fix works, the errors have been fixed, but the code still looks pretty ugly. For formatting code, the best tool in my opinion is Prettier . Let's add it to our project:
npm i -D prettier-eslint npm i -D prettier-eslint-cli
"scripts": { "format": "prettier-eslint '**/*.{js,ts,tsx}' --write" },
I added the --write option so that all formatted files are overwritten. Check the result:
npm run format
index.ts
let a; console.log(`a = ${a}`); a = 100;
Everything works great. You can also install plugins for your IDE to format files using keyboard shortcuts or when saving changes. Now let's add the scripts to package.json:
"scripts": { "eslint": "./node_modules/.bin/eslint '**/*.{js,ts,tsx}'", "eslint:fix": "npm run eslint -- --fix", "format": "prettier-eslint '**/*.{js,ts,tsx}' --write" },
The ideal option when you start a new project is to immediately configure all the linters, because if you try to implement them in an already completed project you can see a large number of errors and it will take a lot more time to fix them than if you initially took care of the quality of your code.
Save changes:
git add . git commit -m "Added ESLint and Prettier" git push
Pre-commit hook
We configured ESLint and Prettier and created scripts to run manually, but it would be nice to do this automatically before committing. For this we can use Git hooks. The Husky package allows you to run scripts before executing `git commit`, and the Lint-staged package allows you to check only indexed files against specific filters.
npm i -D husky lint-staged
Let's go back to package.json and add the following code:
"husky": { "hooks": { "pre-commit": "lint-staged" } }, "lint-staged": { "*.(js|jsx|ts|tsx)": [ "npm run eslint:fix", "npm run format", "git add" ] },
Now, before each commit, we will run an ESLint and Prettier check for all modified js and ts files and, after formatting, add these files to our commit.
Let's test the index.ts file again:
var a; console .log(`a = ${a}`); a = 100;
Only this one will immediately index this file and commit:
git add index.ts git commit -m "Testing pre-commit hook"
If you check the index.ts file now, you will see that the code has been formatted. Before saving changes, the file will be checked and formatted if necessary. This allows you to be sure of the correctness of the files that fall into your repository.
## Conclusion
We have to save all the changes. Before that, create a .gitignore file where we write node_modules , we do not need the dependency folder to get into our repository. We can also delete the index.ts file, we will not need it in the future.
git add . git commit -m "Added husky and lint-staged" git push
You can see the whole result of the work in the repository . The current status of the project is the master branch, and for each article I will create a separate branch.
We will stop at this, thank you all for your attention, see you in the following parts.
References
npm documentation
ESLint official site
Prettier-eslint
Prettier-eslint-cli
Prettier extension for VSCode
Husky
Lint-staged