In this article, we will talk about how to learn Zen self-assembly of the gadget, that any experience is also knowledge, as well as some valuable advice for those who suddenly decide to repeat something like that.
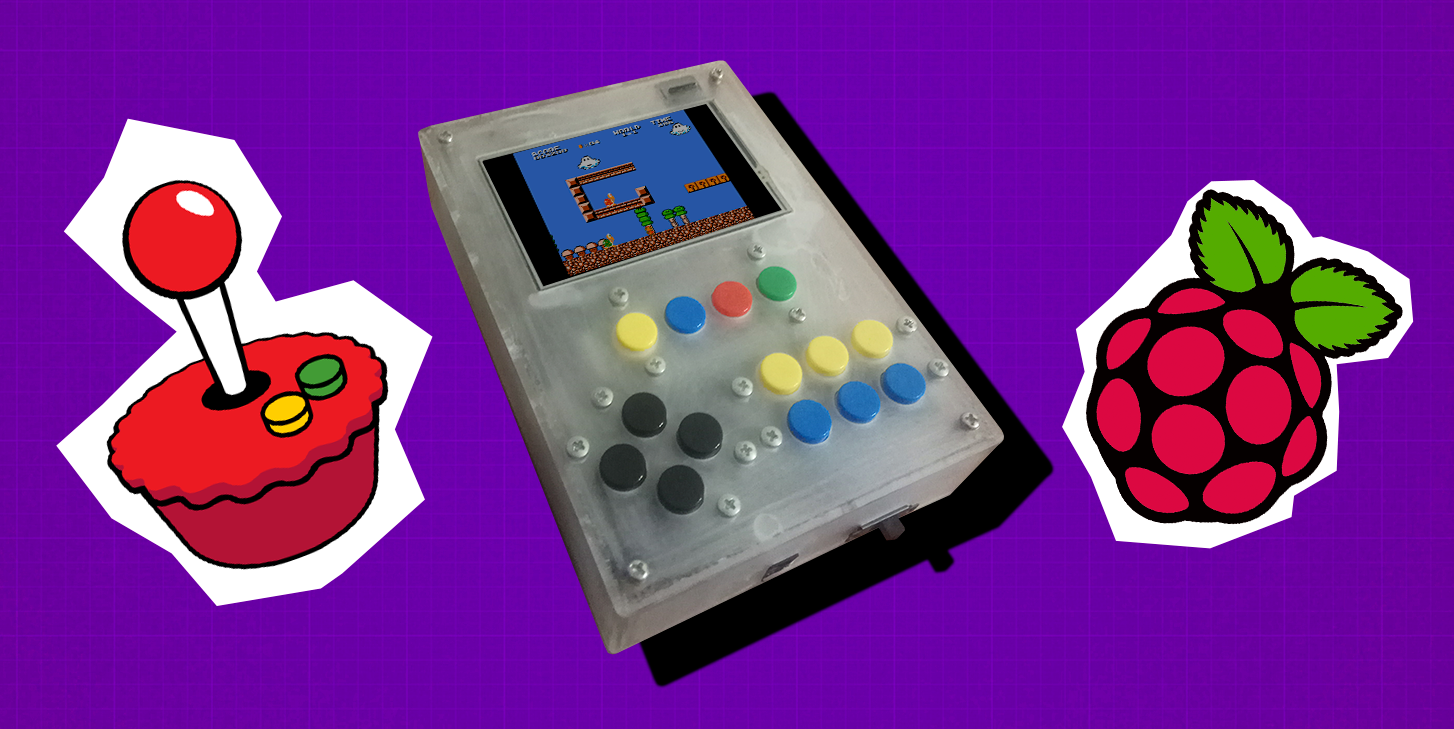
As a result, we will plunge into the period when the words Dendy and Sega aroused awe, and we get just such a "pocket" console:
Under the cut a lot of pictures and a short video for those who like to watch and not read
Foreword
A whole series of events pushed me to build this project. The fact is that I spend a lot of time on the way to work. As a rule, you have to pass the time while listening to books or casual toys on the phone. Well, or as of now - do drafts for the article on Habr. And so, on the road, when all these casuals became very boring, I began to recall that earlier the grass was greener, and the games were more meaningful. I remembered how in childhood, day and night, playing dendy, and decided that there are probably pocket consoles on Chinese sites that will brighten up the long road.
Well, I ordered myself one such prefix. The seller promised as many as 168 games from childhood. Days went by ... Delivery of the order was delayed.
Time passed, in anticipation I decided to go over the list of games that should have been on the console. While reading the list, he refreshed the memory of the games in which he spent whole days, and with disappointment found that many of them were not in the promised set. In addition, the Sega mega drive prefix lay with a stove of memories, with its Comix zone, Rock'n'Roll Racing and Earthworm Jim ... Time passed, but my "Nintendo" prefix did not. By writing to the seller, I received an answer that he simply forgot to send it, and the track that he gave was invalid. I returned the money for her, but my childhood was not returned.
Having spat in the hearts of this bad man’s conscience, I thought that you can play dandy on the emulator on the phone. But as it turned out - the sensations are not at all the same. There are no tactile buttons, and at the same time, the comfort of the game. Moreover, old games are much more complicated than modern ones and missing the jump button can often mean starting the level from the beginning.
And I decided - why not put together my console, with Cannon fodder and buttons? .. And I did. I made a bunch of mistakes, somewhere by inexperience, where by curvature. And I want to share with you exactly the experience with errors, because an intelligent person learns from the mistakes of others, and only smart people are going to Habré :)
Video, with assembly processes:
Platform selection
I had a raspberry pi 2 lying around, and an inexpensive 3.5-inch display to it. With the search for solutions for her, I decided to start. And as it turned out - not in vain. For Raspberry, there is already a RetroPie operating system, which turns it into a full-fledged emulator for a variety of consoles. (more on the link ).
In addition, the Internet is full of instructions on how to connect joysticks to it and put it into the case from the old set-top box.
But this is not our way, we are collecting a "pocket" console. So the joystick needs a built-in.
Error 1: It is better to use raspberry pi 3 or 4 models due to the presence of wi-fi and bluetooth. This will greatly simplify the configuration of the already assembled console in the future. You can also use Orange pi, the solution is no worse.
Design joystick
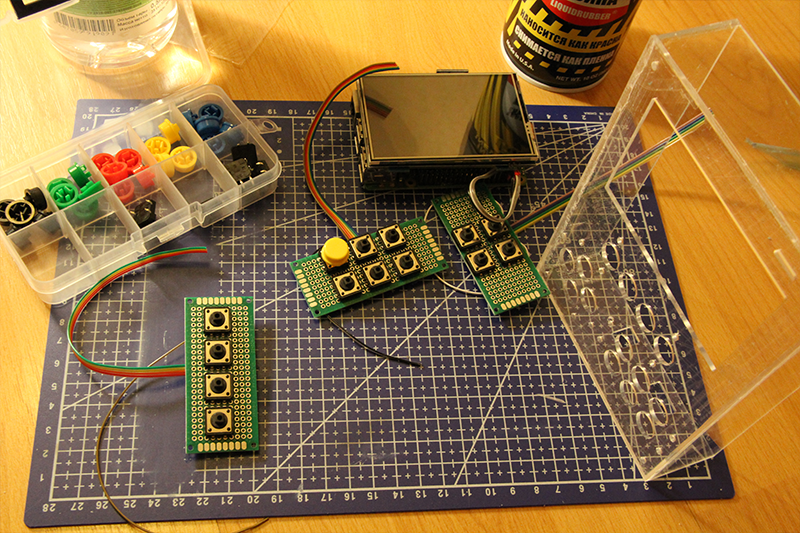
As a basis for the joystick, I decided to take a 6 button controller from sega-mega-drive. First of all, due to the fact that 6 buttons allow you to play segavskie games and will not interfere with Dendev.
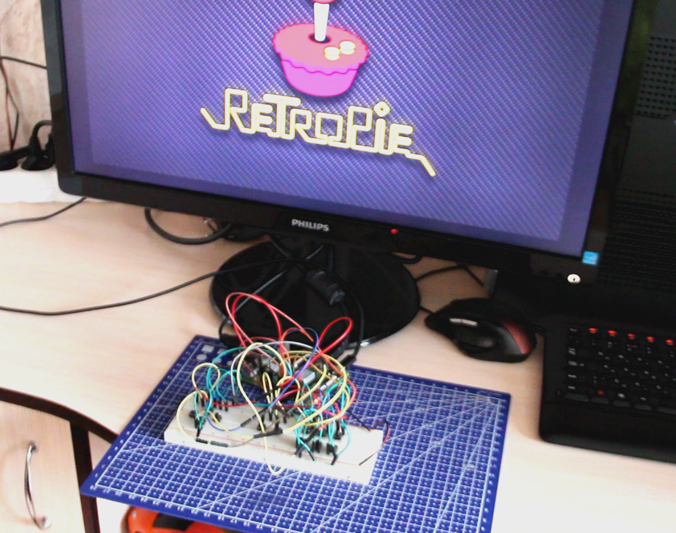
Further, Adafruit found a library that can emulate a keyboard by reading signals from the gpio legs of raspberry itself. And using it is very simple. You need to copy it to the already installed RetroPie and connect the buttons to the pins. Buttons, when pressed, should be shorted to ground (any GND pin).
To begin with, all the buttons on the breadboard were assembled and tested for operability.

I used the following connection diagram:

Because the project was going under the Sega’s joystick - then the designations are appropriate. In general, in RetroPie it is customary to use “TL” and “TR” instead of “C” and “Z”, apparently used in the PlayStation joysticks. In fact, buttons can always be reassigned, including for each specific game.
The buttons are assembled, now you need to think about the case for a pocket console. And here I got both positive and negative experiences:
Putting the case together
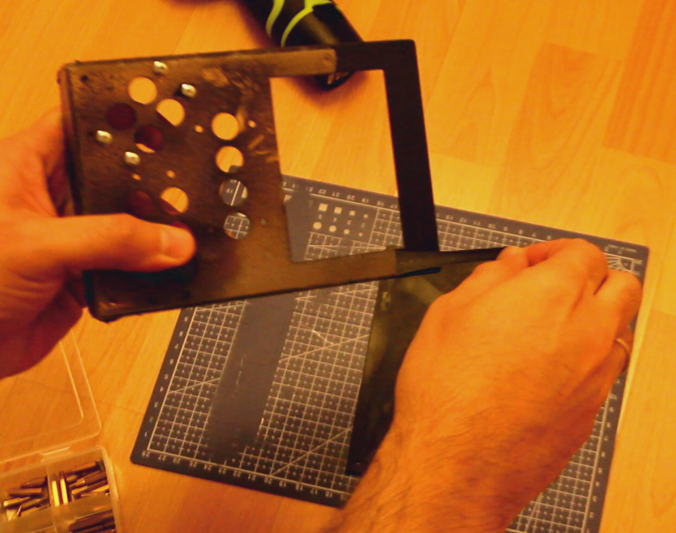
In one of my posts, I already mentioned that creating a case is a direct headache for the non-commercial assembly of gadgets if you do not have a 3D printer. You can search for ready-made boxes and dance on their size, or collect something yourself. I decided to try a new way for myself - gluing acrylic. Moreover, the habravchanin millercutter offered his help in cutting acrylic to one of the previous posts. For which a separate and big thanks to him!
Having estimated the dimensions of the filling, a drawing was made and given for cutting. Initially, the idea was as follows: round off the “sharp” edges in the assembled case with sandpaper and cover it with liquid rubber from a spray can. A soft-touch coating and Porsche design loomed in the imagination.
Bonding acrylic is recommended with dichloroethanol. I did not find it in a hardware store, so I took the first glue for Bison plastic that came across. I ask you not to consider this an advertisement, but the case stuck together very well. Take a look at what a beautiful transparent case turned out:
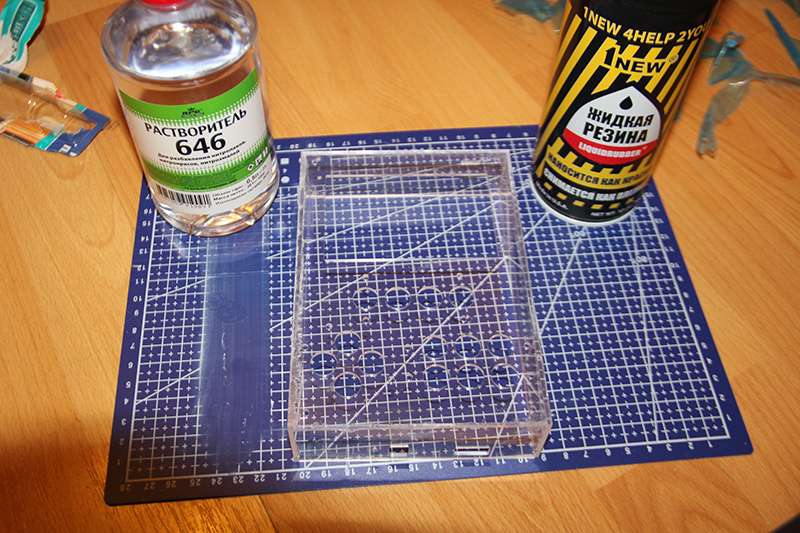
Acrylic easily and reliably glues, looks good and generally pleasant material.
The case is assembled, the buttons are soldered into the breadboard, getting ready to paint ...
After the glue dries, I walked with sandpaper in the corners, as well as throughout the body, so that “the paint is better”. Since there is no place to paint at home - I went out for painting on the street. And here I got my second error:
You need to paint in a dry and warm room, and not in wet and cold Petersburg.
In general, either I violated the process, or the stars did not agree, but the rubber lay disgusting. With bubbles and smudges.
I had to tear off this coating and again skin the body. Painting the body, it was decided to postpone for some time. Therefore, hot smudges are now visible through the body, which does not look very good. And if you know how and how to carefully paint acrylic, I will definitely follow your advice, because you can’t leave the assembly in its current form:
Console assembly
It was decided to bolt the electronic elements to the housing. This should give the case a peculiar charm, but to be honest - I did not come up with other ways.
I coated all the joints and soldering with hot-melt adhesive. Yes, this is ugly, but the surefire way to fix the mounted installation.
Error 3: mounted installation is in any case unreliable and ugly, so if you have the opportunity to order or ZALUT a printed circuit board - you will get more reliable and compact
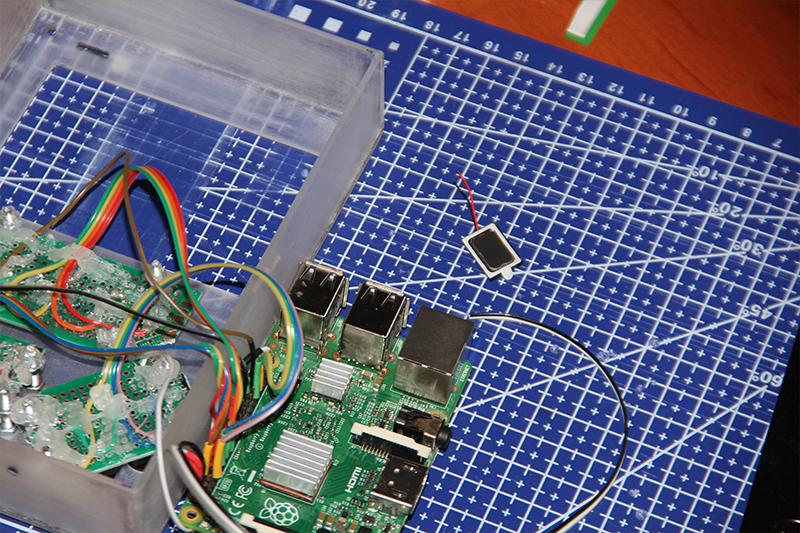
Making sound
Build sound is one big mistake number 4:
I decided that the speaker from the phone would be perfect for playing sound. The one that plays the ringtone. But by mistake I got a voice speaker (the one that is attached to my ear) Well, after connecting it to the amplifier chip - the speaker simply could not cope with the volume. I had to remove the amplifier.
Honestly, I still don’t know what to do with the sound. used an MC34119L amplifier chip. Maybe there was a problem in the connection. If someone knows which speaker will be suitable and which simple amplifier is suitable for him, please tell me. It is advisable without additional body kit such as capacitors.
Collecting food
Everything is pretty simple here. Need to assemble a powerbank. I have a supply of 18650 batteries and various ready-made boards for charging them.
Mistake 5: First, I used a nameless 3 ampere from China with a round power socket. She did not have a 5V stabilizer, so I additionally had to solder the DC-DC converter. A little later I redid it to a ready-made module immediately with a stabilizer and a battery charge indicator, but because of an already-prepared hole in the case, a round socket remained. Now I understand what should be done for microUSB. A pair of 2300mAh batteries lasts for several days of uncontrolled play. Also, it did not immediately occur to me to put a button with a latch to turn on the device. You can justify the large toggle switch, the only one at hand, but ... There is no excuse for him, the button would be better. In addition, the 18650 batteries are rather bulky; you might consider using flat lithium batteries.
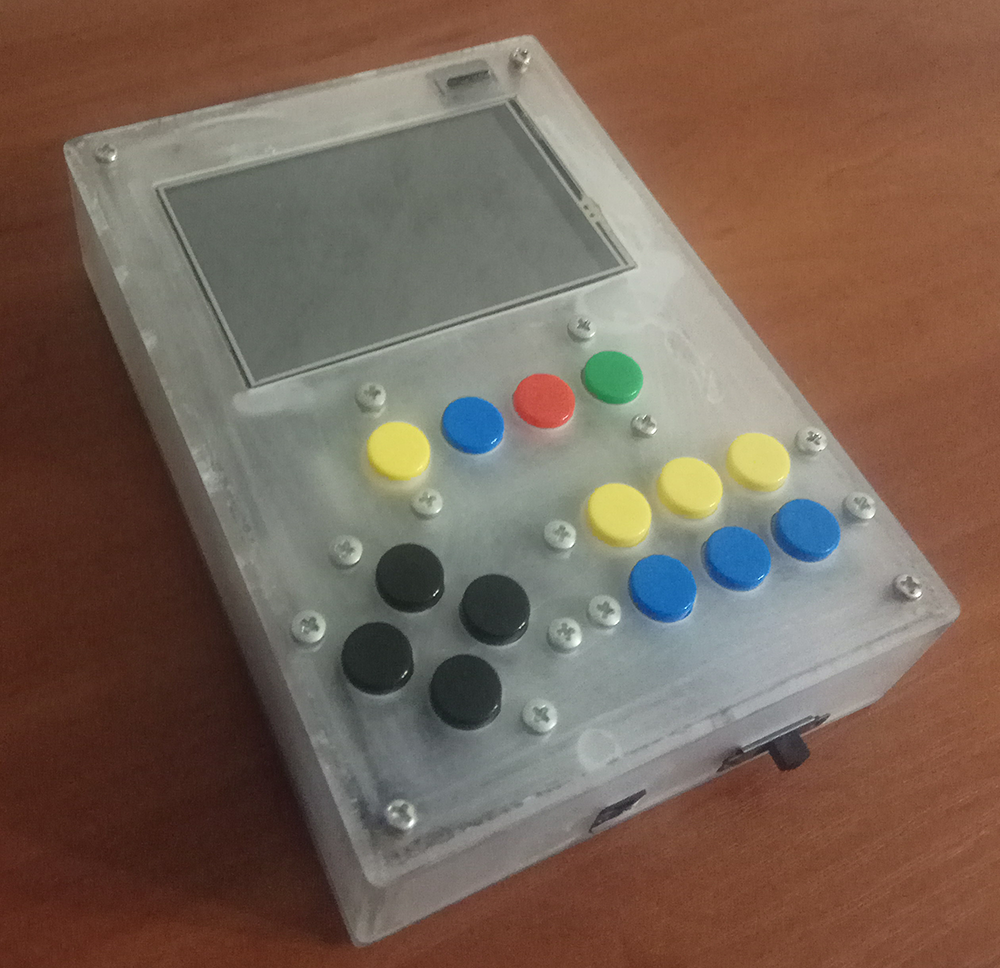
Finally assembled device
Conclusion
In general, the console turned out to be pleasant. Plunging into old toys is just like surviving a rebirth. The console still does not fit in your pocket (except in the down jacket), but it is easy to carry in the backpack.
On the Internet, you can find whole collections of games at 30 Gigabytes. On this site you can legally download free games for this console.
For those who decide to repeat this project - I dare to give some advice:
- Better not use hot melt glue.
- If possible - order or make a printed circuit board, the console will be more accurate and compact
- Before you begin to paint the body - you should practice on
catson similar material - Use the Raspberry Pi with WiFi. This is better than constantly opening the case and getting a raspberry for downloading games or reconfiguring.
- Better yet, use the Raspberry Pi Zero or Orange Pi. They are more compact
- It’s not a good idea to give a console to a child - then it’s hard to pick up
Well, I would like to finish the article with the words of Alexander Sergeyevich:
“About how many miraculous discoveries the spirit of enlightenment prepares And experience, the son of difficult mistakes, And genius, friend of paradoxes, And chance, god inventor.”
