How to create a GUI with JavaFX using FXML markup and SceneBuilder.
All posts in the JavaFX series:
- JavaFX Tutorial: Getting Started
- JavaFX Tutorial: Hello world!
- JavaFX Tutorial: FXML and SceneBuilder
- JavaFX Tutorial: Basic Layouts
- JavaFX Tutorial: Advanced Layouts
- JavaFX Tutorial: CSS styling
- JavaFX Weaver: Integrating JavaFX and Spring Boot Applications
Traditional way
In the previous article, we created a simple Hello World application .
Just a reminder - the code looked like this:
@Override public void start(Stage primaryStage) throws Exception { primaryStage.setTitle("Hello world Application"); primaryStage.setWidth(300); primaryStage.setHeight(200); InputStream iconStream = getClass().getResourceAsStream("/icon.png"); Image image = new Image(iconStream); primaryStage.getIcons().add(image); Label helloWorldLabel = new Label("Hello world!"); helloWorldLabel.setAlignment(Pos.CENTER); Scene primaryScene = new Scene(helloWorldLabel); primaryStage.setScene(primaryScene); primaryStage.show(); }
As you can see, the entire user interface is created in Java code.
This is a very simple example, but as your application becomes more complex, when you have to enter several levels of nested layouts and many components, the resulting code can become very difficult to understand. However, this is not all - in the same class there is code that is responsible for the structure, visual effects and behavior at the same time.
The class clearly does not have a single responsibility. Compare this, for example, with the web interface, where each page has clearly separated tasks:
- HTML is a structure
- CSS is visual effects
- JavaScript is behavior
Introducing FXML
Obviously, having all the code in one place is not a good idea. You need to structure it somehow so that it is easier to understand and make it more manageable.
In reality, there are many design patterns for this. Typically, you end up with a “Model-View-Whatever” option — it's something like “Model View Controller,” “Model View Presenter,” or “Model View ViewModel.”
You can spend hours discussing the pros and cons of different options - let's not do it here. More importantly, with JavaFx you can use any of them.
This is possible because in addition to the procedural design of your user interface, you can use declarative XML markup.
It turns out that the hierarchical structure of XML is a great way to describe the hierarchy of components in the user interface. HTML works pretty well, right?
The JavaFX-specific XML format is called FXML. In it, you can define all application components and their properties, as well as associate them with the controller, which is responsible for managing interactions.
Download FXML files
So, how can we change our launch method to work with FXML?
FXMLLoader loader = new FXMLLoader(); URL xmlUrl = getClass().getResource("/mainScene.fxml"); loader.setLocation(xmlUrl); Parent root = loader.load(); primaryStage.setScene(new Scene(root)); primaryStage.show();
Here root represents the root component of your user interface, other components are nested in it.
The load method has a generic return value, so you can specify a specific type, not Parent . Next, you get access to component-oriented methods. However, this makes your code more fragile. If you change the type of root component in your FXML, the application may stop working at run time, but there will be no errors during compilation. This is because there is now a mismatch of the type declared in your FXML and in the Java FXML loader.
Create FXML file
Now we know how to load the FXML file, but we still need to create it. The file must have the extension .fxml. In a Maven project, you can put this file in the resources folder or FXMLLoader can download it from an external URL.
After creating the file, enter the XML declaration in its first line:
<?xml version="1.0" encoding="UTF-8"?>
Import
Before adding individual components to a file, you must ensure that they are correctly recognized. To do this, add import statements. This is very similar to importing in Java classes. You can import individual classes or use wildcards as usual. Let's look at an example of an import section:
<?import java.lang.*?> <?import java.util.*?> <?import javafx.scene.*?> <?import javafx.scene.control.*?> <?import javafx.scene.layout.*?>
The good news is that instead of adding all the import statements manually, your IDE should help you add the import like adding them to Java classes.
Adding Components
Now it's time to add some components. In a previous article, we learned that each scene can have only one child component. First, let's add a simple label:
<?xml version="1.0" encoding="UTF-8"?> <?import javafx.scene.control.Label?> <!-- --> <Label>Hello World!</Label>
Of course, labeling as the root component is not a very realistic example. It is usually preferable to use some kind of layout (layout), which is a container for several components and organizes their location. We'll cover layouts later in this series, but for now, let's just use a simple VBox that places its children vertically on top of each other.
<?xml version="1.0" encoding="UTF-8"?> <?import javafx.scene.control.Label?> <?import javafx.scene.layout.VBox?> <?import javafx.scene.control.Button?> <VBox> <Label text="Hello world!"/> <Label text="This is a simple demo application."/> <Button text="Click me!"/> </VBox>
FX Namespace
There are a couple of FXML elements and attributes that are not available by default. You need to add a Namespace FXML to make them available. It must be added to the root component:
<?xml version="1.0" encoding="UTF-8"?> ... <VBox xmlns="http://javafx.com/javafx" xmlns:fx="http://javafx.com/fxml"> ... </VBox>
Now you can use the new elements from the fx namespace. Let's try adding unique identifiers to our components:
<Label fx:id="mainTitle" text="Hello world!"/>
The fx: id attribute is a unique identifier for a component that can be used to refer to a component from other parts of our FXML and even from our controller.
Scripts
Our application is still static. There are several labels and a button, but the application does not do anything dynamic.
Let's respond to the click of our button and change the title from “Click me!” To “Click me again!”.
The first thing to do is add an onAction event handler for our button.
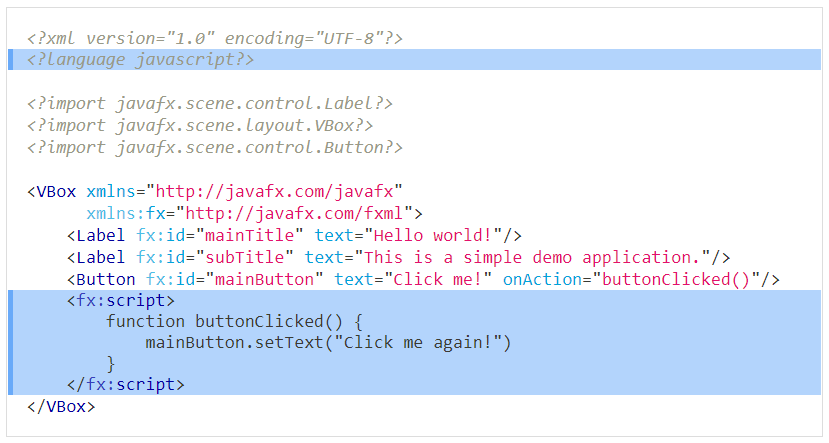
<Button fx:id="mainButton" text="Click me!" onAction="buttonClicked()"/>
Pay attention to fx: id, this is the identifier that will be used later to refer to the button.
Now you need to provide a function that will be called to handle the event. It can be defined inside the fx: script tag. The important thing is that you can use different languages to write a script, JavaScript, Groovy or Clojure. Let's look at an example in JavaScript:

Notice that we refer to our Button component using the mainButton identifier, which was declared like this:
fx:id = "mainButton"
You must also indicate which scripting language you use in the FXML file:
<?language javascript?>
Let's look at the full text of the example:
Should I use this?
The above example shows how to reference components using fx: id and how to add simple behavior using a JavaScript script. Is that really what you should be doing?
The answer is in most cases no. There are several problems with this approach. The reason FXML was introduced was a separation of interests - to separate the structure and behavior of the user interface. In this script, the behavior merged with the user interface structure again returned. Moreover, since we no longer work with Java code, but with XML, all code checks at compile time and type safety were lost. Now all problems in the application will be detected at runtime, and not at compile time. The application has become very fragile and error prone.
Adding a Controller
So what can be done to get a clear separation of interests? You can link the controller to our FXML file. A controller is a Java class that is responsible for handling behavior and user interaction in an application. This way you can return type safety and compile-time checks.
The controller is a POJO, it should not extend or implement anything, nor should it have any special annotations.
How can I associate a controller class with our FXML? There are essentially two options.
In Java
You can create an instance of the controller yourself or use any other methods of creating an instance, such as dependency injection. Then just download your FXMLLoader .
FXMLLoader loader = new FXMLLoader(); loader.setController(new MainSceneController());
In FXML
You can specify the class of your controller as an attribute fx: controller , which should be in the root component.
<VBox xmlns="http://javafx.com/javafx" xmlns:fx="http://javafx.com/fxml" fx:controller="com.vojtechruzicka.MainSceneController"> ... </VBox>
If you declare your Controller class in FXML, it is automatically created for you. This approach has one limitation - in the controller you need to create a constructor without arguments to make it easy to create a new instance of the Controller class.
To access an instance of a controller created automatically, you can use the FXML loader:
FXMLLoader loader = new FXMLLoader(); loader.setLocation(getClass().getResource("/mainScene.fxml")); MainSceneController controller = loader.getController();
Calling Controller Methods
Now that you have a controller, you can delete the script and implement the logic for pressing buttons directly in the controller:
public class MainSceneController { public void buttonClicked() { System.out.println("Button clicked!"); } }
The next step is to register the call of this method as the onAction event handler of our button. To refer to methods from our controller, we need to use the # sign in front of the method name:
<VBox xmlns="http://javafx.com/javafx" xmlns:fx="http://javafx.com/fxml" fx:controller="com.vojtechruzicka.MainSceneController"> <Label fx:id="mainTitle" text="Hello world!"/> <Label fx:id="subTitle" text="This is a simple demo application."/> <Button fx:id="mainButton" text="Click me!" onAction="#buttonClicked"/> </VBox>
When a button is clicked, it calls the MainSceneController.buttonClicked () method. Keep in mind that this only works if the method is declared public. If the access modifier is more strict, you must annotate the method with the @FXML annotation.
@FXML private void buttonClicked() { System.out.println("Button clicked!"); }
Embedding components in a controller
So far, we are just printing to the console. What if we want to change the text of our button to “ Click me again ” again ? How can we get links to components in our controller?
Fortunately, this is easy. Remember these fx: id attributes?
<Button fx:id="mainButton" text="Click me!" onAction="#buttonClicked"/>
JavaFX tries to automatically match components with fx: id with the fields defined in your controller with the same name.
Suppose we have a button described above with
fx:id="mainButton"
JavaFX tries to inject the button object into your controller in a field named mainButton :
public class MainSceneController { // fx:id = "mainButton" @FXML private Button mainButton; }
As in previous methods, your fields must be public or annotated @FXML .
Now that we have a link to our button, we can easily change its text:
public class MainSceneController { @FXML private Button mainButton; @FXML private void buttonClicked() { mainButton.setText("Click me again!"); } }
Scene builder
Writing your GUI structure in XML may be more natural than in Java (especially if you are familiar with HTML). However, it is still not very convenient. The good news is that there is an official tool called Scene Builder that will help you in creating the user interface. In a nutshell, this is a graphical editor for your GUI.

The editor has three main areas:
- The left part displays the available components that can be dragged to the middle part. It also contains a hierarchy of all the components in your user interface, so you can easily navigate it.
- The middle part is your application displayed based on your FXML file.
- On the right is the current component inspector. Here you can edit various properties of the selected current component. Any component selected in the middle of the hierarchy is displayed in the inspector.
Standalone
Scene Builder can be downloaded as a standalone application that can be used to edit FXML files.
Integration with IntelliJ IDEA
Alternatively, Scene Builder offers integration with the IDE.
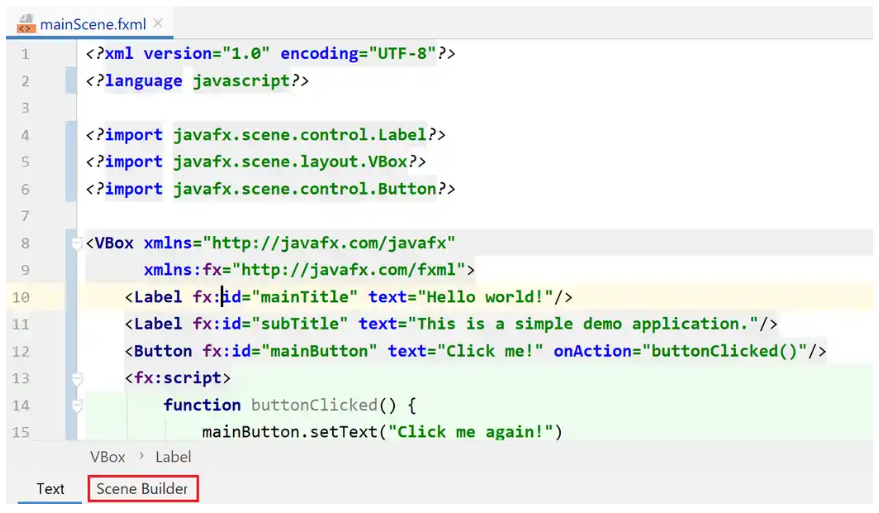
In IntelliJ IDEA, you can right-click on any FXML file and then select the Open menu option in SceneBuilder.
Alternatively, IntelliJ IDEA integrates SceneBuilder directly into the IDE. If you open the FXML file in IDEA, two tabs will appear at the bottom of the screen.
- Text
- Scenebuilder
For each FXML file, you can easily switch between editing the FXML file directly or through SceneBuilder.
In IntelliJ IDEA, you can configure the location of the SceneBuilder executable file:
Settings → Languages & Frameworks → JavaFX → Path to SceneBuilder
What's next
In the next post in our series, we will discuss some basic layouts that can be used to organize the components of a GUI application in JavaFX.