
Today I will tell you how we made an access control system in the office based on the Vision facial recognition service. First, a little background. As in any email service, we have created an anti-spam system. Such systems are now being made on the basis of machine learning, we have a powerful team in charge of it. And where machine learning is, there is computer vision. Therefore, the Vision service arose quite naturally and naturally.
In parallel with this, a few years ago we launched the Cloud, a reliable file storage with geo-distribution to data centers, which can be used by both individuals and companies. Over time, we got a "Cloud for Business", which not only stores files, but also allows you to order virtual machines. Gradually, it turned into MCS - Mail.ru Cloud Solutions, where Vision organically fit in as one of the services.
Cloud
Our neural networks are capable of recognizing not only faces, but also various objects, objects and scenes , including sights . Now they can recognize about 10 thousand categories, and machine vision sometimes works better than human.
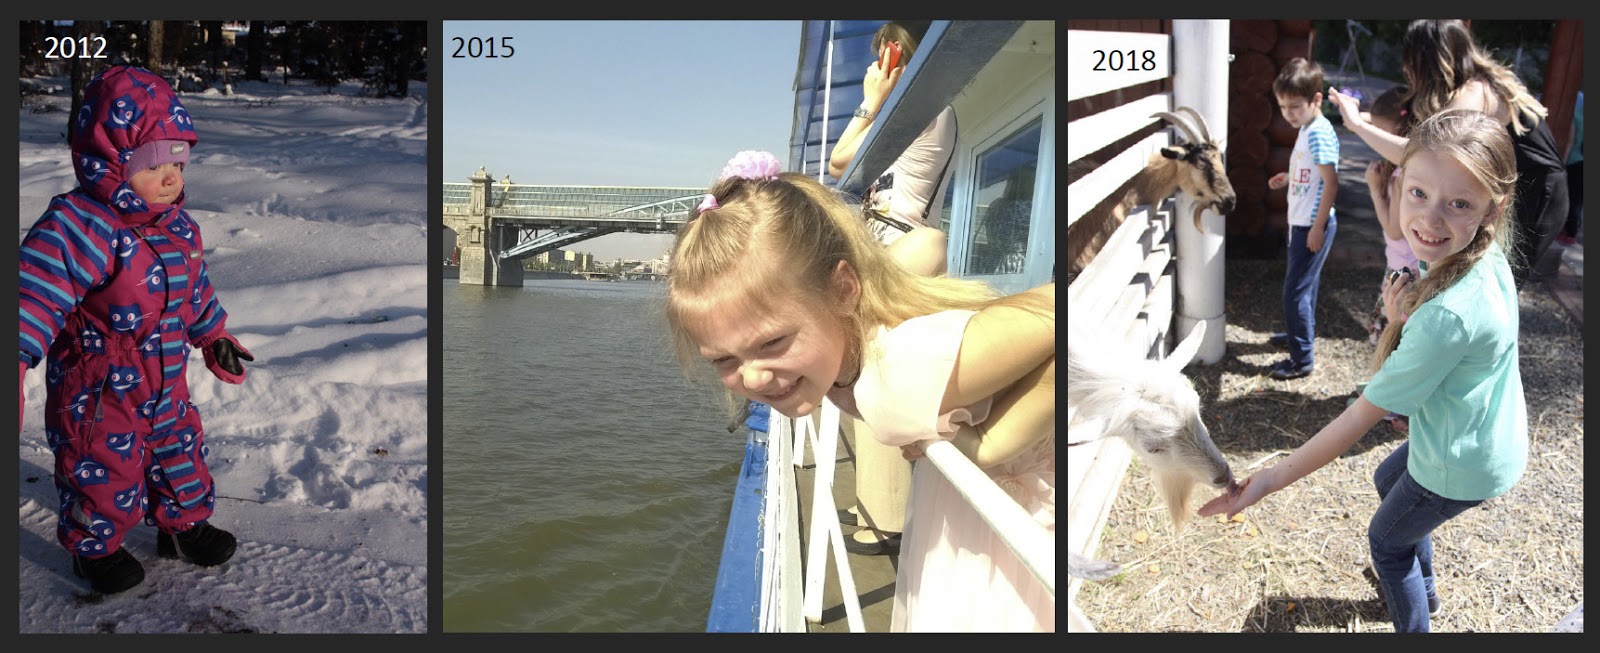
This is my daughter in 2012, in 2015 and 2018. If I didn’t know her personally, I probably didn’t immediately understand that this is one and the same person. And the neural network was able to match and understand.

Here the girl turned away and squinted, and the boy was generally in a cap with a shadow on half his face. But at the same time, the neural network accurately recognized them, even despite such difficult conditions. Naturally, the technology that is developing inside the company could not help but find support in internal services.
Our intranet
Our intranet is called sys. This is a kind of social network (we have few of them). In it, employees upload photos from various events.

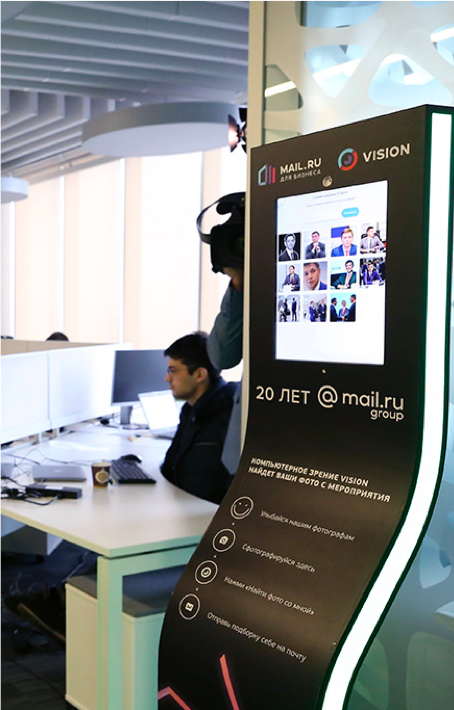
When several hundred photos are laid out from the event, it is quite difficult to find yourself there. Therefore, we have machine vision connected to these albums, which right on the intranet, in a single place, shows the photographs in which I am depicted. Here the system saw me at one of the summer corporate parties.

The neural network recognized me even in the twilight in profile, and there are still many people in the photo.
Conference Racks
Later we made conference racks. I wrote software for the iPad, which is installed inside the rack, but in general I am an iOS developer and have nothing to do with computer vision, I just help in a friendly way.
What is the essence of this rack? Throughout the event - a meeting, conference, corporate party, or at least a birthday - you are photographed by a photographer. From time to time, it drops accumulated images in the Cloud. You can go to the counter at any time, take a picture and click on the “Find Me” button. And the rack will either immediately display all the photos in which you are captured, or say that nothing has been found so far, if the system has not yet managed to index the images, and prompts you to enter an e-mail. And after the event, you will receive a link in the mail to the folder in the Cloud with all the photos on which you are. This is one of the applications of the Vision service.
Access system
Naturally, I wanted to use such facial recognition capabilities not only to search for my physiognomy in corporate images, but also for something more practical. For example, for an automatic throughput system. Applying a pass at each entrance to your floor is not very convenient: you often forget the pass, and for girls in light clothes in summer there is even nowhere to fix the pass.
Therefore, we decided to experiment. For this, we have all the conditions: no one needs to ask for permission, a very responsive administrative department, which says with a sigh: “Okay. Attach your cameras. Just not at the door. Doors relate to fire safety. ” We are: “Well then. We will attach on the side. " We also have patient colleagues, they have suffered from us.
Architecture
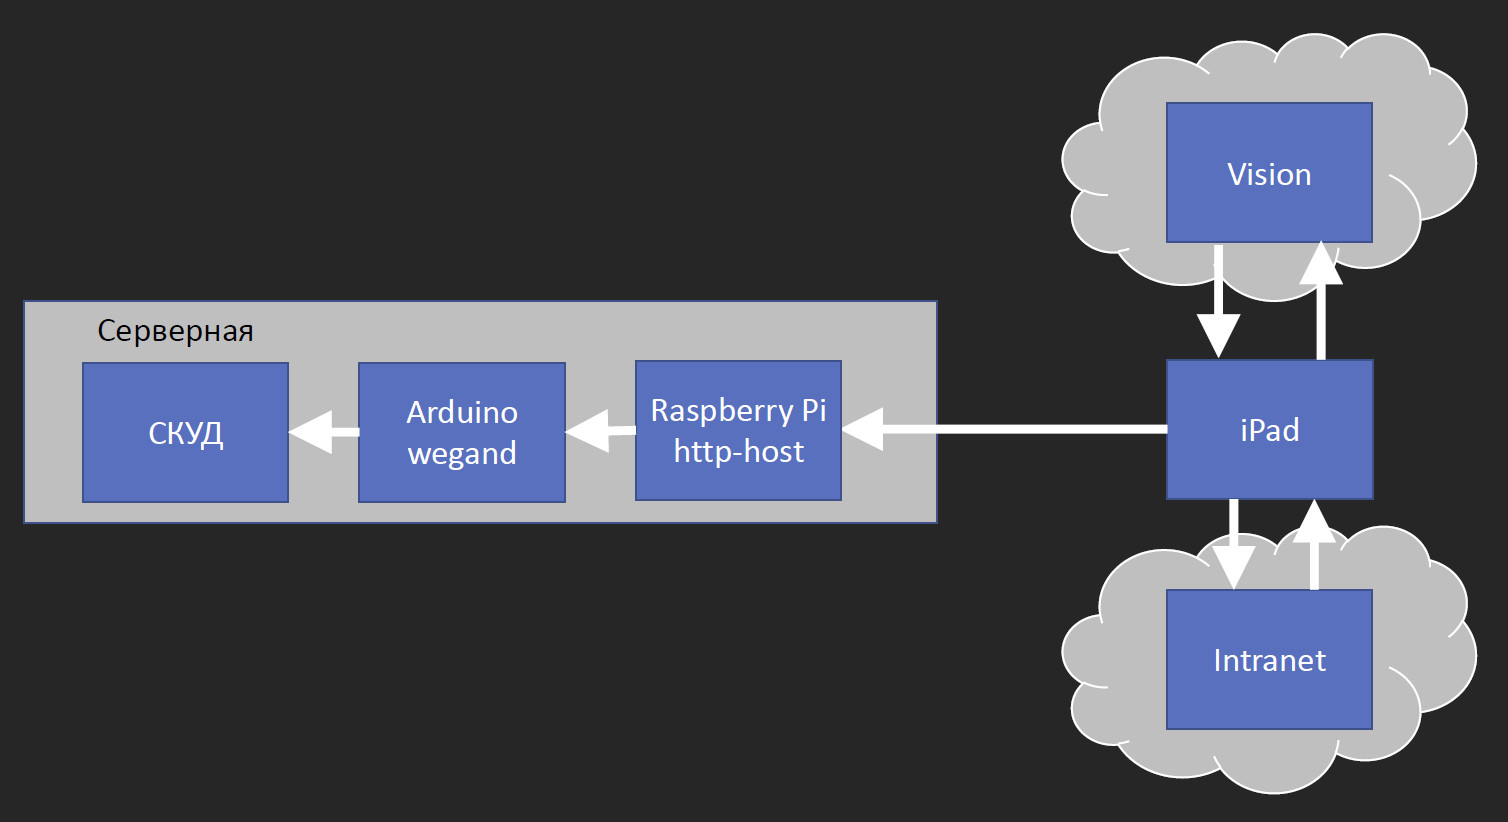
At first glance, the architecture of the access system seems very simple: the camera takes pictures, sends it to Vision, and Vision opens the door. But when we started to paint with colleagues how to actually do this, then we got this scheme:
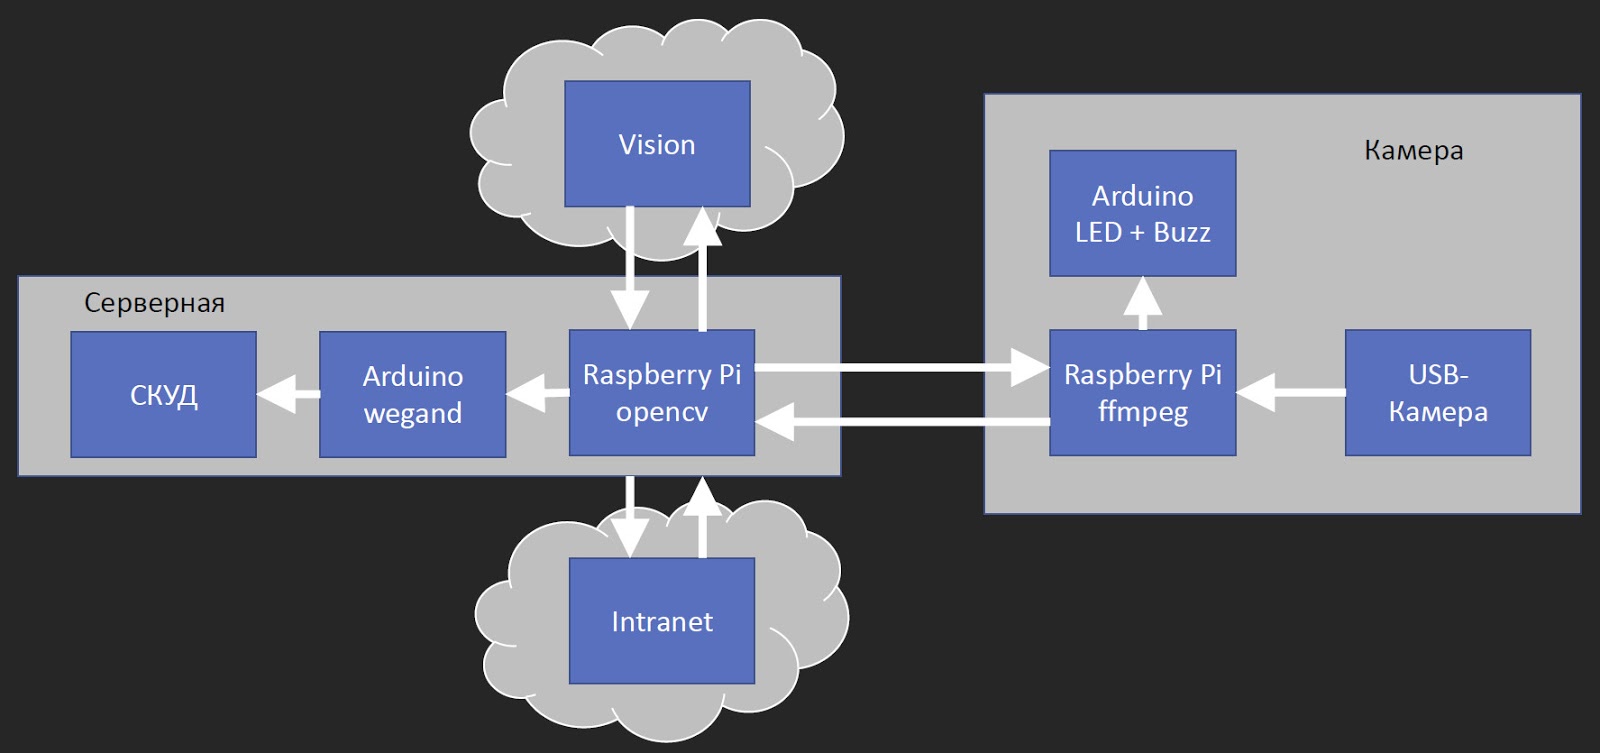
The block on the right we call the “camera” - this is the module that hangs on the door. It consists of three parts. The Raspberry Pi receives video from a USB camera, encodes with FFmpeg, and sends. We tested several IP cameras of a reasonable price range, and everyone had a noticeable delay of about 0.5 s. And since we have delays at other stages, when a person comes up, looks at the camera and nothing happens for several seconds, he already wants to make a pass. Therefore, we reduced delays wherever possible, and the Raspberry Pi with a USB camera turned out to be faster than many commercial IP cameras. Also connected to the Raspberry is a small Arduino with a multi-colored LED and a squeaker. The default LED is red. When a person comes up and is recognized, the green lights up.
So, the Raspberry Pi transmits a video stream that gets to the server via wired Ethernet. We have a server room on each floor, in which there are switches, connecting cables to the desks of employees, and a full-time access control system - an access control and management system.
We put another Raspberry Pi in the server room, which receives the video stream in real time and runs it through OpenCV. Why do we still need OpenCV? We need to determine if there is a face in the picture. The neural network that defines the person in the photo works a little longer, and it’s too expensive to constantly feed the video stream to it. Therefore, through OpenCV, we determine the presence of a face, and if it appears, then we send it to Vision. The service either answers that it did not find this employee, or sends the employee identifier in the HR database. With this employee identifier, we go to the intranet that is associated with the ACS, and it returns us the pass identifier. Further we throw this pass identifier in Arduino, which passes it to the ACS. For an access control system, this is equivalent to a person applying a pass. That is, we do not change the ACS in any way; it still logs the entry and exit of employees.
How did we integrate our system with ACS? In our office, Bolid C2000-2 devices are used.
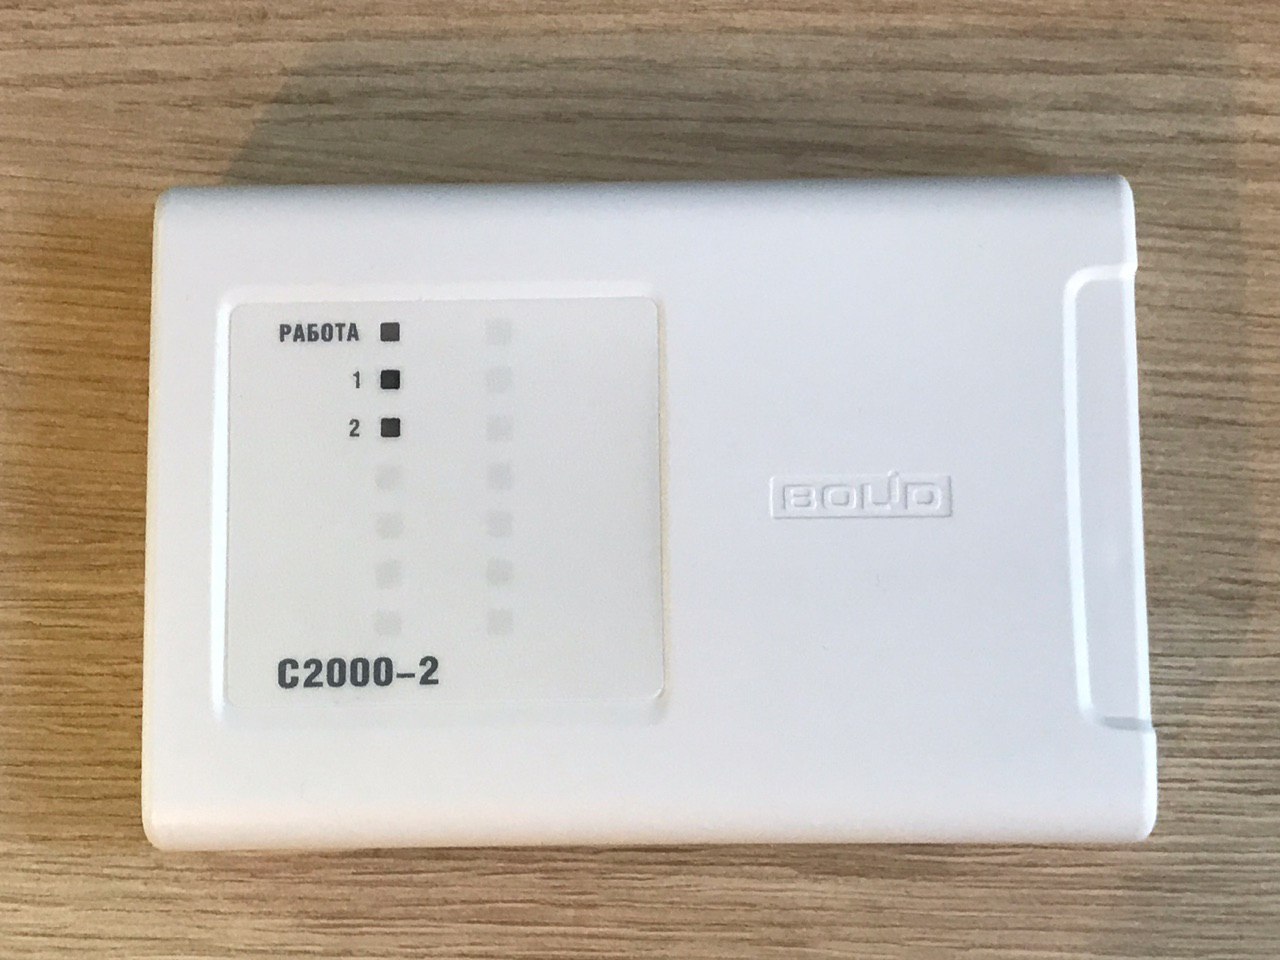
This is a domestic access control system. Most likely, you can connect to these devices through the 485th interface, but we connected via the Wiegand protocol.

We connected the Arduino, which acts as a proxy, to the pass reader installed near the door.
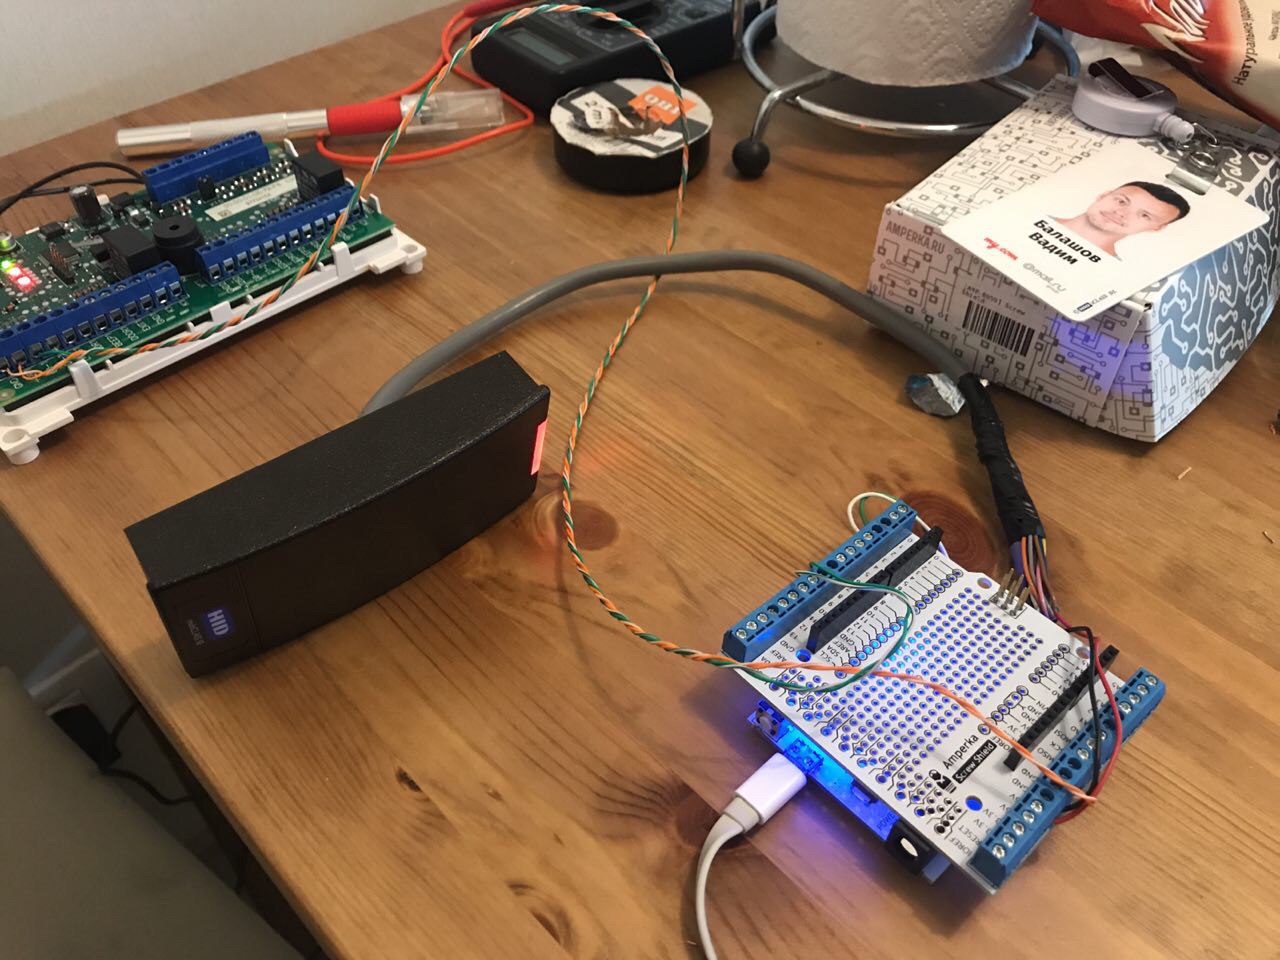
The photo shows the power connection and two data lines from the pass reader. The pad is used for a more convenient connection.
Arduino receives the pass number either from the reader or from the Raspberry Pi via USB, and gives it to the ACS. The ACS does not even know where the pass number was received from.
Wiegand
This is the standard protocol for access control systems, it is supported by most readers. The protocol is very simple: two data lines, one line of zeros and one line of units. As soon as you connect the zero line to the ground, the reader understands that zero is transmitted, the same with units. That is, the protocol does not have standardized timings, and the skip number is easy to read through an interrupt on the Arduino, it is easy to represent it as a data sequence. And since recording requires some kind of timing, I focused on these values:
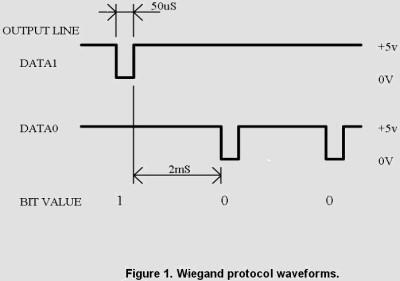
There is already a library for Arduino. She can read different Wiegand formats, but her capabilities are limited to this. And I still had to transmit. Therefore, I wrote my library, which works only with the Wiegand-26 format. 26 is the number of bits: 3 bytes of the skip number and 2 parity bits. Moreover, in all the documentation and articles it is written that, most likely, your modern controller will ignore the parity bits, so I am lazy and do not count them, but always send zero. ACS perceives this normally.
We had another problem: if someone first appeared in front of the camera, and then, without waiting for operation, applied a pass, then a race situation occurred: at the same time the pass number came from the reader and from recognition. ACS could not cope with this and did not let people in. Therefore, I had to add a ring buffer with 4 codes to the library. No matter where the codes come from, they are placed in the buffer, and then with a timeout of 0.5 s are transmitted to the ACS. Since then, colleagues have stopped complaining that they are not allowed.
Test stand
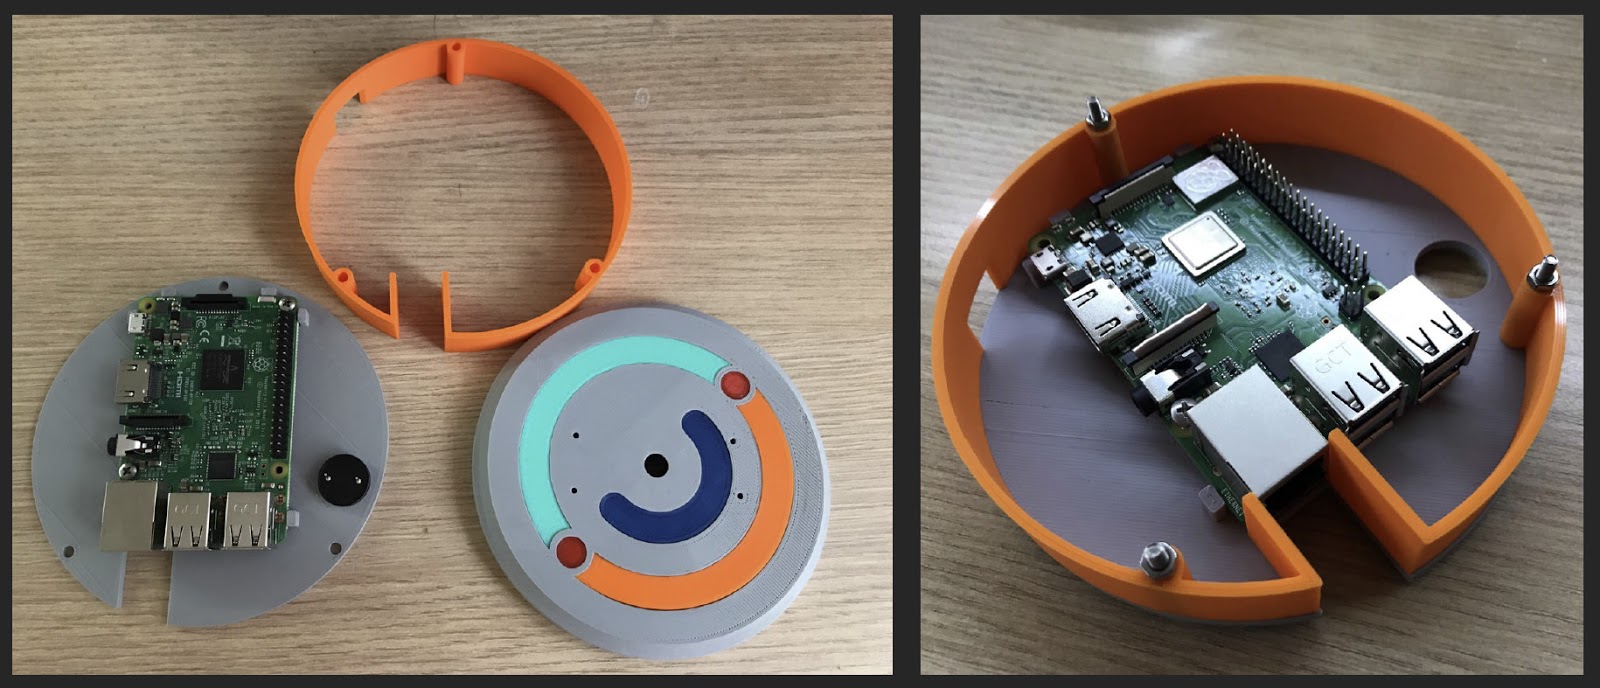
The first prototype was assembled from anything horrible. Raspberry Pi hung in a box on some ridiculous rack, and a camera was glued on top of a double-sided tape. Arduino hangs on the side screeds. In general, everything we love is very DIY.
Of course, in this form it was impossible to leave, it was necessary to issue beautifully. We talked with several contractors, they promised us to order samples in China, but then all the agreed deadlines passed, and nobody offered us anything.
Custom products have one problem - all solutions are highly specialized, they would be made specifically for us. Firstly, we become dependent on the supplier. Secondly, a unique circuit design with a small circulation is obtained, which means that the cost of one piece will be high. Thirdly, the production time is long enough, and if a copy fails, we won’t be able to quickly buy a replacement in the store, we will have to wait for the next print run, and if we do it immediately, the remaining copies will gather dust in the warehouse.
After all potential partners let us down, I went to a colleague from Vision and said: “Volodya, let me print a case on your 3D printer to make it look beautiful.” He sighed and said: “Come on. What to do?"
Camera V 1
In Fusion, I drew such a Frankenstein monster. In the corner was supposed to be a Raspberry Pi with an input for an Ethernet cable. Side entrance for power. The “second floor” was a camera. The result was a large structure, and I even printed it with a thin layer so as not to spend a lot of plastic. It looked terrible, and hanging it was even more embarrassing.
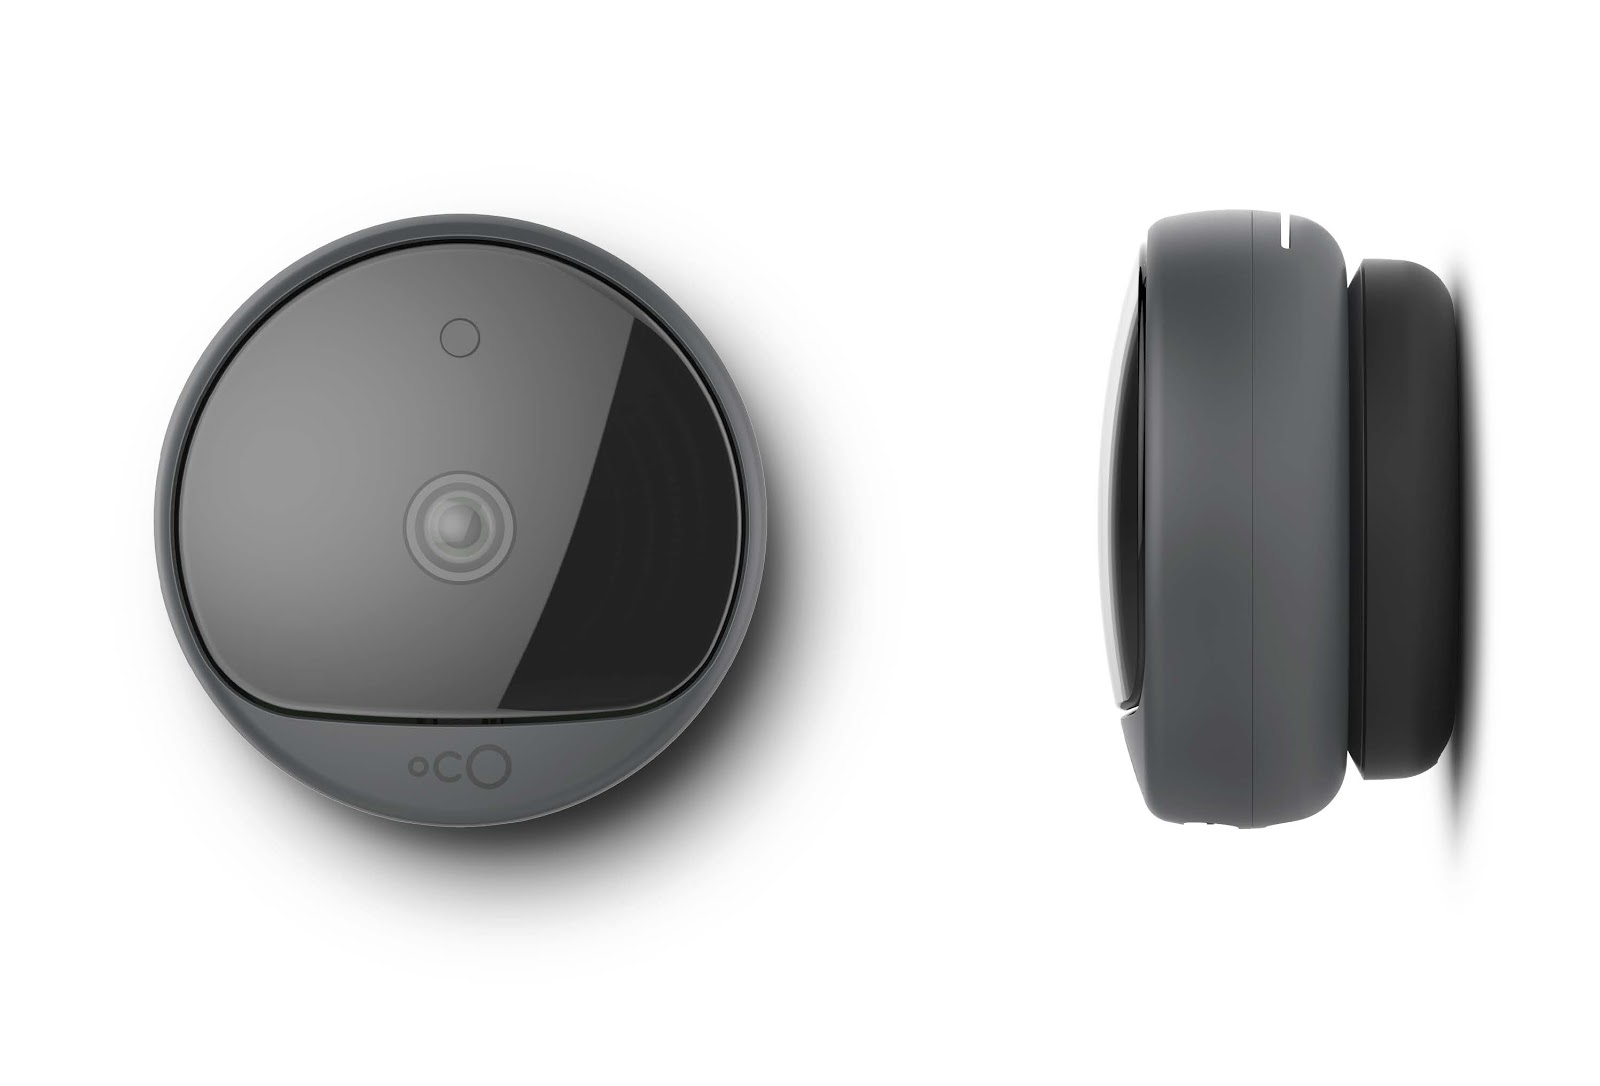
In addition, a colleague sent me such a reference, they say, we would like that. I replied that I could not do this, but decided to design another building.
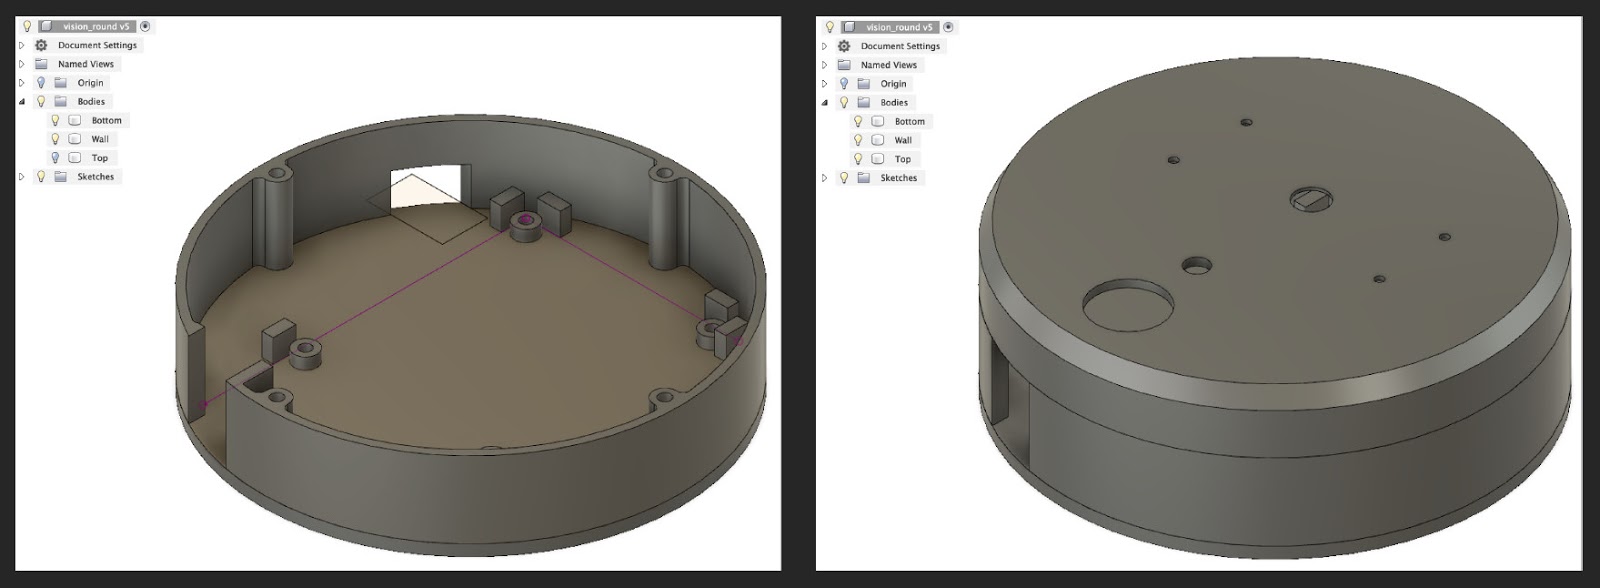
The new case was 11 cm in diameter, smaller than the CD. The placement of the filling is also two-layer. Having printed the first version, I realized that it makes no sense to put the entire USB camera in its native case. I disassembled it carefully, and it turned out that it has 4 landing holes on the front panel. I combined this panel with a camera into a common assembly with a tweeter and an LED.
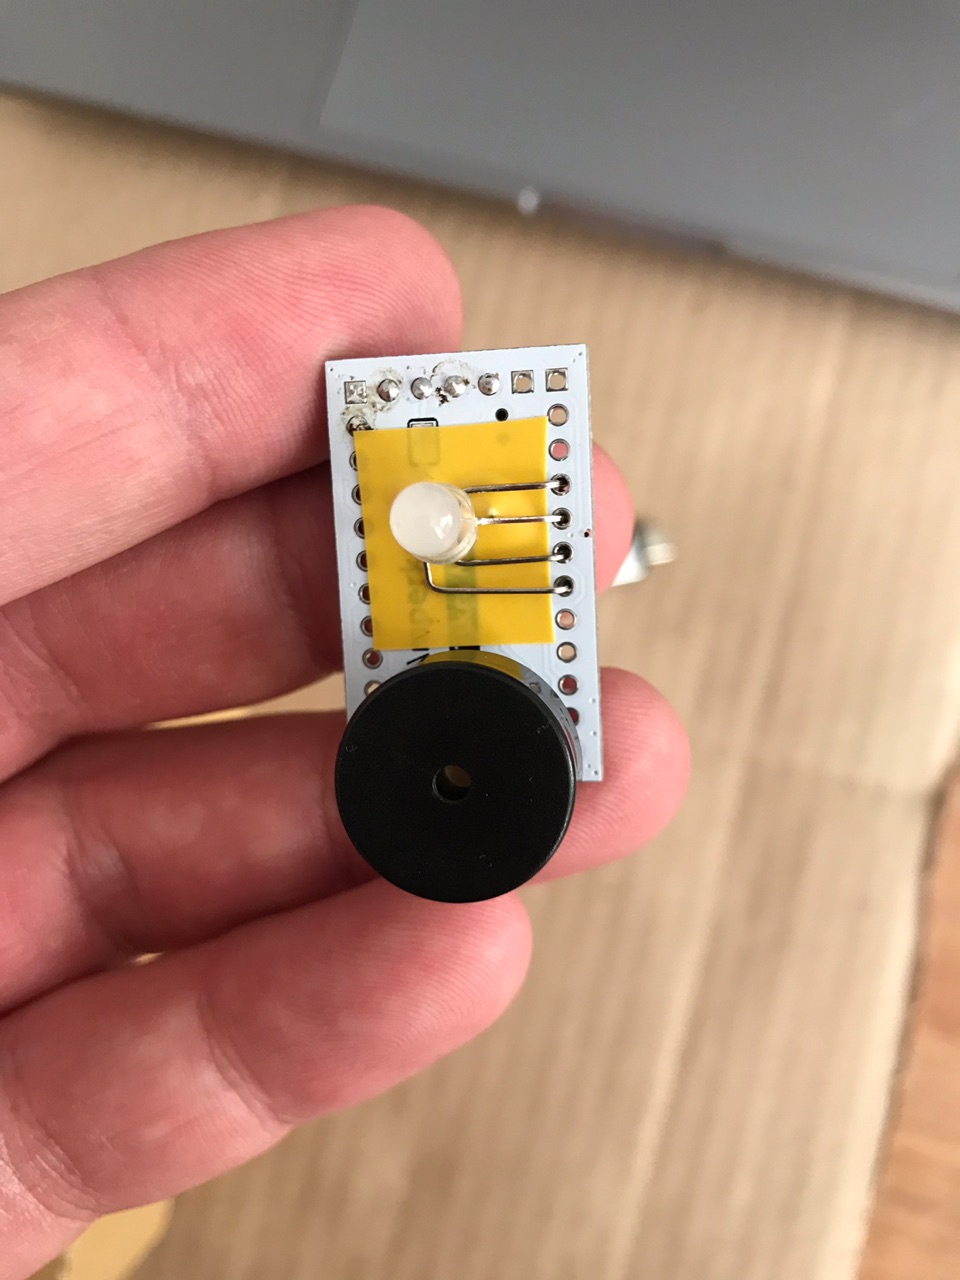
First, we tried to generate a squeak on the Raspberry Pi via gpio. It turned out extremely badly. Therefore, we decided to take this function separately from the Raspberry Pi by connecting a small arduino (actually Iskra mini), to which the squeaker and LED were soldered, through TTL directly to the block.
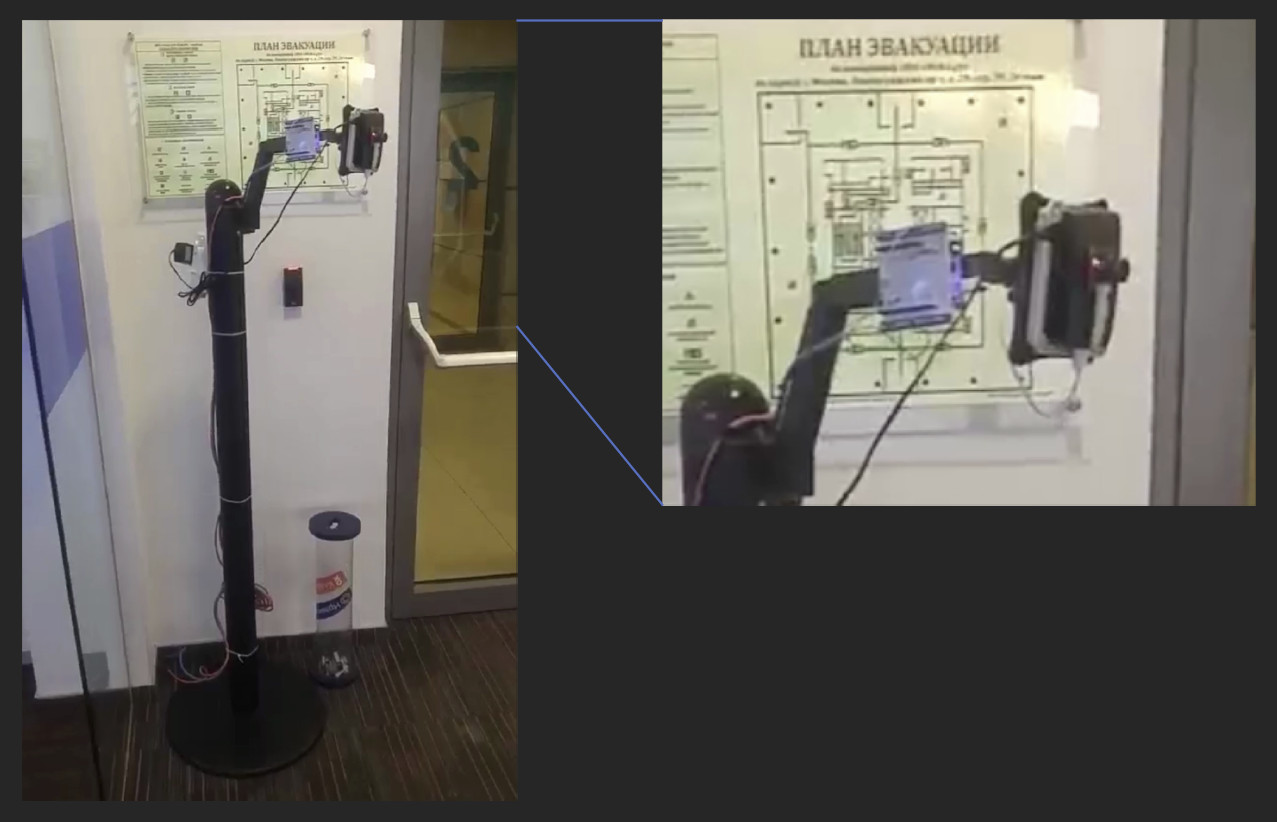
This is what it looked like in battle:
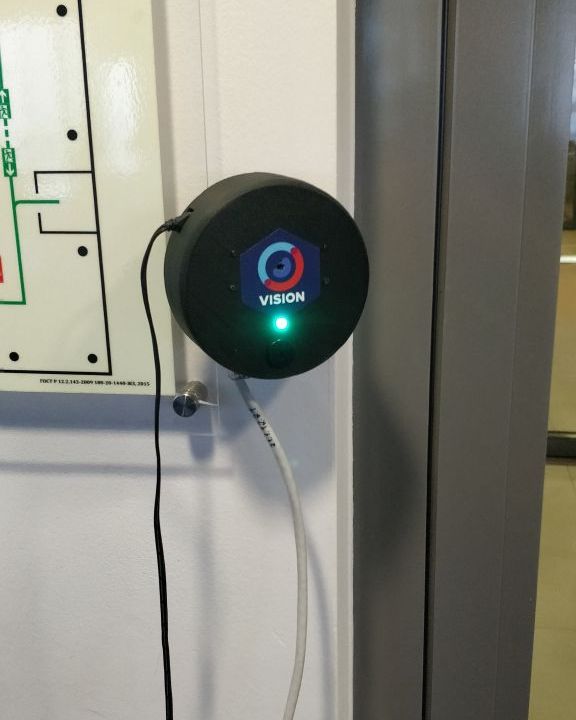
We hung the device on the floor. In this form, it lived long enough. Squealing, glowing beautifully, opening the door, however, not every time. Colleagues, however, complained that the LED is too bright. I had to weaken it 4 times.
Camera V 2
Then they made this option:
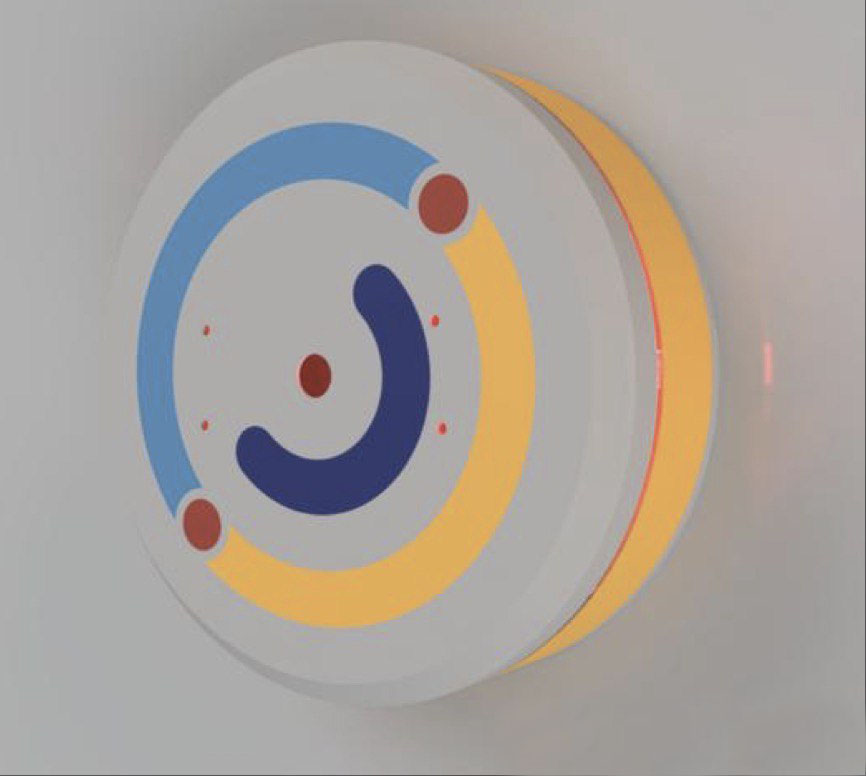
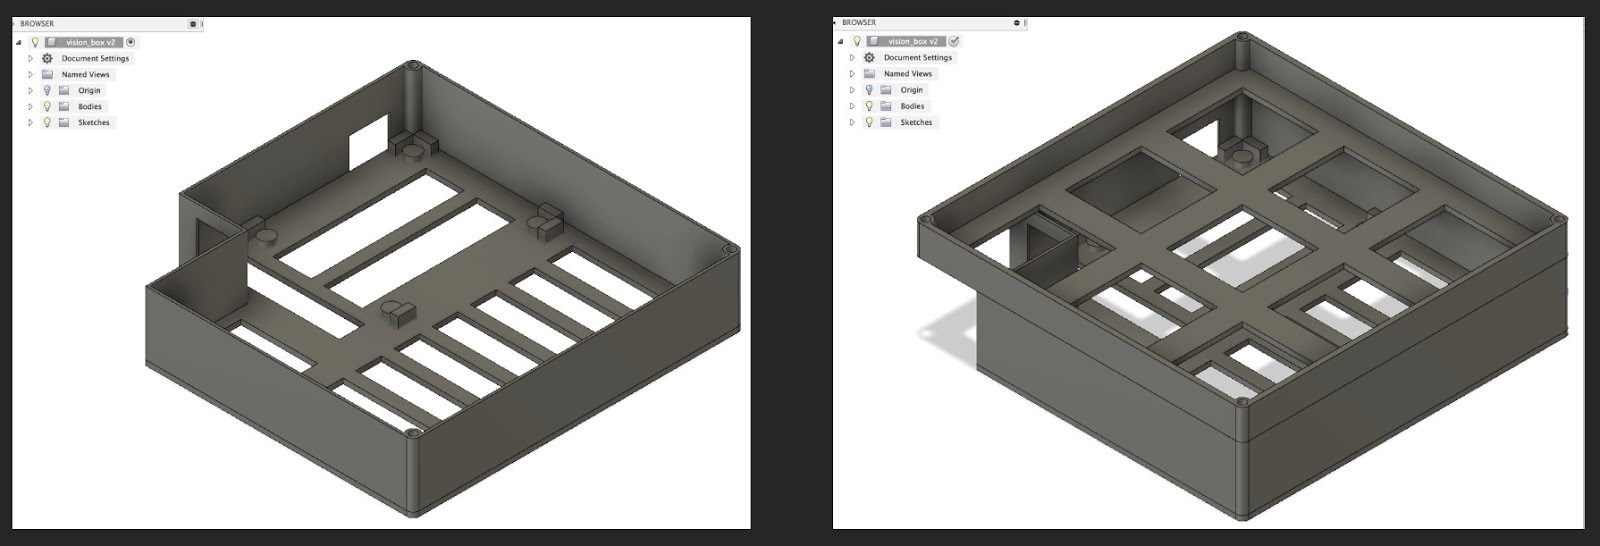
It was inspired by the design of the Xiaomi hub, with a luminous ring around the perimeter. It looks very beautiful. The Vision logo is made by individual parts printed in different color plastics. Here is the model:
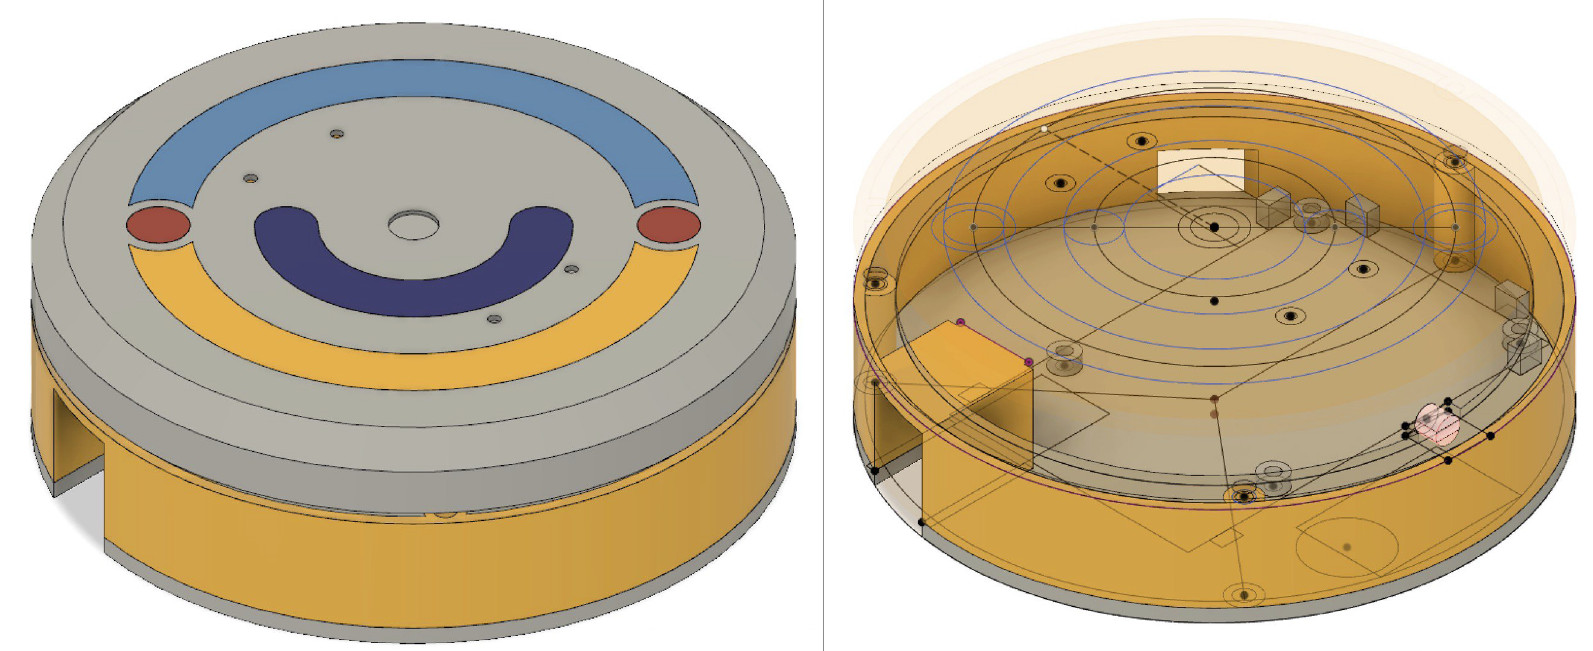
This time I put the squeaker on the back wall, mounted the LED in a transparent ring around the perimeter, printed from a transparent PLA. The decor almost immediately collapsed inside, because it was originally simply inserted on friction, and I had to put it on glue.
Camera issues
We had the idea to replicate this decision throughout the building. But there is a problem: almost all floors have two doors, and each should have two cameras, only 96 cameras for only one of our towers, and now the second one is being actively developed. Printing so many cases is possible, but it already seems complicated. In addition, we have a lot of components in the device, which means many points of failure. If we scale the solution to the entire building, we will constantly maintain these cameras. Again, the complexity of quick replacement, because each camera is a piece device. And you need to either print a lot of them, with a margin, or, if something happened, then immediately run, print and collect a new one. We realized that DIY solutions are cool, but you need something more convenient in replication. And the idea arose to transfer everything to the iPad.
IPad
IPad has several advantages. The first is the screen. Colleagues complained about the lack of feedback, they are suitable and do not understand whether recognition has begun or not, to wait for them or not to wait.
Secondly, iOS has a built-in face recognition feature. The function that OpenCV performed was passed to the iPad. A frame is displayed on the screen, and the person should come so far that the face fits into this frame. After that, the system starts to automatically recognize it, you do not need to press anything.
Thirdly, iPad is a mass product. If it fails, we set another. Although the tablet itself costs about 20 thousand rubles, it is still cheaper than the custom cameras that partners offered us. In addition, faster and more reliable.
New architecture
iPad took over most of the features. On the Raspberry Pi, which is in the server room, there is actually only an HTTP host that accepts a GET request with a pass ID. He immediately proxies the code in Arduino, and she proxies in ACS.
In the first version, the Raspberry Pi was very loaded, because OpenCV was constantly working on it. It was no longer possible to connect a second camera to it; there would not be enough computing power. We already thought about putting an honest computer there, which would parse 4 threads from two doors. But it didn’t come to that. Now the face search in the image is performed independently on each iPad. In the cross, there are two Arduino, one for each door. Both boards work with entry and exit passes. Why is it important to work with entry and exit passes? Firstly, when the face is recognized and the door opens, a green light on the card reader lights up, and colleagues understand that you can go out. Secondly, ACS logs inputs and outputs. Emulating the input and output separately, we do not break the ACS operation scheme.
Naturally, designers came up with a beautiful interface. This is how it looks now on one of the floors of our office:

Work with Vision
Despite the fact that MCS is a business product, amateurs can also use it. The service offers everyone 5 thousand free transactions per month, that is 166 per day. Therefore, you can apply for your domestic needs, if you fit in the limit, of course. How can I do that?
python examples/python/smarty.py \ -u "https://smarty.mail.ru/api/v1/persons/recognize ?oauth_provider=mcs&oauth_token=e50b000614a371ce 99c01a80a4558d8ed93b313737363830" \ -p friends1.jpg \ --meta '{"space":"1", "create_new":true}' \ -v
Take a photo and send it to Vision along with our access token. We indicate that we are working with the first space and set
create_new
- then the system will create a new identifier for each unfamiliar person. Here is what we get in response:
{ "status":200, "body":{ "objects": [ { "status":0, "name":"file_0", "persons":[ {"tag":"person1","coord":[102,30,184,134],"confidence":0.99999,"awesomeness":0.5025}, {"tag":"person2","coord":[393,74,461,166],"confidence":0.99987,"awesomeness":0.548}, {"tag":"person3","coord":[458,48,535,149],"confidence":0.99976,"awesomeness":0.4766}, {"tag":"person4","coord":[273,45,352,147],"confidence":0.99963,"awesomeness":0.504}, {"tag":"person5","coord":[525,81,600,184],"confidence":0.99954,"awesomeness":0.4849}, {"tag":"person6","coord":[194,76,258,167],"confidence":0.9984,"awesomeness":0.5725} ] } ], "aliases_changed":false }, "htmlencoded":false, "last_modified":0 }
I formatted JSON a bit. The response contains the identifier of the person, the coordinates of the face in the photo and two parameters: how well the face is recognized and how this person matches the standard. You can send a POST request with a picture in your programming language, get JSON and parse the response.
If you have a large cross, and you need to determine only a dozen people, you can set them manually. Then the system will give out identifiers for familiar people, and undefined for unfamiliar ones. People can also be selectively removed, for example, if an employee quit.
Ideas
In which projects can you use face recognition? If you want to implement a bandwidth system, you have to worry about anti-spoofing. For example, adding an infrared camera to determine whether it is a photograph or a living person. Or putting two cameras to determine the depth of the object, this can be done using OpenCV.
You can organize recognition of people in the entrance. If these are your neighbors, then everything is in order, and if someone is an outsider, you can send yourself an alert. In our house there is such a problem, strangers come from time to time and leave a lot of garbage after themselves on the landing.
If you make a “smart mirror”, then you can equip it with recognition of family members, so that everyone can show what is interesting to him. Let’s say the mirror will show me the schedule of meetings for today, and my daughter will greet me cheerfully and offer to brush my teeth, and not quickly, as usual, but two minutes.
Another idea is the recognition of a license plate by an automatic gate in the country. In order not to go out or press the key fob, you can put a camera that will remove your number, and the gate will open automatically.