Warning: the project in the video is just a sample that can be done according to the tutorial in the article regarding stereo vision and “head turns”. Tanks with xbox remote are not included.
Despite the clarity, the meager story of the author of the project on the video and the availability of links, right away to figure out how it all works is not easy. If you want to collect something similar and in a much more convenient format, it is recommended to read.
* I’ll immediately make a reservation, the person on the video with YouTube is unfamiliar to me, I didn’t transmit any secret data, what is the state of his project now, I don’t know.
** We will not control the movement of the robot on raspberry on the surface through the remote control from xbox, we can deal with this on our own.
*** Please do not throw bast shoes, as the project is still in development.
So, we are interested in two things:
- how to get a stereo picture on the phone in a helmet;
- how to control the servos by turning the head.
The concept that is used in the video, if summarized, looks like this:
- 2 raspberry pi send video streams to the network from their cameras via webrtc services;
- the phone (in the helmet) accepts streams in 2 identical applications on the phone - float apps.
- at the same time, the phone controls the servers connected to raspberry.
Everything is simple. But diablo, as you know, is in the details and inconveniences, namely:
- you need to run 2 raspberry, monitor the settings of 2 cameras, power raspberry * 2.
- float apps constantly slide in the phone, you have to align the pictures on the screen.
- ...
Therefore, we will transfer to stereopi, fortunately, it appeared in Russian stores (I hope it won’t disappear after this post):
Stereopi is the development of our compatriot, who is now actively conquering the market.
Its charm follows from the name - you can connect 2 CSI raspberry pi cameras at the same time. At the same time, all this works on the basis of one raspberry pi Compute Module. Unfortunately, the module itself is not included;
About stereopi there are articles on Habré.
From it we need 2 video streams and control of servers through GPIO.
As the base for stereopi we will use the Raspberry Pi Compute Module 3+.
Stereopi preparation
After assembling stereopi (inserting the compute module into stereopi, cameras), fill in the software.
We use the ready-made image for raspberry pi compute module - Raspbian (stretch). It is available at stereopi.com - Raspbian Stretch OpenCV image, Google Drive
Fill it with raspberry.
If there are difficulties with filling, others go to wiki stereopi .
Installing webrtc.
Install the webrtc software on stereopi. Partially the installation material is taken from this page: Installation for ARM (Raspberry Pi)
We will avoid unnecessary comments that are already on the above page and simply install everything that is required.
curl http://www.linux-projects.org/listing/uv4l_repo/lpkey.asc | sudo apt-key add - sudo nano /etc/apt/sources.list deb http://www.linux-projects.org/listing/uv4l_repo/raspbian/stretch stretch main sudo apt-get update sudo apt-get install uv4l uv4l-raspicam sudo apt-get install uv4l-raspicam-extras sudo raspi-config Anvanced Options Memory Split 256 enter sudo apt-get install uv4l-server uv4l-uvc uv4l-xscreen uv4l-mjpegstream uv4l-dummy uv4l-raspidisp sudo apt-get install uv4l-webrtc sudo apt-get install uv4l-demos sudo apt-get install uv4l-xmpp-bridge sudo apt-get install uv4l-raspidisp-extras
Now we need to (in the instructions, have this) generate the ssl keys, since Chrome may not show the video through the http connection (only via https):
openssl genrsa -out selfsign.key 2048 && openssl req -new -x509 -key selfsign.key -out selfsign.crt -sha256
* when generating keys, questions will be asked about the company, region, etc. - You can answer them arbitrarily.
The generated keys (selfsign.key and selfsign.crt will appear in the current folder) should be put in the folder:
/etc/ssl/private/
All webrtc settings are stored in 2 files:
/etc/uv4l/uv4l-raspicam.conf /etc/uv4l/uv4l-raspidisp.conf
In order not to tire of listing items in files that need to be uncommented or
tweak, overwrite the configuration files with your uv4l-raspicam.conf and uv4l-raspidisp.conf.
Reboot raspberry and log in to the ip raspberry using chrome:
https://192.168.1.100:8080
WebRTC is a whole fan of possibilities, but we will limit ourselves to one thing - we will go to the webrtc tab:
picture 
Now check if the video works with stereopi.
Press the “Call” button at the bottom of the web page on the phone.
picture 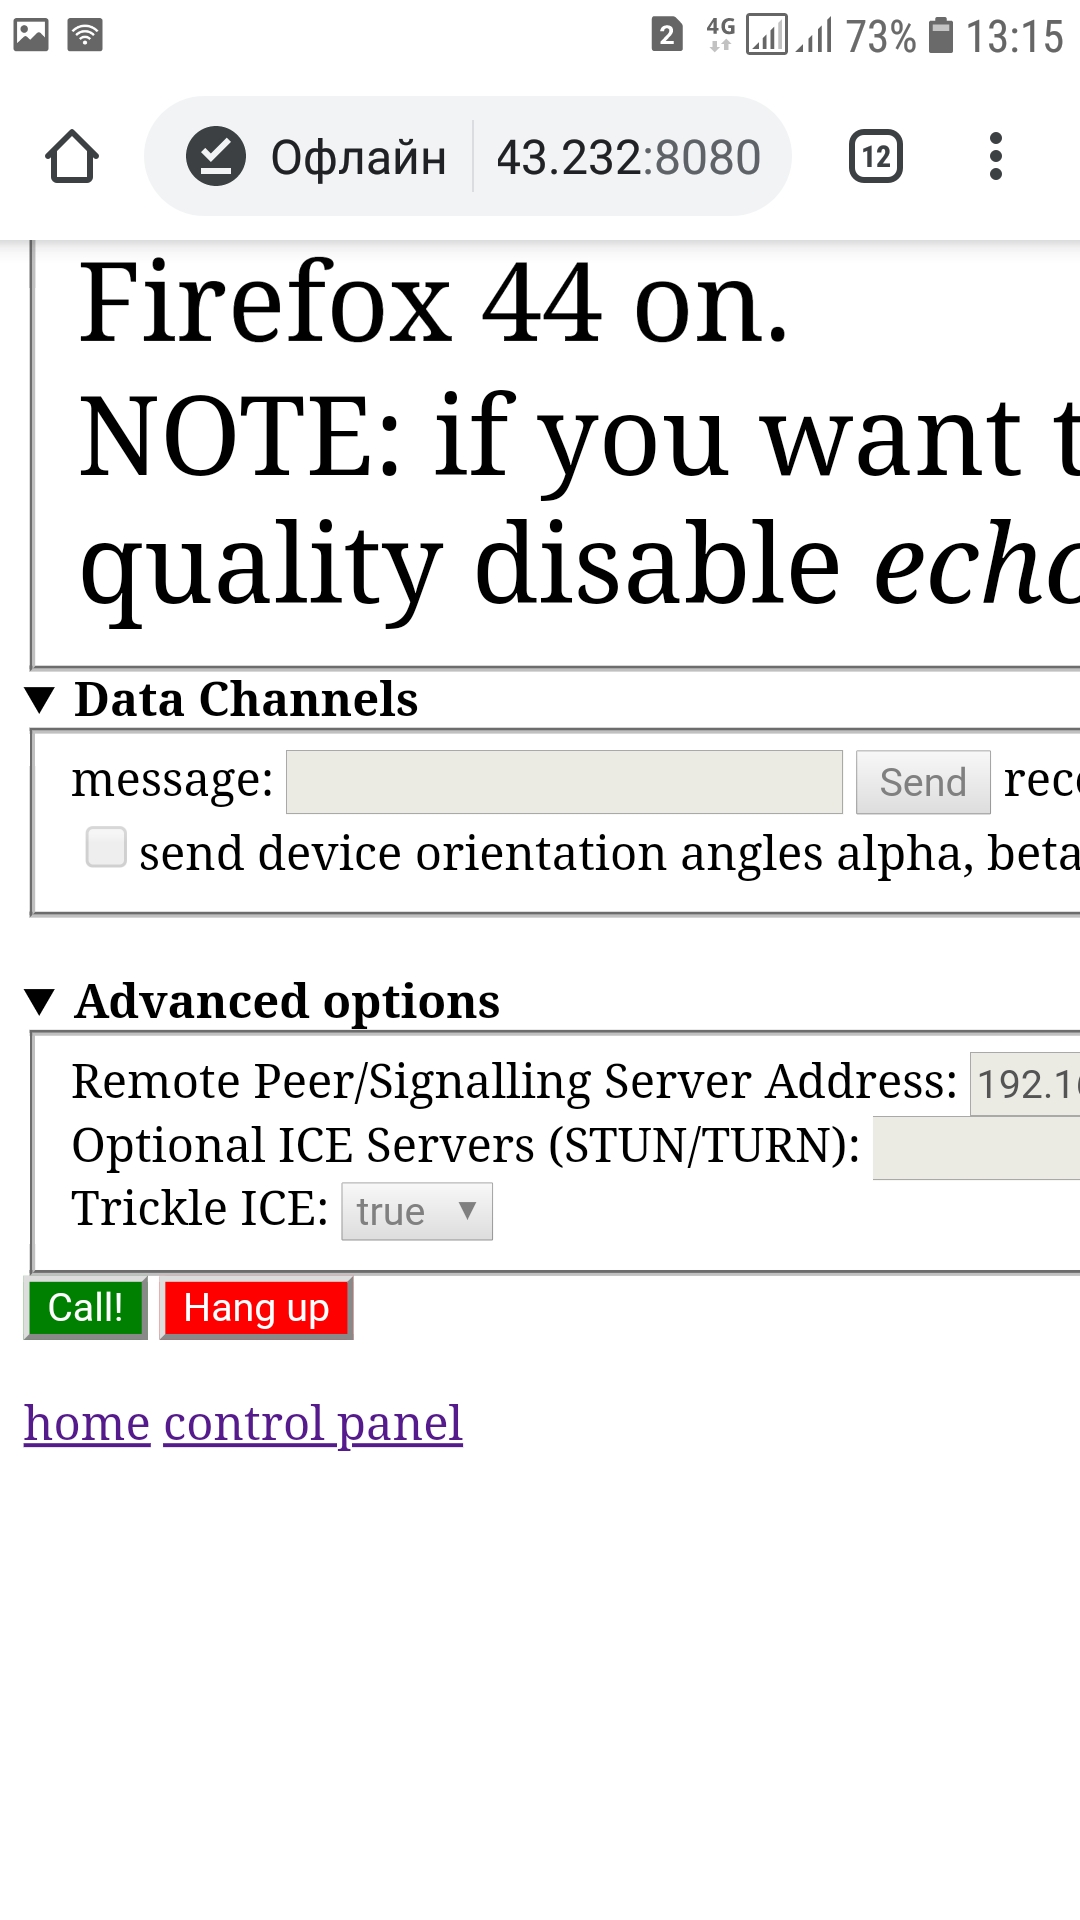
A video from the stereo cameras should appear.
Click on the “Fullscreen” button under the window with the image from web-cameras:
picture 
* Do not reload the page on the phone! If this still happened, you need to kill the processes on raspberry:
sudo killall uv4l
And restart the services on it:
sudo service uv4l_raspidisp restart sudo service uv4l_raspicam restart
Then again, on the page in the phone’s browser , click “Call”.
** Call will not work if no camera is connected to raspberry.
We will deal with the servos.
To control the servos on raspberry from the phone, you need a code that will run on raspberry and actions on the phone.
But first, decide on the servos. The YouTube video uses servos connected directly to gpio raspberry. Since the servos are low-power, you can probably hang 2 servos on gpio raspberry. These tricks can easily be performed on sg-90 servers. They are not demanding in nutrition, but also not particularly good for loads. In principle, they should be enough to hold a suspension with two cameras from stereopi. The gimbal itself can be bought on the same aliexpress, for the search “pan-tilt”. However, these servos also have a serious minus - they "tremble with fear." It is this effect that the author of the YouTube video observes. Why this is happening and what to do with it will not be considered here.
In our case, the mg-996n servos and the robot joint are used, which I hope he will not need in the near future.
Picture 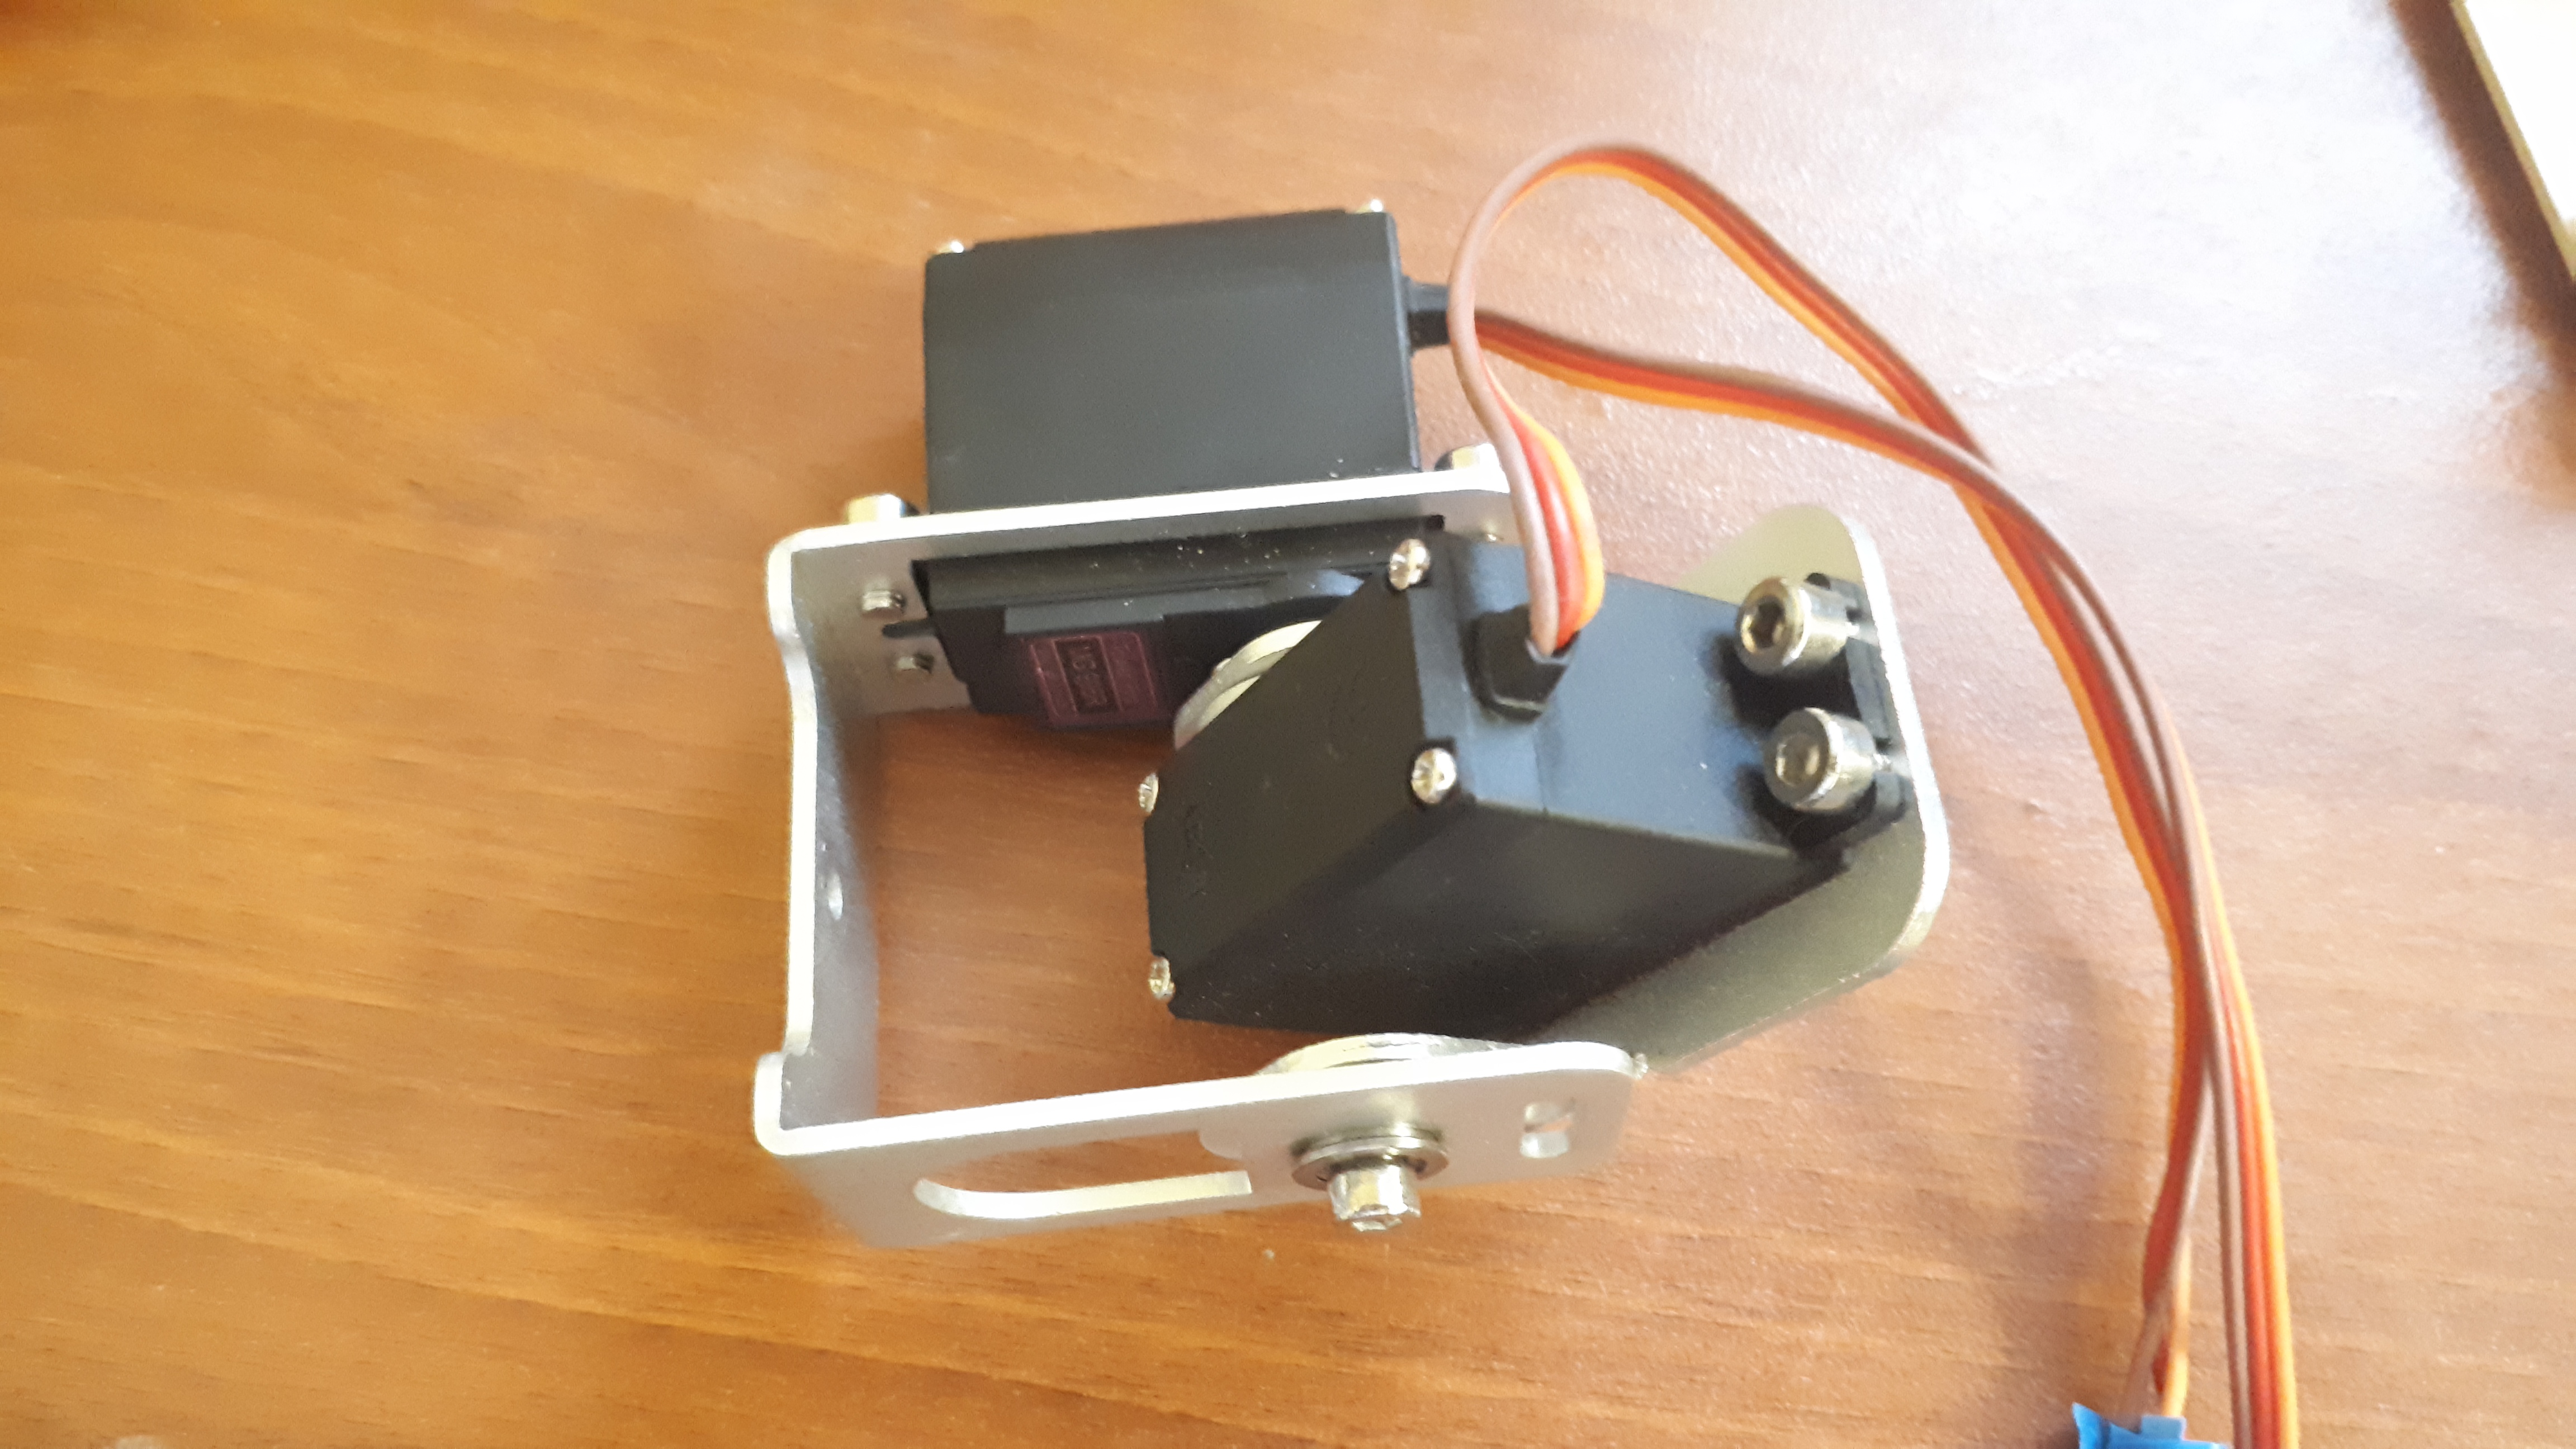
* Mg-996N does not “tremble”.
Stereopi has a gpio layout similar to the standard on raspberry 3 .
Therefore, the signal wires from the servos will go to gpio, and it is better to take 5V not from raspberry, but from the side, combine GND serv with GND raspberry and GND of an external source.
Now the most important thing is software
On raspberry we need a demon, but not Lermontov’s, but pigpio. You don’t need to take any special steps to configure it, the main thing is to know that it hangs on port 8888 and you must first run it:
sudo systemctl start pigpiod.service
Next, create a file that will manage the servers, receiving data from the socket, which it itself creates:
datachannel_server_tele.py
# python 3 # Taken from: # https://stackoverflow.com/questions/45364877/interpreting-keypresses-sent-to-raspberry-pi-through-uv4l-webrtc-datachannel # based on: # https://raspberrypi.stackexchange.com/questions/29480/how-to-use-pigpio-to-control-a-servo-motor-with-a-keyboard # public domain # systemctl status pigpiod.service # sudo systemctl start pigpiod.service # goto http://raspberrypi:8080/stream/webrtc and press Call! # video from raspberry pi appear # run from cmd raspberry: sudo python3 datachannel_server.py # turn on gps on phone # put V on 'send device orientation' from phone import socket import time import pigpio import os import re import json socket_path = '/tmp/uv4l.socket' try: os.unlink(socket_path) except OSError: if os.path.exists(socket_path): raise s = socket.socket(socket.AF_UNIX, socket.SOCK_SEQPACKET) ROLL_PIN = 4 #gpio PITCH_PIN = 17 #gpio ! not phisical pin YAW_PIN = 15 MIN_PW = 1000 # 0 degree MID_PW = 1500 # 90 degree MAX_PW = 2000 # 180 degree print ('socket_path: %s' % socket_path) s.bind(socket_path) s.listen(1) def cleanup(): pi.set_servo_pulsewidth(ROLL_PIN, 0) pi.set_servo_pulsewidth(PITCH_PIN, 0) pi.set_servo_pulsewidth(YAW_PIN, 0) pi.stop() while True: print ('awaiting connection...') connection, client_address = s.accept() print ('client_address %s' % client_address) try: print ('established connection with', client_address) pi = pigpio.pi() #pi = pigpio.pi('soft', 9080) rollPulsewidth = MID_PW pitchPulsewidth = MID_PW yawPulsewidth = MID_PW pi.set_servo_pulsewidth(ROLL_PIN, rollPulsewidth) pi.set_servo_pulsewidth(PITCH_PIN, pitchPulsewidth) pi.set_servo_pulsewidth(YAW_PIN, yawPulsewidth) while True: try: data = json.loads(connection.recv(200).decode('utf-8')) # dict except ValueError: # no data return continue # data #{"do":{"alpha":0.1,"beta":-0.3,"gamma":-0.2,"absolute":false}, # "dm":{"x":0,"y":0,"z":-0.2,"gx":0,"gy":0,"gz":-9.6,"alpha":-0.1,"beta":-0.1,"gamma":0.1} #print ('received message"%s"' % data) #print ('received message"%s"' % data['dm']['x']) # coordinate x from data #print ('received message"%s"' % data['dm']['y']) # coordinate y from data time.sleep(0.01) key1 = float(data['do']['alpha']) # os x 0 to 360 degree #key2 = float(data['do']['beta']) # os y #print(key1) #print(key2) rollPW = rollPulsewidth pitchPW = pitchPulsewidth yawPW = yawPulsewidth pitchPW = key1*5+500 print ('x: '+str(pitchPW)) #if pitchPW > MAX_PW: # pitchPW = MAX_PW #elif pitchPW < MIN_PW: # pitchPW = MIN_PW #rollPW = int(key2 + 1000) #print ('y: '+ str(int(rollPW))) #if rollPW > MAX_PW: # rollPW = MAX_PW #elif rollPW < MIN_PW: # rollPW = MIN_PW if rollPW != rollPulsewidth: rollPulsewidth = rollPW pi.set_servo_pulsewidth(ROLL_PIN, rollPulsewidth) if pitchPW != pitchPulsewidth: pitchPulsewidth = pitchPW pi.set_servo_pulsewidth(PITCH_PIN, pitchPulsewidth) if yawPW != yawPulsewidth: yawPulsewidth = yawPW pi.set_servo_pulsewidth(YAW_PIN, yawPulsewidth) #if data: #print ('echo data to client') #connection.sendall(str(data)) #else: #print ('no more data from', client_address) #break finally: # Clean up the connection cleanup() connection.close()
Comments are left in the text to understand where the code came from and what else can be corrected.
The general meaning of the code is as follows:
- at start, the servos are set to the middle position.
- There are 3 pins (gpio) on which the signal wires of the servos hang. In our case, 2 pins (suspension of 2 servos).
- gpio are controlled by applying a signal in the PWM range from 1000 to 2000.
- a line arrives from the phone that is parsed by json (you can do something else), then the values x and y are taken from it. Next, these values are translated into PWM values to rotate the servos.
* The problem is that x takes values from 0 to 360 (the phone rotates around its axis), like y. And these values must be bound to PWM, which take values from 1000 to 2000. The code uses the formula pitchPW = key1 * 5 + 500. 500 is the minimum PWM servo value (although the assumption is 1000 in the code). And multiplying by 5 is conditional. This point needs to be improved, since at x = 360, the PWM value is many times higher than the maximum. Servos are protected from exceeding the maximum rotation angles in order to avoid damage, but this is not very pleasing.
Run the code in the raspberry terminal:
sudo python3 datachannel_server_tele.py
We’ll turn on GPS on the phone (each phone has a corresponding icon in the settings) and go over ip raspberry.
https://192.168.1.100:8080/stream/webrtc
Click “Call.” After the connection is established, on the phone in the browser on the page, check "send device orientation angles alpha, beta, gamma".
The x values will go to the terminal with the script. And, if you rotate the phone, they will change.
Servos will also move.
* Currently one of them (the second is commented out).
Of the nice bonuses webrtc also gives you the opportunity :
- create a kind of teleconference between the phone and raspberry (your interlocutor will be voluminous),
- broadcast sound in both directions (not tested, but taken into account in the settings),
- stream to a web page, youtube in 3d.
- create a conference call from several friends (jitsi meet).
- change the camera settings on the fly through the web-interface (why does rotate! &? not work).
Now about the sad.
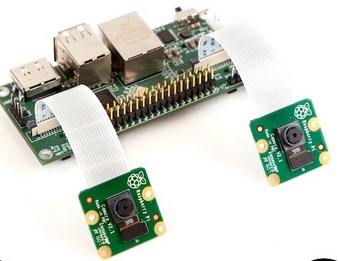
1. Shalturit by connecting two different cameras with fish eyes on the school ruler did not work. It turns out that fish have different eyes. We need the same type of camera:

2. It was not possible to expand the picture from the stereo cameras via the webrtc web-interface settings. While the pictures are narrowish, like a Frenchman's pants.

3. The MG996N servo is limited to -180 rotation angles. In fact - 160. Perhaps someone will advise with 360, but without continuous rotation.
4. Software requires grinding.
5. Call sometimes falls off, you have to reconnect.
Application: