Even if the system is assembled correctly and boiled up good code is written, the probability that everything will work as it should, is approximately 50/50.
There can be three reasons for this:
- Solderless breadboards
- Electric motors
- GSM Communication Modules
And if in the first case it’s enough to pick up a soldering iron (which I’m doing from the very beginning), then electromagnetic interference is a problem that cannot always be solved by shielding and power filters.
Under the cut - the most simple and "wireless", as you understand from the photo, a way to change Arduino's fuse, by switching to the internal RC generator and turning off the power control.
And if I “spied” the solution with the generator on modellers using powerful engines, then I came to the second myself, even before I met Arduino.
Since the first design was an irrigation indicator, consuming 0.5mA in the active phase (for 1MHz and 2.4V power supply).
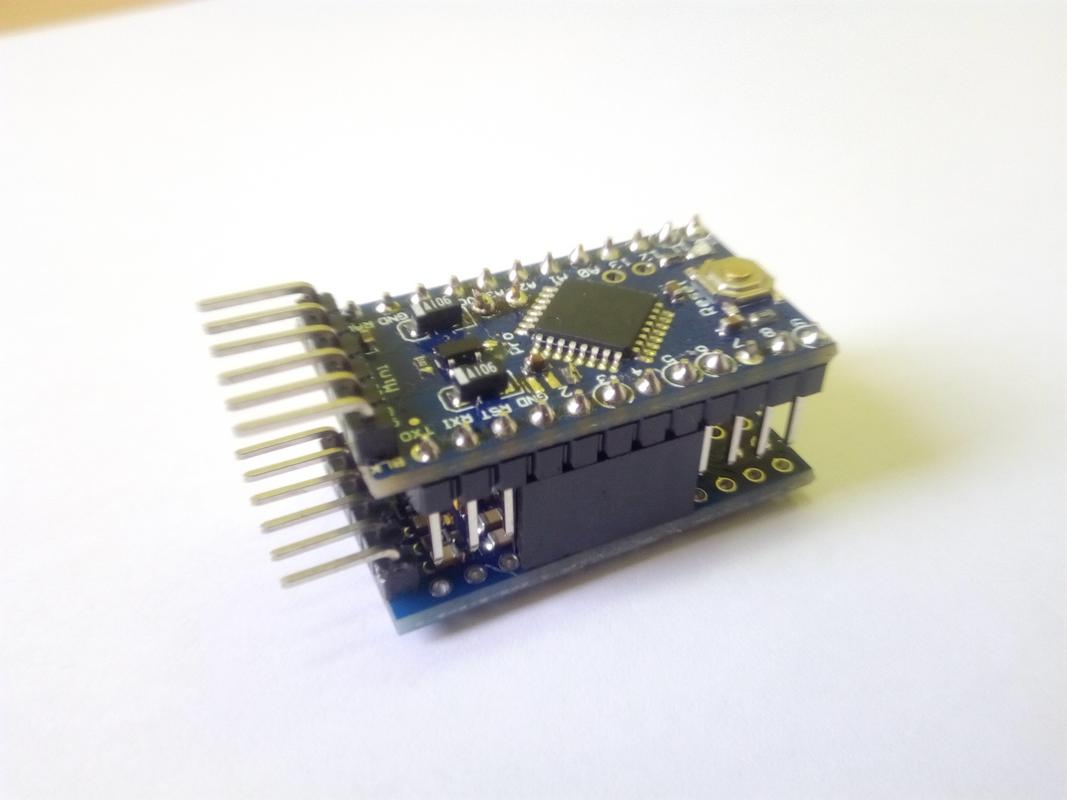
Why ProMini boards? they do not contain anything superfluous (except for LEDs ;-)

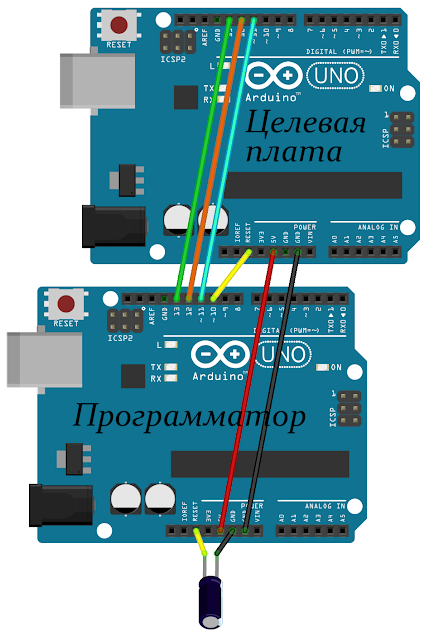
Why did you make a stable decision on an ongoing basis by remaking one board for the programmer?
If you have to do something more than three times, then I try to automate / simplify it!
And you must admit, it’s not serious to poke postings every time.
Looking ahead, I’ll say that I tested the results on my SMS scales.
And if earlier it was worth the communication module to register in the GSM-900 standard, then with a distance between it and Arduinka less than a meter, the controller began to start.
Now everything is OK, at different locations where this effect was observed.
All we need is a comb of PBS connectors, a thin scalpel and a magnifying glass:

With a scalpel, we cut the reset path (in a blue circle), and in no case do we solder the connectors to the places indicated by the yellow oval.
Yes, we connect the D10 pin with the trimmed reset by any twisted pair segment.
In fact, we get this (honestly copied from the Internet) scheme:
Only much more compact, without wires and capacitor, because it works.
Now we connect our future programmer to USB-TTL, in ArduinoIDE we set the board type and port, we flash the ArduinoISP sketch from the examples (do not forget to uncomment the line #define USE_OLD_STYLE_WIRING)
In the \ arduino-your_version \ hardware \ arduino \ awr folder, edit the BOARDS file, instead of the Arduino Pro or Pro Mini block, put the following:
## Arduino Pro or Pro Mini (3.3V, 8 MHz INTERNAL) w/ ATmega328P ## --------------------------------------------------- pro.menu.cpu.8MHzatmega328=ATmega328P (3.3V, 8 MHz INTERNAL) pro.menu.cpu.8MHzatmega328.upload.maximum_size=30720 pro.menu.cpu.8MHzatmega328.upload.maximum_data_size=2048 pro.menu.cpu.8MHzatmega328.upload.speed=57600 pro.menu.cpu.8MHzatmega328.bootloader.low_fuses=0xE2 pro.menu.cpu.8MHzatmega328.bootloader.high_fuses=0xDA pro.menu.cpu.8MHzatmega328.bootloader.extended_fuses=0xFF pro.menu.cpu.8MHzatmega328.bootloader.file=atmega/ATmegaBOOT_168_atmega328_pro_8MHz.hex pro.menu.cpu.8MHzatmega328.build.mcu=atmega328p pro.menu.cpu.8MHzatmega328.build.f_cpu=8000000L
Then I changed low_fuses FF> E2 (switch to the internal generator) and extended_fuses FD> FF (prohibition of power control)
That's it, restart ArduinoIDE, put the donor in our programmer, disconnect the DTR wire from USB-TTL (unless of course you have one ;-)
In the Tools-Programmer section, select "Arduino AS ISP", board type Arduino Pro or Pro Mini (3.3V, 8 MHz INTERNAL) - Flash bootloader.
Everything! I will not bother with unnecessary checks using avrdude and other tricks and so described in dozens of manuals - I wanted to give the most simple material.
In the title photo, by the way, there is a board with an already soldered ceramic resonator.
An additional bun - sketches in arduinki can be flashed without pressing reset - by Ctrl-Shift-U (Unload using the programmer)
In addition to noise immunity, this method eliminates the failure of the generation of ordinary quartz during shaking and shock.
Minus - accuracy of timers + -5%.
Successful to you projects!
Andrey.