If your work requires keeping a lot of SSH sessions to different servers, you probably know how they break easily when switching to another Wi-Fi or when the Internet is temporarily lost. But what if I tell you that all these problems have long been resolved and you can forget about broken sessions and constant reconnections?
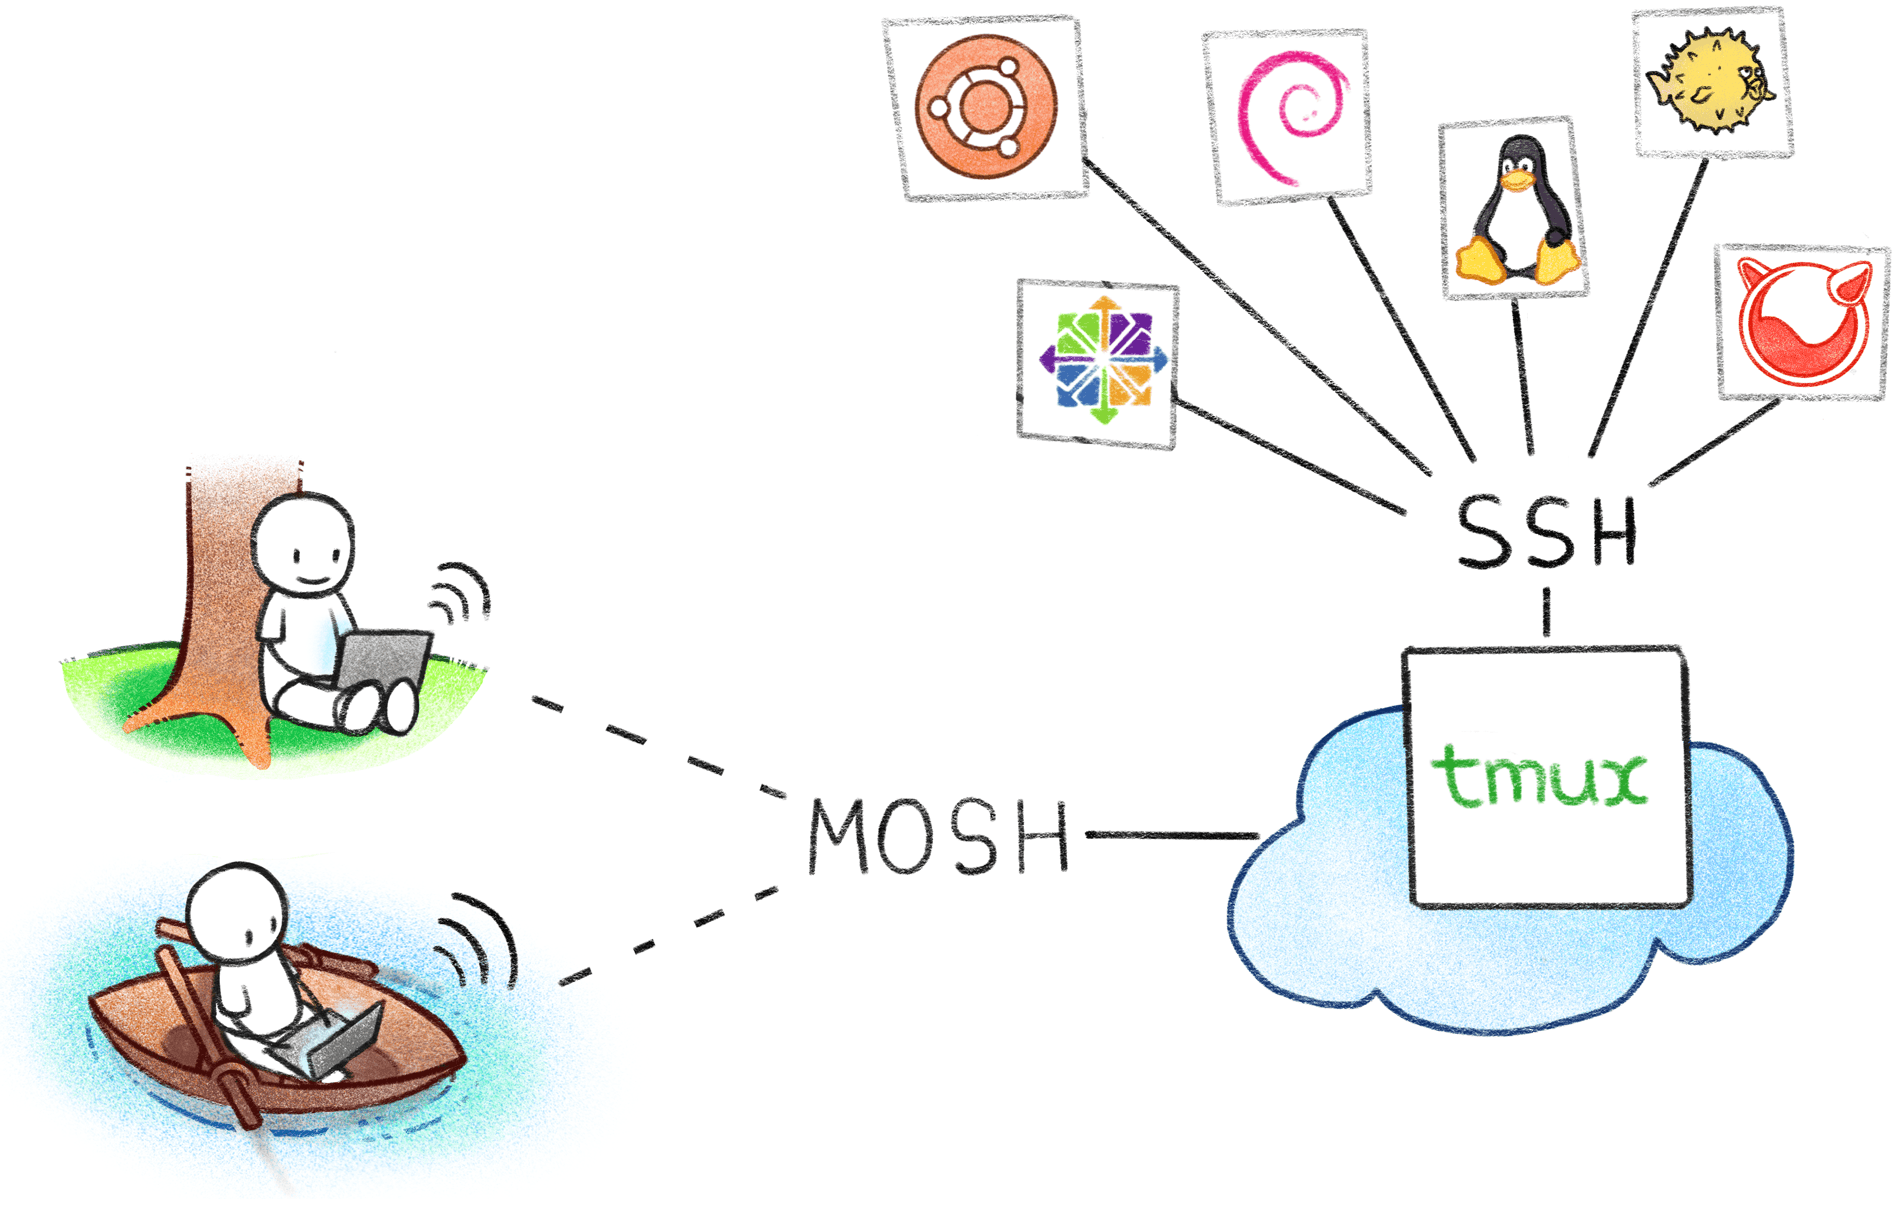
Opening the lid of the laptop, all my dozens of SSH sessions are immediately available and in the same state as I left them. This article describes how to configure a terminal server for a system administrator. Using such a server allows you to forget about broken SSH sessions, constantly reconnecting and entering passwords.
Server Tuning
The idea is simple and clearly illustrated in the picture in the post title: we will keep all SSH connections on a special terminal server. This server will be our entry point for managing other servers. At the same time, the final servers do not need to configure or install additional software.
Almost any configuration is suitable for a terminal server, but it is better to have more RAM to store the console log inside each session and to be able to scroll up the history at any time and see what you did on the session server a month ago. Usually 1-2GB of memory is enough.
Distribution choice
In the terminal server, the most important thing is uptime, because the less often we reboot, the more our SSH sessions live. Therefore, we choose the most conservative LTS (Long Term Support) distribution, for example, a stable debian or ubuntu branch. We configure automatic updates (unattended-upgrades) so that a sudden restart of programs is not a surprise.
SSH server setup
Since the terminal server will open access to all our servers at once, it will be safe to secure it. To do this, we prohibit authentication using passwords, leaving only access using keys, and we also prohibit logging in as root.
First you need to create a new user in the system.
/ etc / ssh / sshd_config
..... # root PermitRootLogin no # , ChallengeResponseAuthentication no # , PAM UsePAM no ....
Such a configuration is quite enough to protect against mass enumeration of passwords, since the SSH server will simply close the connection when trying to log in with a password. Even with a large number of connections, they will close quickly enough without creating a significant load on the server. In my opinion, with this configuration there is no need to install additional security features like fail2ban.
Often, beginning administrators in their manuals advise changing the SSH port and installing some kind of non-standard one like 2222 instead of 22 . In my opinion this is a bad practice that does not add any security.
- This will not allow you to protect yourself from password cracking, as automatic scanners will still find SSH on any port and begin to hammer.
- This makes a mess if several people administer the system and each invents its own ports. When there are dozens of such systems, you have to look for the scanner on which port the SSH is hidden this time.
- This breaks the built-in security restrictions in programs. For example, web browsers will not connect to port 22 if you explicitly specify it in HTTP, but at the same time connect to another non-standard port. This can be used to trigger IDS / IPS DDoS systems.
Tmux - one window to rule all
Tmux is an incredibly convenient program for managing virtual terminals, without which I simply can not imagine my work. At first it seems confusing and complicated, but if you overpower yourself and learn how to use it, you can no longer refuse it.
For those who do not know what tmux is, imagine a tabbed web browser, but instead of sites there are console sessions. You can open an infinite number of tabs and in each tab run your program. At the same time, it is running on the server, and you can disconnect from it at any time, while all running tabs and programs will remain in their place and you can return to them.
Install tmux if it is not already installed:
apt install tmux
In tmux terminology, a separate set of windows is called a session. We will use only one session by default, therefore we will not use session names at all. But it is important to know that there can be more than one if necessary.
Create a new session:
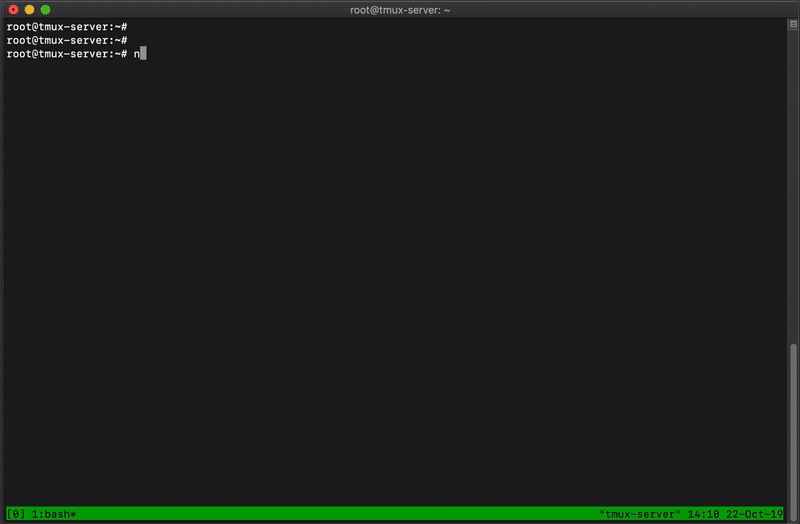
tmux new
At this moment, we created a new session with one window and immediately connected to it. You can see the green status bar that appears below. This is something like a tabbed bar in a browser. It will display the current tab and neighboring, as well as service messages.

The tmux status bar displays the window (tab) names
At this point, even if we close the SSH connection and reconnect to the server, our running tmux session will remain in the same state, along with all running programs, as if we minimized it. Let's try to run the top program inside the tmux session and disconnect from it. For clarity, close the terminal window completely and reconnect to the server.
After reconnecting to the server, we will connect to our previously launched session:
tmux attach
And make sure that the top running program continues to work. At this point, it is important to understand the main principle: after starting the tmux session, it remains to work in the background on the server, regardless of whether you are connected to it or not.
Since the tmux session allows several simultaneous connections, this can be used for collaboration of several people on the server to see the same console in real time. To do this, everyone connects to the same server under the same account and enter tmux attach. There you can chat, right on the command line. We often use this in order not to toss the console log to each other in the messenger, but to immediately work on one terminal.
Tmux can divide a window into several (each window inside a tab is called pane), this is convenient when you need to see two consoles at the same time. For example, in one window, edit the script, and in another, look at the log.
tmux allows you to create multiple windows inside one and resize them
By default, Ctrl + b is used to control tmux. After pressing this control hotkey, tmux expects to enter the main command from a single letter.
Here are the basic commands:
Ctrl + b + c - (create) Create a new window (tab)
Ctrl + b + <digit> - Move to the tab number N, where the digit is a key from 0 to 9. Window numbering starts from zero.
Ctrl + b + x - close the current window. If the last window is closed, the tmux session will end.
Ctrl + b + w - display a list of all windows on which you can move the cursor buttons up and down and select the desired one by pressing enter.
Ctrl + b + " - split the window in half horizontally and create a new one
Ctrl + b +% - split the window vertically and create a new one
Ctrl + b +, - rename the current window
Ctrl + b + down / up / left / right - move through pane'am inside the window
Ctrl + b + page up / page down - scroll scroll up
Ctrl + b + / - search by history, as in vim or less
These are all the hotkeys that I needed over 10 years of using tmux. In fact, there are many more, but for a start it is better to dwell on these.
Config Tmux
I find the Ctrl + b hotkey uncomfortable, since it is too much to press three keys for any action. The theme of tmux configs is a separate area of taste, and each experienced user has his own vision of how to use it correctly and conveniently. There are even whole author's selections of configs and themes for tmux.
For a starting point I will give an example of my config, which, it seems to me, fixes all the difficulties that prevent the rapid development of tmux. The config is located in the home folder with the name ~ / .tmux.conf
# ctrl+b . macbook set-option -g prefix ` # <`> `+a bind-key a send-prefix # set -g base-index 1 set-option -g base-index 1 setw -g pane-base-index 1 # Lowers the delay time between the prefix key and other keys - fixes pausing in vim set-option -sg escape-time 1 # 1000 . set -g history-limit 1000 # # default statusbar colors set-option -g status-fg white set-option -g status-bg default # default window title colors set-window-option -g window-status-fg default set-window-option -g window-status-bg default # #------------------ # Respawn windows when PANE IS DEAD bind-key R respawn-window # default local new -d -s default -n local # irc irssi neww -d -n irc irssi # superserver ssh root@superserver.com neww -d -n superserver ssh root@superserver.com # anotherserver ssh root@123.123.123.123 neww -d -n superserver anotherserver root@123.123.123.123
This configuration allows you to automatically create multiple windows at startup, in which SSH sessions immediately start. In this case, it is not necessary to manually create a new session with the tmux new command, it is enough to always enter tmux attach . If the session did not exist before, it will be created.
Autostart tmux
We want that when connecting to a terminal server, we immediately get into tmux, even if the server was rebooted and the tmux session was closed.
To do this, add tmux at the end of the ~ / .bashrc file . It is important to remember that such a design will only work with the config above.
if [ ! "$TMUX" ]; then tmux attach fi if [ "$TMUX" ]; then export TERM=screen fi
This simple condition means that if we are not in tmux, then we are connected to it.
This completes the tmux configuration on the terminal server. From now on, for each new SSH connection we will create a separate window in tmux. And even if the connection to the terminal server is lost, all SSH connections will remain active.
Mosh - No More Breaks
Now we need to provide a continuous connection to the terminal server, which will always be active. Even if we closed the laptop for several days and opened it in another wifi network, the connection should be restored itself.
Mosh is an add-on over a regular OpenSSH server, which allows you to forget about disconnections. Mosh logs in using ordinary SSH, after which a separate UDP channel is raised, which is instantly restored after a break, even if your external IP address has changed.
Since we need to keep a constant connection to the terminal server, we will install mosh only on the server and on our working computer. At the same time, you do not need to install anything on the remote servers, since connections to them already live forever in tmux.
Install mosh on the server:
apt install mosh
Install mosh on our working computer. It is available for all major operating systems, but the native client is only for Unix-like operating systems. The Windows version is implemented using Cygwin or the Chrome application.
I use macOS and install mosh through the brew package manager:
brew install mosh
In most cases, mosh does not require additional configuration and works right out of the box. It is enough to write mosh instead of the ssh command:
mosh user@my-server.com
For non-standard configurations, the command looks a little more complicated. For example, if you need to specify the port and key path:
mosh --ssh="ssh -p 2222 -i /path/to/ssh.key" user@my-server.com
Mosh performs primary authentication as a regular SSH client, authorizing to standard port 22. At the same time, the mosh server does not initially listen to any ports, and apart from the original OpenSSH daemon, no ports are open on the server. After connecting via TCP, mosh runs on the server in user space and opens an additional tunnel via UDP.
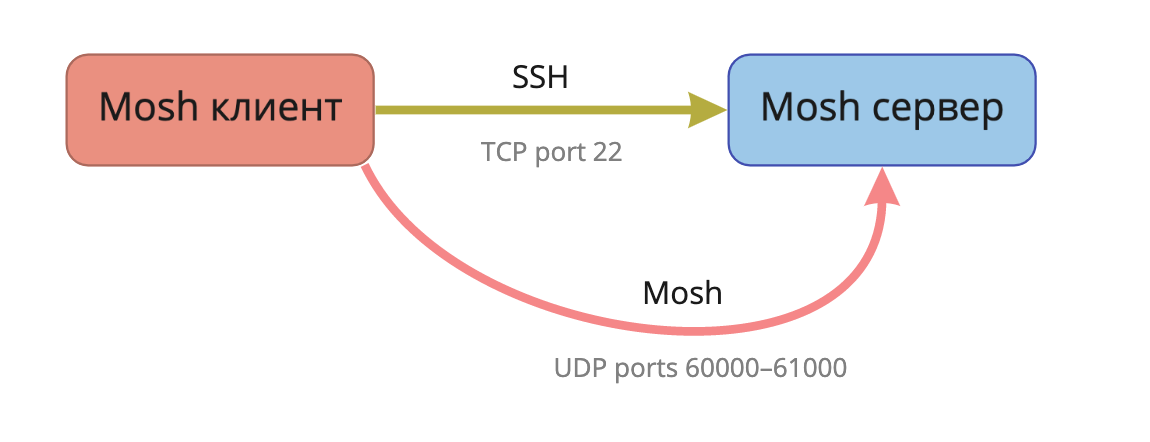
Mosh protocol flow chart
Now the mosh session running on the client will always be restored when the Internet appears. On my laptop I keep one session mosh open for months without restarting and I don’t have to constantly log in to the terminal server again, it just always works.
In order not to enter a long connection command to the terminal server each time, I made an alias of the connection command from one letter:
alias t='mosh --ssh="ssh -p 443 -i /path/to/ssh.key" user@my-server.com'
Conclusion
This simple scheme allows you to significantly save time and nerves, not to lose the result of work when SSH is broken. I constantly have to see how novice admins start logging in to their servers every time and kill sticky SSH sessions.
It may seem confusing at first glance, but I assure you that once you overpower yourself and get used to it, you will begin to look with condescending regret at those who still have SSH connections broken.

Subscribe to our Instagram developer