A note from our editorial staff of the translations: the presented article describes the closed product of a particular company and, unfortunately, there is no evidence that they are ever planning to open it - in the Stallman sense of the word. Nevertheless, it seemed to us very important and useful to consider how people generally approach Istio debug issues and how they optimize their work in this field. Perhaps someone can draw a couple of interesting ideas for themselves.
At some point, when developing production systems based on microservice architecture, we came to the conclusion that monitoring each individual element of our service is not enough to cope with serious problems. Over time, there is a need to get a complete picture of the entire call stack in the entire application at the same time, with detailed information about the request topology, network delays and the duration of individual commands. To solve this problem, engineers usually resort to distributed tracing.
In this post, the concept of distributed tracing will be examined through the prism of microservice architecture: how it all integrates and automates through Istio , and then the whole process is simplified and processed through Backyards - our service product for Istio.
Introduction
Earlier we wrote about how complicated it can be just installing and configuring Istio, so to simplify this situation, we chose the open source development of Banzai Cloud Istio . In addition to Istio, you can use a number of convenient tools with Helm ( Prometheus , Grafana , Jaeger , Kiali ), in any case, most of the support / integration requests came just for them. Since we believe that everyone chooses a tool to their liking , we did not rigidly implement the listed tools in Istio, but only provided the ability to easily integrate these components.
In addition, we wanted to provide our users with another powerful tool for managing the listed components in the cluster (that is, something other than Istio), so we also created Backyards . With it, you can easily install Prometheus, Grafana and Jaeger, and, unlike Kiali, Backyards is not just a web-based monitoring interface, but a full-fledged multifunctional tool for managing your services network. It is compatible with one or several clusters at once and contains a powerful CLI and GraphQL API.
In this post, we will focus on distributed tracing and Jaeger.
Introduction to Distributed Tracing
In the architecture of microservices, when several services call each other at the same time, it is often difficult to find and debug problems. Actually, in this statement lies the main reason why the efficiency of requests for services is low: which service has become a bottleneck, how large is the network delay between requests?
Thanks to distributed tracing, you can visualize the complete call tree, see which service has accessed which service, how long each call takes and what is the delay in answering. It is the distributed trace that helps determine where the failure occurred and which service has exceeded the response time limit.
Distributed tracing is the process of tracking individual requests across the entire call stack within the system.
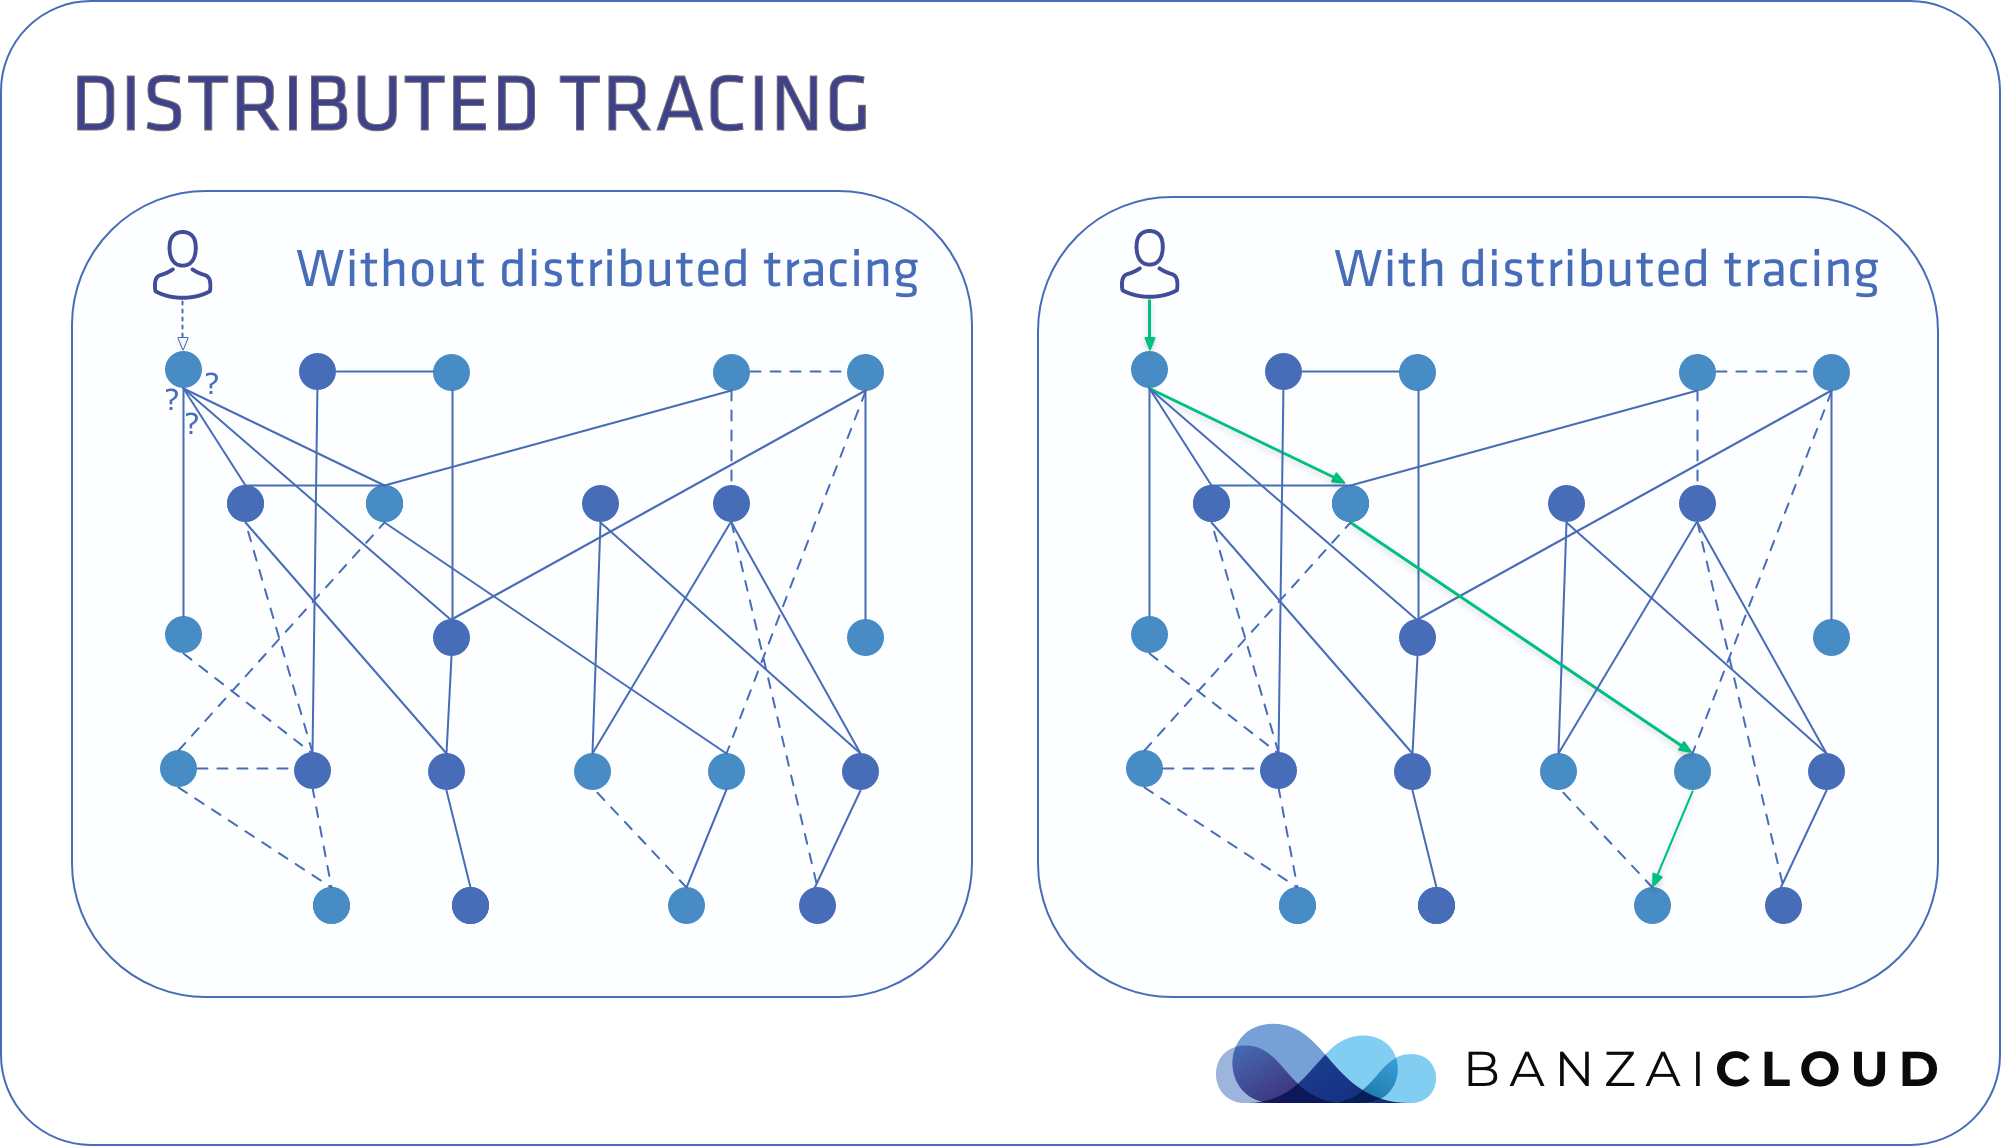
Without using distributed tracing, it is indeed easy to get lost in the many calls exchanged between microservices. It’s also difficult to debug problems without it, since you have to rely only on logs. But thanks to distributed tracing, the entire call stack with all the information necessary for diagnosing the problem becomes available to you.
Under the hood of a distributed trace
Span is the smallest unit in a distributed trace. She has the labels “start” and “duration”. Span have parent-child relationships with each other and together form Trace.
There are three tasks in which to correctly collect traces
1. Incoming request spans 2. Outgoing request spans 3. Context propagation
Incoming request spans:when a request arrives at a service, it must be checked for a trace header. If there is no header, then you need to create a root (parent) span to start tracing; if you have to, create a child span to continue tracing.
Outgoing request spans:when a request is sent from one service to another, a span is created first, so the party receiving the request continues to trace, as described above.
Context propagation:Services typically receive and send multiple requests at once. Without making any changes, it is impossible to track the connection between incoming and outgoing requests. Here comes the finest hour to convey context. For HTTP, this can be done by passing the trace headers of incoming calls to outgoing calls from the application, which will allow you to build a full trace.
In addition to these tasks, traces should be collected, grouped, and perfectly visualized.
All this may seem complicated enough to be implemented on all services within the system, but there are tools that allow you to solve almost all the tasks described in automatic mode. As a result, developers can get distributed tracing, in fact, out of the box.
For more information on the basic principles of distributed tracing, I would recommend reading this great post from Nike .
Distributed Tracing in Istio
In Istio, Envoy proxies do the dirty work of distributed tracing . Istio has a sidecar injection, thanks to which all incoming and outgoing requests to / from the service first pass through the Envoy proxy server. It is at this stage that the parent and daughter traces are generated, which are the first two of the three necessary conditions for creating a distributed trace.
The third condition - the transfer of context - must be performed through a change in the application logic. In Istio Bookinfo, this is already implemented at the level of each microservice, so full traces can be obtained immediately after installation. When using distributed tracing in your own services, you need to implement context propagation yourself.
Contrary to some common misconceptions, it is worth noting that full support for distributed tracing with context propagation, even at the level of a regular service grid, can only be created by changing the logic of the application. A good example is given in Caveat 1 .
The Istio website contains documentation about which headers (headers) to use. All are compatible with the Zipkin header format .
Please note that in addition to the Envoy -based tracing described above, Istio also has a Mixer-based tracing that uses the Mixer component more actively. It is likely that in future versions Mixer will be discontinued, so I will not describe working with it in detail. One has only to say that mixer telemetry can be felt through the operator.With Envoy and distributing the trace headers we need, we can get the traces we need. To collect and visualize this information, Istio comes with tools such as Jaeger , Zipkin , Lightstep and Datadog . By default, Jaeger is used, it is also the most popular tool of all listed.
We can also adjust the sampling rate, that is, what percentage of all requests will be presented in the form of traces. The default value is 1% of the total number of requests. The frequency can be changed here in this field of the Istio operator.
How it works in Istio
Let's summarize how to do distributed tracing with Jaeger (later we compare this with the same process in Backyards):
- Together with Istio, you get Jaeger with all the necessary services and deployment.
- The address of the trace service is set by default according to the configuration of Envoy proxies and through them Span reports and sidecar services work.
- Bookinfo can be installed before all services distribute their head headers to traces.
- Traces will become available after enough information has been collected.
- The Jaeger control panel can be redirected to open the user part through a browser.
Distributed trace in Backyards
In Backyards, installing, configuring Jaeger, installing a demo application with automatically distributed trace headers and sending loads to all of this - everything is done with one simple command! And after linking the services to each other with the tracks, all this becomes available from the user interface.
Now look!
Create a cluster
Well, for starters, we need a cluster in Kubernetes. I raised the Kubernetes cluster on GKE through the free version of Pipeline for developers. If you want to do the same, create your cluster through Pipeline on any of the five cloud providers that we support. Otherwise, raise your Kubernetes cluster somewhere else.
How it works in Backyards
Earlier, we summed up the intermediate result that Jaeger can be used in conjunction with Istio. Now let's compare how everything happens in Backyards.
Now the easiest way to install Istio, Backyards, and the demo application on a new cluster is to use the Backyards command-line interface .
You need to enter only one command (on your cluster should be
KUBECONFIG):
$backyards install –a –run-demo
- With this command, Jaeger is automatically installed (instead of with our open source Istio operator and Backyards components).
- As mentioned earlier, Istio is out of the box ready to integrate with other components like Prometheus, Grafana or Jaeger. When Jaeger is installed, its service address is set in the operator’s user window. In the future, this address is written in every place where it is needed to control Istio components and data flow.
- The demo application is also installed by default. It uses golang services that are already configured to distribute the necessary trace headers.
- The demo application starts automatically loading (hence the --run-demo flag), so you can immediately start tracking tracks.
- Jaeger opens through the input gateway, it is linked with the UI and is automatically available both in the form of a scheme and as a list.
It is literally as simple as writing a team to create a new Kubernetes cluster, so try it if you want!
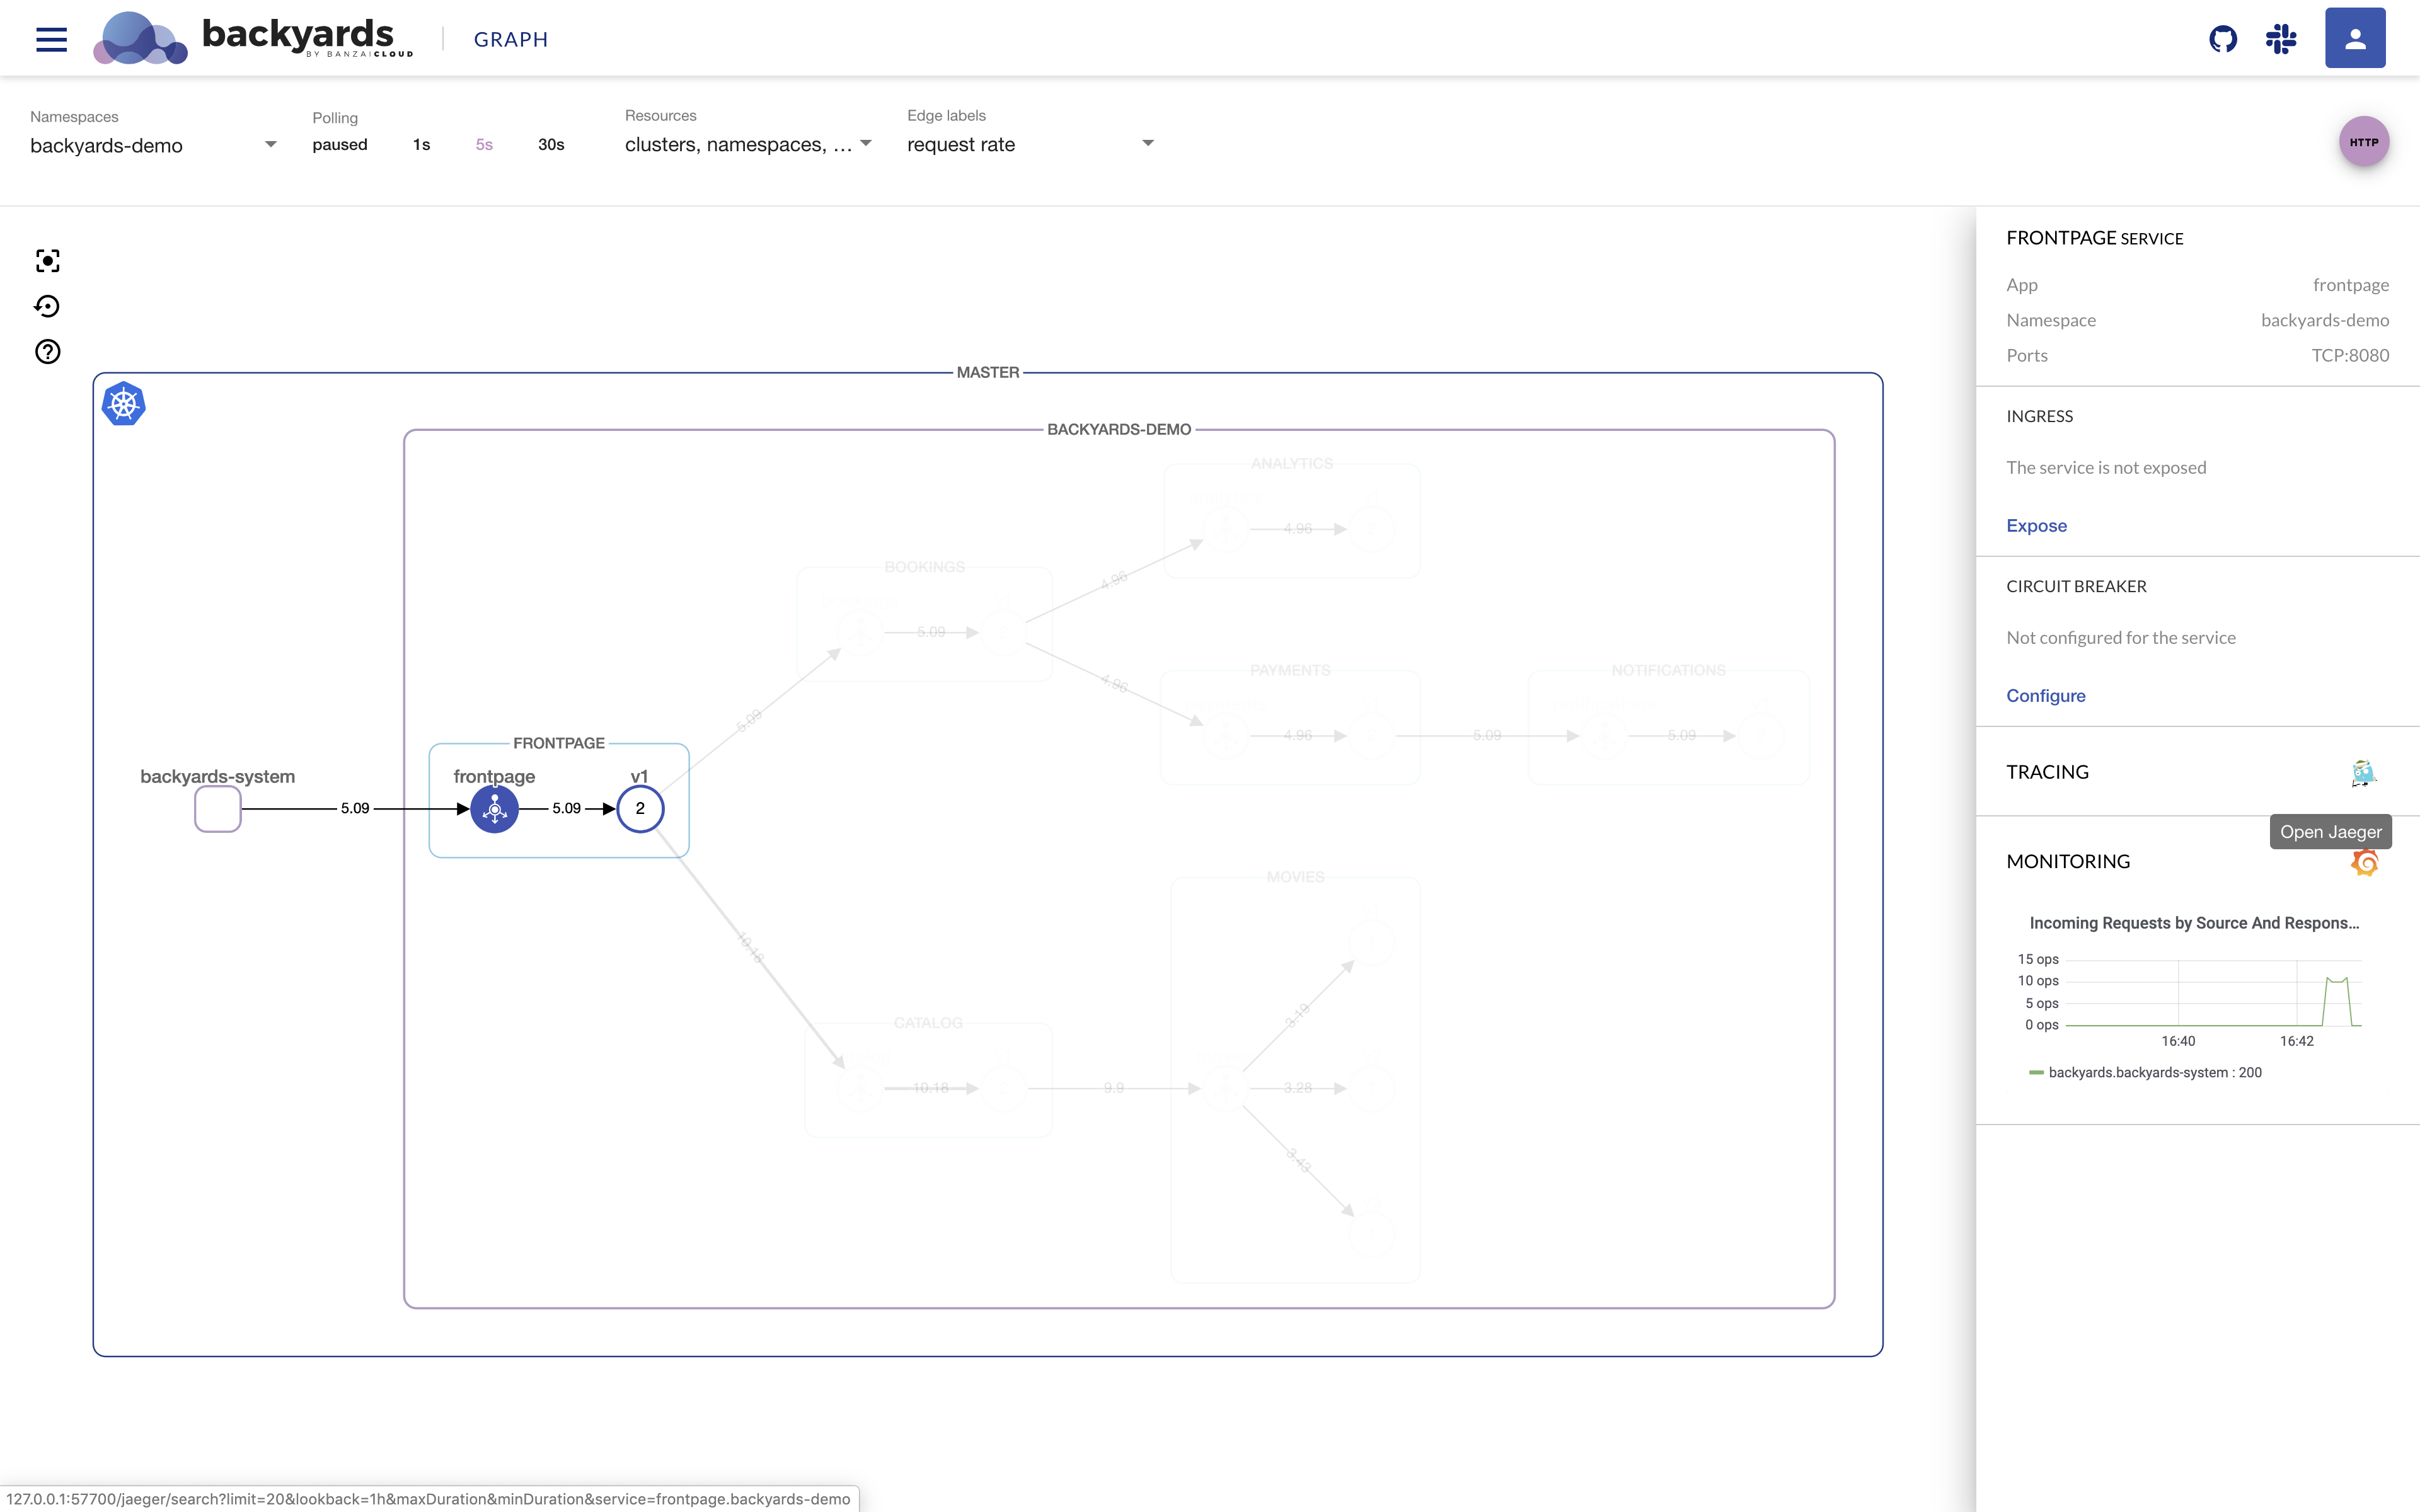
Here is what you will see:
Jaeger linked to with the scheme:
And here is a list:
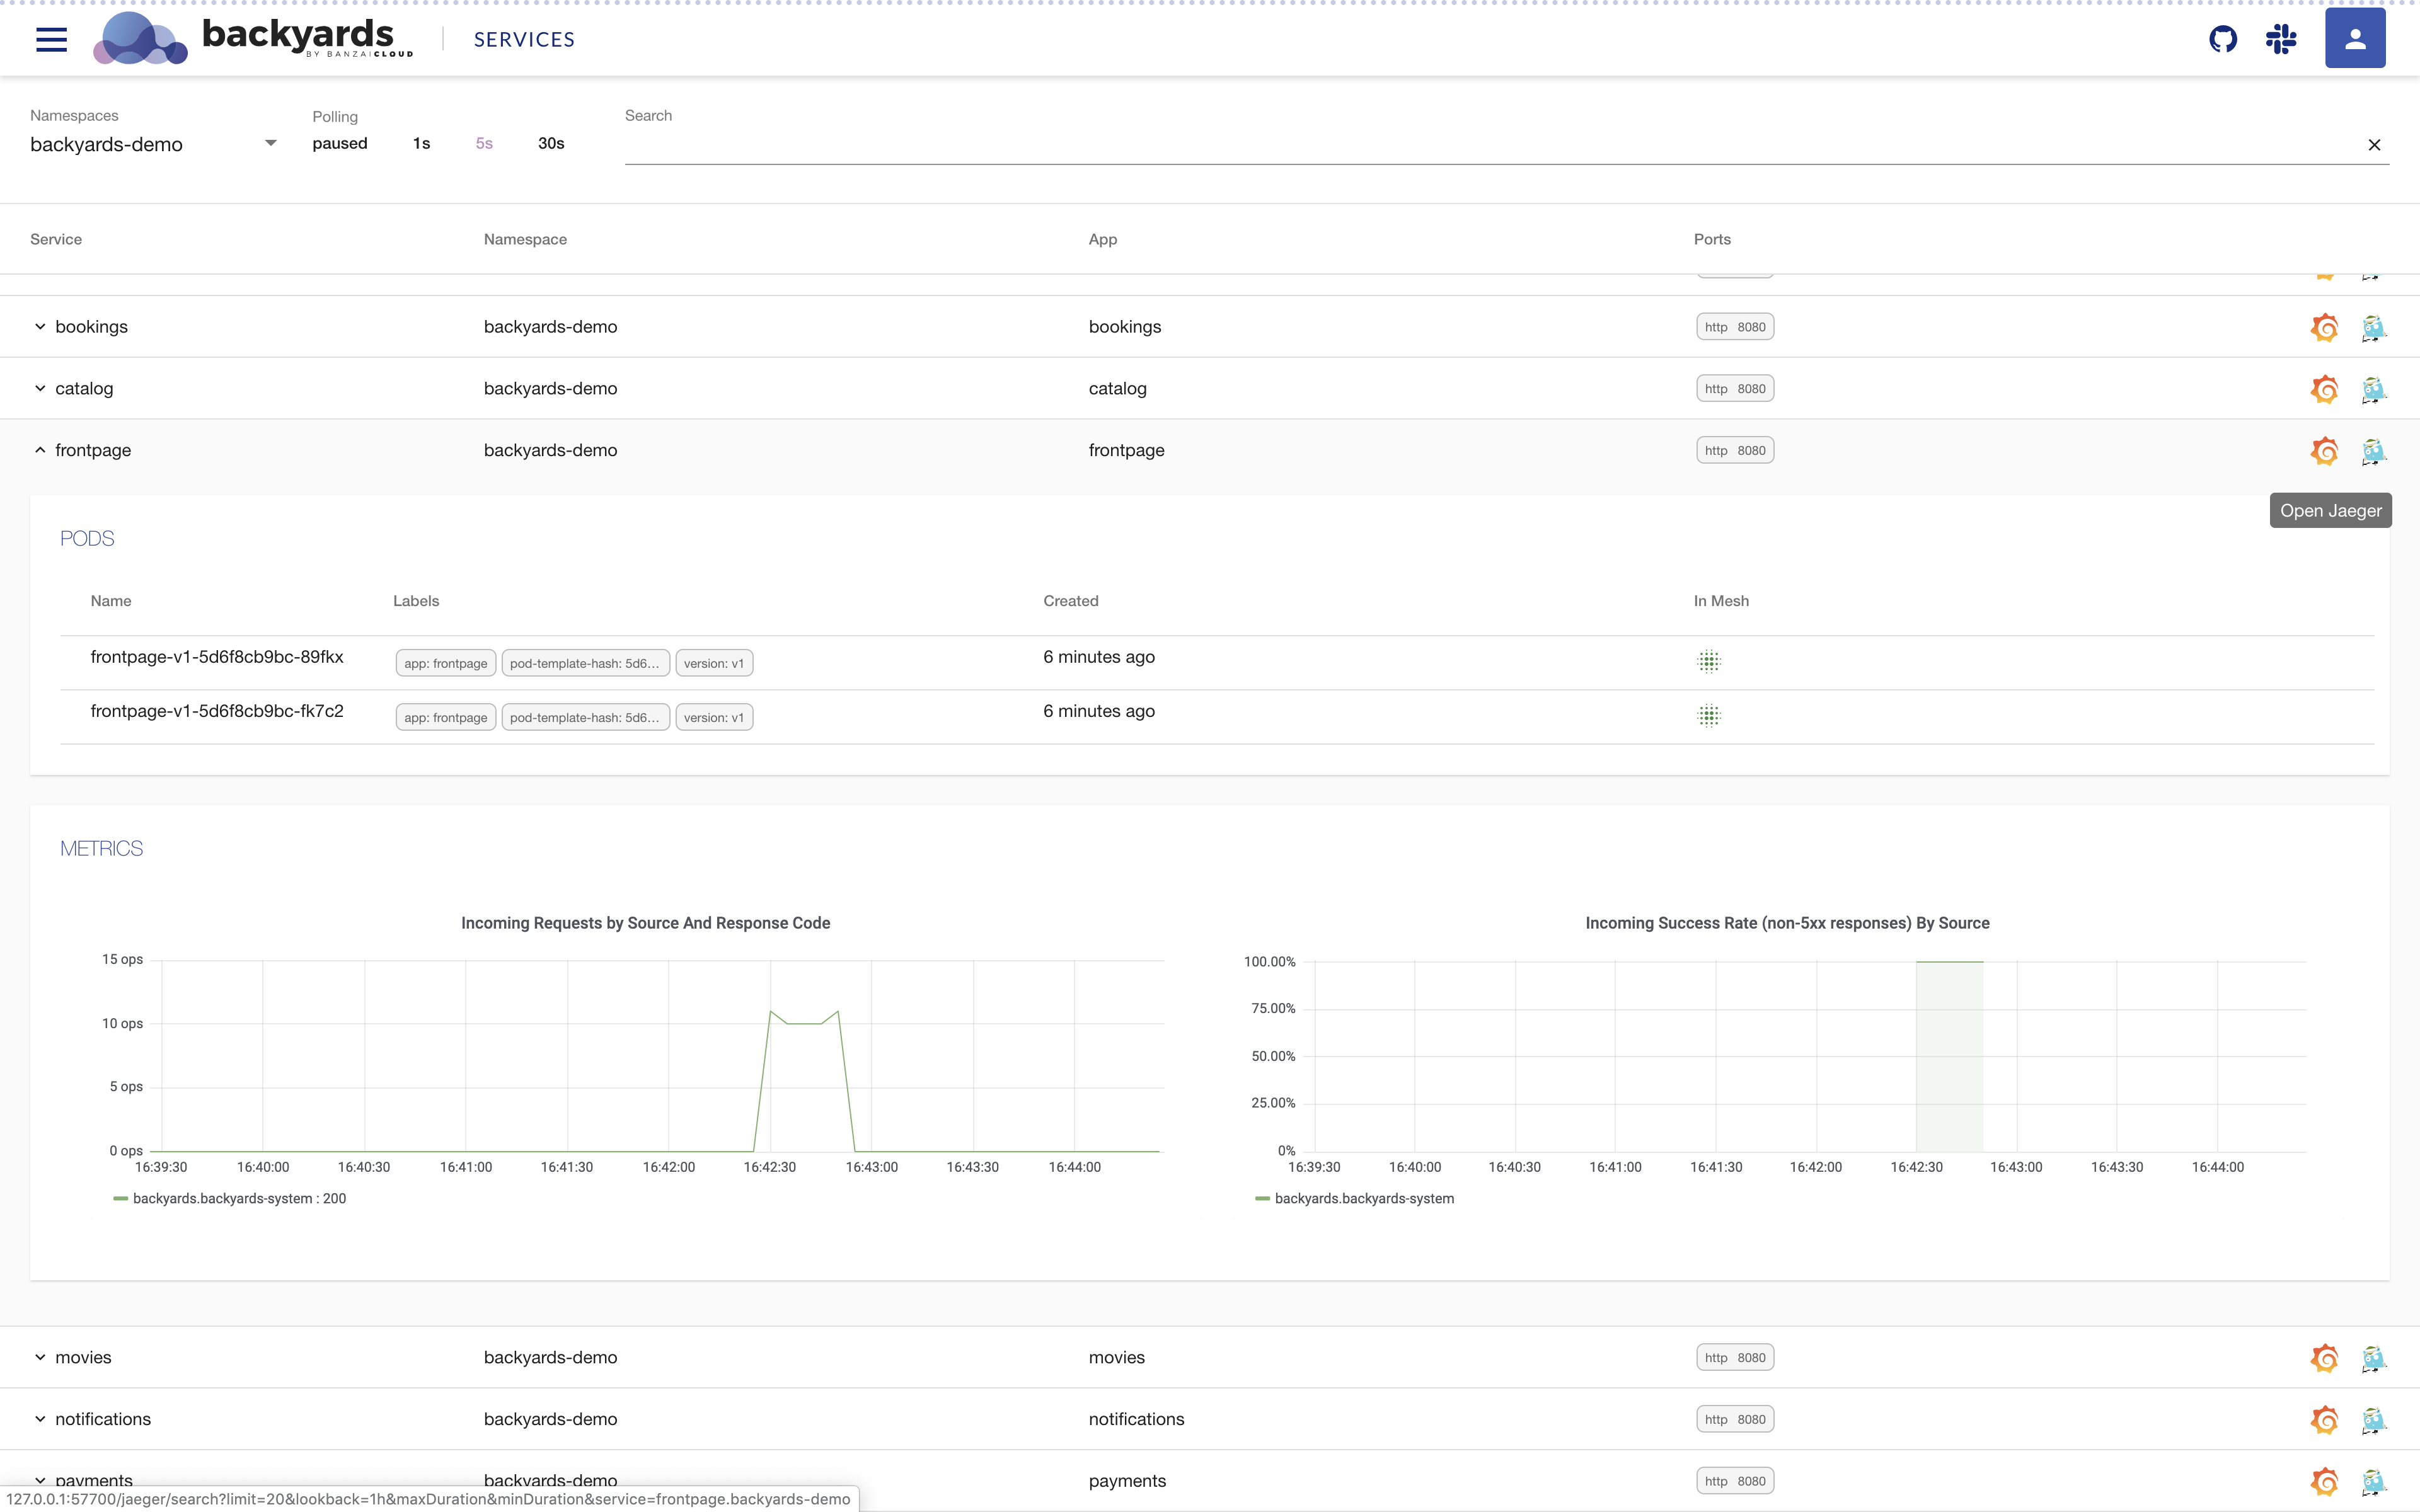
Jaeger UI for demo application:
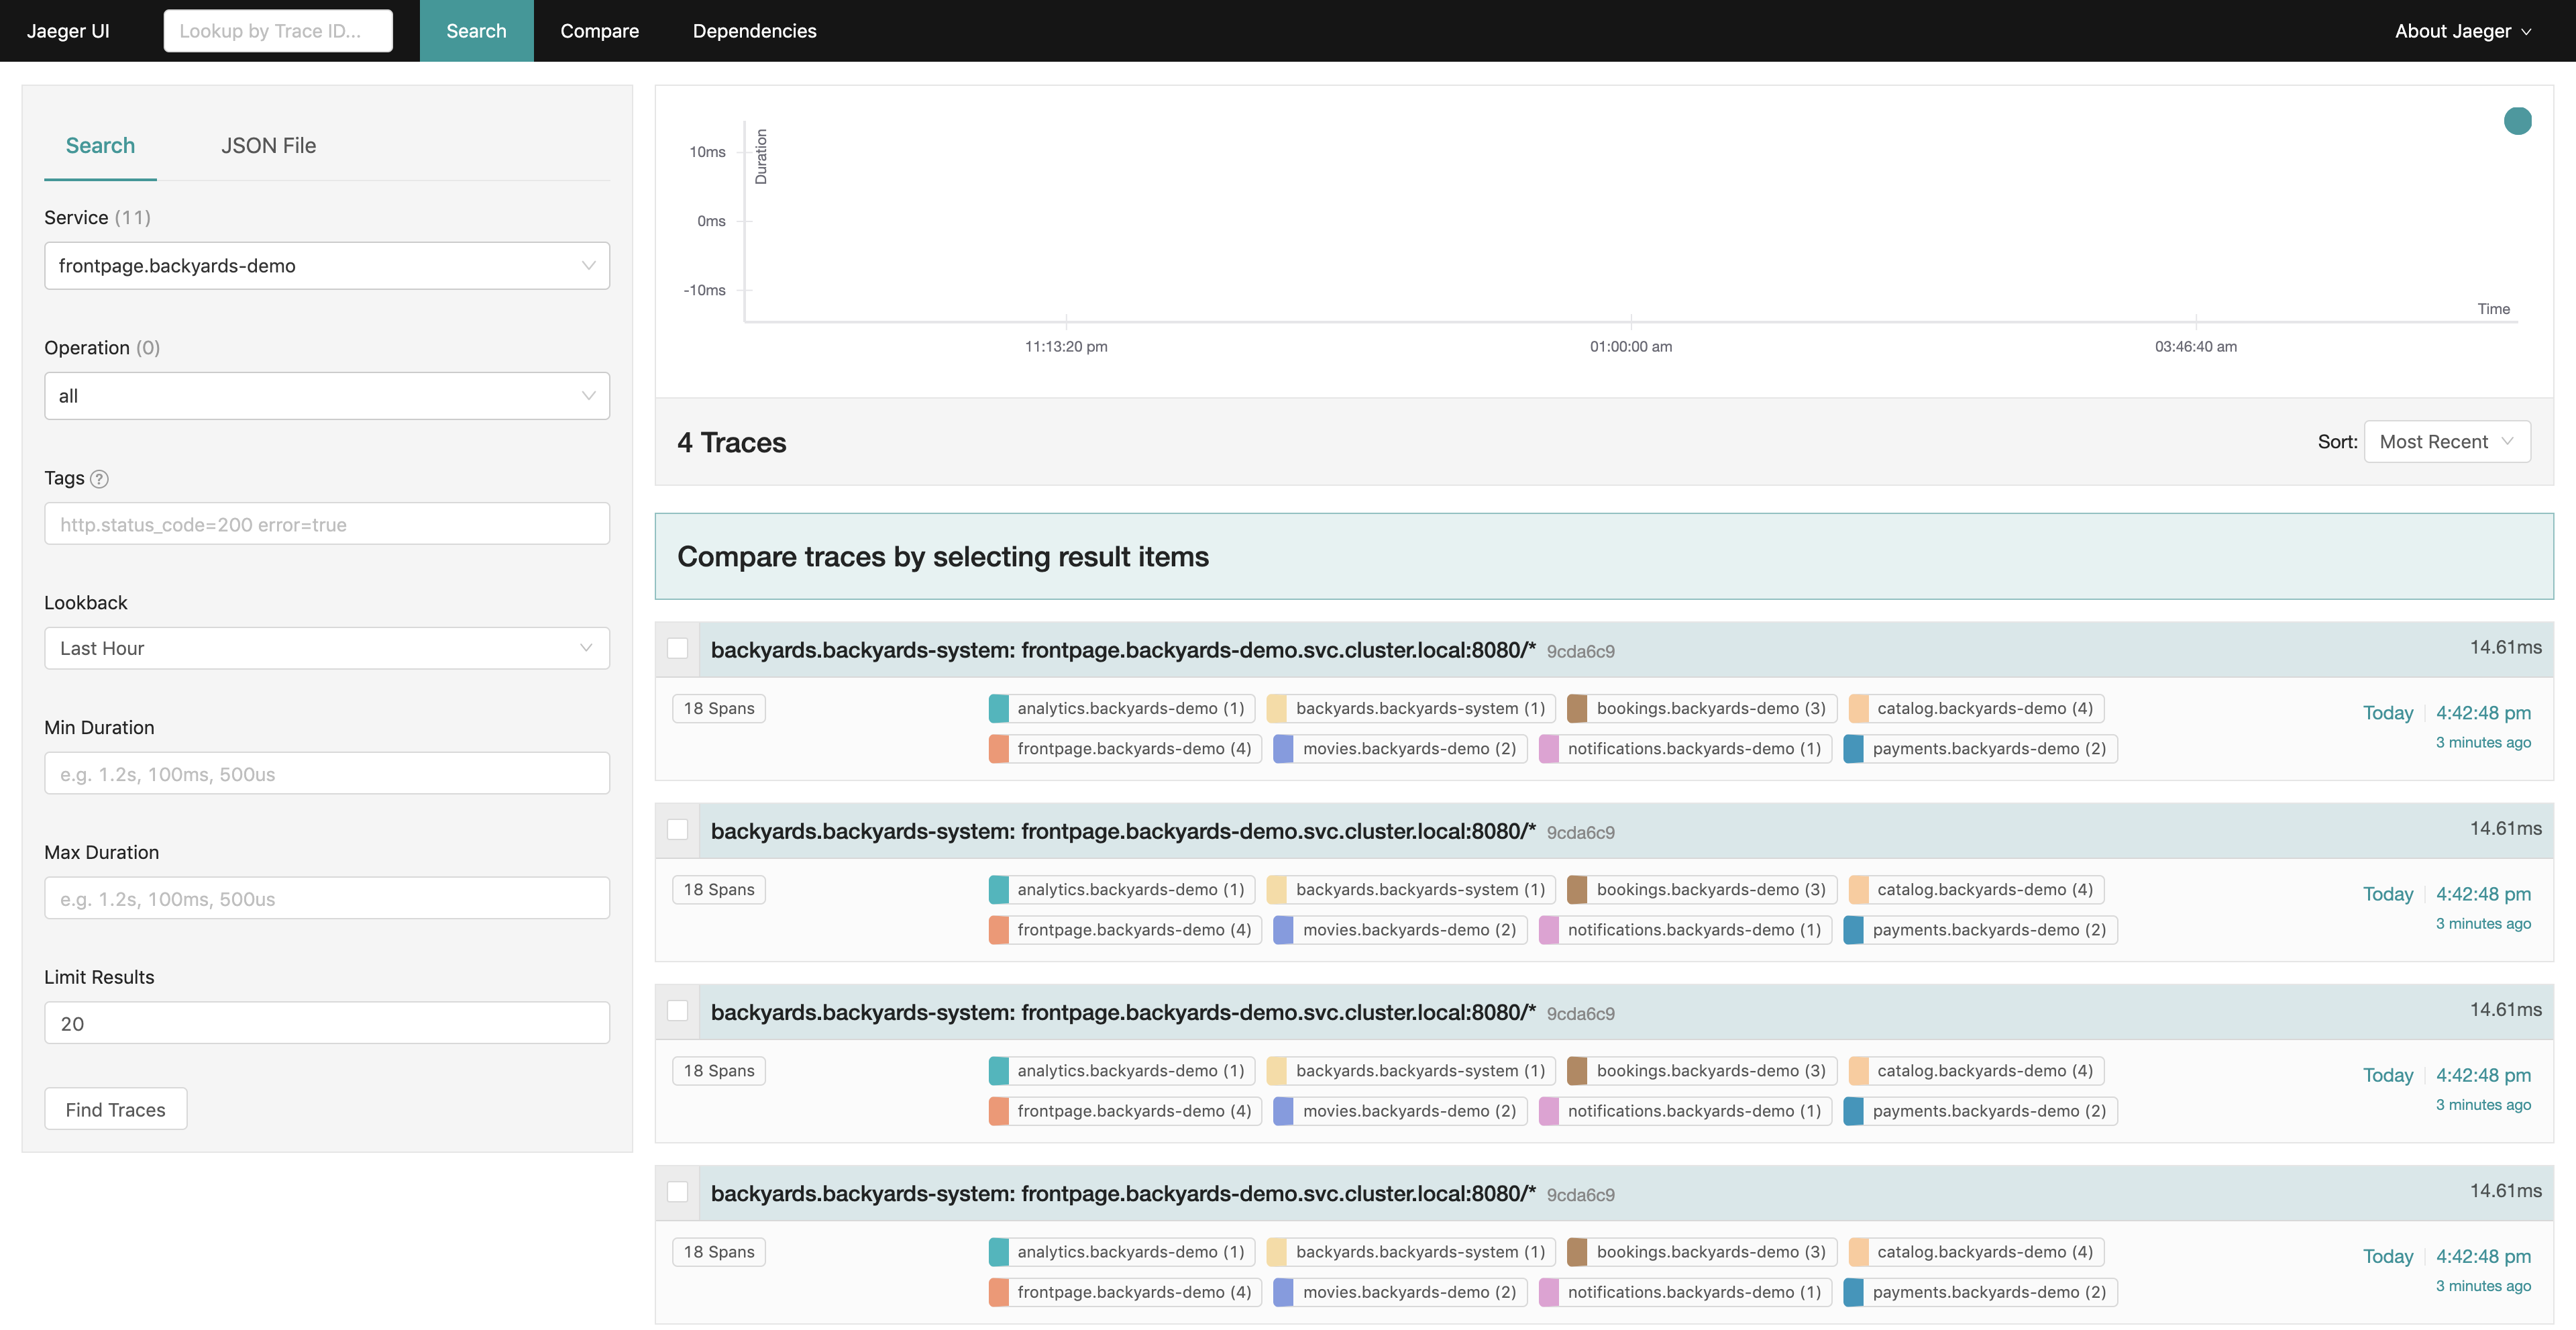
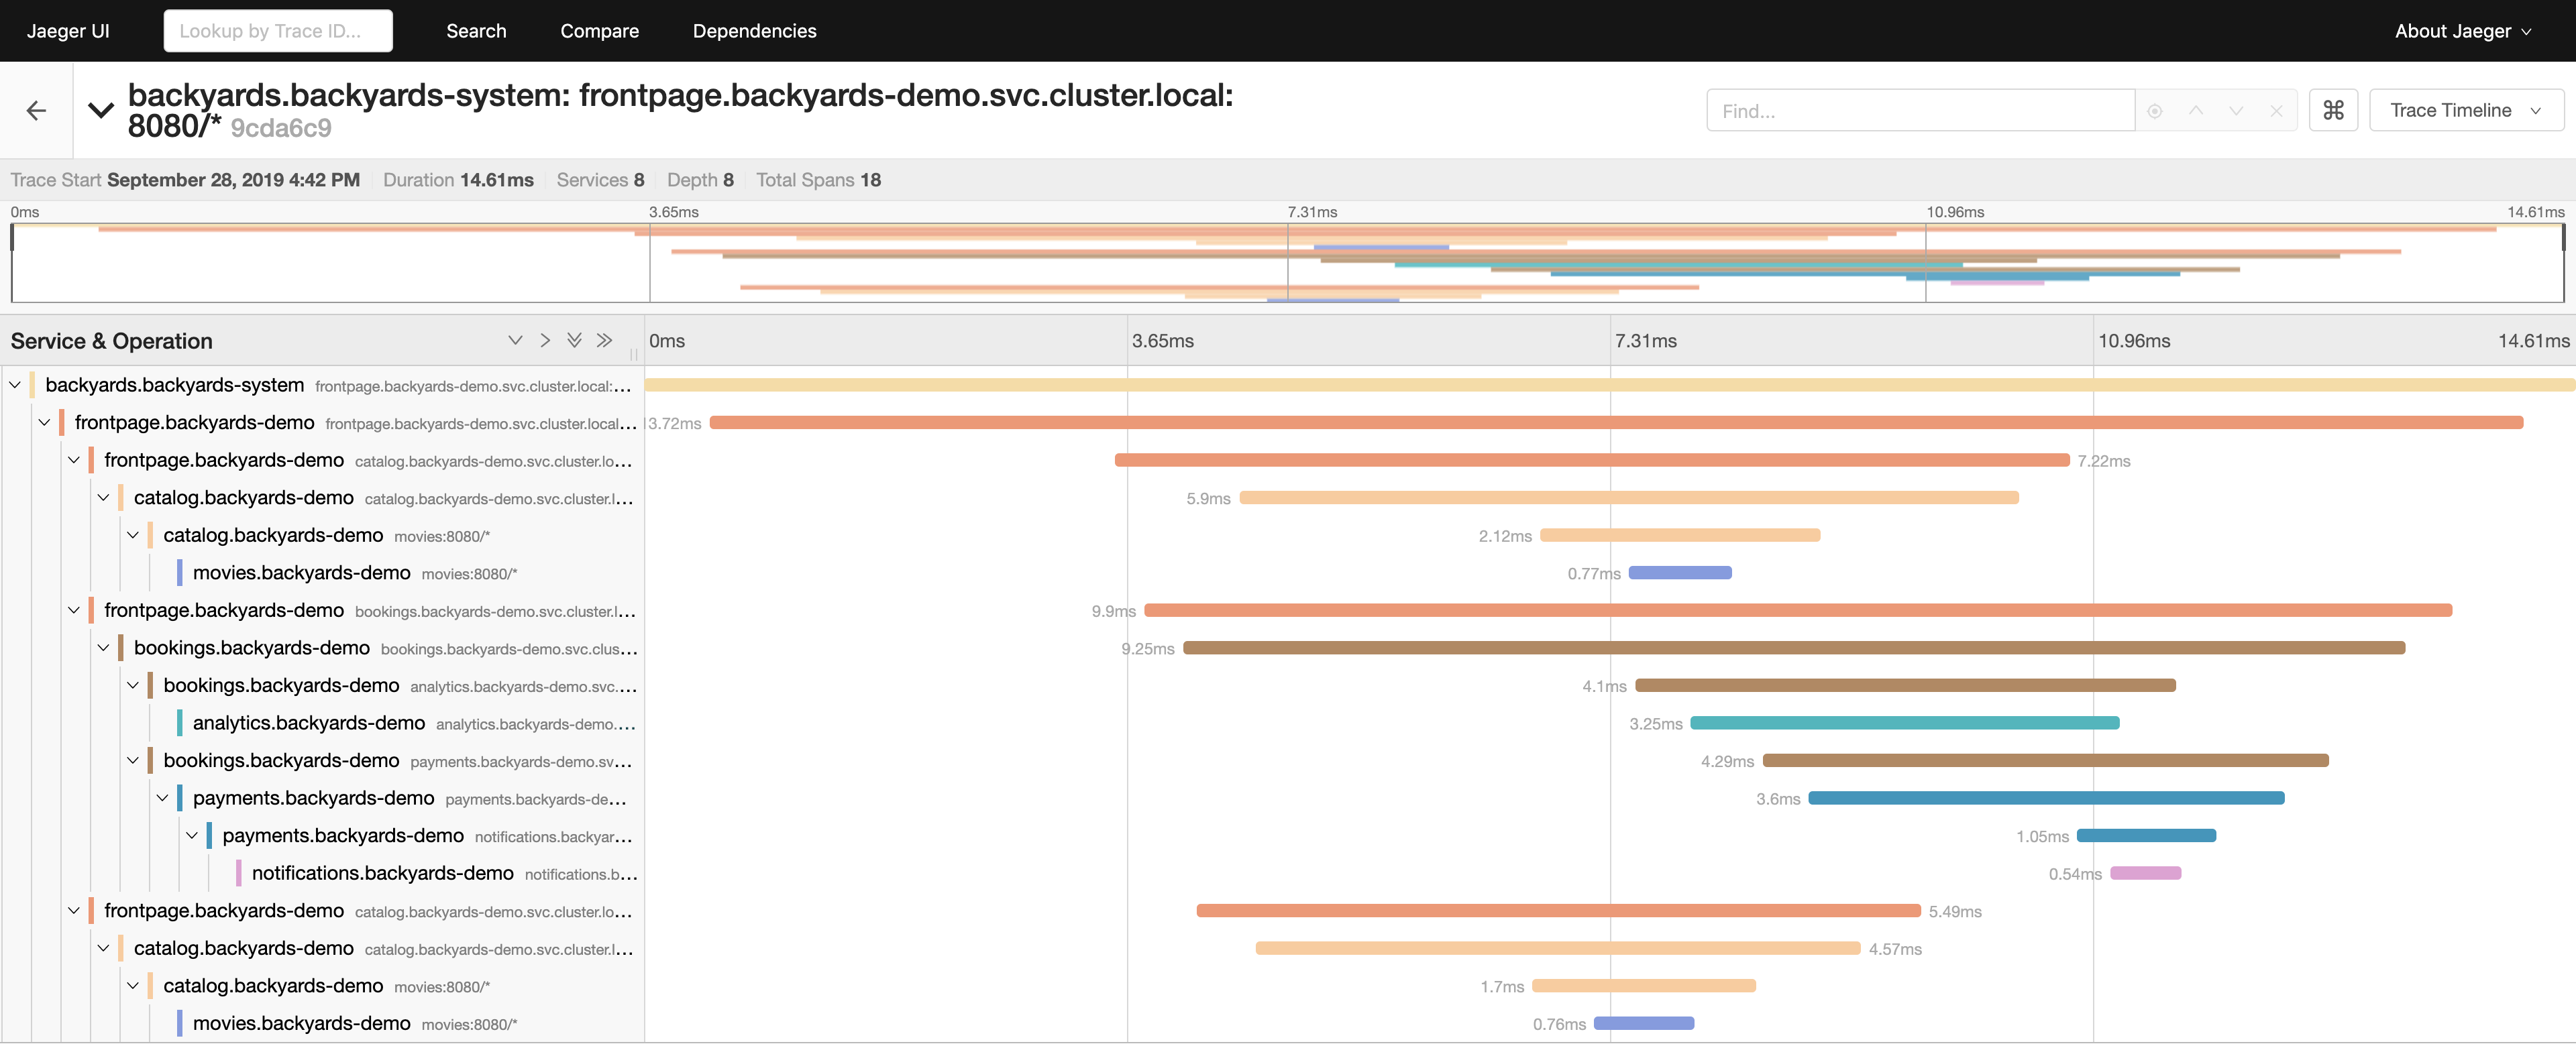
In the UI, you can see the entire call stack in your microservice system. Now you can track exactly when the root request was launched and how long each request took. Or, for example, you can see that the analytical service spent most of some time certain queries, as it is busy with actual calculations (for example, it calculates the values of Pi).
Cleaning
To remove the demo application, Backyards and Istio from your cluster, you only need one team. She will take care of removing all components in the correct order:
$ backyards uninstall -a
Summary
Distributed tracing is necessary mainly for existing distributed systems in which any difficulties or problems need to be fixed. Our operator, Istio, focuses solely on management when, like Backyards, there are many more components that you can use in your work. For example, this is Jaeger, which out of the box provides the ability to conduct distributed tracing.
In this case, Jaeger is installed using Backyards, and the latter displays all the links and traces of Jaeger in the system directly in the interface!
Have a nice trace!