Python music cover generator in Blender
In this article I will talk about my addon to the blender, the reasons that prompted me to create it, the development process and the “success” on YouTube.

It all started with the fact that about a year ago (in November 2018) I saw in YouTube’s offer such an unusual cover on The Ultimate Canon
The guy recorded the samples of each note of the song and, through painstaking editing, assembled the whole song from them. To whom it is, but I think it is at least funny. And the number of views (at that time a little more than 1,000,000) indicated that the theme ( 1% guitar skill 99% editing skills ) was popular.
I am sure that those who were at least a little bit involved in mixing songs know that sometimes it’s easier to slightly cut and move the track than to ask a careless guitarist to replay the part. I also used to make classic covers, and even then I had the idea of creeping in and creating a cover exactly as the guy from the video did. And now I see that "my idea was brazenly stolen" and got a good exhaust. I was annoyed that my train left, but it dawned on me that I could do the same, but at a different level, adding a new step - 1% guitar 1% editing 98% programming skills .
In addition, this will allow you to create much more complex compositions, which, when manually edited, few people have the patience.
So, the task was to automate the process of slicing sound samples into a musical composition.
First of all, it was necessary to somehow convey to the future program data on the composition, its notes, tracks, instruments. I immediately thought about GuitarPro and its data export options: MusicXML and MIDI.
Searches led me to choose a parser for midi files on Python music21 . This is not only a parser, but apart from this, I do not need anything from the module. And the analogues were either with terrible documentation, or could not do what I needed as easily as music21.
Great, now I can get data from midi files about tracks, their notes, their position and duration. We are going further.
Now, based on this data, you need to cut from video / audio files. Then I chose fast enough. Definitely Blender, even despite its modest capabilities as a video editor. I have experience working with Adobe PremierePro, After Effects, but there is my own scripting dialect, which is no longer useful anywhere, and its capabilities are unknown to me. In Blender, almost any action can be carried out through a Python script. And that already matches the language of music21. It is worth explaining that at that time I was not familiar with Python at all, therefore I also considered this project as an excellent occasion to get acquainted with this popular language. Bingo!
Gradually, I began to delve into the language, outputted midi-file notes to the console through music21, quickly looked at how to make add-ons to the blender, and proceeded to the first practical task: generating sample data. He recorded every unique note on the guitar and proceeded to cut, but soon stopped. My internal programmer protested against this painstaking work (and there can be a lot of notes for each instrument: 30-50). And this would have to cut the notes and render them individually in separate files, and to do this, adjust each track-note in length to the beginning of the timeline ... In general, this process had to be simplified.
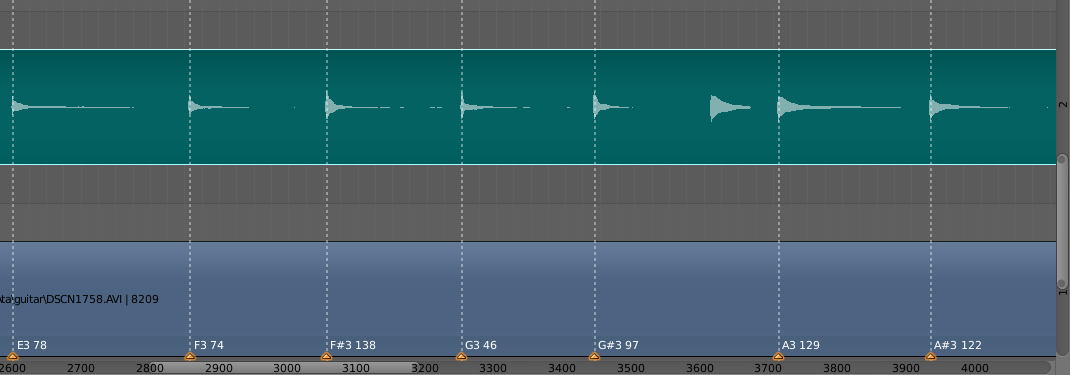
The solution was to use such a thing in Blender as markers. These are essentially points with textual information that can be set on a specific frame. The logic was this: the user arranges his video and audio (if the audio was recorded on a separate track), drives them to each other and marks with the markers the beginning of each note in the video, and in the marker text indicates what kind of note is (A #, D, C and etc.) and its maximum duration on the record. Then the information about the markers is recorded in a file and is already used when cutting individual notes.
The next point was already the “core” of the functional itself - cutting notes and their positioning on the timeline. Ironically, there’s nothing special to say: there was a lot of reading documentation, Blender’s documentation was far from always quite detailed, but gradually I achieved what I wanted. When I saw (and heard) the first result (it was a short composition of the Epidemic - Frodo group), happiness knew no bounds. I think everyone knows the feeling when something finally comes out.
The quality of the code is poor. I tried to do it in a hurry, because I fancied that I was not the only one to think of such a thing, and I would not want to get ahead of me here (spoiler! how naive I was). Therefore, there was no time to adhere to the style and reflect on the structure, I tried to get a working prototype faster.
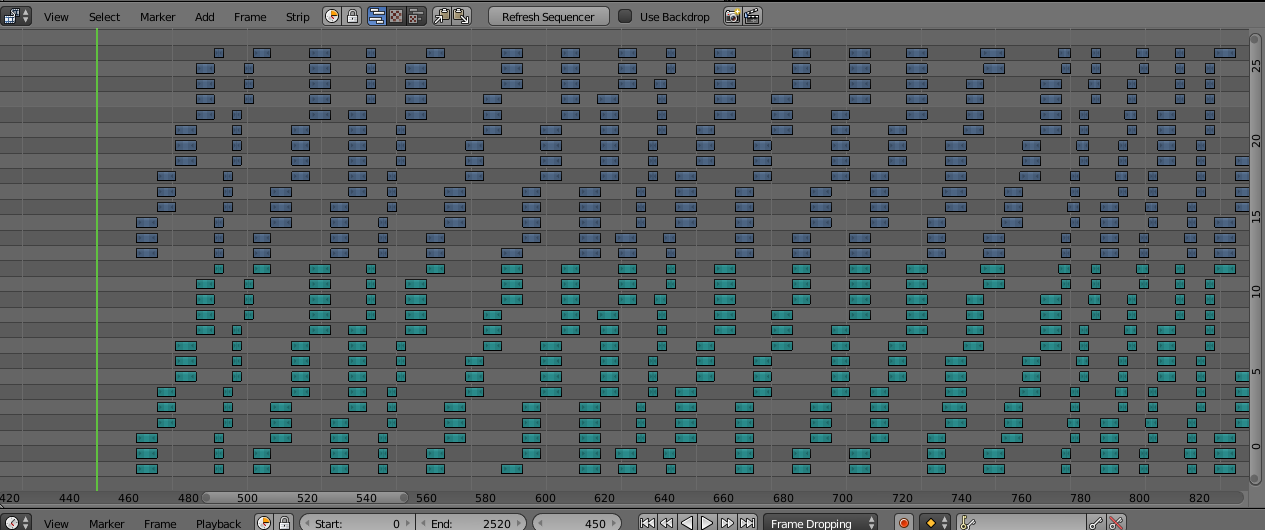
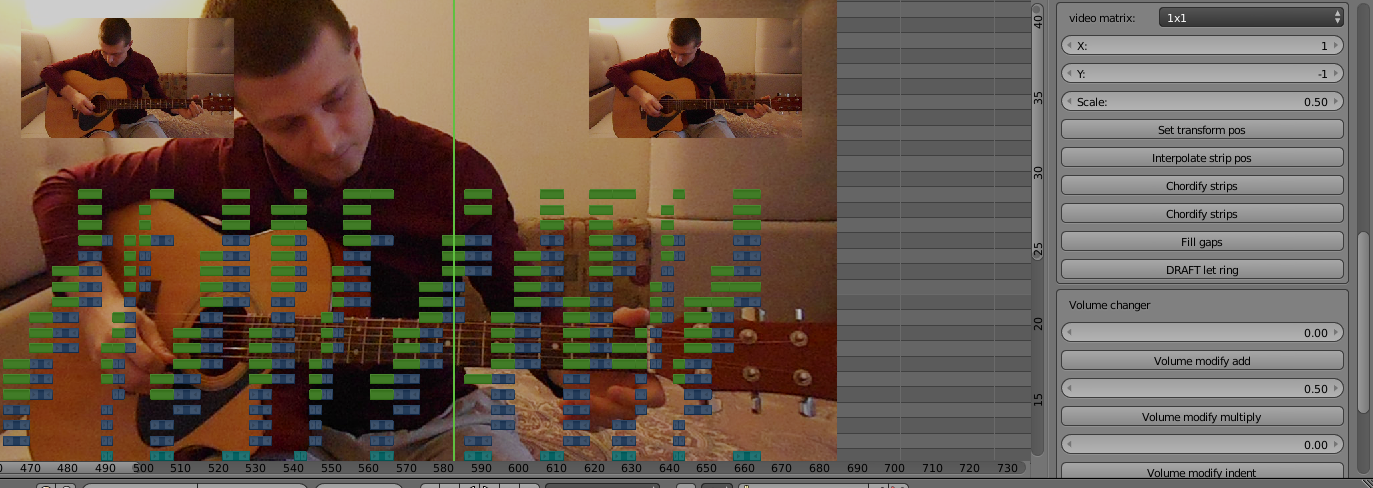
Now for the nuances of implementation. Blender has a limit in the layers of the editor, maximum 32. From the picture you can see that the audio and video samples (green and purple) occupy 14 layers each and are formed in ascending order, then again at the beginning of their sector. This is due to the fact that Blender will not allow you to spawn a sample on top of another. And in music it often happens that the next note begins even before the previous sound ends. Therefore, in order to avoid overlap, I decided to spawn the next note on a layer higher than the previous one, and when the layers of the sector end, start again from the first layer (it is unlikely that the first note will sound as much as 14 layers forward). Yes, this could be done smarter by saving layers, but as I said, I was in a hurry.
The most attentive ones could notice that the entire sector is 2 by 14 layers, this is 28, and the maximum in Blender is 32. The fact is that for spawn notes, you have to spawn 2 original tracks (video and audio) through a script and then cut them out note. And you can’t spawn on top of another track, so I reserved the 31st and 32nd layers for this business. The 29th and 30th are used for intermediate storage of already generated tracks: generation occurs under one track from the midi file, then the notes are grouped into one track, transferred to the 29/30 layer, we generate the next track, etc.
There is also a nuance: in midi scores there is such a property as playback speed. And it can change many times inside the composition. In music21, I never found the opportunity to track these speed changes. Therefore, the speed of the generated notes will coincide with the very first speed specified in the midi file. There are 2 solutions:
I prefer to add my own tracks for each speed in GuitarPro, then in Blender, it’s enough to only generate them with a speed modifier, it’s faster and more difficult to get confused.
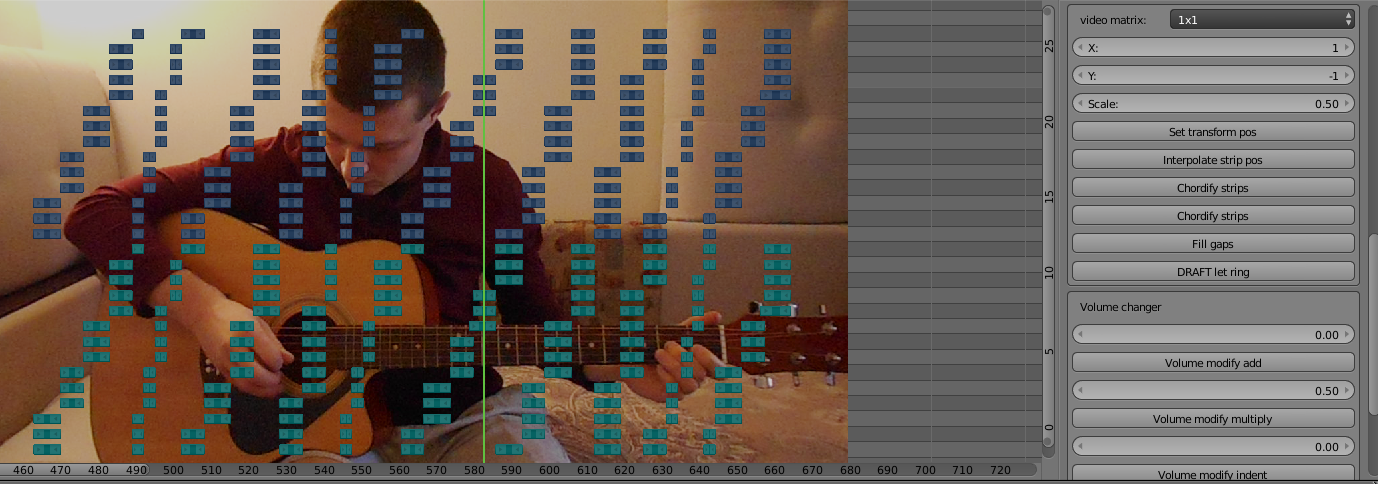
Now that you have a rough set of generated tracks, you need to mount a watchable cover. Those. position the tracks in the corners of the video, switch depending on the music, etc. In a blender, this is pretty bad. To apply the effect to the track, you need to “glue” another track from above, which will be rendered when rendering, and put it in the right position.
Of particular note are chords. This is when several notes sound at the same time, i.e. when rendering a video, only the top note of the chord will be displayed. The solution was to add the same effect (fortunately, they do not break when superimposed on each other). If during normal editing of the generated tracks I could do everything manually, then editing every note of the chord is too much. As you know, I also automated this nuance. Now, at the touch of a button “Chordify strips”, the selected samples will be transformed as needed and each note of the chord will be drawn.
And one more point of automation: sometimes the generated samples have empty parts between themselves. This is due to the fact that the scores in these places are suddenly empty places. In GuitarPro, this sounds normal, due to various effects, the sound of the note is kept in between. However, voids form in the blender. They must be filled by stretching the previous note before the next. Exactly this task is performed by the “Fill gaps” button.
Functionality for working with volume was also written on trifles, as well as the ability to replace the missing note with another, but with a different value of the pitch, which allows you to go beyond the boundaries of the instrument range (although in practice it is no more than 1 octave).
So, the addon is ready. About a month and a half was spent from the beginning of the idea, he worked in the evenings in his spare time. It's time to make a cover that will beat that guy’s hand cover. I chose the same song, but in a rock arrangement: Canon Rock. It is much more melodic and more complicated than the original, and will clearly demonstrate the new level of my approach. Yes, and as a response to an already popular video, it can attract the attention of an audience.
In the text above, I deceived a bit, because I started working on the cover in the process of writing the add-on, so that, using his example, I understand what functionality is needed and implement it.
And now the cover is ready and polished ! He shot the introduction and the ending, in which, in broken English, he tried to explain the steepness of my answer. He spoke some words deliberately with errors (complimented, double y eff), hoping to get viewers to amend in the comments. Prepared a preview. With bated breath, in anticipation of the expected triumph, uploaded and published the video. I sent them in cover groups on covers, and threw the link on Instagram to that guy. He, by the way, has a very triumphant nickname: Ralph Jay Triumfo.
As time went. There was no triumph. In the first day I got about 100 views, half of which were mine and my friends. Then there was a lull. With each new day I became more and more disappointed in this whole undertaking. Do people really not understand how cool I did it? Why word of mouth does not work? Or maybe the idea itself was cool only in my head?
Be that as it may, I liked the result, and I gradually began to make new covers.
At that time, I participated in the filming of the program “Brain Modeling” on local TV, and once I mentioned my craft in a conversation with the host. The result was a small report about me. Mom, I'm on TV !
I perfectly understood that pensioners mainly watch local TV, so there were no expectations from this.
Even then, I wanted to bring the add-on code to mind, optimize generation and put the add-on in the public domain, but the failure of triumph diminished my ardor. In addition, then the full release of the new version of Blender was being prepared, and the API was changing. I wanted to wait for its release in the summer and transfer the addon to the new version, and then put it out, but again, there was no special desire.
And now, after almost a year, when views of the first video barely exceeded 600, I decided to put an addon on the public and write this article, maybe at least it will brighten up my leisure time, but at the same time I reprimanded.
Of course, I tried to transfer the addon to the new version 2.80, but it turned out that the video editor was not only not improved, but even worsened. Performance is much worse, sometimes crashes when generating heavy tracks. The editor himself began to slow down. The inability to muffle certain audio tracks (I hope this is a bug, and they will be fixed in the next minor release). In the meantime, the addon needs the good old version 2.79
Here is a link to the addon , do not forget to put music21 on the Python blender interpreter. I look forward to the massive appearance of synthesized covers from you.
Background
It all started with the fact that about a year ago (in November 2018) I saw in YouTube’s offer such an unusual cover on The Ultimate Canon
The guy recorded the samples of each note of the song and, through painstaking editing, assembled the whole song from them. To whom it is, but I think it is at least funny. And the number of views (at that time a little more than 1,000,000) indicated that the theme ( 1% guitar skill 99% editing skills ) was popular.
I am sure that those who were at least a little bit involved in mixing songs know that sometimes it’s easier to slightly cut and move the track than to ask a careless guitarist to replay the part. I also used to make classic covers, and even then I had the idea of creeping in and creating a cover exactly as the guy from the video did. And now I see that "my idea was brazenly stolen" and got a good exhaust. I was annoyed that my train left, but it dawned on me that I could do the same, but at a different level, adding a new step - 1% guitar 1% editing 98% programming skills .
In addition, this will allow you to create much more complex compositions, which, when manually edited, few people have the patience.
Development
So, the task was to automate the process of slicing sound samples into a musical composition.
First of all, it was necessary to somehow convey to the future program data on the composition, its notes, tracks, instruments. I immediately thought about GuitarPro and its data export options: MusicXML and MIDI.
Searches led me to choose a parser for midi files on Python music21 . This is not only a parser, but apart from this, I do not need anything from the module. And the analogues were either with terrible documentation, or could not do what I needed as easily as music21.
Great, now I can get data from midi files about tracks, their notes, their position and duration. We are going further.
Now, based on this data, you need to cut from video / audio files. Then I chose fast enough. Definitely Blender, even despite its modest capabilities as a video editor. I have experience working with Adobe PremierePro, After Effects, but there is my own scripting dialect, which is no longer useful anywhere, and its capabilities are unknown to me. In Blender, almost any action can be carried out through a Python script. And that already matches the language of music21. It is worth explaining that at that time I was not familiar with Python at all, therefore I also considered this project as an excellent occasion to get acquainted with this popular language. Bingo!
Gradually, I began to delve into the language, outputted midi-file notes to the console through music21, quickly looked at how to make add-ons to the blender, and proceeded to the first practical task: generating sample data. He recorded every unique note on the guitar and proceeded to cut, but soon stopped. My internal programmer protested against this painstaking work (and there can be a lot of notes for each instrument: 30-50). And this would have to cut the notes and render them individually in separate files, and to do this, adjust each track-note in length to the beginning of the timeline ... In general, this process had to be simplified.
The solution was to use such a thing in Blender as markers. These are essentially points with textual information that can be set on a specific frame. The logic was this: the user arranges his video and audio (if the audio was recorded on a separate track), drives them to each other and marks with the markers the beginning of each note in the video, and in the marker text indicates what kind of note is (A #, D, C and etc.) and its maximum duration on the record. Then the information about the markers is recorded in a file and is already used when cutting individual notes.
The next point was already the “core” of the functional itself - cutting notes and their positioning on the timeline. Ironically, there’s nothing special to say: there was a lot of reading documentation, Blender’s documentation was far from always quite detailed, but gradually I achieved what I wanted. When I saw (and heard) the first result (it was a short composition of the Epidemic - Frodo group), happiness knew no bounds. I think everyone knows the feeling when something finally comes out.
The quality of the code is poor. I tried to do it in a hurry, because I fancied that I was not the only one to think of such a thing, and I would not want to get ahead of me here (spoiler! how naive I was). Therefore, there was no time to adhere to the style and reflect on the structure, I tried to get a working prototype faster.
Nuances
Now for the nuances of implementation. Blender has a limit in the layers of the editor, maximum 32. From the picture you can see that the audio and video samples (green and purple) occupy 14 layers each and are formed in ascending order, then again at the beginning of their sector. This is due to the fact that Blender will not allow you to spawn a sample on top of another. And in music it often happens that the next note begins even before the previous sound ends. Therefore, in order to avoid overlap, I decided to spawn the next note on a layer higher than the previous one, and when the layers of the sector end, start again from the first layer (it is unlikely that the first note will sound as much as 14 layers forward). Yes, this could be done smarter by saving layers, but as I said, I was in a hurry.
The most attentive ones could notice that the entire sector is 2 by 14 layers, this is 28, and the maximum in Blender is 32. The fact is that for spawn notes, you have to spawn 2 original tracks (video and audio) through a script and then cut them out note. And you can’t spawn on top of another track, so I reserved the 31st and 32nd layers for this business. The 29th and 30th are used for intermediate storage of already generated tracks: generation occurs under one track from the midi file, then the notes are grouped into one track, transferred to the 29/30 layer, we generate the next track, etc.
There is also a nuance: in midi scores there is such a property as playback speed. And it can change many times inside the composition. In music21, I never found the opportunity to track these speed changes. Therefore, the speed of the generated notes will coincide with the very first speed specified in the midi file. There are 2 solutions:
- for each section with a new speed, make a new midi file only with it;
- generate section notes again with the Tempo speed modifier (multiplicative factor to the initial speed).
I prefer to add my own tracks for each speed in GuitarPro, then in Blender, it’s enough to only generate them with a speed modifier, it’s faster and more difficult to get confused.
Video Editor Utilities
Now that you have a rough set of generated tracks, you need to mount a watchable cover. Those. position the tracks in the corners of the video, switch depending on the music, etc. In a blender, this is pretty bad. To apply the effect to the track, you need to “glue” another track from above, which will be rendered when rendering, and put it in the right position.
Of particular note are chords. This is when several notes sound at the same time, i.e. when rendering a video, only the top note of the chord will be displayed. The solution was to add the same effect (fortunately, they do not break when superimposed on each other). If during normal editing of the generated tracks I could do everything manually, then editing every note of the chord is too much. As you know, I also automated this nuance. Now, at the touch of a button “Chordify strips”, the selected samples will be transformed as needed and each note of the chord will be drawn.
And one more point of automation: sometimes the generated samples have empty parts between themselves. This is due to the fact that the scores in these places are suddenly empty places. In GuitarPro, this sounds normal, due to various effects, the sound of the note is kept in between. However, voids form in the blender. They must be filled by stretching the previous note before the next. Exactly this task is performed by the “Fill gaps” button.
Functionality for working with volume was also written on trifles, as well as the ability to replace the missing note with another, but with a different value of the pitch, which allows you to go beyond the boundaries of the instrument range (although in practice it is no more than 1 octave).
Glory on youtube
So, the addon is ready. About a month and a half was spent from the beginning of the idea, he worked in the evenings in his spare time. It's time to make a cover that will beat that guy’s hand cover. I chose the same song, but in a rock arrangement: Canon Rock. It is much more melodic and more complicated than the original, and will clearly demonstrate the new level of my approach. Yes, and as a response to an already popular video, it can attract the attention of an audience.
In the text above, I deceived a bit, because I started working on the cover in the process of writing the add-on, so that, using his example, I understand what functionality is needed and implement it.
And now the cover is ready and polished ! He shot the introduction and the ending, in which, in broken English, he tried to explain the steepness of my answer. He spoke some words deliberately with errors (complimented, double y eff), hoping to get viewers to amend in the comments. Prepared a preview. With bated breath, in anticipation of the expected triumph, uploaded and published the video. I sent them in cover groups on covers, and threw the link on Instagram to that guy. He, by the way, has a very triumphant nickname: Ralph Jay Triumfo.
As time went. There was no triumph. In the first day I got about 100 views, half of which were mine and my friends. Then there was a lull. With each new day I became more and more disappointed in this whole undertaking. Do people really not understand how cool I did it? Why word of mouth does not work? Or maybe the idea itself was cool only in my head?
Be that as it may, I liked the result, and I gradually began to make new covers.
At that time, I participated in the filming of the program “Brain Modeling” on local TV, and once I mentioned my craft in a conversation with the host. The result was a small report about me. Mom, I'm on TV !
I perfectly understood that pensioners mainly watch local TV, so there were no expectations from this.
Even then, I wanted to bring the add-on code to mind, optimize generation and put the add-on in the public domain, but the failure of triumph diminished my ardor. In addition, then the full release of the new version of Blender was being prepared, and the API was changing. I wanted to wait for its release in the summer and transfer the addon to the new version, and then put it out, but again, there was no special desire.
And now, after almost a year, when views of the first video barely exceeded 600, I decided to put an addon on the public and write this article, maybe at least it will brighten up my leisure time, but at the same time I reprimanded.
Of course, I tried to transfer the addon to the new version 2.80, but it turned out that the video editor was not only not improved, but even worsened. Performance is much worse, sometimes crashes when generating heavy tracks. The editor himself began to slow down. The inability to muffle certain audio tracks (I hope this is a bug, and they will be fixed in the next minor release). In the meantime, the addon needs the good old version 2.79
Here is a link to the addon , do not forget to put music21 on the Python blender interpreter. I look forward to the massive appearance of synthesized covers from you.
All Articles