Kubernetes RBAC Users and Authorization
Note perev. : Continuing the recently raised topic of Kubernetes security in general and RBAC in particular, we are publishing a translation of this material from a French consultant from the Adaltas Big Data company. The author shows in detail how to create users, give them rights and continue to serve.
Setting up and starting a Kubernetes cluster is just the beginning: it needs to be exploited as well. To secure access to the cluster, you need to set user credentials and correctly manage authentication and authorization settings.
(Illustration taken from the CNCF blog - approx. Transl.)
This article focuses on how to create users using X.509 client certificates, and how to manage authorization using the basic RBAC APIs in Kubernetes. We will also talk about some open source projects that simplify cluster administration: rakkess, kubectl-who-can, rbac-lookup, and RBAC Manager.
First of all, several assumptions must be made:
If you do not have a ready-made Kubernetes cluster, I recommend that you refer to a colleague's article (Arthur BUSSER) in which he talks about installing Kubernetes on CentOS 7 using Vagrant.
There are 4 nodes in our cluster: one master and 3 workers. The wizard will also be used as an edge node to interact with the cluster.
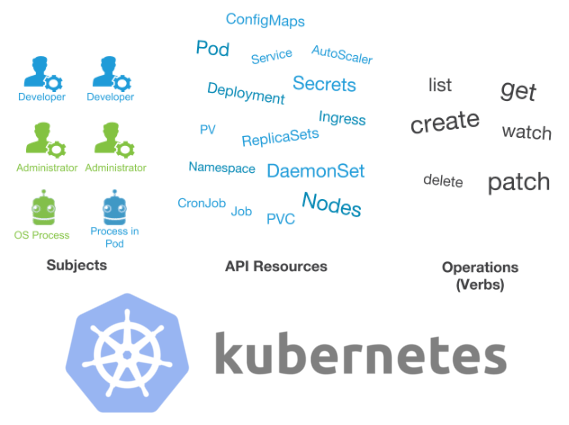
Role-based access control (RBAC) is a method of controlling access to computers and network resources, based on the roles of individual users in a company. RBAC can be used with all Kubernetes resources that support CRUD (Create, Read, Update, Delete). Examples of such resources:
And here are examples of possible operations with them:
To manage RBAC in Kubernetes, we need to declare:
Kubernetes has the following default roles:
Of course, you can create your own
and
, but we recommend that you use the default roles as much as possible, as the situation allows. Otherwise, you can quickly get confused in all this.
We will create two namespaces:
and
, - as well as two users:
and
- with different roles in these namespaces:
Typically, there are two types of users: service accounts managed by Kubernetes, and regular users. We will focus on the latter. Here's how they are described in the official documentation:
There are several ways to manage regular users:
In this article, we will use X.509 and OpenSSL certificates because of their simplicity. Creating users takes place in several stages - we will go through them all. Operations should be performed under the user account with administrator privileges of the cluster (cluster-admin). Here are all the steps for creating a user (using
as an example):
User
created successfully. We’ll do the same for
. There are quite a few steps, and it can take a long time to create a large number of users. Therefore, I wrote Bash scripts that automate the process: they can be found in the repository on GitHub .
Note perev. : As we wrote in our recent article , this procedure can be simplified in a more “native” way to Kubernetes - through new features in the kubeadm console utility . However, remember that at the time of publication of this translation, they are available in alpha form. An example of a command to create a user is
.
We now have users, and we can move on to creating two namespaces:
Since we have not yet determined user authorization, they should not have access to cluster resources:
We will use
, available by default. However, we also show how to create your own
and
. In essence,
and
are just a set of actions (called
, that is, verbatim - verbs) that are allowed for certain resources and namespaces. Here is an example YAML file:
To create them, run the command:
Now bind the default
(
and
) to our users as follows:
RoleBindings must be specified by namespace, not by user. In other words, to authorize
we will create two RoleBindings. An example of a YAML file that defines RoleBindings for
:
We allow
to
and edit
. The same thing needs to be done with authorizations for
. To activate them, run the command:
In this case,
was used instead of
. The difference between them is that
creates an object and does nothing else, and
- not only creates the object (if it does not exist), but also updates if necessary.
Let's check if our users have received the necessary permissions.
So, we have successfully set various roles and user authorizations. The question arises: how now to manage all this? How do I know if the permissions for a specific user are set correctly? How do you know who has the authority to perform a specific action? How to get a general picture of user permissions?
We need answers to all these questions to ensure cluster security. The
command allows you to find out if a user can perform a specific action:
The first command (1) allows the user to find out if he can perform some action. The second (2) - allows the administrator to impersonate the user to find out if he can perform a certain action. This "reincarnation" is allowed only for users with cluster administrator privileges.
This is practically all that can be done using the built-in tools. That is why I will present some Open Source projects that will expand the capabilities offered by the kubectl auth can-i team. Before introducing them, let's establish the dependencies: Go and Krew .
Go is an open source programming language that allows you to create simple, reliable and efficient software. It was developed by Google under the inspiration of C and Pascal, based on the original concepts of Robert Griesemer , Rob Pike and Ken Thompson .
Krew is a tool that simplifies the use of kubectl plugins . Krew helps you find, install, and manage plugins. In terms of functions, it resembles tools such as apt, dnf or brew. Krew is only compatible with kubectl version 1.12 and higher.
This project allows you to view all the permissions that were granted to the user. For example, it helps answer the question of what
can do. First of all, let's install it:
Project documentation can be found in the repository on GitHub . Here is an example of his work:
This project allows us to find out which users can perform a specific action. He helps to answer the question: "Who can do this?" Installation:
The documentation is in the GitHub repository . Work example:
This project provides an overview of RBAC rules. It helps answer the questions: “What role do
and
belong to?”, “What role do all users belong to?”, “What role does the whole group belong to?”. To install, run the command:
The documentation is in the GitHub repository . Here is an example of work:
As the name of this project obviously implies, he is the manager of RBAC. It simplifies the many necessary manipulations. Perhaps the most important is the creation of RoleBindings. We saw earlier that when creating different roles for a user, it is necessary to create different RoleBindings. RBAC Manager helps by allowing you to do just one RoleBinding with all authorization at once. To install, you need to download the YAML file from the repository on GitHub:
The official documentation is in the GitHub repository . Work example:
We created users in the Kubernetes cluster using the X.509 client certificate with OpenSSL and gave them privileges. For easier user creation, you can use the script available in my repository on GitHub (or the experimental kubeadm commands - approx. Transl.) . As for cluster administration, you can use the Open Source-projects presented in the article:
Creating users can turn into a very time-consuming task, especially if you need to set a large number of users at a time (or create them often). To alleviate the situation can connect corporate LDAP to the Kubernetes cluster. Some Open Source projects ( Kismatic [Project looks abandoned - approx. Transl.] And ObjectifLibre ) offer Kubernetes webhooks that allow direct authentication through LDAP. Another possible solution is to configure an OpenID server with corporate LDAP as a backend.
Read also in our blog:
Setting up and starting a Kubernetes cluster is just the beginning: it needs to be exploited as well. To secure access to the cluster, you need to set user credentials and correctly manage authentication and authorization settings.
(Illustration taken from the CNCF blog - approx. Transl.)
This article focuses on how to create users using X.509 client certificates, and how to manage authorization using the basic RBAC APIs in Kubernetes. We will also talk about some open source projects that simplify cluster administration: rakkess, kubectl-who-can, rbac-lookup, and RBAC Manager.
Preconditions and Assumptions
First of all, several assumptions must be made:
- At least you can imagine how Kubernetes works .
- You have a working Kubernetes or Minikube cluster .
- You have the kubectl CLI utility installed .
- You have the OpenSSL package installed.
If you do not have a ready-made Kubernetes cluster, I recommend that you refer to a colleague's article (Arthur BUSSER) in which he talks about installing Kubernetes on CentOS 7 using Vagrant.
There are 4 nodes in our cluster: one master and 3 workers. The wizard will also be used as an edge node to interact with the cluster.
RBAC APIs
Role-based access control (RBAC) is a method of controlling access to computers and network resources, based on the roles of individual users in a company. RBAC can be used with all Kubernetes resources that support CRUD (Create, Read, Update, Delete). Examples of such resources:
- namespaces
- Pods
- Deployments
- persistent volumes (PersistentVolumes);
- ConfigMaps
And here are examples of possible operations with them:
-
create
-
get
-
delete
(delete) ; -
list
(list
view) ; -
update
.
To manage RBAC in Kubernetes, we need to declare:
-
Role
andClusterRole
. These are simply rule sets representing a set of permissions.Role
can only be used to provide access to resources within namespaces.ClusterRole
can provide the same permissions asRole
, and also give access to resources available within the entire cluster, and so-called non-resource endpoints (like/healthz
- approx. Transl.) . -
Subjects
Subject is an entity that will perform operations in a cluster. It can be users, services, or even groups. -
RoleBinding
andClusterRoleBinding
. As the name implies, this is simply a binding of the subject to a Role or ClusterRole.
Kubernetes has the following default roles:
-
view
: read-only access, excludes secrets; -
edit
: the above + the ability to edit most resources, excludes roles and role bindings; -
admin
: the above + the ability to manage roles and role mappings at the namespace level; -
cluster-admin
: all possible privileges.
Of course, you can create your own
Roles
and
ClusterRoles
, but we recommend that you use the default roles as much as possible, as the situation allows. Otherwise, you can quickly get confused in all this.
Usage example
We will create two namespaces:
my-project-dev
and
my-project-prod
, - as well as two users:
jean
and
sarah
- with different roles in these namespaces:
- my-project-dev:
- jean: edit
- my-project-prod:
- jean: view
- sarah: edit
Create and authenticate users using X.509 client certificates
Typically, there are two types of users: service accounts managed by Kubernetes, and regular users. We will focus on the latter. Here's how they are described in the official documentation:
It is assumed that regular users are managed by an external, independent service. The role may be played by an administrator distributing private keys, a user repository like Keystone or Google Accounts, or even a file with a list of usernames and passwords. In this regard, Kubernetes has no objects representing ordinary users. Ordinary users cannot be added to the cluster through an API call.
There are several ways to manage regular users:
- Basic Auth :
- transferring the configuration to the API server with the following (or similar) contents: password, username, uid, group;
- X.509 Client Certificate:
- creation of a user’s secret key and certificate signing request;
- certification in a certification authority (Kubernetes CA) to obtain a user certificate;
- Bearer Tokens (JSON Web Tokens, JWT):
- OpenID Connect
- authentication layer on top of OAuth 2.0;
- webhooks
In this article, we will use X.509 and OpenSSL certificates because of their simplicity. Creating users takes place in several stages - we will go through them all. Operations should be performed under the user account with administrator privileges of the cluster (cluster-admin). Here are all the steps for creating a user (using
jean
as an example):
- Create a user on the wizard, and then go to his home directory to complete the remaining steps:
useradd jean && cd /home/jean
- Create a private key:
openssl genrsa -out jean.key 2048
- Create a certificate signing request (CSR).
CN
is the username,O
is the group. You can set permissions by group. This will simplify the work if, for example, you have many users with the same permissions:
# openssl req -new -key jean.key \ -out jean.csr \ -subj "/CN=jean" # $group openssl req -new -key jean.key \ -out jean.csr \ -subj "/CN=jean/O=$group" # openssl req -new -key jean.key \ -out jean.csr \ -subj "/CN=jean/O=$group1/O=$group2/O=$group3"
- Sign CSR in Kubernetes CA. We must use the CA certificate and key, which are usually found in
/etc/kubernetes/pki
. The certificate will be valid for 500 days:
openssl x509 -req -in jean.csr \ -CA /etc/kubernetes/pki/ca.crt \ -CAkey /etc/kubernetes/pki/ca.key \ -CAcreateserial \ -out jean.crt -days 500
- Create the
.certs
directory. In it we will store the public and private keys of the user:
mkdir .certs && mv jean.crt jean.key .certs
- Create a user inside Kubernetes:
kubectl config set-credentials jean \ --client-certificate=/home/jean/.certs/jean.crt \ --client-key=/home/jean/.certs/jean.key
- Set context for user:
kubectl config set-context jean-context \ --cluster=kubernetes --user=jean
- Edit the user configuration file. It contains the information necessary for authentication in a cluster. You can use the cluster configuration file, which usually lies in
/etc/kubernetes
: thecertificate-authority-data
andserver
variables should be the same as in the mentioned file:
apiVersion: v1 clusters: - cluster: certificate-authority-data: { } server: { } name: kubernetes contexts: - context: cluster: kubernetes user: jean name: jean-context current-context: jean-context kind: Config preferences: {} users: - name: jean user: client-certificate: /home/jean/.certs/jean.cert client-key: /home/jean/.certs/jean.key
Now you need to copy the above config to the.kube
directory:
mkdir .kube && vi .kube/config
- It remains to make the user the owner of all created files and directories:
chown -R jean: /home/jean/
User
jean
created successfully. We’ll do the same for
sarah
. There are quite a few steps, and it can take a long time to create a large number of users. Therefore, I wrote Bash scripts that automate the process: they can be found in the repository on GitHub .
Note perev. : As we wrote in our recent article , this procedure can be simplified in a more “native” way to Kubernetes - through new features in the kubeadm console utility . However, remember that at the time of publication of this translation, they are available in alpha form. An example of a command to create a user is
kubeadm alpha kubeconfig user
.
We now have users, and we can move on to creating two namespaces:
kubectl create namespace my-project-dev kubectl create namespace my-project-prod
Since we have not yet determined user authorization, they should not have access to cluster resources:
User: Jean kubectl get nodes Error from server (Forbidden): nodes is forbidden: User "jean" cannot list resource "nodes" in API group "" at the cluster scope kubectl get pods -n default Error from server (Forbidden): pods is forbidden: User "jean" cannot list resource "pods" in API group "" in the namespace "default" kubectl get pods -n my-project-prod Error from server (Forbidden): pods is forbidden: User "jean" cannot list resource "pods" in API group "" in the namespace "my-project-prod" kubectl get pods -n my-project-dev Error from server (Forbidden): pods is forbidden: User "jean" cannot list resource "pods" in API group "" in the namespace "my-project-dev"
User: Sarah kubectl get nodes Error from server (Forbidden): nodes is forbidden: User "sarah" cannot list resource "nodes" in API group "" at the cluster scope kubectl get pods -n default Error from server (Forbidden): pods is forbidden: User "sarah" cannot list resource "pods" in API group "" in the namespace "default" kubectl get pods -n my-project-prod Error from server (Forbidden): pods is forbidden: User "sarah" cannot list resource "pods" in API group "" in the namespace "my-project-prod" kubectl get pods -n my-project-dev Error from server (Forbidden): pods is forbidden: User "sarah" cannot list resource "pods" in API group "" in the namespace "my-project-dev"
Creation of Role and ClusterRole
We will use
ClusterRole
, available by default. However, we also show how to create your own
Role
and
ClusterRole
. In essence,
Role
and
ClusterRole
are just a set of actions (called
verbs
, that is, verbatim - verbs) that are allowed for certain resources and namespaces. Here is an example YAML file:
apiVersion: rbac.authorization.k8s.io/v1beta1 kind: Role metadata: name: list-deployments namespace: my-project-dev rules: - apiGroups: [ apps ] resources: [ deployments ] verbs: [ get, list ] --------------------------------- apiVersion: rbac.authorization.k8s.io/v1beta1 kind: ClusterRole metadata: name: list-deployments rules: - apiGroups: [ apps ] resources: [ deployments ] verbs: [ get, list ]
To create them, run the command:
kubectl create -f /path/to/your/yaml/file
Binding Role or ClusterRole to Users
Now bind the default
ClusterRole
(
edit
and
view
) to our users as follows:
-
jean
:-
edit
- in the namespacemy-project-dev
; -
view
- in the namespacemy-project-prod
;
-
-
sarah
:-
edit
- in themy-project-prod
namespace.
-
RoleBindings must be specified by namespace, not by user. In other words, to authorize
jean
we will create two RoleBindings. An example of a YAML file that defines RoleBindings for
jean
:
apiVersion: rbac.authorization.k8s.io/v1 kind: RoleBinding metadata: name: jean namespace: my-project-dev subjects: - kind: User name: jean apiGroup: rbac.authorization.k8s.io roleRef: kind: ClusterRole name: edit apiGroup: rbac.authorization.k8s.io --------------------------------- apiVersion: rbac.authorization.k8s.io/v1 kind: RoleBinding metadata: name: jean namespace: my-project-prod subjects: - kind: User name: jean apiGroup: rbac.authorization.k8s.io roleRef: kind: ClusterRole name: view apiGroup: rbac.authorization.k8s.io
We allow
jean
to
view
my-project-prod
and edit
my-project-dev
. The same thing needs to be done with authorizations for
sarah
. To activate them, run the command:
kubectl apply -f /path/to/your/yaml/file
In this case,
kubectl apply
was used instead of
kubectl create
. The difference between them is that
create
creates an object and does nothing else, and
apply
- not only creates the object (if it does not exist), but also updates if necessary.
Let's check if our users have received the necessary permissions.
- User:
sarah
(edit
inmy-project-prod
)-
my-project-prod
- can list pods (1);
- can create deployments (2).
-
my-project-dev
- cannot list pods (4);
- cannot create deployments (5).
-
(1) kubectl get pods -n my-project-prod No resources found. (2) kubectl run nginx --image=nginx --replicas=1 -n my-project-prod deployment.apps/nginx created (3) kubectl get pods -n my-project-prod NAME READY STATUS RESTARTS AGE nginx-7db9fccd9b-t14qw 1/1 Running 0 4s (4) kubectl get pods -n my-project-dev Error from server (Forbidden): pods is forbidden: User "sarah" cannot list resource "pods" in API group "" in the namespace "my-project-dev" (5) kubectl run nginx --image=nginx --replicas=1 -n my-project-dev Error from server (Forbidden): deployments.apps is forbidden: User "sarah" cannot create resource "deployments" in API group "apps" in the namespace "my-project-dev"
- User:
jean
(view
inmy-project-prod
andedit
inmy-project-dev
)-
my-project-prod
- can list pods (1);
- can display a list of deployments (2);
- cannot delete deployments (3).
- my-project-dev:
- can list pods (4);
- can create deployments (5);
- can list deployment'ov (6);
- can remove deployments (7).
-
(1) kubectl get pods -n my-project-prod NAME READY STATUS RESTARTS AGE nginx-7db9fccd9b-t14qw 1/1 Running 0 101s (2) kubectl get deploy -n my-project-prod NAME READY UP-TO-DATE AVAILABLE AGE nginx 1/1 1 1 110s (3) kubectl delete deploy/nginx -n my-project-prod Error from server (Forbidden): deployments.extensions "nginx" is forbidden: User "jean" cannot delete resource "deployments" in API group "extensions" in the namespace "my-project-prod" (4) kubectl get pods -n my-project-dev No resources found. (5) kubectl run nginx --image=nginx --replicas=1 -n my-project-dev deployment.apps/nginx created (6) kubectl get deploy -n my-project-dev NAME READY UP-TO-DATE AVAILABLE AGE nginx 0/1 1 0 13s (7) kubectl delete deploy/nginx -n my-project-dev deployment.extensions "nginx" deleted (8) kubectl get deploy -n my-project-dev No resources found.
User management and authorization
So, we have successfully set various roles and user authorizations. The question arises: how now to manage all this? How do I know if the permissions for a specific user are set correctly? How do you know who has the authority to perform a specific action? How to get a general picture of user permissions?
We need answers to all these questions to ensure cluster security. The
kubectl auth can-i
command allows you to find out if a user can perform a specific action:
# kubectl auth can-i $action $resource --as $subject (1) kubectl auth can-i list pods (2) kubectl auth can-i list pods --as jean
The first command (1) allows the user to find out if he can perform some action. The second (2) - allows the administrator to impersonate the user to find out if he can perform a certain action. This "reincarnation" is allowed only for users with cluster administrator privileges.
This is practically all that can be done using the built-in tools. That is why I will present some Open Source projects that will expand the capabilities offered by the kubectl auth can-i team. Before introducing them, let's establish the dependencies: Go and Krew .
Go installation
Go is an open source programming language that allows you to create simple, reliable and efficient software. It was developed by Google under the inspiration of C and Pascal, based on the original concepts of Robert Griesemer , Rob Pike and Ken Thompson .
wget https://dl.google.com/go/go1.12.5.linux-amd64.tar.gz sudo tar -C /usr/local -xzf go1.12.5.linux-amd64.tar.gz export PATH=$PATH:/usr/local/go/bin
Krew Installation
Krew is a tool that simplifies the use of kubectl plugins . Krew helps you find, install, and manage plugins. In terms of functions, it resembles tools such as apt, dnf or brew. Krew is only compatible with kubectl version 1.12 and higher.
set -x; cd "$(mktemp -d)" && curl -fsSLO "https://storage.googleapis.com/krew/v0.2.1/krew.{tar.gz,yaml}" && tar zxvf krew.tar.gz && ./krew-"$(uname | tr '[:upper:]' '[:lower:]')_amd64" install \ --manifest=krew.yaml --archive=krew.tar.gz export PATH="${KREW_ROOT:-$HOME/.krew}/bin:$PATH"
rakkess
This project allows you to view all the permissions that were granted to the user. For example, it helps answer the question of what
jean
can do. First of all, let's install it:
kubectl krew install access-matrix
Project documentation can be found in the repository on GitHub . Here is an example of his work:
kubectl access-matrix -n my-project-dev --as jean
kubect-who-can
This project allows us to find out which users can perform a specific action. He helps to answer the question: "Who can do this?" Installation:
go get -v github.com/aquasecurity/kubectl-who-can
The documentation is in the GitHub repository . Work example:
kubectl-who-can list pods -n default No subjects found with permissions to list pods assigned through RoleBindings CLUSTERROLEBINDING SUBJECT TYPE SA-NAMESPACE cluster-admin system:masters Group rbac-manager rbac-manager ServiceAccount rbac-manager system:controller:attachdetach-controller attachdetach-controller ServiceAccount kube-system system:controller:clusterrole-aggregation-controller clusterrole-aggregation-controller ServiceAccount kube-system system:controller:cronjob-controller cronjob-controller ServiceAccount kube-system system:controller:daemon-set-controller daemon-set-controller ServiceAccount kube-system system:controller:deployment-controller deployment-controller ServiceAccount kube-system system:controller:endpoint-controller endpoint-controller ServiceAccount kube-system system:controller:generic-garbage-collector generic-garbage-collector ServiceAccount kube-system system:controller:horizontal-pod-autoscaler horizontal-pod-autoscaler ServiceAccount kube-system system:controller:job-controller job-controller ServiceAccount kube-system system:controller:namespace-controller namespace-controller ServiceAccount kube-system system:controller:node-controller node-controller ServiceAccount kube-system system:controller:persistent-volume-binder persistent-volume-binder ServiceAccount kube-system system:controller:pod-garbage-collector pod-garbage-collector ServiceAccount kube-system system:controller:pvc-protection-controller pvc-protection-controller ServiceAccount kube-system system:controller:replicaset-controller replicaset-controller ServiceAccount kube-system system:controller:replication-controller replication-controller ServiceAccount kube-system system:controller:resourcequota-controller resourcequota-controller ServiceAccount kube-system system:controller:statefulset-controller statefulset-controller ServiceAccount kube-system system:coredns coredns ServiceAccount kube-system system:kube-controller-manager system:kube-controller-manager User system:kube-scheduler system:kube-scheduler User
rbac-lookup
This project provides an overview of RBAC rules. It helps answer the questions: “What role do
jean
and
sarah
belong to?”, “What role do all users belong to?”, “What role does the whole group belong to?”. To install, run the command:
kubectl krew install rbac-lookup
The documentation is in the GitHub repository . Here is an example of work:
kubectl-rbac_lookup jean SUBJECT SCOPE ROLE jean my-project-dev ClusterRole/edit jean my-project-prod ClusterRole/view kubectl-rbac_lookup sarah SUBJECT SCOPE ROLE sarah my-project-prod ClusterRole/edit kubectl-rbac_lookup --kind user SUBJECT SCOPE ROLE jean my-project-dev ClusterRole/edit jean my-project-prod ClusterRole/view sarah my-project-prod ClusterRole/edit system:anonymous kube-public Role/kubeadm:bootstrap-signer-clusterinfo system:kube-controller-manager kube-system Role/extension-apiserver-authentication-reader system:kube-controller-manager kube-system Role/system::leader-locking-kube-controller-manager system:kube-controller-manager cluster-wide ClusterRole/system:kube-controller-manager system:kube-proxy cluster-wide ClusterRole/system:node-proxier system:kube-scheduler kube-system Role/extension-apiserver-authentication-reader system:kube-scheduler kube-system Role/system::leader-locking-kube-scheduler system:kube-scheduler cluster-wide ClusterRole/system:kube-scheduler system:kube-scheduler cluster-wide ClusterRole/system:volume-scheduler kubectl-rbac_lookup --kind group SUBJECT SCOPE ROLE system:authenticated cluster-wide ClusterRole/system:basic-user system:authenticated cluster-wide ClusterRole/system:discovery system:authenticated cluster-wide ClusterRole/system:public-info-viewer system:bootstrappers:kubeadm:default-node-token cluster-wide ClusterRole/system:node-bootstrapper system:bootstrappers:kubeadm:default-node-token cluster-wide ClusterRole/system:certificates.k8s.io:certificatesigningrequests:nodeclient system:bootstrappers:kubeadm:default-node-token kube-system Role/kube-proxy system:bootstrappers:kubeadm:default-node-token kube-system Role/kubeadm:kubelet-config-1.14 system:bootstrappers:kubeadm:default-node-token kube-system Role/kubeadm:nodes-kubeadm-config system:masters cluster-wide ClusterRole/cluster-admin system:nodes kube-system Role/kubeadm:kubelet-config-1.14 system:nodes kube-system Role/kubeadm:nodes-kubeadm-config system:nodes cluster-wide ClusterRole/system:certificates.k8s.io:certificatesigningrequests:selfnodeclient system:unauthenticated cluster-wide ClusterRole/system:public-info-viewer
RBAC Manager
As the name of this project obviously implies, he is the manager of RBAC. It simplifies the many necessary manipulations. Perhaps the most important is the creation of RoleBindings. We saw earlier that when creating different roles for a user, it is necessary to create different RoleBindings. RBAC Manager helps by allowing you to do just one RoleBinding with all authorization at once. To install, you need to download the YAML file from the repository on GitHub:
kubectl apply -f /path/to/rbac/manager/yaml/file
The official documentation is in the GitHub repository . Work example:
apiVersion: rbacmanager.reactiveops.io/v1beta1 kind: RBACDefinition metadata: name: jose rbacBindings: - name: jose subjects: - kind: User name: jose roleBindings: - namespace: my-project-prod clusterRole: edit - namespace: my-project-dev clusterRole: edit
Conclusion
We created users in the Kubernetes cluster using the X.509 client certificate with OpenSSL and gave them privileges. For easier user creation, you can use the script available in my repository on GitHub (or the experimental kubeadm commands - approx. Transl.) . As for cluster administration, you can use the Open Source-projects presented in the article:
- kubectl auth can-i : find out if the user can perform some action;
- rakkess : find out all the actions that the user can perform;
- kubectl-who-can : determine which users can perform some action;
- rbac-lookup : get a general overview of RBAC;
- RBAC Manager : Simplify configuration by combining rights bindings, automating changes to RBAC, using labels as selectors to assign rights.
Creating users can turn into a very time-consuming task, especially if you need to set a large number of users at a time (or create them often). To alleviate the situation can connect corporate LDAP to the Kubernetes cluster. Some Open Source projects ( Kismatic [Project looks abandoned - approx. Transl.] And ObjectifLibre ) offer Kubernetes webhooks that allow direct authentication through LDAP. Another possible solution is to configure an OpenID server with corporate LDAP as a backend.
PS from the translator
Read also in our blog:
All Articles