Experience building Linux assemblies for single-board updates
Introduction
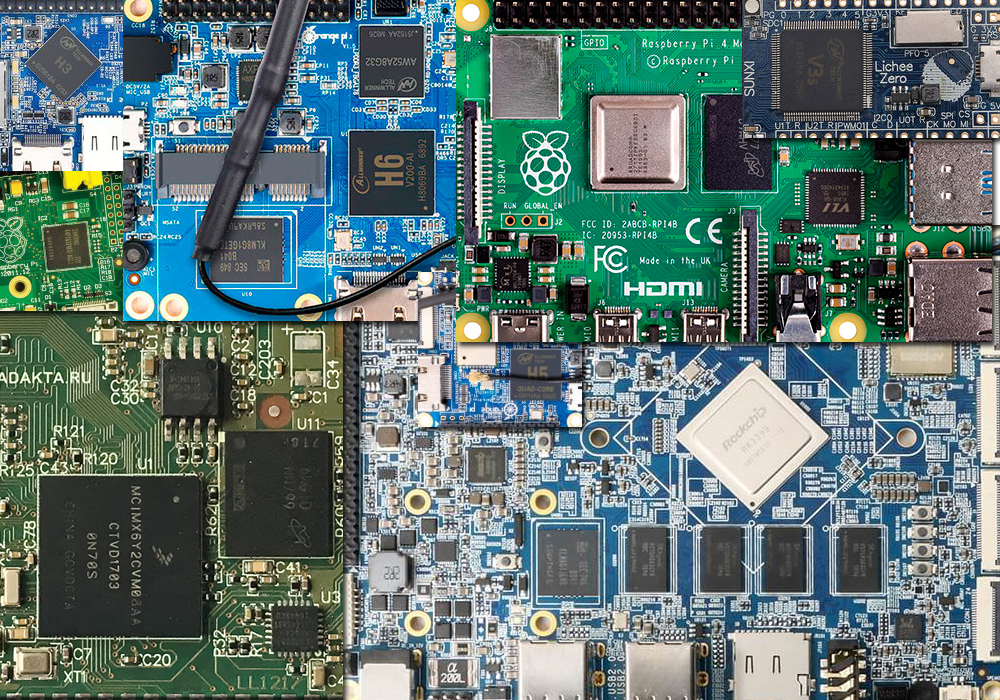
At the moment, the market offers a wide range of single-payers for every taste at an affordable price.
As a rule, various assemblies from manufacturers are designed to evaluate the platform and are the starting point of a new project, therefore they are not always suitable for specific tasks. In tasks where high reliability is required, the developer faces the question of how to modify the distribution kit and then not pay for it by completely reworking the image and the update system.
On the Internet, there is almost no information about what the release build should be and how to implement its update, so the developer is forced to come up with a “bicycle” or use his own developments, which are not always 100% tested.
Since I take part in the development of software for various Linux devices (my portfolio can be google by the word develinux) and I am also the author of the 11-parts project, I regularly have to deal not only with building assemblies, but also with developing update mechanisms via WEB or USB flash.
In this article I want to share my experience and knowledge in relevant areas.
Assembly requirements
In the process of developing assemblies and updates for various devices, I identified several requirements for myself:
- the assembly should not be damaged when the power is suddenly turned off;
- assembly should load quickly;
- the bootloader should work flawlessly;
- assembly must support update.
I will try to explain these requirements in more detail below, and after that I will describe 3 approaches in the division of images into sections and their updates.
The assembly must not be damaged when the power is suddenly turned off.
Who needs a device that stops working after a tenth reboot? To nobody! If you take ready-made distributions (and there are very few of them for embedded), then without a file from the box they are all very unreliable in this regard. I remembered very well the project where I used ubuntu under imx6, the file systems on the map were damaged, sometimes from the tenth reboot, sometimes from the fortieth, it depended on the stars in the sky. The project saved FS aufs. The fact is that ubuntu is not designed to readonly, and it should always write something. I remember a similar situation in another project where yocto was used on an SD card. In general, so note, SD cards are the ugliest type of drive that crashes the fastest, much more reliable than emmc and nand. If you use an SD card, it is advisable to write to it as little as possible during operation, the background transfer algorithms for the sectors are very unpredictable, I worked with dozens of different SD cards from world brands and did not find a single card that I could recommend.
But SD cards have several advantages, they are affordable, inexpensive and convenient in debugging software.
Why am I ... And, here's the thing - the root FS should be readonly, there should not be any entries in it during operation. You will probably think: how so? Millions of Android devices always write something and do not fail. True, but this is all because most Android devices, firstly, have a battery, and secondly, the root FS is framed as ramdisk, and the system partition is readonly.
If the system should be reliable, then all sorts of things with installing packages in the root FS can spoil a lot. I recommend squashfs as a file system. It works quickly, cannot write anything, saves space due to compression ...
But what about saving configs, downloading files, etc. you ask?
But for this you need to create separate RW partitions. If you plan to write in NAND, then I recommend a proven option - UBIFS. If in NOR, then jffs2. If I write to another drive, I recommend ext4, btrfs, ReiserFS, I can’t point out the best FS among them, because there were various problems with everyone.
In this case, always before mounting rw partitions, be sure to check the partitions for errors using fsck-like utilities.
Assembly should load quickly
Device download speeds affect overall usability. In some tasks, the loading time is not more than 30 seconds, in some, 5 minutes is permissible. For myself, I worked out time up to 1 minute, the less the better. Wait for the download for more than one minute for too long, it may seem that the device is frozen, so if you can reduce the time, then it is better to use it.
The bootloader should work flawlessly
The loader is what the assembly will not start without. Recently, I often observe how single-board manufacturers facilitate development by uploading a demo for an SD card with a description of how to register a bootloader in it or a finished image with a bootloader, which is simply filled in with the dd command. But what if the SD card freezes? The same is not uncommon. Personally, in my practice, cards often fell off. This is how you work for a fee for several hours, you write software, bam and that’s all ... errors in the kernel begin to pour in, the card fell off. But what if this is a device that should work in the fields without rebooting? And by the way, rebooting including watchdog does not always revive a hung card, the card does not have a reset signal, this is not emmc, of course this is more a question for the circuitry of the board, if the board has a reset of the power of the card, it will save, but this is not everywhere. On some boards, only distorting the power or card helps. Based on my experience, I do not recommend storing the bootloader on a drive with the main assembly if recording is performed on the drive during operation. If the system writes nothing to the drive with the bootloader, and this rarely happens, then please. In my experience, in readonly mode, the file system was deformed only due to hardware errors, but not software errors.
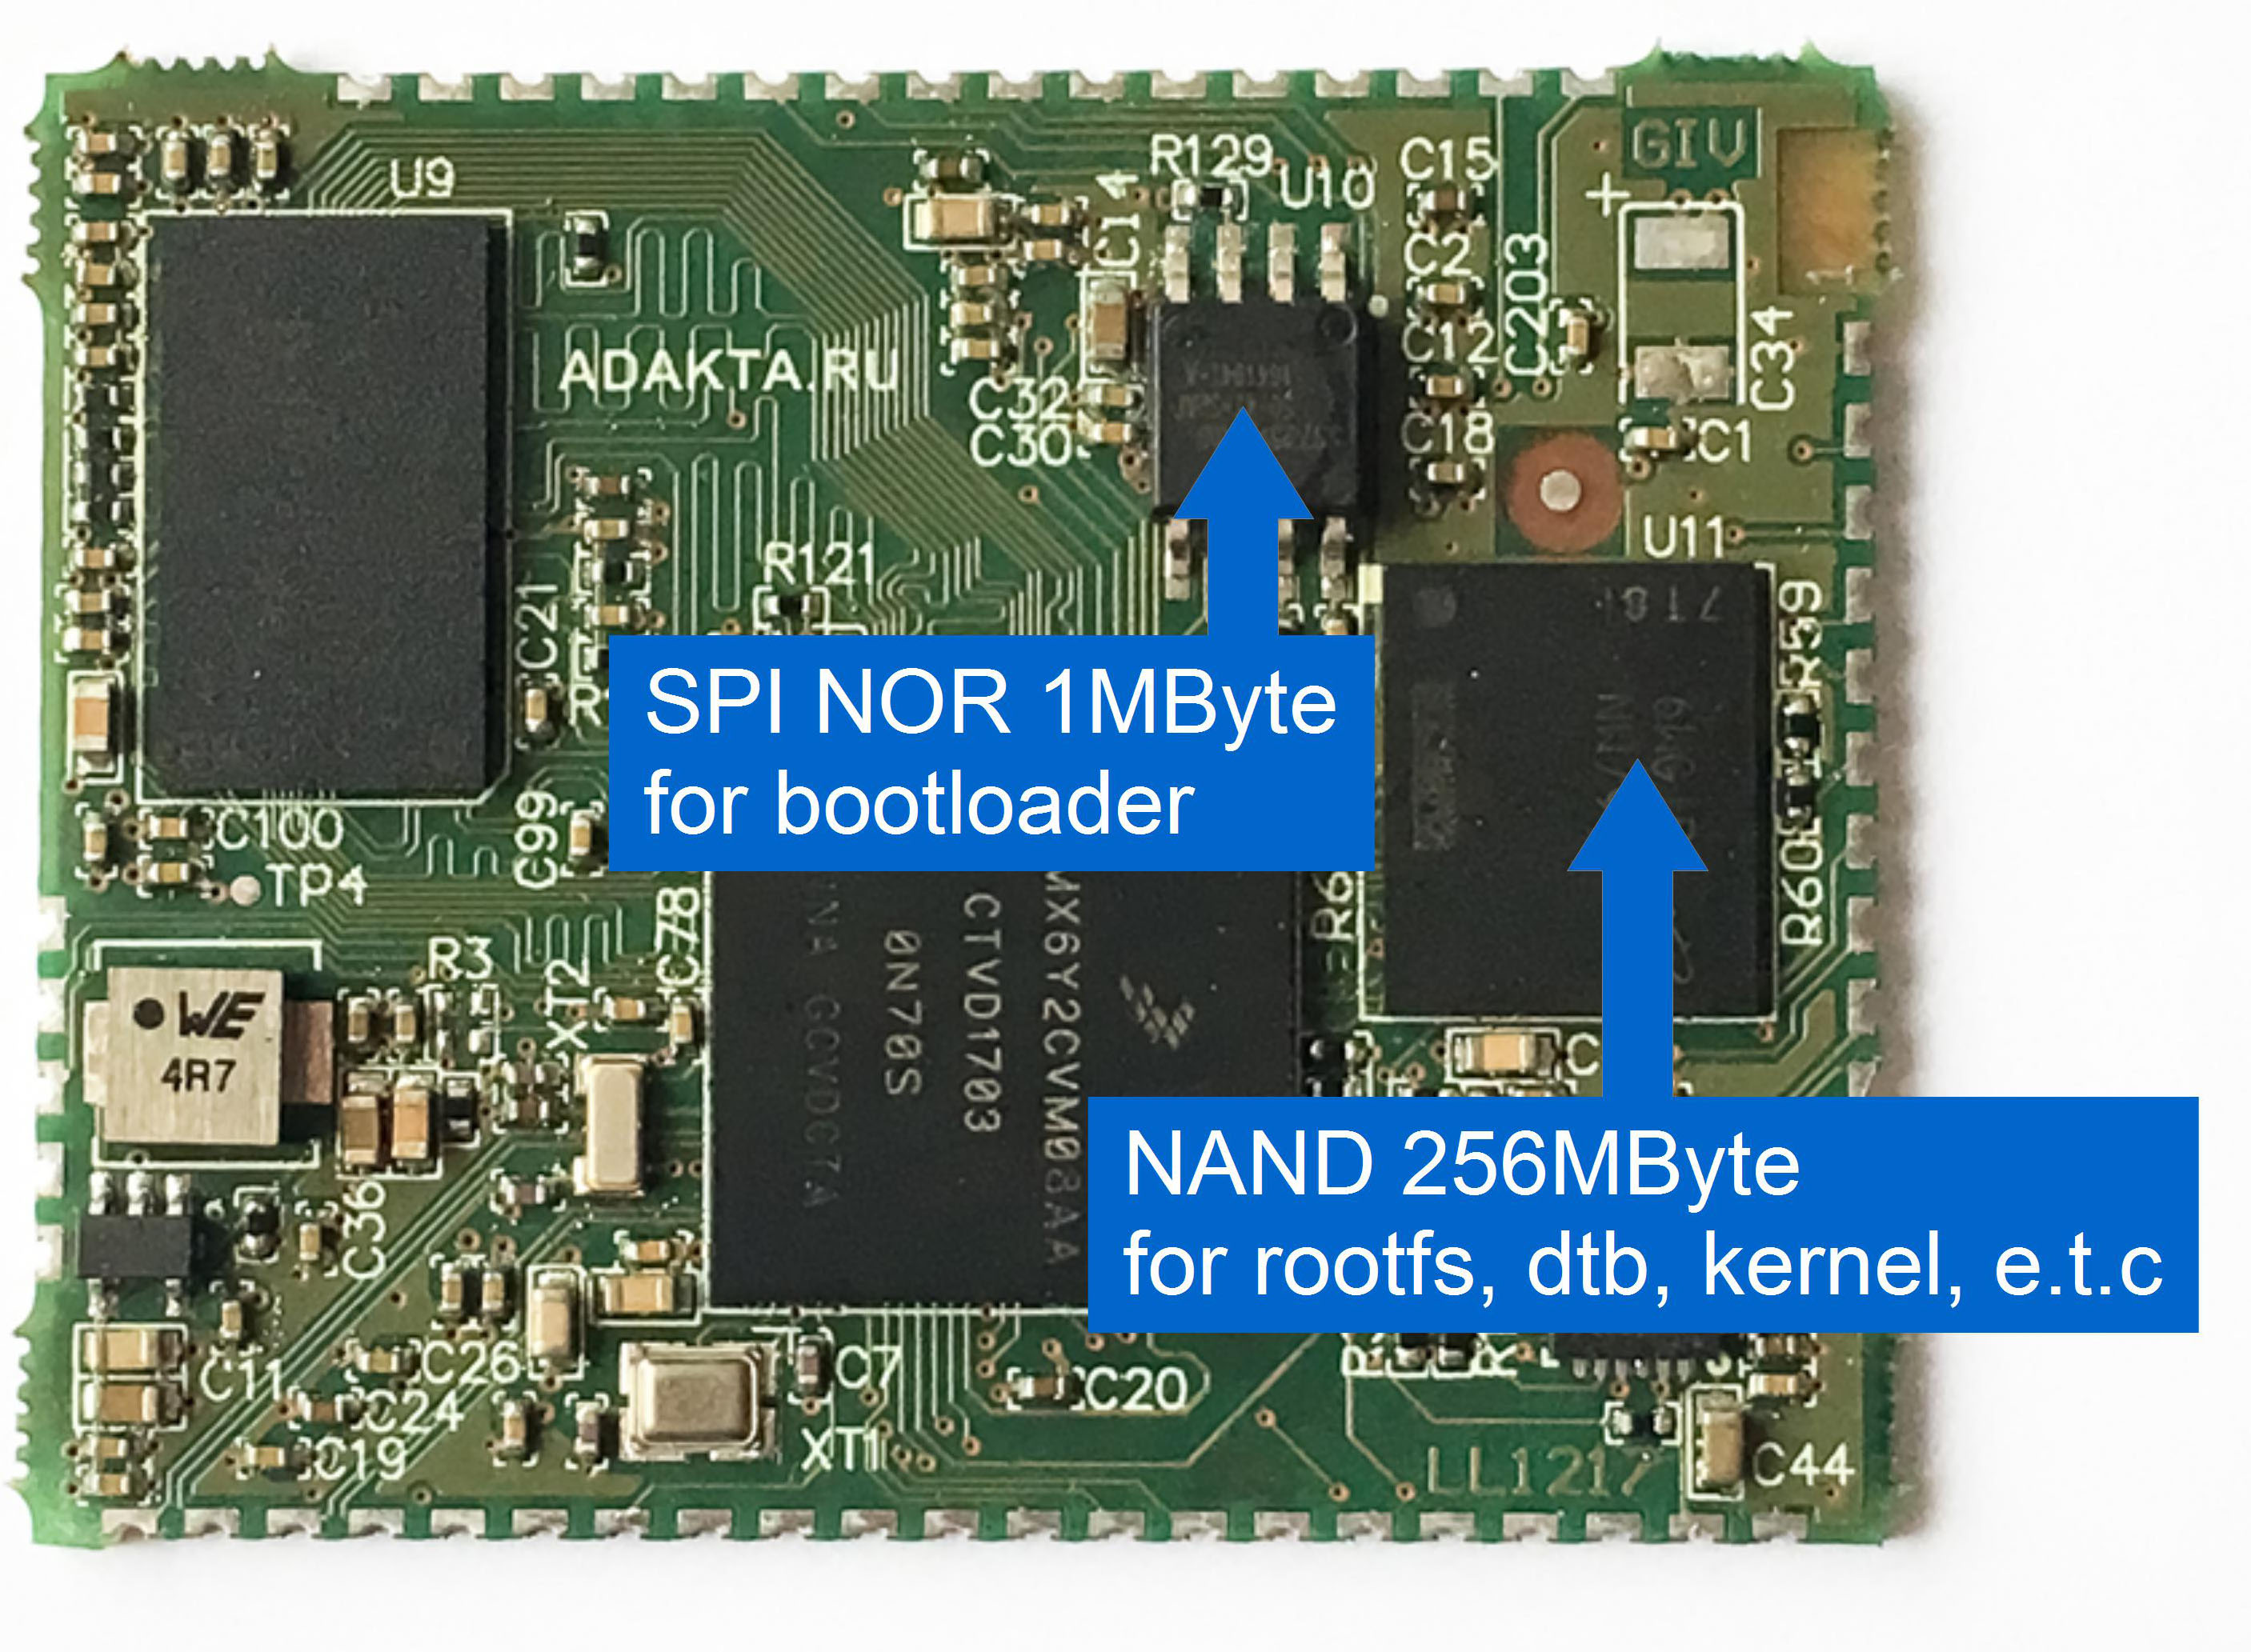
The bootloader should be stored in a safe place, on a reliable drive, for example, in a separate NOR or EEPROM chip. Below is an example of a module based on the imx6ull chip, with SPI NOR for storing the bootloader.
Build must support upgrade
Without updating, nowhere ... I participated in many projects and never got the perfect software to submit the work. An error is always detected or a functional improvement is required. You need to understand that while people write software, they will make mistakes, while people use the device, they will want a little more. In 90% of cases, the lack of a well-thought-out update system can lead both to a headache for the manufacturer and to the collapse of the entire project. For example, a video surveillance system has been developed for transport, the system has been installed all over Russia and it turns out that marketers underestimated the market and did not provide for streaming, and besides, several errors were found in the firmware, plus the consumer begins to glance in the direction of competitors, because there is just something that is not in the purchased device ... Yes, yes, in a strange garden strawberries are tastier and the weather is better (psychology).
What to do in such a situation? If the update is supported, then there are a lot of solutions, errors can be fixed, stream broadcasting can be improved, and the functionality can be customized for the consumer, give the consumer firmware with instructions and that’s it. But if it is not supported, then the manufacturer will have big adventures with business trips of service engineers up to replacing devices.
The update system in the device should be thought out to the smallest detail and tested 100%. One mistake in this part will turn the iron into brick, so there should not be any tolerances and exceptions.
The update process must be resistant to turning off the power, and under no circumstances should it spoil the device.
An overview of the approaches for partitioning images into account future updates
Of the many approaches I can recommend 3 types that I personally implemented. These are not all approaches; their scope is beyond the scope of this article. All 3 types have flaws and are far from ideal, but, as it seems to me, are close to the golden mean of common sense.
Approach No. 1
The easiest and most affordable way:
An image is put on the drive, for example an SD card, which is flashed from u-boot into the device’s built-in drive, for example NAND flash.
In u-boot, you need to prepare scripts for this.
Of the benefits - this is the easiest type of update, the development of which will take a maximum of 1 day.
The disadvantages of this approach are the lack of visualization of the process and the very limited capabilities of the bootloader, i.e. no complicated logic with standard tools, unless of course you come up with your own u-boot command (but this is another type of update, C is a great force). This method is not intended for updates via WEB - it is problematic to control the integrity of the flashed image; in some cases, the assembly size should not exceed the RAM size.
In addition, in some tasks it is required to save the settings during the upgrade, and this, with this approach, is not easy to implement.
Approach No. 2
The most reliable and protected method of the considered, but the most difficult. I recommend this method to be used in especially responsible developments, as It protects both from broken images and from physical damage to the main drive, since the circuit uses an additional one.
The approach uses a minimal build (ramdisk size 8-16Mb) and the main one. Ramdisk is a compressed archive, so a 16MB build will physically be several times smaller.
The goal of a minimal assembly is to evaluate the main assembly and load it.
Ramdisk is hosted with the kernel and u-boot scripts in a FIT image.
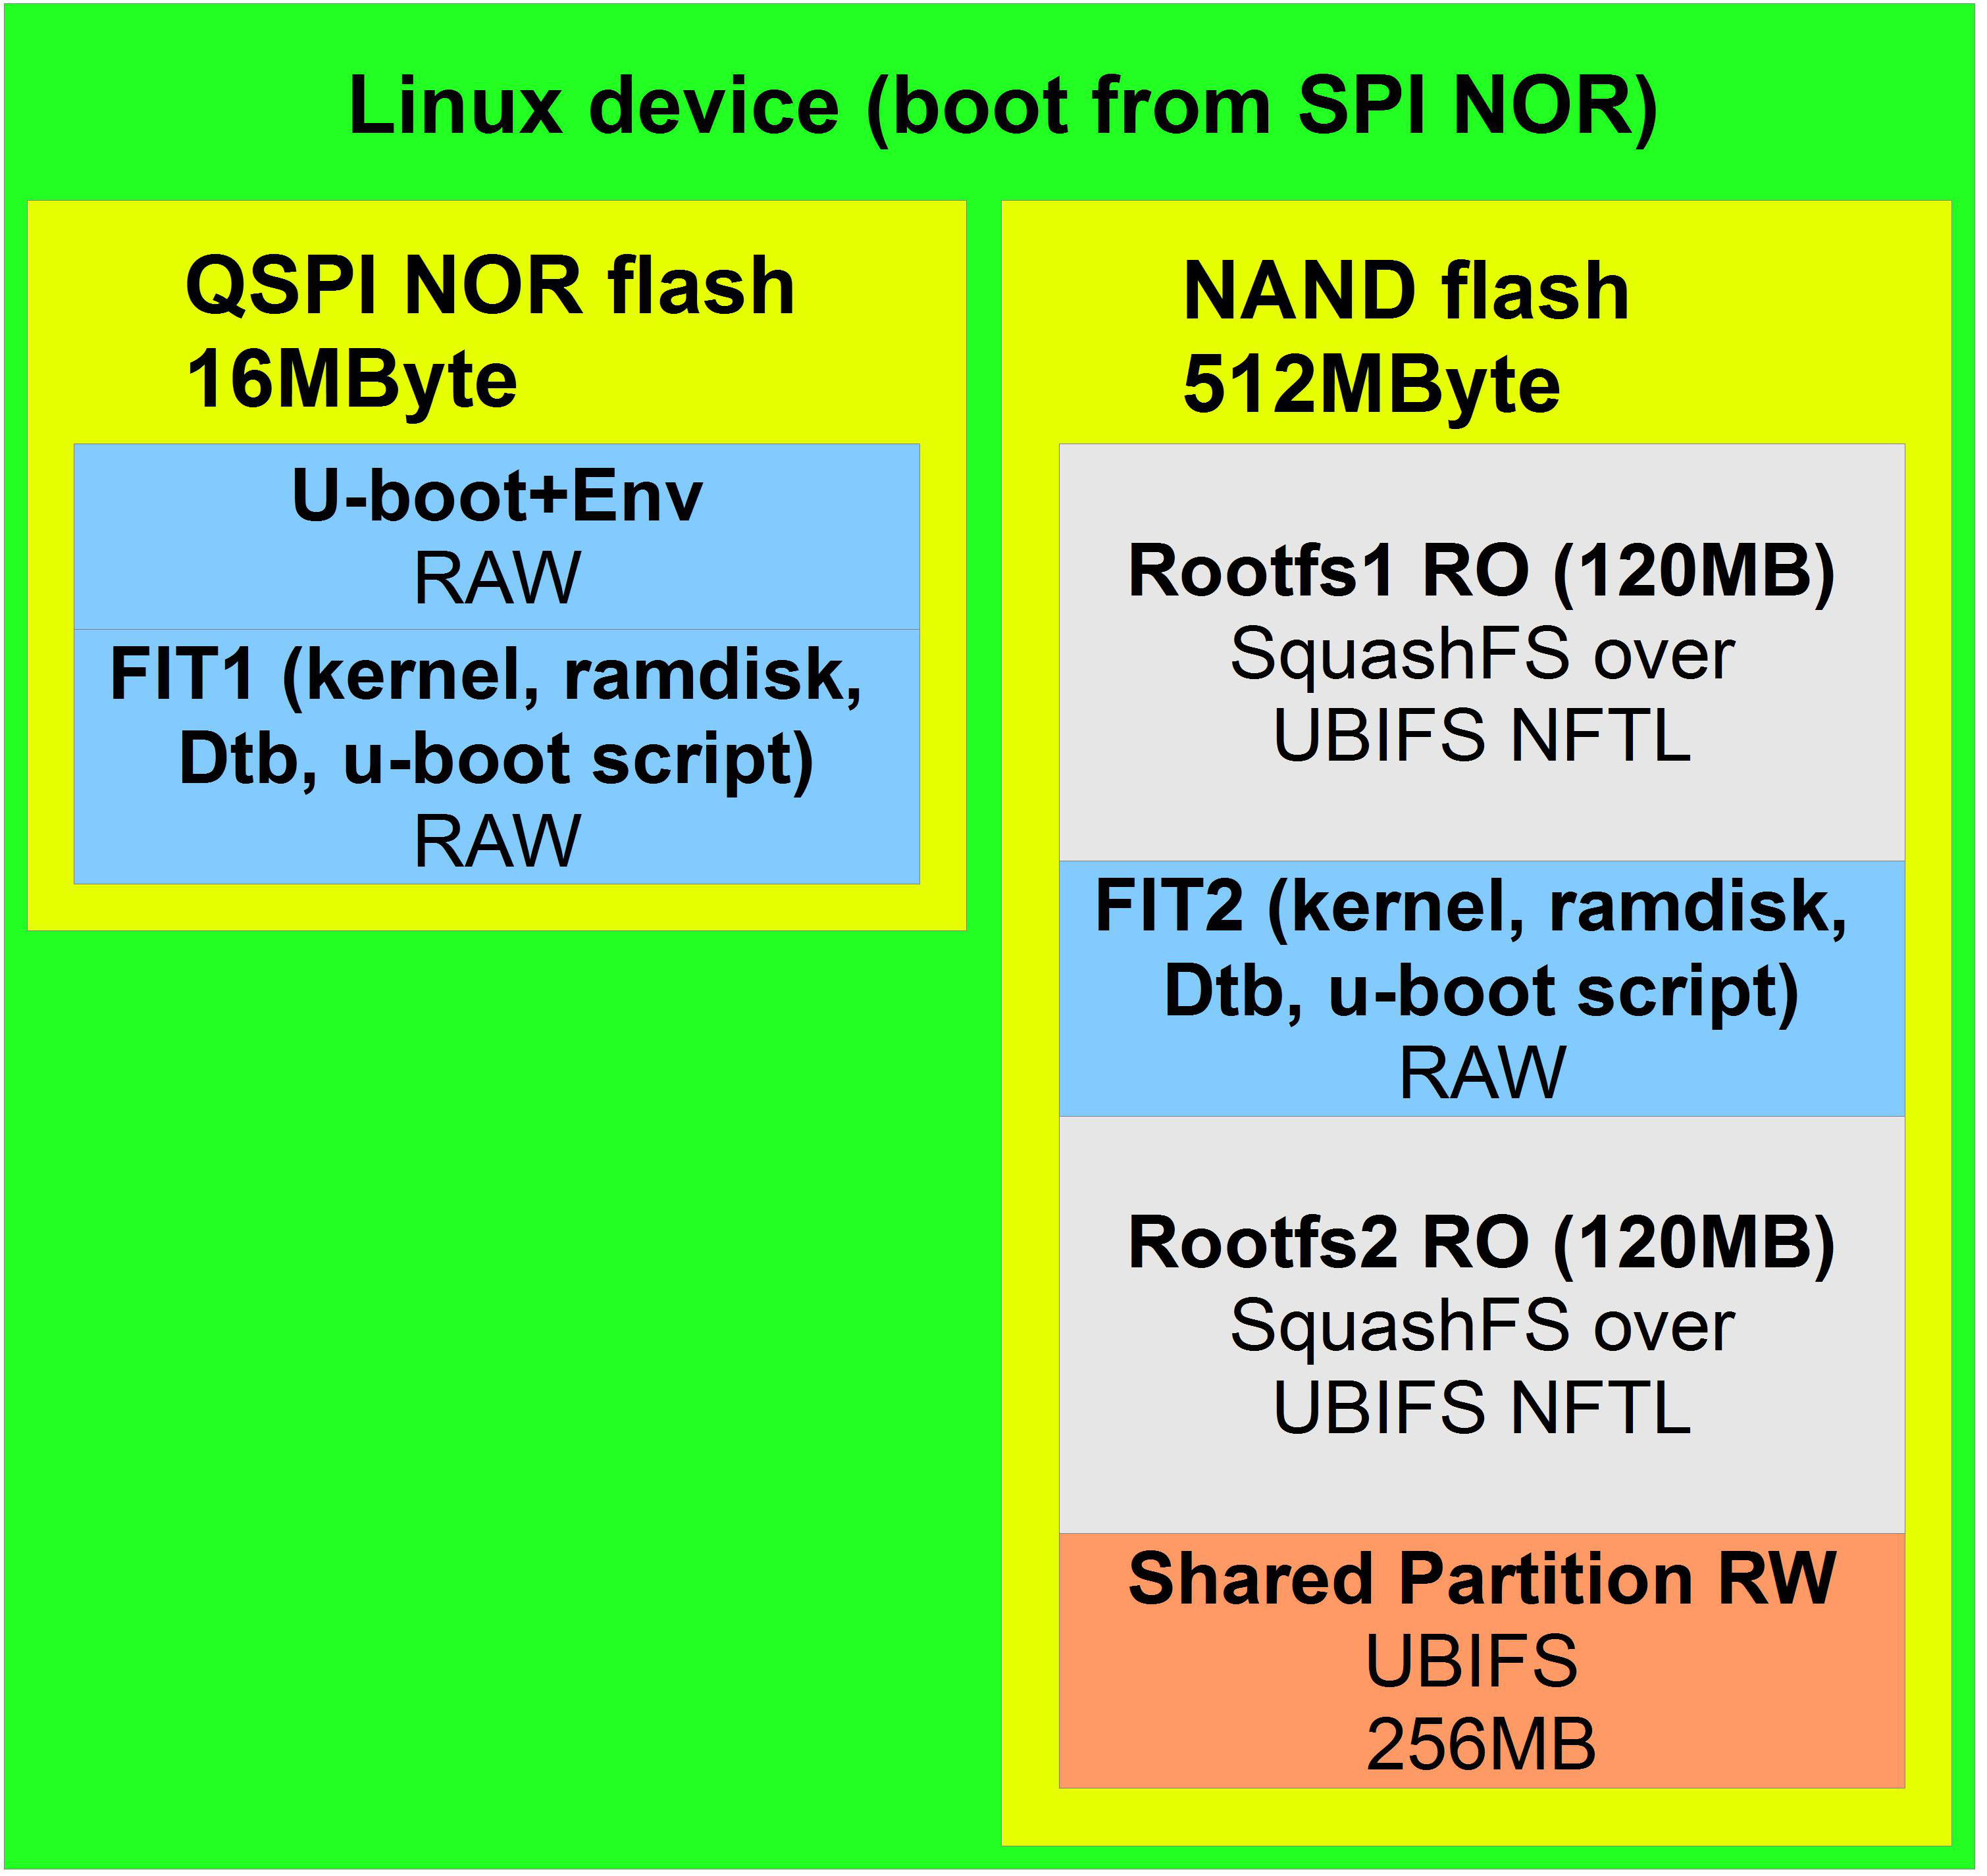
Why FIT image and what does it give? FIT image is a format that is supported by u-boot. It ensures the integrity of all components (kernel, dts, ramdisk, scripts). Unpacking the FIT image is carried out in u-boot, and if the checksum does not converge, u-boot will refuse to load it. This is convenient, i.e. no need to take care of integrity control by yourself, no need to write several files separately or invent your own images, everything is done by FIT image. Usually a FIT image takes up 7-20MB, it should be written to a separate highly reliable drive, for example, in qspi nor flash. The main assembly can be stored in cheaper and unreliable memory, for example, NAND flash. Since the main work will take place in the main assembly, it is precisely it that will be damaged first. In this case, a separate drive with minimal rootfs will come to the rescue.
Boot process.
u-boot downloads a script that tries to use FIT updates (FIT2), and then FIT factory firmware (FIT1).
If FIT2 is not present or its integrity is violated, the fit check will fail and u-boot will load the first FIT (FIT1). If there are FIT updates (FIT2), and it is not broken, then its ramdisk is loaded which checks the rootfs updates (Rootfs2).
If Rootfs2 is broken, then the scripts will delete the FIT updates (FIT2), then after the reboot the factory image consisting of FIT (FIT1) and Rootfs1 will be downloaded.
Update process.
The update image contains FIT, rootfs, and various assembly information, including checksums of all its components. Assembly information is used during the upgrade to monitor integrity and compatibility.
Update progress in steps:
- checking the image for compatibility with hardware and software,
- checking the integrity of the image in the update file,
- copying Rootfs2 from the update file to a previously prepared section,
- checking the integrity of the copied image in the section,
- copy FIT2 to the appropriate section,
- reboot.
If the process fails, the absence or damage of FIT2 will not spoil the system, as u-boot will simply refuse to use it and load the factory image. Therefore, during the upgrade, the integrity of FIT2 is not checked.
After the update, the new assembly will be placed on the main drive in the form of FIT2 and Rootfs2.
This method is resistant to mechanical damage to the drive and FS errors.
In case of critical malfunctions, the factory image will start, where the recovery software will work, which, for example, can double-check NAND, download the firmware from the network using the SSH protocol, and then record it.
I gave just an example of recovery, there are many options. In this approach, the recovery process is driven by full-fledged Linux, which can do anything ... and not the bootloader as in the first version.
Approach No. 3
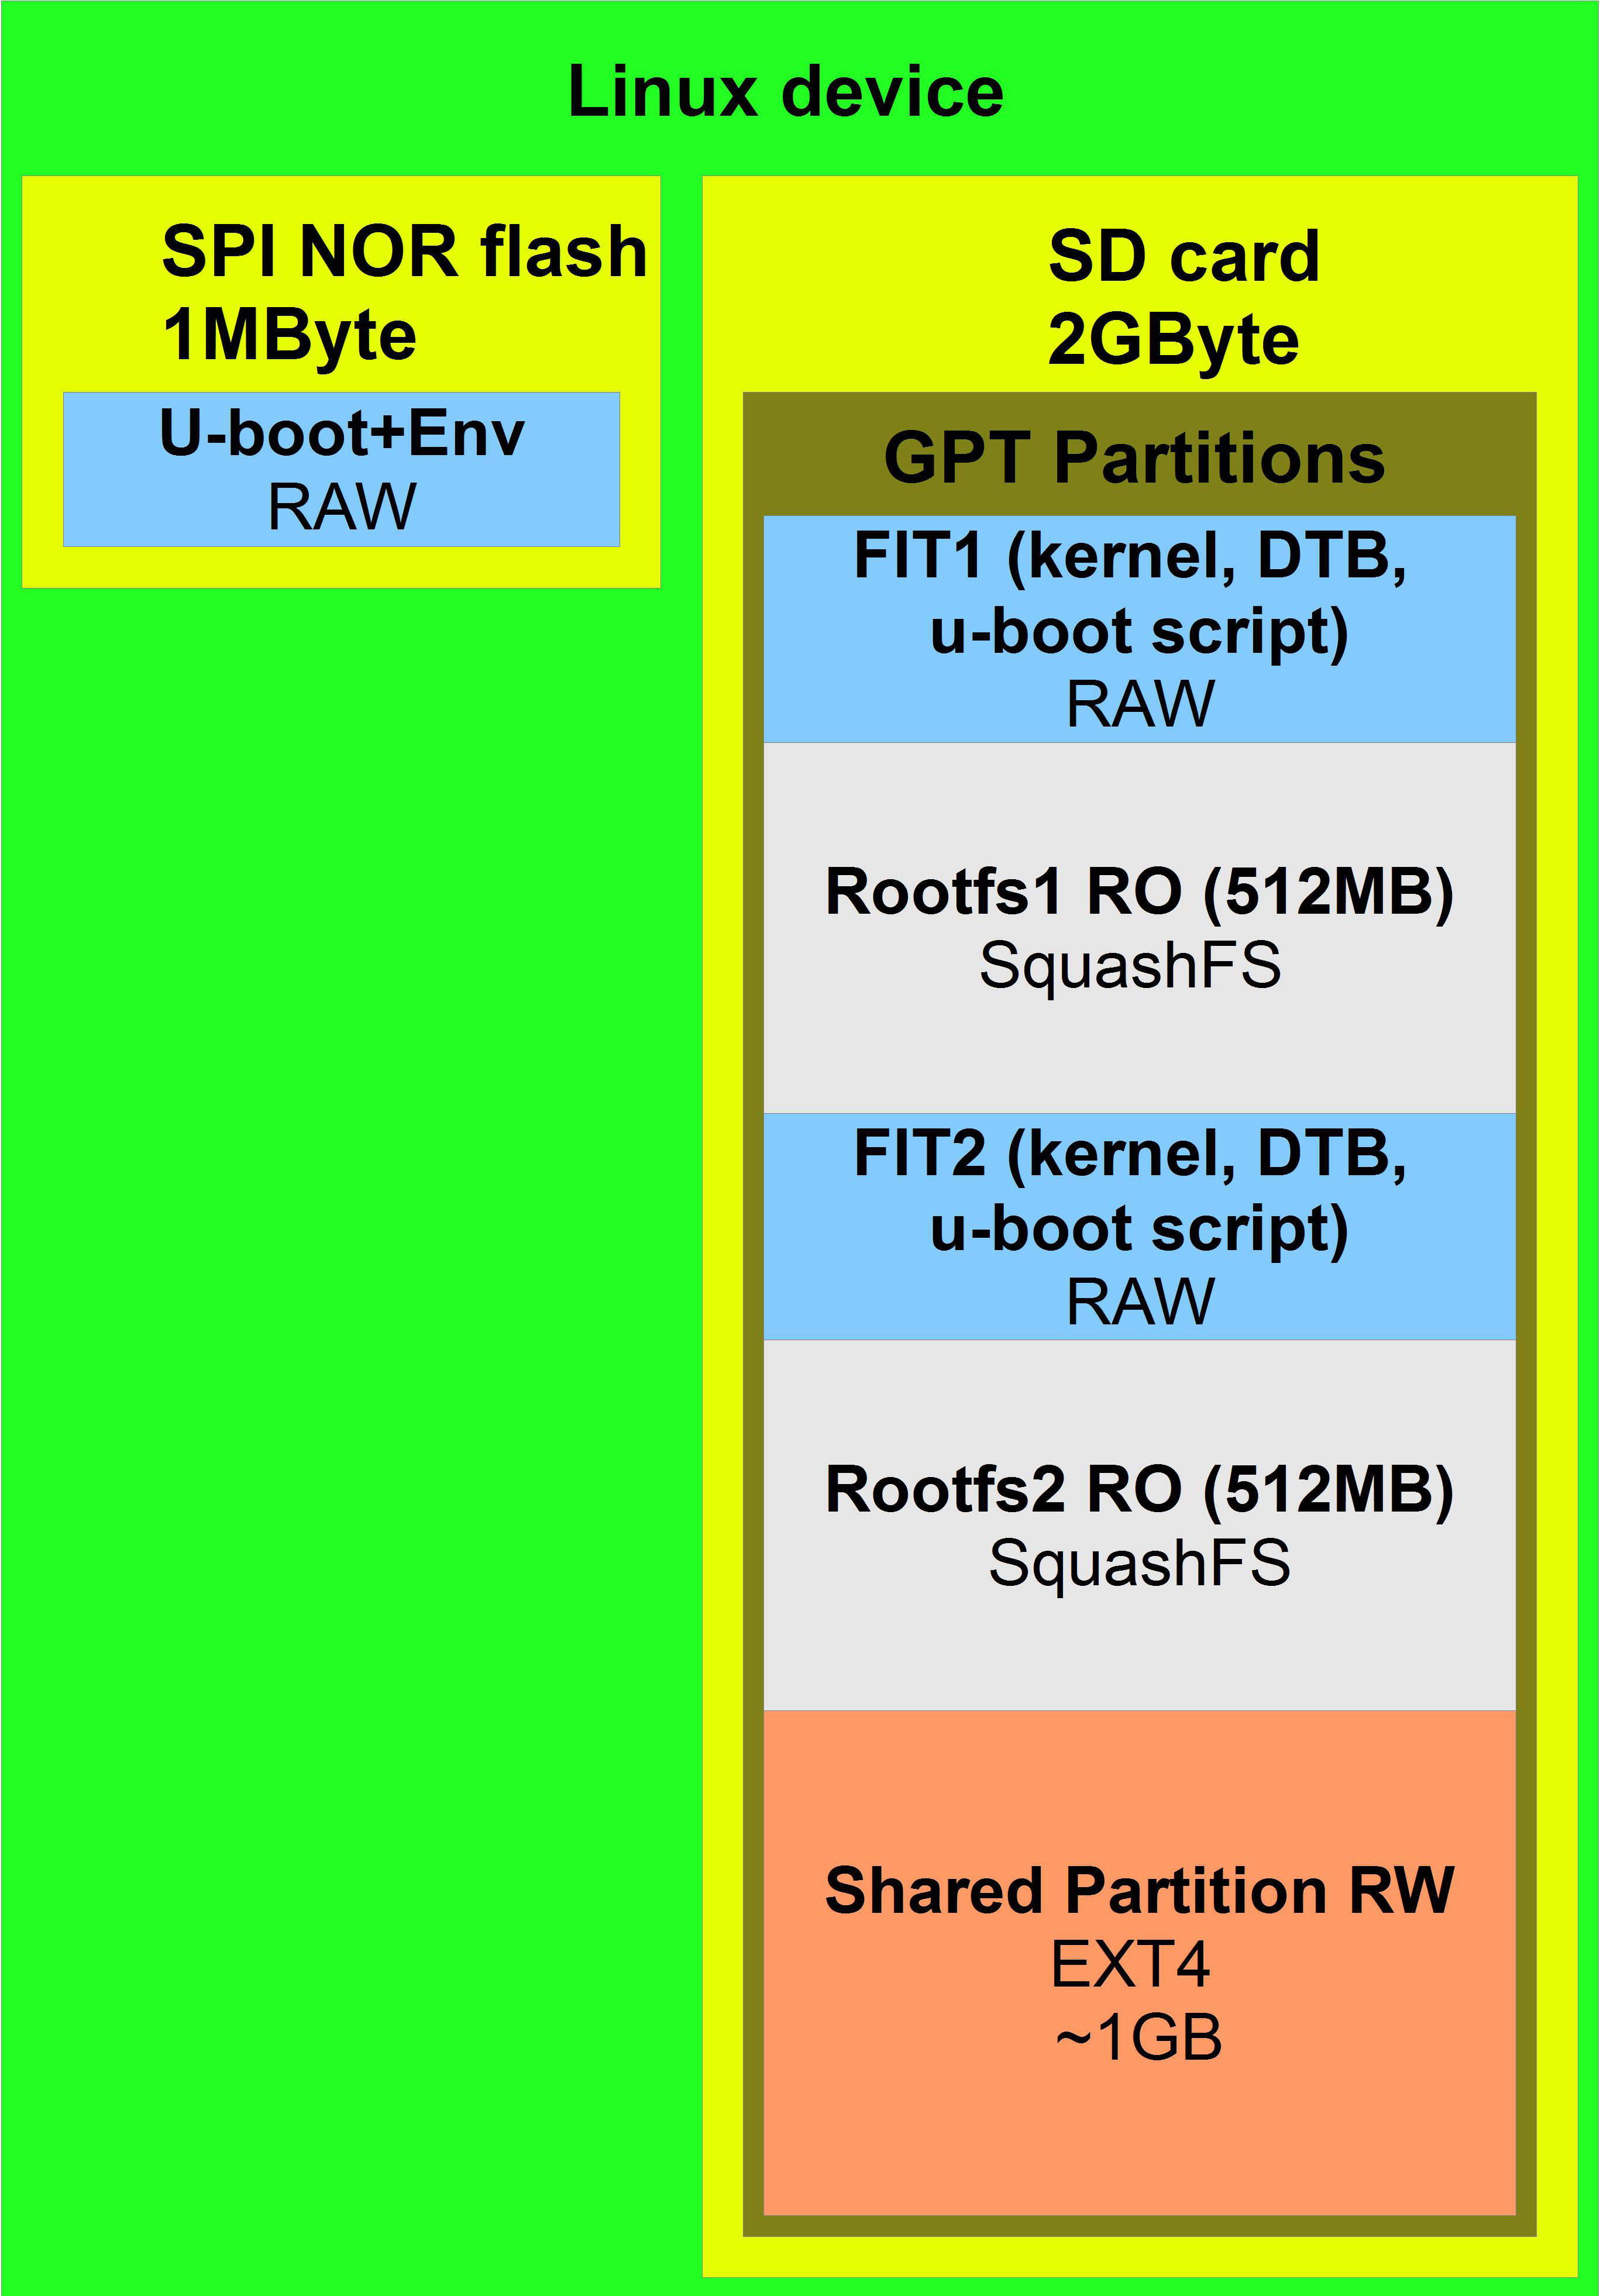
This type of update is used in almost all 11-parts projects, as it has worked very well.
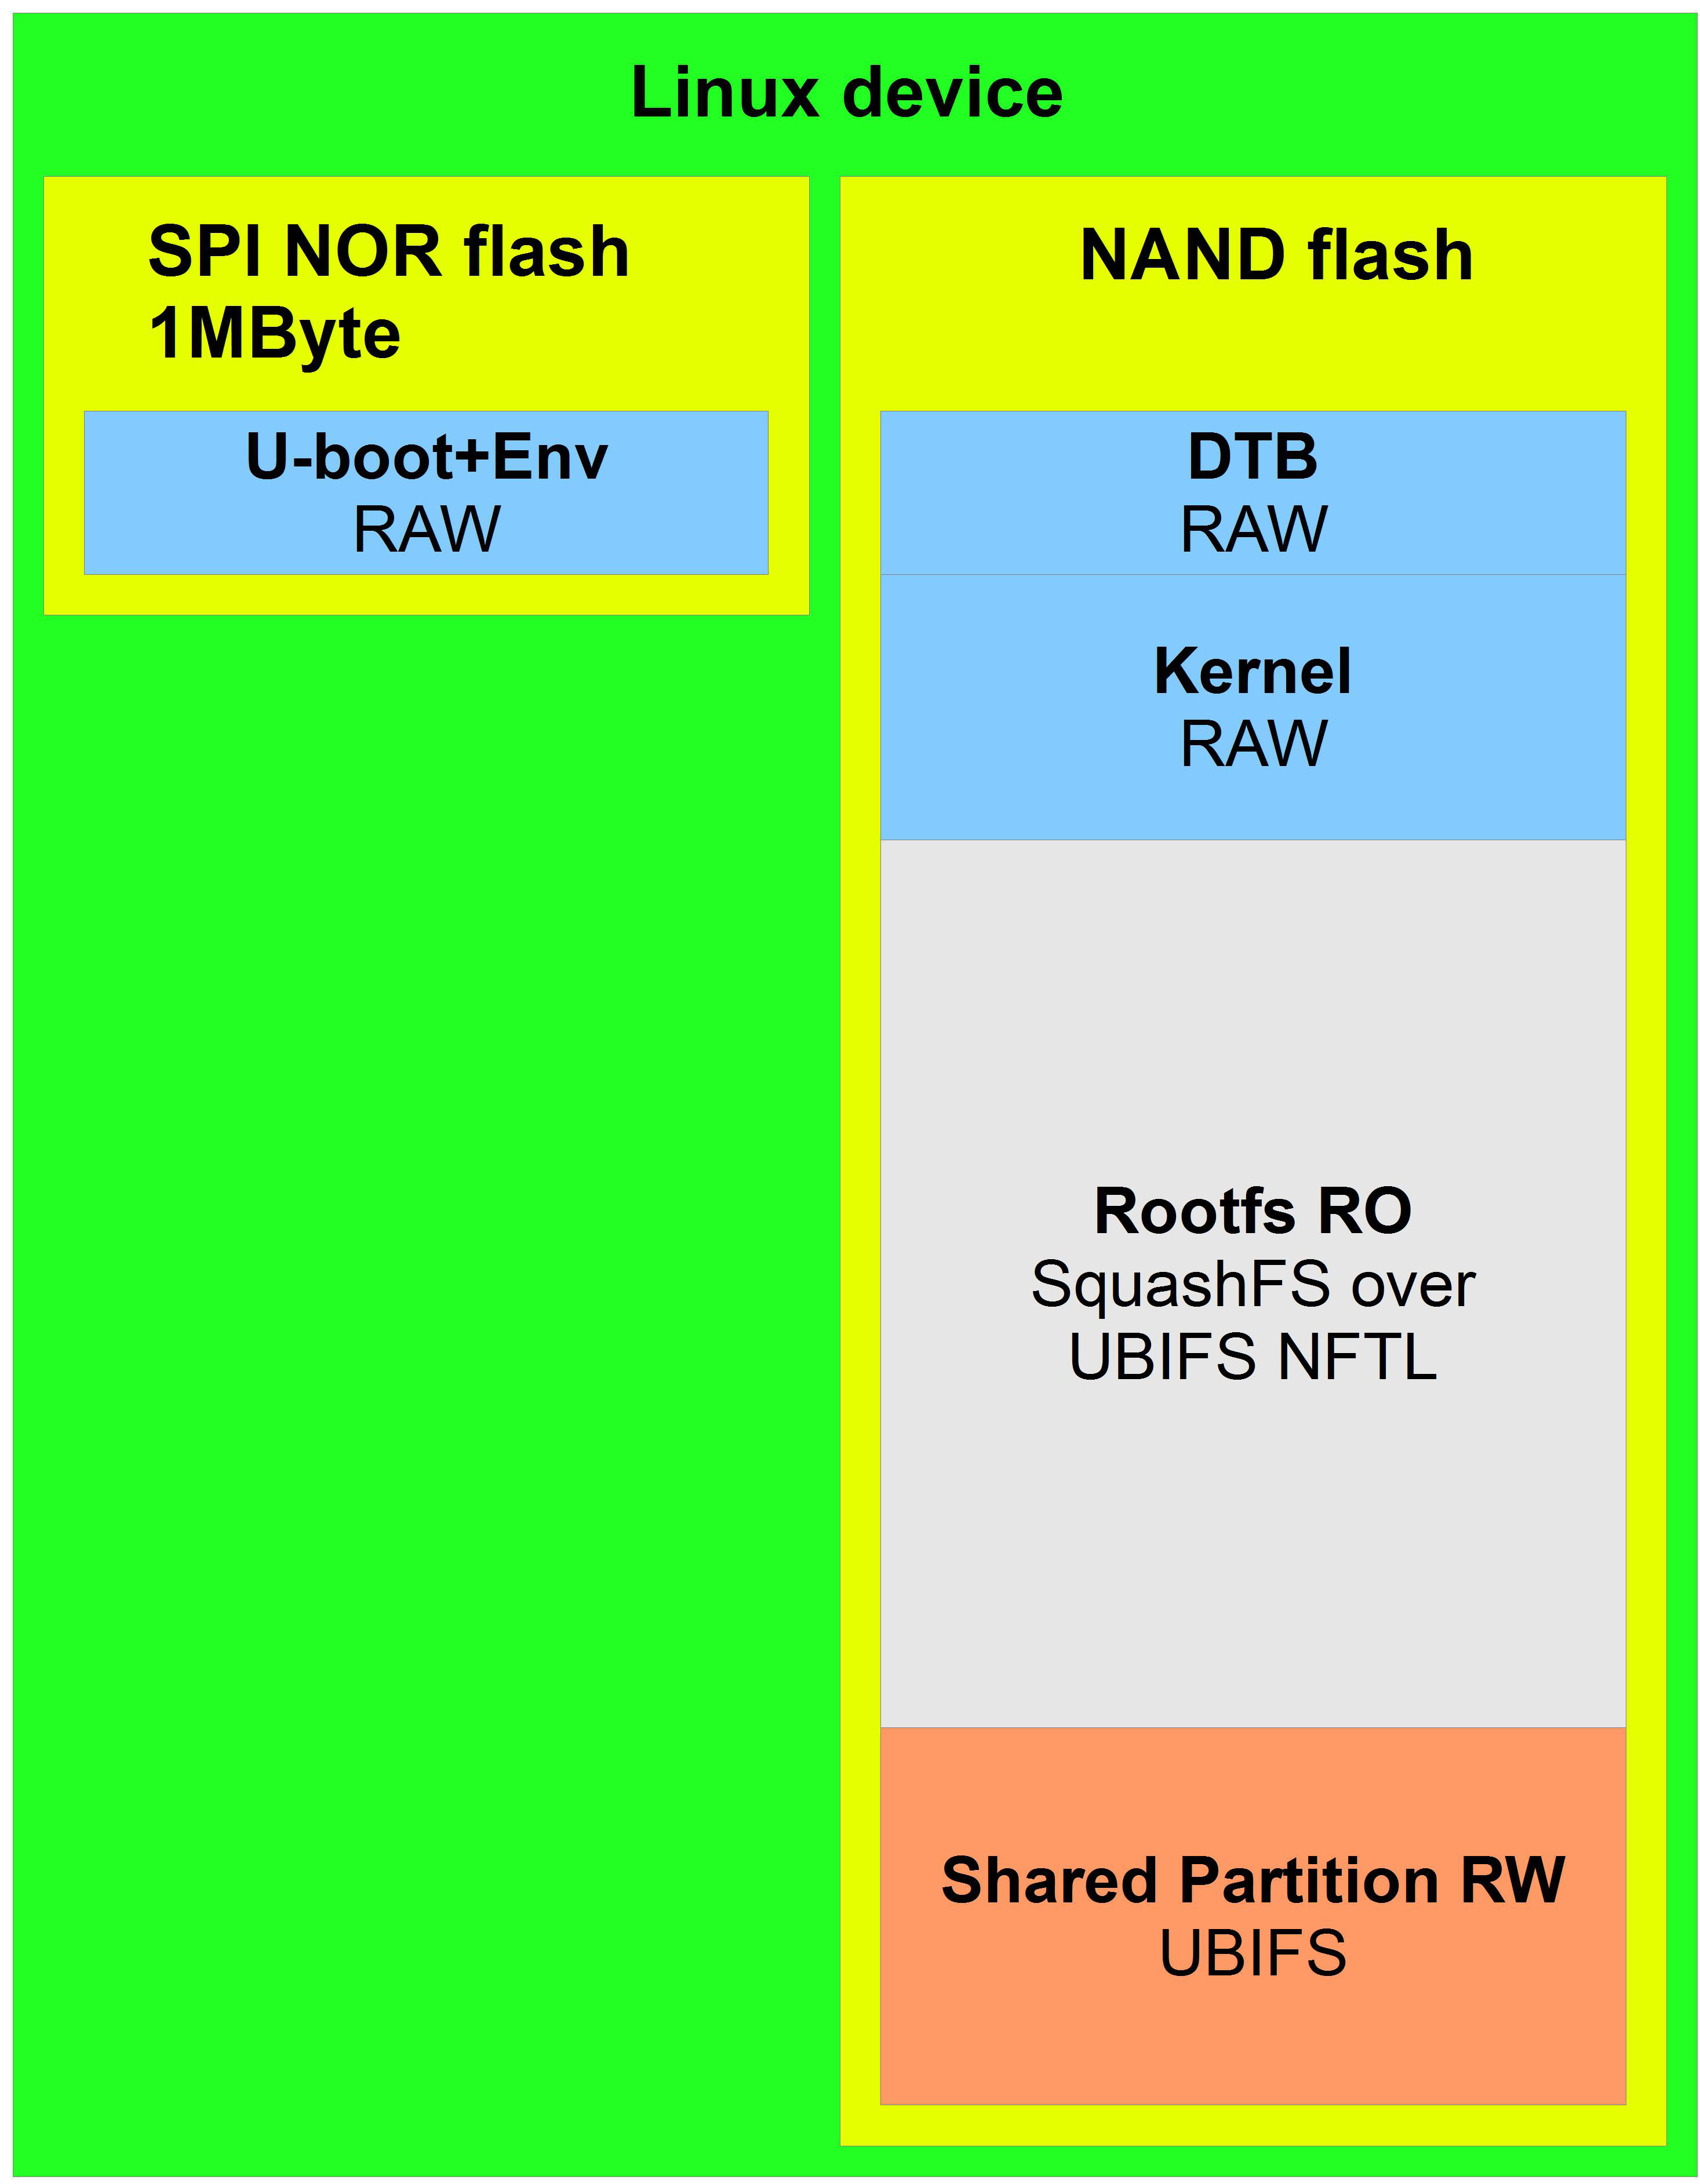
The update is suitable for any assembly sizes, for any types of drives. Unlike the previous type, here SPI NOR is used only for u-boot, therefore it has a smaller size and lower cost, 1 MB is enough.
This type of update does not require a separate build of ramdisk, which means that programming time is saved for its development and support in the future.
The example uses an SD card drive, but it can also be NAND using UBIFS, no difference. In this approach, there is no check of Rootfs RO before loading, if the assembly is damaged, the system will not know that it was damaged and will load it in a circle. Here it is assumed that the data in the RO section cannot be changed in any way, this approach eliminates the physical malfunction of the drive. If the drive is not physically healthy, then the device must be carried to a service center, no self-healing is provided. This is the price that you have to pay for increasing the speed of development, cheaper support and cheaper elemental base, but it is justified. Why insure against something that almost never happens.
The logic for downloading and updating is the same as in the previous approach.
In the case of boot, u-boot first downloads FIT updates (FIT2), if it is not there or integrity is violated, u-boot loads the first FIT (FIT1), the assembly that was stitched at the factory starts, and so on until the system is updated. When the system is updated, FIT2 and Rootfs2 will appear. In this case, when the device boots, the FIT update (FIT2) starts first. In the u-boot scripts that are stored in each FIT, it must be written which rootfs to mount.
Shared partition RW
In diagrams, there is a shared partition block everywhere, this is a group of partitions for writing. Any entries are made only there. Shared partition is shown as one partition for clarity. In fact, there are 3 of them: two small for configs, working in the mirror, and one large for everything else. In addition, I recommend that you keep some of the configs when updating, which is convenient, for example, if you configure the network and upgrade, you will not need to reconfigure the network settings.
Summarize
The article discusses three types of assemblies with support for updates, all checked by me personally, you can safely use them in projects.
At the moment, I use only the last two, since they are most suitable for the requirements. For clarity, you can see examples of devices where these types of updates are used (details in the 11-parts portfolio):
- RS485 repeater via 4G / WiFi / LAN,
- 4K V-By-One Industrial Display Controller Control Board,
- integrated hangar climate control system,
- 2DisplayPort-LVDS industrial display video controller,
- line control system
- VPN gateway.
If my article is useful and interesting, I’m ready to further share my experience and proven technical solutions in the field of embedded linux on this site.
Thanks to all.
Gorchakov Ilya
telegram: develinux
All Articles