How I did a desktop application on Flutter (+ bonus)
Recently, the news came to my attention that the next release of Flutter (1.9) was released , which promises various goodies, including early support for web applications.
At work, I’m developing mobile applications on React Native, but I look at Flutter with curiosity. For those who are not in the know: on Flutter you can already create applications for Android and iOS, support for web applications is being prepared for release, and there are also plans to support desktop.
This is "one ring to rule all."
Having turned my mind over a couple of days about what kind of application you can try to make, I decided to choose a task with an asterisk - what do we need these well-worn tracks? Swing on the desktop and heroically overcome difficulties! Looking ahead, I will say that almost no difficulties arose.
Under the cut - a story about how I solved the usual React Native programmer's tasks using Flutter tools, plus the general impression of the technology.

Thinking about what features of Flutter I would like to “touch”, I decided that in my application should be:
I don’t know how to backend, so I decided to look for a third-party open API. As a result, I settled on this resource - CBR courses in XML and JSON, API . Well, here I’ve finally decided on the application’s functionality: there will be two screens, on the main one there is a list of currencies at the CBR rate, when you click on a list item, we open a screen with detailed information.
Since the
command does not yet know how to create a project for Windows / Linux (only Mac is currently supported, use the
flag for this), you have to use this repository, where there is a prepared example. We clone the repository, take the
folder from there, if necessary, rename it and continue working in it.
Since support for desktop platforms is still under development, you still need to perform a number of manipulations. To access the features under development, run in the terminal:
In addition, you need to tell Flutter that it can use your platform:
or
or
If everything went well, then by running the
command you should see a similar output:

So, the scenery is ready, the audience in the hall - we can begin.
The first thing that catches your eye after React Native is the lack of a special markup language a la JSX. Flutter forces you to write both markup and business logic in Dart . At first, this is annoying: the look has nothing to catch on, the code seems cumbersome, and even these brackets are at the end of the component!
For example, such:
And this is not the limit! It is worth removing one in the wrong place and a pleasant (no) pastime is guaranteed to you.
In addition, due to the peculiarities of styling components in Flutter, for large components, the indent from the left edge of the editor increases quite quickly, and with it the number of parentheses to close.
This feature is that in Flutter styles are the same components (to be more precise - widgets).
If in React Native for arranging three buttons in a row inside the
so that they evenly distribute the container space, it’s enough for me to specify
for the
and add
for the styles, then Flutter has a separate component
for arranging elements in a row and a separate one for “expandability” of an element to all available space:
.
As a result, instead of
we have to write like this:
More verbose, isn't it?
Or, say, you want to add a frame with rounded edges to this container. In React Native, we simply add to the styles:
In Flutter, we have to add something like this to the container arguments:
In general, at first, my markup turned into huge sheets of code, in which the devil would break his leg. However, not everything is so bad.
First, large components must of course be broken down - placed in separate widgets or at least in the methods of your widget class.
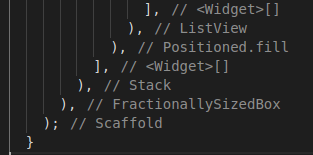
Secondly, the Flutter plugin in VS Code helps a lot - in the picture above comments to the brackets are signed by the plugin itself (and they are undeletable), which helps not to get confused in brackets. Plus auto-formatting tools - after half an hour you get used to periodically press
to format the code.
In addition, the syntax of the Dart language in the second edition became much more pleasant, so by the end of the day I already enjoyed using it. Unusual? Yes. But not unpleasant.
In React Native, to get data from some API, we usually use the
method, which returns
us.
In Flutter, the situation is similar. After looking at the examples in the documentation, I added the http package to
(an analogue of
from the JS world) and wrote something like this:
The
object is very similar in meaning to Promise, therefore everything is pretty transparent here. Well, for serializing / deserializing json objects, you can use the concept of model classes with special methods
/
. You can read more about this in the documentation .
Despite the fact that I was making a desktop application, from the point of view of Flutter there is no difference on which platform it is spinning. Well, that is, in my case this is so, in general - I do not know. In fact, the system window in which the flutter application is launched is the same screen of a smartphone.
The transition between screens is quite trivial: we create a screen widget class, and then use the standard
class.
In the simplest case, it might look something like this:
If your application has several screens, it is more reasonable to first prepare a dictionary of routes, and then use the
method. A small example from the documentation:
In addition, you can prepare a special animation for switching between screens and write something like this:
Here
is a special class for creating transition animations. Good examples of such animations can be found here .
It happens that we need to have access to some data from any part of our application. In React Native,
often used (if not most often) for these purposes.
For Flutter, there is a repository that shows examples of using various application architectures - there are Redux, MVC, and MVU, and even those that I have not heard about before.
Having rummaged a bit in these examples, I decided to stop on
.
In general, the idea is quite simple: we create a special class that
class, in which we will store our data, update them using the methods of this class, and pick them up from there if necessary. See the package documentation for more details.
To do this, add the
package to
and prepare the Provider class. In my case, it looks like this:
Here
is my currency model class (with fields
,
,
, etc.),
is the field in which the selected currency will be stored, and
is the method by which the
value is
.
To attach our provider to the application, we change the application class code:
That's it, now if we want to save the selected currency, then we write something like this:
And if we want to get the stored value, then this:
Everything is quite transparent and no boilerplate (unlike Redux). Of course, maybe for more complex applications everything will turn out not so smoothly, but for those like my example, pure wines.
In theory, the
command is used to build the application. In practice, when I executed the
command, I received this message:

“It didn’t hurt,” I thought, I was horrified by the weight of the
folder - 287.5 MB - and because of the simplicity of my soul, I deleted this folder permanently. As it turned out - in vain.
After deleting the
directory, the project stopped starting. I could not restore it, so I copied it from the original example. It did not help - the collector swore at the missing files.
After a little research, it turned out that there was a
file in this folder, in which, apparently, the paths to all the files used in the project were written. I added the missing paths and it worked.
Thus, at the moment Flutter is not able to prepare release builds for the desktop. Anyway, for Linux.
In general, if you close your eyes to this minus, the application turned out the way I wanted and looks
We pass to the promised bonus.
Even at the stage of writing the application, I had a desire to check how difficult it would be to port it to other platforms. Let's start with the cell phone.
Surely there is a less barbaric way, but I decided that the shortest path is direct. Therefore, I simply created a new Flutter project, transferred the
file, the
,
and
directories to it and added the line to
:
The application started with a half kick and I got this
At first, I had to tinker with the web. I did not know how to create a web project, so I used the instructions from the Internet, which for some reason did not work. I wanted to spit already, but came across this manual.
As a result, everything turned out to be as simple as possible - you just had to enable support for web applications. Squeeze from the manual:
Then I transferred the necessary files to this project in the same barbaric way and received such
At first it was unusual to work with Flutter, I constantly tried to use the usual approaches from React Native, and this interfered. Also, some redundancy of the dart code was a little annoying.
After I got my hand (and cones) a little bit, I began to see the advantages of Flutter over React Native. I will list some.
Language . Dart is a completely understandable and pleasant language with strict static typing. After JavaScript, it was like a breath of fresh air. I stopped being afraid that my code would break in runtime and it was a pleasant feeling. Someone may say that there is Flow and TypeScript, but it's not that - in our projects we used both, and something else always broke somewhere. When I write in React Native, I can’t help but feel like my code is on matchstick props that can break at any time. With Flutter, I forgot about this feeling, and if the price is code redundancy, then I am ready to pay it.
Platform . In React Native, you use native components and this is generally good. But because of this, you sometimes have to write platform-specific code, as well as catch bugs specific to each platform. It can be incredibly tiring. With Flutter, you can forget these problems like a nightmare (although it may be that everything is not so smooth in large applications).
The environment . With the environment in React Native, everything is sad. The vscode plugins constantly fall off, the debugger can gobble up 16 gig of operative and 70 gig of swap, tightly hanging the system (from personal experience), and the most common error correction scenario: "remove node_modules, install packages again and try to restart several times." This usually helps, but bljad! Not so it should be, not so.
In addition, you will have to run AndroidStudio and Xcode periodically, because some are put only this way (in fairness, with the release of RN 0.60 this became better).
Against this background, the official Flutter plugin for vscode looks very good. Tips for the code allow you to get acquainted with the platform without looking at the documentation, autoformatting solves the problem with the coding style, a normal debugger, etc.
In general, it looks like a more mature tool.
Cross-platform . React Native professes the principle “Learn once, write everywhere” - once you learn, you can write for different platforms. True, under each platform you will encounter problems specific to it. But perhaps this is only a consequence of the immaturity of React Native - at the moment, the latest stable version is 0.61. Maybe with the release of version 1.0, most of these problems will go away.
The Flutter approach is more like Write once, compile everywhere. And even if the desktop is not ready for production at the moment, the web is still in alpha, but everything goes to that. And the ability to have a single code base for all platforms is a strong argument.
Of course, Flutter is also not without flaws, but a little experience in using it does not allow me to identify them. So if you want a more objective assessment - feel free to discount the novelty effect.
In general, it should be noted that Flutter left mostly positive feelings, although he has room to grow. And the next project I would be more willing to start on it, and not on React Native.
The source code for the project can be found on GitHub .
PS I take this opportunity to congratulate all those involved in the past Teacher’s Day.
At work, I’m developing mobile applications on React Native, but I look at Flutter with curiosity. For those who are not in the know: on Flutter you can already create applications for Android and iOS, support for web applications is being prepared for release, and there are also plans to support desktop.
This is "one ring to rule all."
Having turned my mind over a couple of days about what kind of application you can try to make, I decided to choose a task with an asterisk - what do we need these well-worn tracks? Swing on the desktop and heroically overcome difficulties! Looking ahead, I will say that almost no difficulties arose.
Under the cut - a story about how I solved the usual React Native programmer's tasks using Flutter tools, plus the general impression of the technology.
Thinking about what features of Flutter I would like to “touch”, I decided that in my application should be:
- requests to the remote API;
- transitions between screens;
- Transition animations
- state manager - redux or something similar.
I don’t know how to backend, so I decided to look for a third-party open API. As a result, I settled on this resource - CBR courses in XML and JSON, API . Well, here I’ve finally decided on the application’s functionality: there will be two screens, on the main one there is a list of currencies at the CBR rate, when you click on a list item, we open a screen with detailed information.
Training
Since the
flutter create
command does not yet know how to create a project for Windows / Linux (only Mac is currently supported, use the
--macos
flag for this), you have to use this repository, where there is a prepared example. We clone the repository, take the
example
folder from there, if necessary, rename it and continue working in it.
Since support for desktop platforms is still under development, you still need to perform a number of manipulations. To access the features under development, run in the terminal:
flutter channel master flutter upgrade
In addition, you need to tell Flutter that it can use your platform:
flutter config --enable-linux-desktop
or
flutter config --enable-macos-desktop
or
flutter config --enable-windows-desktop
If everything went well, then by running the
flutter doctor
command you should see a similar output:
So, the scenery is ready, the audience in the hall - we can begin.
Layout
The first thing that catches your eye after React Native is the lack of a special markup language a la JSX. Flutter forces you to write both markup and business logic in Dart . At first, this is annoying: the look has nothing to catch on, the code seems cumbersome, and even these brackets are at the end of the component!
For example, such:
And this is not the limit! It is worth removing one in the wrong place and a pleasant (no) pastime is guaranteed to you.
In addition, due to the peculiarities of styling components in Flutter, for large components, the indent from the left edge of the editor increases quite quickly, and with it the number of parentheses to close.
This feature is that in Flutter styles are the same components (to be more precise - widgets).
If in React Native for arranging three buttons in a row inside the
View
so that they evenly distribute the container space, it’s enough for me to specify
flexDirection: 'row'
for the
flexDirection: 'row'
and add
flex: 1
for the styles, then Flutter has a separate component
Row
for arranging elements in a row and a separate one for “expandability” of an element to all available space:
Expanded
.
As a result, instead of
<View style={{height: 100, width:300, flexDirection: 'row'}}> <Button title='A' style={{flex:1}}> <Button title='B' style={{flex:1}}> <Button title='C' style={{flex:1}}> </View>
we have to write like this:
Container( height: 100, width: 300, child: Row( children: <Widget>[ Expanded( child: RaisedButton( onPressed: () {}, child: Text('A'), ), ), Expanded( child: RaisedButton( onPressed: () {}, child: Text('B'), ), ), Expanded( child: RaisedButton( onPressed: () {}, child: Text('C'), ), ), ], ), )
More verbose, isn't it?
Or, say, you want to add a frame with rounded edges to this container. In React Native, we simply add to the styles:
borderRadius: 5, borderWidth: 1, borderColor: '#ccc'
In Flutter, we have to add something like this to the container arguments:
decoration: BoxDecoration( borderRadius: BorderRadius.all(Radius.circular(5)), border: Border.all(width: 1, color: Color(0xffcccccc)) ),
In general, at first, my markup turned into huge sheets of code, in which the devil would break his leg. However, not everything is so bad.
First, large components must of course be broken down - placed in separate widgets or at least in the methods of your widget class.
Secondly, the Flutter plugin in VS Code helps a lot - in the picture above comments to the brackets are signed by the plugin itself (and they are undeletable), which helps not to get confused in brackets. Plus auto-formatting tools - after half an hour you get used to periodically press
Ctrl+Shift+I
to format the code.
In addition, the syntax of the Dart language in the second edition became much more pleasant, so by the end of the day I already enjoyed using it. Unusual? Yes. But not unpleasant.
API Requests
In React Native, to get data from some API, we usually use the
fetch
method, which returns
Promise
us.
In Flutter, the situation is similar. After looking at the examples in the documentation, I added the http package to
pubspec.yaml
(an analogue of
package.json
from the JS world) and wrote something like this:
Future<http.Response> getAnything() { return http.get(URL); }
The
Future
object is very similar in meaning to Promise, therefore everything is pretty transparent here. Well, for serializing / deserializing json objects, you can use the concept of model classes with special methods
fromJSON
/
toJSON
. You can read more about this in the documentation .
Transition between screens
Despite the fact that I was making a desktop application, from the point of view of Flutter there is no difference on which platform it is spinning. Well, that is, in my case this is so, in general - I do not know. In fact, the system window in which the flutter application is launched is the same screen of a smartphone.
The transition between screens is quite trivial: we create a screen widget class, and then use the standard
Navigator
class.
In the simplest case, it might look something like this:
RaisedButton( child: Text('Go to Detail'), onPressed: () { Navigator.of(context).push<void>(MaterialPageRoute(builder: (context) => DetailScreen())); }, )
If your application has several screens, it is more reasonable to first prepare a dictionary of routes, and then use the
pushNamed
method. A small example from the documentation:
class NavigationApp extends StatelessWidget { // This widget is the root of your application. @override Widget build(BuildContext context) { return MaterialApp( ... routes: <String, WidgetBuilder>{ '/a': (BuildContext context) => usualNavscreen(), '/b': (BuildContext context) => drawerNavscreen(), } ... ); } } // AnyWidget ... onPressed: () { Navigator.of(context).pushNamed('/a'); }, ...
In addition, you can prepare a special animation for switching between screens and write something like this:
Navigator.of(context).push<void>(ScaleRoute(page: DetailScreen()));
Here
ScaleRoute
is a special class for creating transition animations. Good examples of such animations can be found here .
State managment
It happens that we need to have access to some data from any part of our application. In React Native,
redux
often used (if not most often) for these purposes.
For Flutter, there is a repository that shows examples of using various application architectures - there are Redux, MVC, and MVU, and even those that I have not heard about before.
Having rummaged a bit in these examples, I decided to stop on
Provider
.
In general, the idea is quite simple: we create a special class that
ChangeNotifier
class, in which we will store our data, update them using the methods of this class, and pick them up from there if necessary. See the package documentation for more details.
To do this, add the
provider
package to
pubspec.yaml
and prepare the Provider class. In my case, it looks like this:
import 'package:flutter/material.dart'; import 'package:rates_app/models/rate.dart'; class RateProvider extends ChangeNotifier { Rate currentrate; void setCurrentRate(Rate rate) { this.currentrate = rate; notifyListeners(); } }
Here
Rate
is my currency model class (with fields
name
,
code
,
value
, etc.),
currentrate
is the field in which the selected currency will be stored, and
setCurrentRate
is the method by which the
currentrate
value is
currentrate
.
To attach our provider to the application, we change the application class code:
@override Widget build(BuildContext context) { return ChangeNotifierProvider( builder: (context) => RateProvider(), // child: MaterialApp( ... ), home: HomeScreen(), ), ); }
That's it, now if we want to save the selected currency, then we write something like this:
Provider.of<RateProvider>(context).setCurrentRate(rate);
And if we want to get the stored value, then this:
var rate = Provider.of<RateProvider>(context).currentrate;
Everything is quite transparent and no boilerplate (unlike Redux). Of course, maybe for more complex applications everything will turn out not so smoothly, but for those like my example, pure wines.
Build application
In theory, the
flutter build <platform>
command is used to build the application. In practice, when I executed the
flutter build linux
command, I received this message:
“It didn’t hurt,” I thought, I was horrified by the weight of the
build
folder - 287.5 MB - and because of the simplicity of my soul, I deleted this folder permanently. As it turned out - in vain.
After deleting the
build
directory, the project stopped starting. I could not restore it, so I copied it from the original example. It did not help - the collector swore at the missing files.
After a little research, it turned out that there was a
snapshot_blob.bin.d
file in this folder, in which, apparently, the paths to all the files used in the project were written. I added the missing paths and it worked.
Thus, at the moment Flutter is not able to prepare release builds for the desktop. Anyway, for Linux.
In general, if you close your eyes to this minus, the application turned out the way I wanted and looks
So 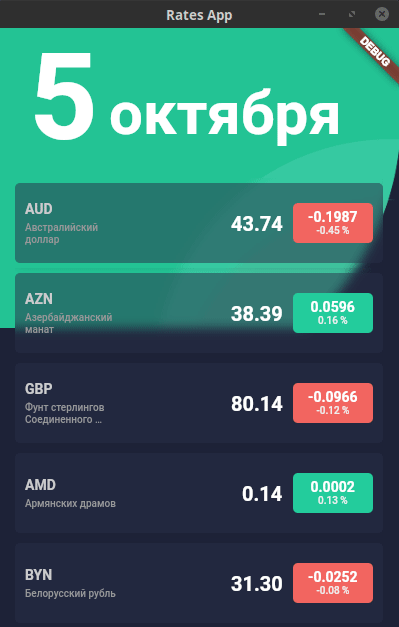
Bonus
We pass to the promised bonus.
Even at the stage of writing the application, I had a desire to check how difficult it would be to port it to other platforms. Let's start with the cell phone.
Surely there is a less barbaric way, but I decided that the shortest path is direct. Therefore, I simply created a new Flutter project, transferred the
pubspec.yaml
file, the
assets
,
fonts
and
lib
directories to it and added the line to
AndroidManifest.xml
:
<uses-permission android:name="android.permission.INTERNET" />
The application started with a half kick and I got this
picture 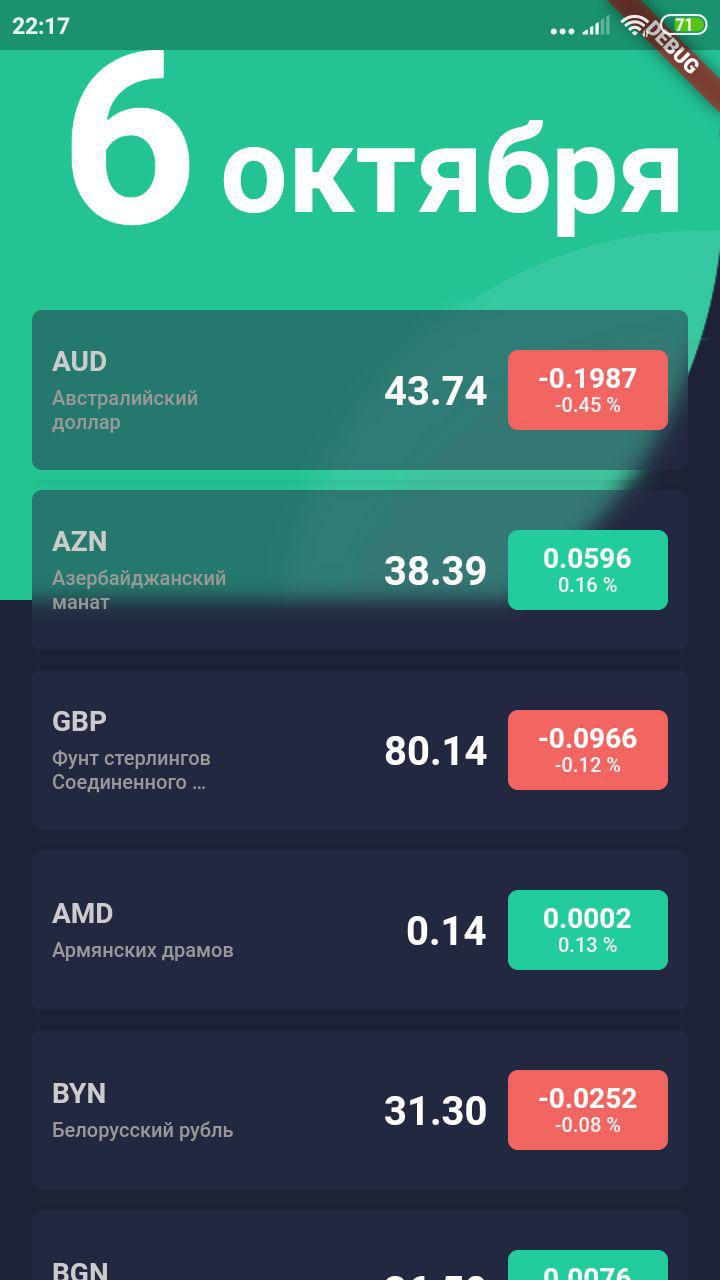
At first, I had to tinker with the web. I did not know how to create a web project, so I used the instructions from the Internet, which for some reason did not work. I wanted to spit already, but came across this manual.
As a result, everything turned out to be as simple as possible - you just had to enable support for web applications. Squeeze from the manual:
flutter channel master flutter upgrade flutter config --enable-web cd <into project directory> flutter create . flutter run -d chrome
Then I transferred the necessary files to this project in the same barbaric way and received such
result 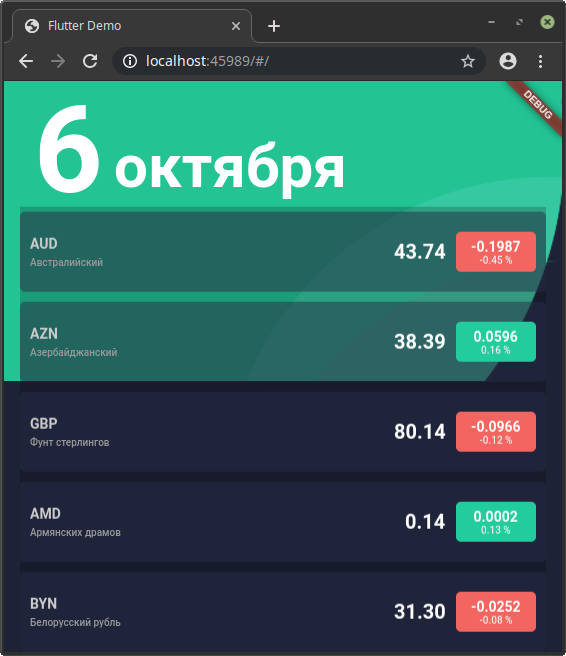
General impressions
At first it was unusual to work with Flutter, I constantly tried to use the usual approaches from React Native, and this interfered. Also, some redundancy of the dart code was a little annoying.
After I got my hand (and cones) a little bit, I began to see the advantages of Flutter over React Native. I will list some.
Language . Dart is a completely understandable and pleasant language with strict static typing. After JavaScript, it was like a breath of fresh air. I stopped being afraid that my code would break in runtime and it was a pleasant feeling. Someone may say that there is Flow and TypeScript, but it's not that - in our projects we used both, and something else always broke somewhere. When I write in React Native, I can’t help but feel like my code is on matchstick props that can break at any time. With Flutter, I forgot about this feeling, and if the price is code redundancy, then I am ready to pay it.
Platform . In React Native, you use native components and this is generally good. But because of this, you sometimes have to write platform-specific code, as well as catch bugs specific to each platform. It can be incredibly tiring. With Flutter, you can forget these problems like a nightmare (although it may be that everything is not so smooth in large applications).
The environment . With the environment in React Native, everything is sad. The vscode plugins constantly fall off, the debugger can gobble up 16 gig of operative and 70 gig of swap, tightly hanging the system (from personal experience), and the most common error correction scenario: "remove node_modules, install packages again and try to restart several times." This usually helps, but bljad! Not so it should be, not so.
In addition, you will have to run AndroidStudio and Xcode periodically, because some are put only this way (in fairness, with the release of RN 0.60 this became better).
Against this background, the official Flutter plugin for vscode looks very good. Tips for the code allow you to get acquainted with the platform without looking at the documentation, autoformatting solves the problem with the coding style, a normal debugger, etc.
In general, it looks like a more mature tool.
Cross-platform . React Native professes the principle “Learn once, write everywhere” - once you learn, you can write for different platforms. True, under each platform you will encounter problems specific to it. But perhaps this is only a consequence of the immaturity of React Native - at the moment, the latest stable version is 0.61. Maybe with the release of version 1.0, most of these problems will go away.
The Flutter approach is more like Write once, compile everywhere. And even if the desktop is not ready for production at the moment, the web is still in alpha, but everything goes to that. And the ability to have a single code base for all platforms is a strong argument.
Of course, Flutter is also not without flaws, but a little experience in using it does not allow me to identify them. So if you want a more objective assessment - feel free to discount the novelty effect.
In general, it should be noted that Flutter left mostly positive feelings, although he has room to grow. And the next project I would be more willing to start on it, and not on React Native.
The source code for the project can be found on GitHub .
PS I take this opportunity to congratulate all those involved in the past Teacher’s Day.
All Articles