Creating a simple clicker game from scratch
In the past few years, games of such a genre as “clickers” are gaining great popularity. I myself am very interested in playing them, but it is no less interesting to create a game - a clicker myself. Thanks to an engine like Unity, creating a masterpiece will not be difficult even for a simple beginner. Let's get down to business.
As I answered these questions:
The player needs to choose either the sword or the shield in time, depending on what will fall from above. That is, the sword falls - we select the sword, the shield falls - we select the shield. If you make the wrong choice, the player simply loses. In words, everything is quite simple, but in implementation it is even simpler.
Where do I get a beginner to take a beautiful sprite and background? Answer: draw yourself.
There is nothing complicated, as we draw in Adobe Illustrator. Even if you do not have experience in drawing, then again we are not upset, as I will show you everything in detail.
What we need:
That’s enough.
The technique is simple and I will show with the example of a sword:
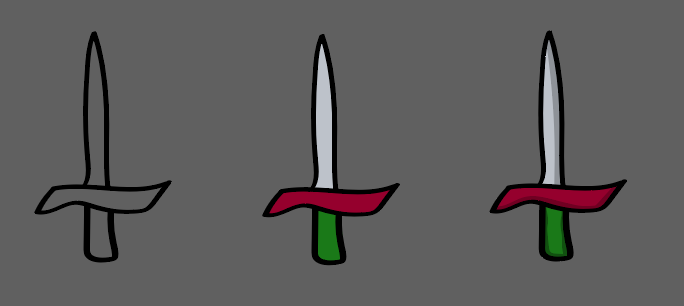
And that's it, our sword is ready!
We also do it with others. Do not be alarmed if at the beginning one of your creations will seem to you far from ideal, because together they will look like a Van Gogh painting. Joke. Or maybe not.
The background will be even trickier.
Draw a green rectangle and use a gradient. It looks like this:
We can say that the art lessons are over and we finally go to Unity.
First of all, let's throw our sprites, and drag the sword and shield into the hierarchy window, since we will need to create prefabs from them and not only.
With the prefab, the same actions, only you need to set the value “1” in the Gravity Scale field so that the shield falls down. And drag it to the Prefabs folder. With the sword the same action. Done!
Next, decorate the game with sprites drawn earlier. The first thing we throw is the background.

The main design secret is this: we will place branches on top and bottom, and on the ladder we will reduce the transparency value. Why do this?
The fact is that in this way we create a certain illusion of space. It will seem to the player that there is a front object, a back one and a horizon. And this is awesome!
Now create a button that will occupy the entire screen. To create a button in the hierarchy, click on UI -> Button. Further:
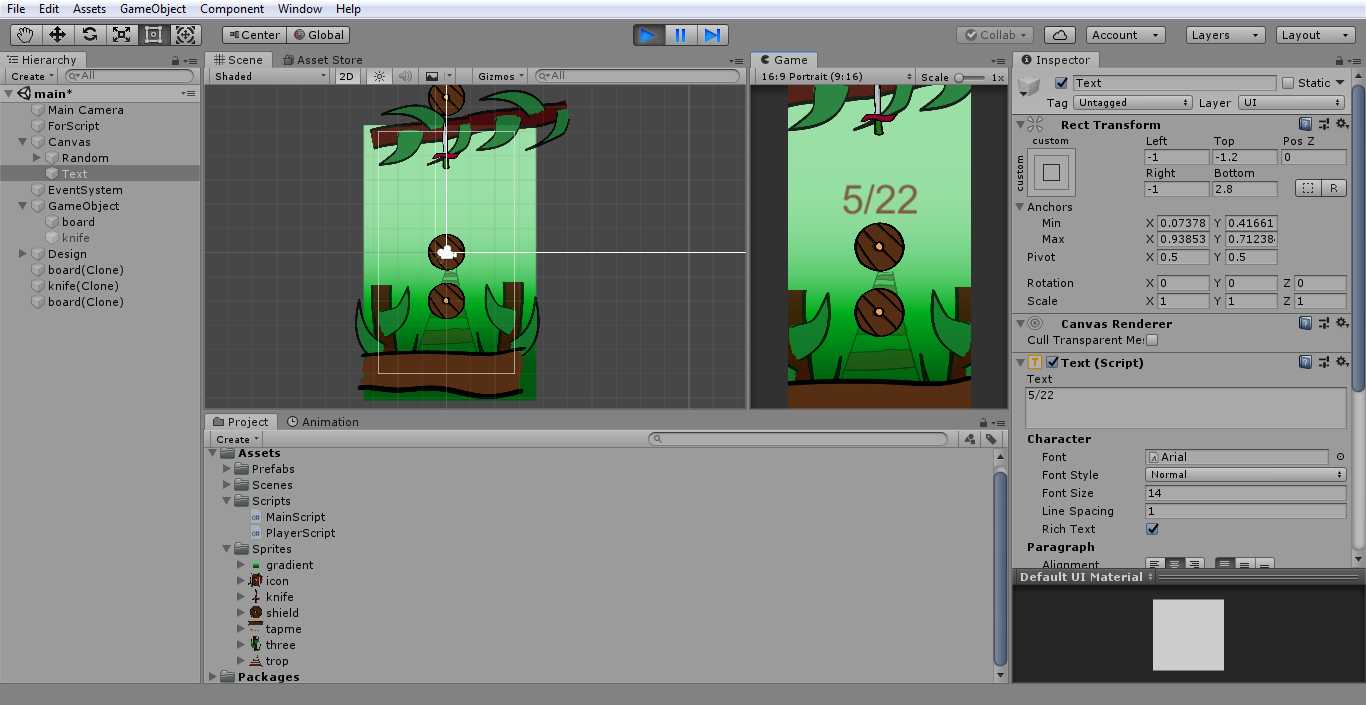
In the same way we create a text to show our current score and record.
And finally, we got to programming.
Second script:
What is going on in these methods?
Start (). It starts every time we start the game or restart the scene. Everything that is written inside this method is performed only once. Therefore, we write there: an account equal to zero, the launch of coroutines (what is responsible for creating prefabs), the value of time.
Update (). Run once per frame. It is convenient to write down here that is constantly updated. In our case: an indicator of score and record, a random value n on which depends on what is created - a sword or shield.
BtnClick (). You may ask why this method is “public”? We need it to be reflected in Unity itself and we can spell out the word “Click” in order to track which button we click on, although there is only one button, it will not hurt anyone to know a little more.
Here we write what should happen after pressing the button. When pressed, it should change from sword to shield and vice versa, set the time value to “1”, since when losing it is reset to zero.
OnTriggerEnter2D (). Checks for collision of an object. If the tags of both objects match, then the score is increased by one, and the prefab is destroyed. If the tags are different, then a loss - time stops and the score is reset.
It remains to add these same tags. And here it is very simple:
After creating, also click on Tag and select the desired one.
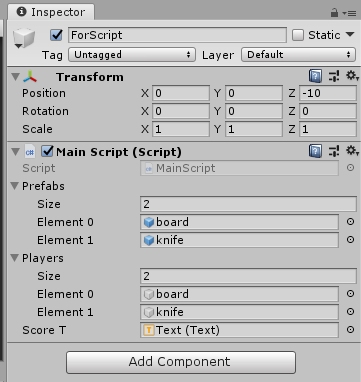
It remains to transfer the scripts to the necessary objects and fill in some fields. Create an empty object and add the “Main Script” script, and add “Player Script” to our sword and shield.
With full confidence, I can say that the game is ready. We launch and enjoy our first creation.
Good luck to everyone in game dev!
What should be done?
- Think about why and what should we click on?
- What should happen when we click?
- What should happen if we don’t click?
As I answered these questions:
- We must click anywhere on the screen.
- When clicked, the object should change.
- If ignored - a loss.
What will the game be about?
The player needs to choose either the sword or the shield in time, depending on what will fall from above. That is, the sword falls - we select the sword, the shield falls - we select the shield. If you make the wrong choice, the player simply loses. In words, everything is quite simple, but in implementation it is even simpler.
Where do I get a beginner to take a beautiful sprite and background? Answer: draw yourself.
There is nothing complicated, as we draw in Adobe Illustrator. Even if you do not have experience in drawing, then again we are not upset, as I will show you everything in detail.
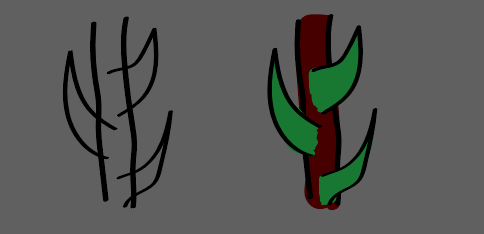
What we need:
- Sword
- Shield
- The background
- Branch with leaves
That’s enough.
The technique is simple and I will show with the example of a sword:
- Draw a contour
- Fill with flowers
- Draw the shadows
And that's it, our sword is ready!
We also do it with others. Do not be alarmed if at the beginning one of your creations will seem to you far from ideal, because together they will look like a Van Gogh painting. Joke. Or maybe not.
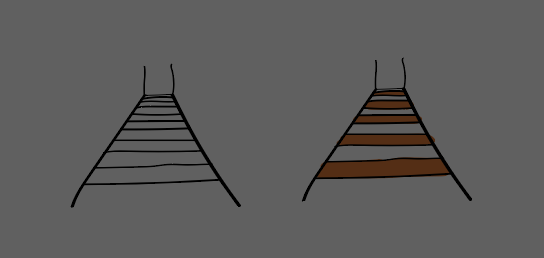
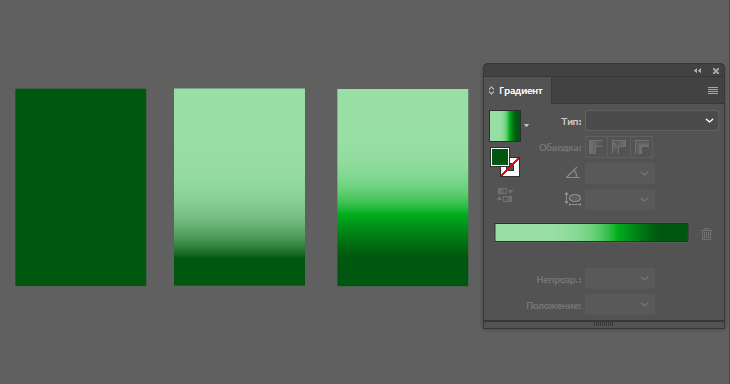
The background will be even trickier.
Draw a green rectangle and use a gradient. It looks like this:
We can say that the art lessons are over and we finally go to Unity.
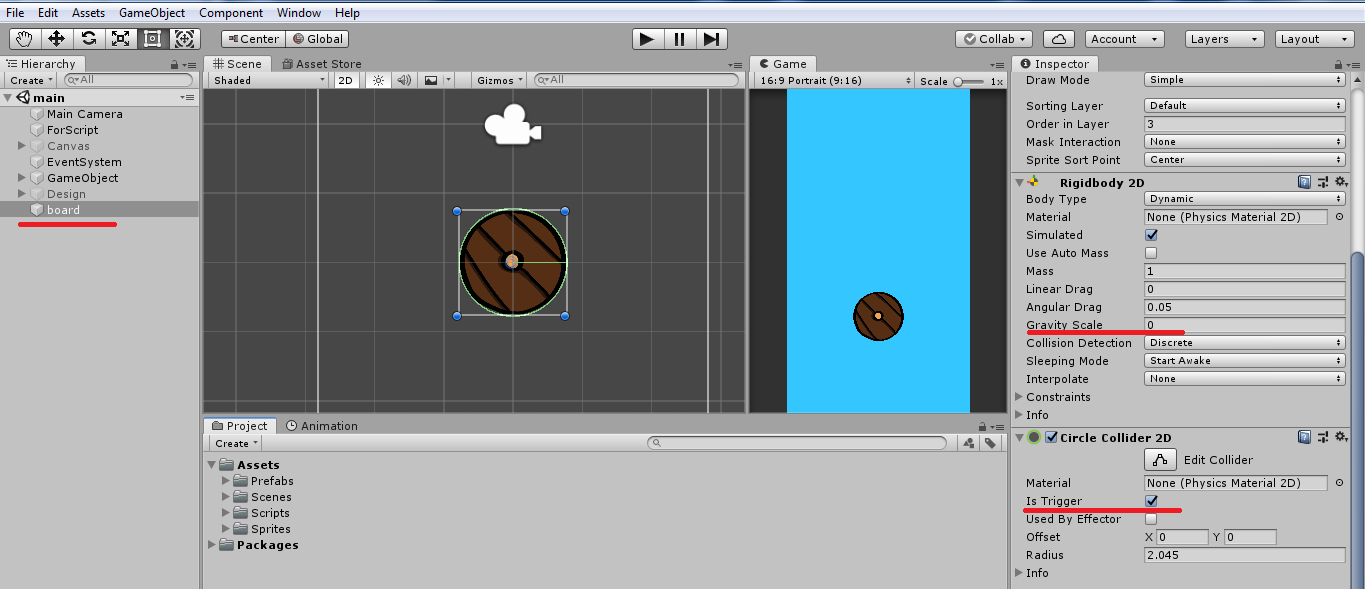
First of all, let's throw our sprites, and drag the sword and shield into the hierarchy window, since we will need to create prefabs from them and not only.
- Add Rigidbody 2D and set the value to “0” in the Gravity Scale field so that the shield stands in one place.
- Add Circle Collider 2D and check the Is Trigger checkbox to track actions.
With the prefab, the same actions, only you need to set the value “1” in the Gravity Scale field so that the shield falls down. And drag it to the Prefabs folder. With the sword the same action. Done!
Next, decorate the game with sprites drawn earlier. The first thing we throw is the background.
- Place branches on top
- Add a log below
- Place a bridge in the middle
The main design secret is this: we will place branches on top and bottom, and on the ladder we will reduce the transparency value. Why do this?
The fact is that in this way we create a certain illusion of space. It will seem to the player that there is a front object, a back one and a horizon. And this is awesome!
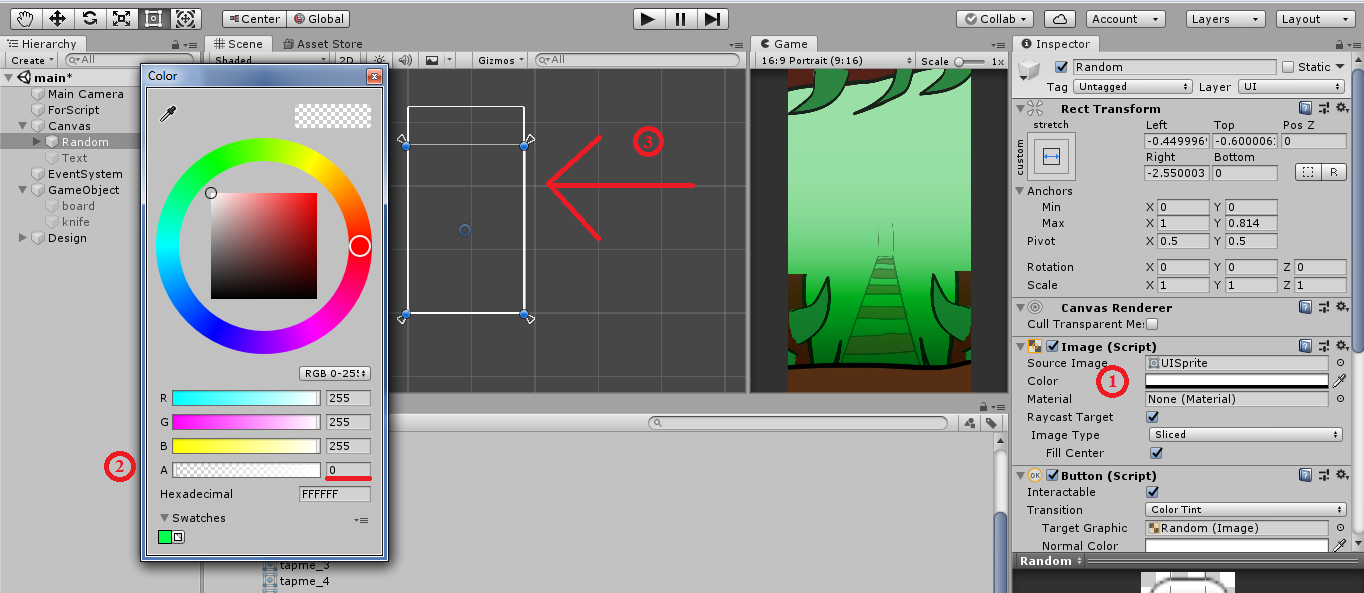
Now create a button that will occupy the entire screen. To create a button in the hierarchy, click on UI -> Button. Further:
- Click on Color.
- Set the value "0" in the field A, which is responsible for the transparency of our button.
- We make sure that the button has become what we wanted.
In the same way we create a text to show our current score and record.
And finally, we got to programming.
using System.Collections; using System.Collections.Generic; using UnityEngine; using UnityEngine.SceneManagement; using UnityEngine.UI; public class MainScript : MonoBehaviour { public GameObject[] prefabs; // public GameObject[] players; // public static int score,record,n,k = 0; //, , "n,k" - public Text scoreT; // void Start() { score = 0; Time.timeScale = 1; StartCoroutine (PrefabsCreate ()); scoreT = scoreT.GetComponent<Text> (); record = PlayerPrefs.GetInt ("Record"); } void Update() { n = Random.Range (0, prefabs.Length); // // 0 - scoreT.text = score + "/" + record; // if (score >= record) { record = score; PlayerPrefs.SetInt ("Record", record); // } } IEnumerator PrefabsCreate(){ // while (true) { Instantiate (prefabs [n], new Vector2 (0, 6.5f), Quaternion.identity); yield return new WaitForSeconds (0.5f); } } public void BtnClick(string btn){ // if(btn == "Click"){ Time.timeScale = 1; players [k].SetActive (false); // (, ...) k++; if (k >= prefabs.Length) { k = 0; // , k - } players [k].SetActive (true); // (, ...) } } }
Second script:
using System.Collections; using System.Collections.Generic; using UnityEngine; public class PlayerScript : MonoBehaviour { void OnTriggerEnter2D(Collider2D other){// (, ) // if (other.gameObject.tag != gameObject.tag) { Time.timeScale = 0; MainScript.score = 0; } else { MainScript.score++; Destroy (other.gameObject);// } } }
What is going on in these methods?
Start (). It starts every time we start the game or restart the scene. Everything that is written inside this method is performed only once. Therefore, we write there: an account equal to zero, the launch of coroutines (what is responsible for creating prefabs), the value of time.
Update (). Run once per frame. It is convenient to write down here that is constantly updated. In our case: an indicator of score and record, a random value n on which depends on what is created - a sword or shield.
BtnClick (). You may ask why this method is “public”? We need it to be reflected in Unity itself and we can spell out the word “Click” in order to track which button we click on, although there is only one button, it will not hurt anyone to know a little more.
Here we write what should happen after pressing the button. When pressed, it should change from sword to shield and vice versa, set the time value to “1”, since when losing it is reset to zero.
OnTriggerEnter2D (). Checks for collision of an object. If the tags of both objects match, then the score is increased by one, and the prefab is destroyed. If the tags are different, then a loss - time stops and the score is reset.
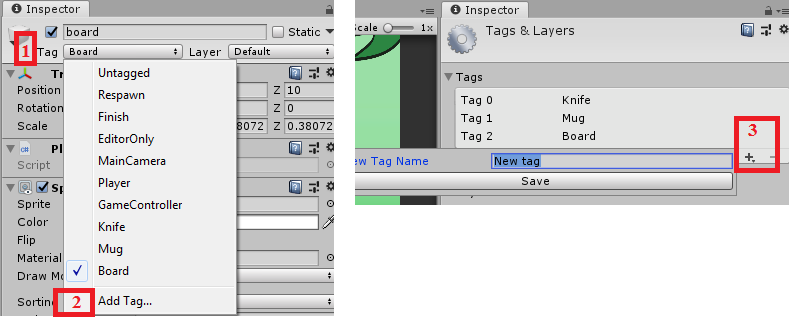
It remains to add these same tags. And here it is very simple:
- In the Inspector window, click on Tag.
- In the drop-down list at the very bottom, click on Add Tag.
- Click on the plus sign and name the tag as we want.
After creating, also click on Tag and select the desired one.
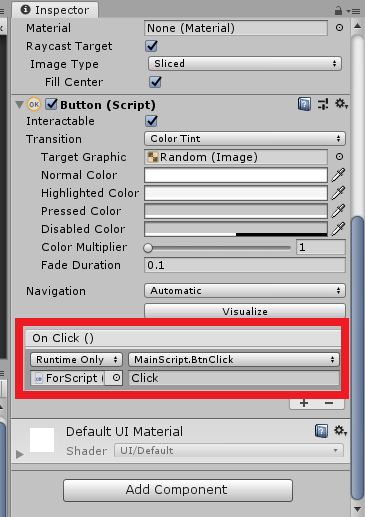
It remains to transfer the scripts to the necessary objects and fill in some fields. Create an empty object and add the “Main Script” script, and add “Player Script” to our sword and shield.
With full confidence, I can say that the game is ready. We launch and enjoy our first creation.
Good luck to everyone in game dev!
All Articles