Chat on iOS: using sockets

Picture created by rawpixel.com
In this publication, we will go down to the TCP layer, learn about the sockets and tools of Core Foundation using the development of a chat application as an example.
Estimated reading time: 25 minutes.
Why sockets?
You may be wondering: “Why should I go a level lower than URLSession ?” If you are smart enough and do not ask this question, proceed immediately to the next section.
The answer is for not so smart
Great question! The fact is that the use of URLSession is based on the HTTP protocol , that is, communication occurs in the style of request-response , approximately as follows:
But what if we need a server on its own initiative to transfer data to your application? Here HTTP is out of work.
Of course, we can continuously pull the server and see if there is data for us (aka polling ). Or we can be more sophisticated and use long-polling . But all these crutches are slightly inappropriate in this case.
After all, why limit yourself to the request-response paradigm if it fits our task a little less than nothing?
In this guide, you will learn how to dive into a lower level of abstraction and directly use SOCKETS in the chat application.
Instead of checking the server for new messages, our application will use streams that remain open during the chat session.
- request from the server some data in JSON format
- get this data, process, display, etc.
But what if we need a server on its own initiative to transfer data to your application? Here HTTP is out of work.
Of course, we can continuously pull the server and see if there is data for us (aka polling ). Or we can be more sophisticated and use long-polling . But all these crutches are slightly inappropriate in this case.
After all, why limit yourself to the request-response paradigm if it fits our task a little less than nothing?
In this guide, you will learn how to dive into a lower level of abstraction and directly use SOCKETS in the chat application.
Instead of checking the server for new messages, our application will use streams that remain open during the chat session.
Getting started
Download the source materials . There is a mock client application and a simple server written in Go .
You do not have to write in Go, but you will need to run the server application so that client applications can connect to it.
Launch the server application
In the source materials there is both a compiled application and a source. If you have healthy paranoia and don’t trust someone else’s compiled code, you can compile the source code yourself.
If you are brave, then open Terminal , go to the directory with the downloaded materials and run the command:
sudo ./server
When prompted, enter your password. After that you should see a message
Listening on 127.0.0.1:80.
Note: the server application starts in privileged mode (the “sudo” command) because it listens on port 80. All ports with numbers less than 1024 require special access.
Your chat server is ready! You can go to the next section.
If you want to compile the server source code yourself,
then in this case you need to install Go using Homebrew .
If you do not have Homebrew, then you need to install it first. Open Terminal and paste the following line there:
Then use this command to install Go:
At the end, go to the directory with the downloaded source materials and compile the source code of the server application:
Finally, you can start the server with the command at the beginning of this section .
If you do not have Homebrew, then you need to install it first. Open Terminal and paste the following line there:
/usr/bin/ruby -e \
"$(curl -fsSL https://raw.githubusercontent.com/Homebrew/install/master/install)"
Then use this command to install Go:
brew install go
At the end, go to the directory with the downloaded source materials and compile the source code of the server application:
go build server.go
Finally, you can start the server with the command at the beginning of this section .
We look at what we have in the client
Now open the DogeChat project, compile it and see what is there.
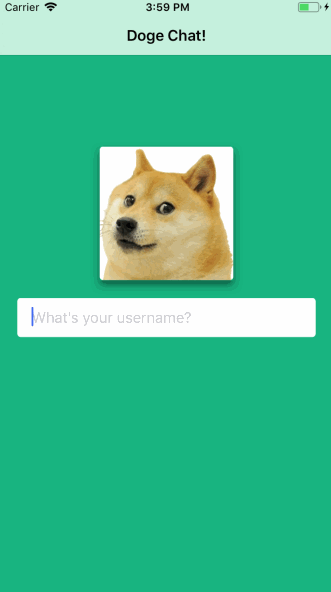
As you can see, DogeChat now allows you to enter a username and go to the chat section itself.
It seems that the developer of this project had no idea how to make a chat. So all we have is a basic UI and navigation. We will write a network layer. Hurrah!
Create a chat room
To go directly to development, go to ChatRoomViewController.swift . This is a view controller that can receive user-entered text and display received messages in a tableview.
Since we have a ChatRoomViewController , it makes sense to develop a ChatRoom class that will do all the rough work.
Let's think about what the new class will provide:
- opening a connection to the server application;
- connecting a user with the name specified by him to the chat;
- sending and receiving messages;
- closing the connection at the end.
Now that we know what we want from this class, press Command-N , select Swift File and call it ChatRoom .
Creating I / O Streams
Replace the contents of ChatRoom.swift with this:
import UIKit class ChatRoom: NSObject { //1 var inputStream: InputStream! var outputStream: OutputStream! //2 var username = "" //3 let maxReadLength = 4096 }
Here we define the ChatRoom class and declare the properties we need.
- First we define the input / output streams. Using them as a pair will allow us to create a socket connection between the application and the chat server. Of course, we will send messages using the output stream, and receive using the input stream.
- Next we define the username.
- And finally, we define the variable maxReadLength, which limits the maximum length of a single message.
Now go to the ChatRoomViewController.swift file and add this line to the list of its properties:
let chatRoom = ChatRoom()
Now that we have created the basic structure of the class, it is time to do the first of the planned tasks: opening the connection between the application and the server.
Open connection
Go back to ChatRoom.swift and add this method for property definitions:
func setupNetworkCommunication() { // 1 var readStream: Unmanaged<CFReadStream>? var writeStream: Unmanaged<CFWriteStream>? // 2 CFStreamCreatePairWithSocketToHost(kCFAllocatorDefault, "localhost" as CFString, 80, &readStream, &writeStream) }
Here's what we do here:
- first we define two variables for socket streams without using automatic memory management
- then we, using these same variables, create directly streams that are bound to the host and port number.
The function has four arguments. The first is the type of memory allocator that we will use when initializing the threads. You should use kCFAllocatorDefault , although there are other possible options in case you want to change the behavior of the threads.
Translator's Note
The documentation for the CFStreamCreatePairWithSocketToHost function says: use NULL or kCFAllocatorDefault . And the description of kCFAllocatorDefault says that it is a synonym for NULL . The circle is closed!
Then we set the host name. In our case, we are connecting to the local server. If your server is located in another place, then you can set its IP address.
Then the port number that the server is listening on.
Finally, we pass pointers to our I / O streams so that the function can initialize them and connect them to the streams it creates.
Now that we have the initialized flows, we can save links to them by adding these lines at the end of the setupNetworkCommunication () method:
inputStream = readStream!.takeRetainedValue() outputStream = writeStream!.takeRetainedValue()
Using takeRetainedValue () as applied to an unmanaged object allows us to maintain a reference to it and, at the same time, avoid future memory leaks. Now we can use our threads wherever we want.
Now we need to add these threads to the run loop so that our application correctly processes network events. To do this, add these two lines at the end of setupNetworkCommunication () :
inputStream.schedule(in: .current, forMode: .common) outputStream.schedule(in: .current, forMode: .common)
Finally it's time to sail! To get started, add this at the very end of the setupNetworkCommunication () method:
inputStream.open() outputStream.open()
Now we have an open connection between our client and server application.
We can compile and run our application, but you will not see any changes yet, because for the time being we are not doing anything with our client-server connection.
Connect to chat
Now that we have an established connection with the server, it's time to start doing something about it! In the case of chat, you need to introduce yourself first, and then you can send messages to the interlocutors.
This leads us to an important conclusion: since we have two types of messages, we need to somehow distinguish between them.
Chat protocol
One of the advantages of using the TCP layer is that we can define our own “protocol” for communication.
If we used HTTP, then we would need to use these different words GET , PUT , PATCH . We would need to form URLs and use the right headers and all that.
We have only two types of messages. We will send
iam:Luke
to enter the chat and introduce yourself.
And we will send
msg:Hey, how goes it, man?
to send a chat message to all respondents.
It is very simple, but absolutely unprincipled, so do not use this method in critical projects.
Now we know what our server expects and we can write a method in the ChatRoom class that will allow the user to connect to the chat. The only argument is the user's nickname.
Add this method inside ChatRoom.swift :
func joinChat(username: String) { //1 let data = "iam:\(username)".data(using: .utf8)! //2 self.username = username //3 _ = data.withUnsafeBytes { guard let pointer = $0.baseAddress?.assumingMemoryBound(to: UInt8.self) else { print("Error joining chat") return } //4 outputStream.write(pointer, maxLength: data.count) } }
- First we form our message using our own “protocol”
- Save the name for future reference.
- withUnsafeBytes (_ :) provides a convenient way to work with an unsafe pointer inside a closure.
- Finally, we send our message to the output stream. This might look more complicated than you might expect, however write (_: maxLength :) uses the unsafe pointer created in the previous step.
Now our method is ready, open ChatRoomViewController.swift and add a call to this method at the end of viewWillAppear (_ :) .
chatRoom.joinChat(username: username)
Now compile and run the application. Enter your nickname and tap on return to see ...
... that again nothing has changed!
Wait, it's all right! Go to the terminal window. There you will see the message Vasya has joined or something like that if your name is not Vasya.
This is great, but it would be nice to have an indication of a successful connection on the screen of your phone.
Responding to Incoming Messages
The server sends out client joining messages to everyone who is in the chat, including you. Fortunately, our application already has everything for displaying any incoming messages in the form of cells in the message table in ChatRoomViewController .
All you have to do is use inputStream to “catch” these messages, convert them to instances of the Message class, and pass them to the table for display.
To be able to respond to incoming messages, you need ChatRoom to comply with the StreamDelegate protocol.
To do this, add this extension at the bottom of the ChatRoom.swift file:
extension ChatRoom: StreamDelegate { }
Now declare who will become a delegate to inputStream.
Add this line to the setupNetworkCommunication () method right before the calls to schedule (in: forMode :):
inputStream.delegate = self
Now add the stream (_: handle :) method implementation to the extension:
func stream(_ aStream: Stream, handle eventCode: Stream.Event) { switch eventCode { case .hasBytesAvailable: print("new message received") case .endEncountered: print("The end of the stream has been reached.") case .errorOccurred: print("error occurred") case .hasSpaceAvailable: print("has space available") default: print("some other event...") } }
We process incoming messages
So, we are ready to start processing incoming messages. The event that interests us is .hasBytesAvailable , which indicates that an incoming message has arrived.
We will write a method that processes these messages. Below the newly added method, we write the following:
private func readAvailableBytes(stream: InputStream) { //1 let buffer = UnsafeMutablePointer<UInt8>.allocate(capacity: maxReadLength) //2 while stream.hasBytesAvailable { //3 let numberOfBytesRead = inputStream.read(buffer, maxLength: maxReadLength) //4 if numberOfBytesRead < 0, let error = stream.streamError { print(error) break } // Construct the Message object } }
- We set the buffer in which we will read the incoming bytes.
- We spin in a loop, while in the input stream there is something to read.
- We call read (_: maxLength :), which reads the bytes from the stream and puts them in the buffer.
- If the call returned a negative value, we return an error and exit the loop.
We need to call this method as soon as we have data in the incoming stream, so go to the switch statement inside the stream (_: handle :) method, find the .hasBytesAvailable switch and call this method immediately after the print statement:
readAvailableBytes(stream: aStream as! InputStream)
In this place we have a prepared buffer of received data!
But we still need to turn this buffer into the contents of the message table.
Place this method on readAvailableBytes (stream :) .
private func processedMessageString(buffer: UnsafeMutablePointer<UInt8>, length: Int) -> Message? { //1 guard let stringArray = String( bytesNoCopy: buffer, length: length, encoding: .utf8, freeWhenDone: true)?.components(separatedBy: ":"), let name = stringArray.first, let message = stringArray.last else { return nil } //2 let messageSender: MessageSender = (name == self.username) ? .ourself : .someoneElse //3 return Message(message: message, messageSender: messageSender, username: name) }
First, we initialize String using the buffer and size that we pass to this method.
The text will be in UTF-8, at the end we will free the buffer, and divide the message by the symbol ':' to separate the name of the sender and the message itself.
Now we are analyzing whether our message is from another participant. On the product, you can create something like a unique token, this is enough for the demo.
Finally, of all this economy, we form an instance of Message and return it.
To use this method, add the following if-let at the end of the while loop in the readAvailableBytes (stream :) method, immediately after the last comment:
if let message = processedMessageString(buffer: buffer, length: numberOfBytesRead) { // Notify interested parties }
Now everything is ready to send Message to someone ... But to whom?
Create the ChatRoomDelegate Protocol
So, we need to inform ChatRoomViewController.swift about the new message, but we do not have a link to it. Since it contains a strong ChatRoom link, we can fall into the trap of a strong link cycle.
This is the perfect place to create a delegate protocol. ChatRoom doesn't care who needs to know about new posts.
At the top of ChatRoom.swift, add a new protocol definition:
protocol ChatRoomDelegate: class { func received(message: Message) }
Now inside the ChatRoom class , add a weak link to store who will become the delegate:
weak var delegate: ChatRoomDelegate?
Now let's add the readAvailableBytes (stream :) method, adding the following line inside the if-let construct, under the last comment in the method:
delegate?.received(message: message)
Go back to ChatRoomViewController.swift and add the following class extension, which ensures compliance with the ChatRoomDelegate protocol, immediately after MessageInputDelegate:
extension ChatRoomViewController: ChatRoomDelegate { func received(message: Message) { insertNewMessageCell(message) } }
The original project already contains the necessary, so insertNewMessageCell (_ :) will accept your message and display the correct cell in the tableview.
Now assign the view controller as a delegate by adding this to viewWillAppear (_ :) immediately after calling super.viewWillAppear ()
chatRoom.delegate = self
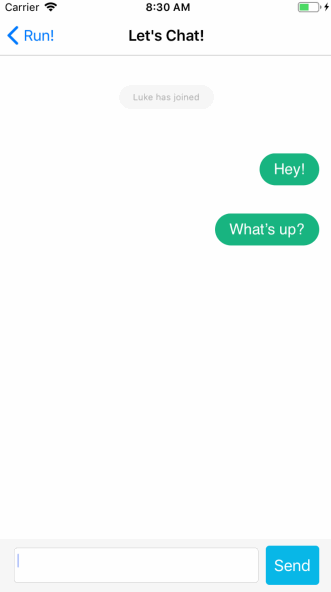
Now compile and run the application. Enter a name and tap return.

You will see a cell about your connection to the chat. Hooray, you successfully sent a message to the server and received a response from it!
Posting Messages
Now that ChatRoom can send and receive messages, it's time to provide the user with the ability to send their own phrases.
In ChatRoom.swift, add the following method at the end of the class definition:
func send(message: String) { let data = "msg:\(message)".data(using: .utf8)! _ = data.withUnsafeBytes { guard let pointer = $0.baseAddress?.assumingMemoryBound(to: UInt8.self) else { print("Error joining chat") return } outputStream.write(pointer, maxLength: data.count) } }
This method is similar to joinChat (username :) , which we wrote earlier, except that it has the msg prefix in front of the text (to indicate that this is a real chat message).
Since we want to send messages by the Send button, we return to ChatRoomViewController.swift and find MessageInputDelegate there.
Here we see the empty sendWasTapped (message :) method. To send a message, send it to chatRoom:
chatRoom.send(message: message)
Actually, that’s all! Since the server will receive the message and forward it to everyone, ChatRoom will be notified of the new message in the same way as when joining the chat.
Compile and run the application.

If you don’t have anyone to chat with now, launch a new Terminal window and enter:
nc localhost 80
This will connect you to the server. Now you can connect to the chat using the same “protocol":
iam:gregg
And so - send a message:
msg:Ay mang, wut's good?
Congratulations, you wrote a client for chat!
We clean ourselves
If you have ever been developing applications that actively read / write files, then you should know that good developers close files when they finish working with them. The fact is that the connection through the socket is provided by the file descriptor. This means that at the end of the work you need to close it, like any other file.
To do this, add the following method to ChatRoom.swift after defining send (message :) :
func stopChatSession() { inputStream.close() outputStream.close() }
As you probably guessed, this method closes threads so that you can no longer receive and send messages. In addition, threads are removed from the run loop in which we previously placed them.
Add a call to this method in the .endEncountered section of the switch statement inside stream (_: handle :) :
stopChatSession()
Then go back to ChatRoomViewController.swift and do the same in viewWillDisappear (_ :) :
chatRoom.stopChatSession()
All! Now for sure!
Conclusion
Now that you have mastered the basics of networking with sockets, you can deepen your knowledge.
UDP sockets
This application is an example of network communication using TCP, which guarantees the delivery of packets to the destination.
However, you can use UDP sockets. This type of connection does not guarantee the delivery of packages to their intended purpose, but it is much faster.
This is especially useful in games. Ever experienced a lag? This meant that you had a bad connection and many UDP packets were lost.
Websockets
Another alternative to HTTP in applications is a technology called web sockets.
Unlike regular TCP sockets, web sockets use HTTP to establish communication. With their help, you can achieve the same as with ordinary sockets, but with comfort and security, as in a browser.
All Articles