Realistic Caustic Reflections

Most technical artists at some point in their careers try to create plausible reflections of caustics. If you are a game developer, then one of the main reasons for reading Twitter is the endless stream of inspiration you can draw from it. A few days ago, Florian Gelzenlichter ( kolyaTQ on twitter) posted a GIF of the caustic effect created in Unity using shaders. The post (presented below) quickly gained 1.5 thousand likes, which shows a sincere interest in this type of content.
Although I am usually more attracted to longer and technically complex series of articles (for example, about volumetric atmospheric scattering of light [ translation on Habré] and inverse kinematics [ first and second parts of translation on Habré), I could not resist the temptation to write a short and cute tutorial about the effects of Florian .
At the end of this article there is a link to download the Unity package and all the necessary assets.
What is caustic
You may not be aware of the concept of caustics , although you encounter this effect daily. Caustics are reflections of light caused by curved surfaces. In the general case, any curved surface can behave like a lens, focusing light at some points and scattering it at others. The most common media providing such an effect are glass and water, which generates the so-called caustic waves (see below).

Caustics can take other forms. A rainbow, for example, is an optical phenomenon that occurs when light is refracted in raindrops. Therefore, strictly speaking, it is caustic.
Anatomy of effect
A recognizable feature of caustic waves is the way it moves; most likely you saw him if you ever looked at the bottom of the pool. Recreating a real caustic is very expensive because it requires the simulation of many rays of light.
Florian managed to create a plausible effect, starting with a single caustic texture. To create my tutorial, I used the texture shown below, taken from OpenGameArt .

An important property that allows this effect to be realized is that the caustic pattern shown above is seamless . This means that you can place two images next to each other and there will be no noticeable seam between them. Since we want to use this effect on large surfaces, it is important that we have the opportunity to stretch this texture without tears that can destroy the illusion.
Having received the texture, Florian suggests taking three steps:
- Apply a caustic pattern twice to the surface of the model, each time using different sizes and speeds
- Mix two patterns with the
min
operator - Separate RGB channels when sampling.
Let's see how you can implement each of the steps in Unity.
Shader Creation
The first step is to create a new shader. Since this effect is likely to be used in a 3D game that also has real lighting, it’s best to start with a surface shader . Surface shaders are one of many types of shaders supported by Unity (such as vertex and fragment shaders for unlit materials, screen shaders for post-processing effects, and computational shaders for simulations off-screen).
The new surface shader has just a few features. To create this effect, we need to transfer information to the shader. The first is the caustic texture. Secondly, this is the parameter used to scale and offset it.
Let's create two shader properties :
Properties { ... [Header(Caustics)] _CausticsTex("Caustics (RGB)", 2D) = "white" {} // Tiling X, Tiling Y, Offset X, Offset Y _Caustics_ST("Caustics ST", Vector) = (1,1,0,0) }
and the corresponding Cg variables :
sampler2D _CausticsTex; float4 _Caustics_ST;
The shader properties correspond to the fields displayed in the Unity Material Inspector. The corresponding Cg variables are the values themselves, which can be used in the shader code.
As you can see from the code above,
_Caustics_ST
is
float4
, i.e. it contains four values. We will use them to control the sampling of the caustic texture. Namely:
-
_Caustics_ST.x
: scale of the caustic texture along the X axis; -
_Caustics_ST.y
: scale of the caustic texture along the Y axis; -
_Caustics_ST.z
: displacement of the caustic texture along the X axis; -
_Caustics_ST.w
: displacement of the caustic texture along the Y axis ;.
Why is the variable called _Caustics_ST?
If you already have a little experience working with shaders, then you have already seen other properties ending with the suffix
. In Unity,
can be used to add additional information about how the texture is sampled.
For example, if you create a Cg variable
, then it can be used to set the size and offset when applying texture to the model.
Usually
variables
not need properties because they are automatically displayed in the inspector. However, in this particular case, we cannot rely on this because we need to sample the texture twice, each time with a different scale and offset. In the future, we need to duplicate this variable into two different variables.
_ST
. In Unity,
_ST
can be used to add additional information about how the texture is sampled.
For example, if you create a Cg variable
_MainTex_ST
, then it can be used to set the size and offset when applying texture to the model.
Usually
_ST
variables
_ST
not need properties because they are automatically displayed in the inspector. However, in this particular case, we cannot rely on this because we need to sample the texture twice, each time with a different scale and offset. In the future, we need to duplicate this variable into two different variables.
Sampling texture
Each surface shader contains a function, usually called
surf
, which is used to determine the color of each rendered pixel. The “standard”
surf
function looks like this:
void surf (Input IN, inout SurfaceOutputStandard o) { // Albedo comes from a texture tinted by color fixed4 c = tex2D (_MainTex, IN.uv_MainTex) * _Color; o.Albedo = c.rgb; // Metallic and smoothness come from slider variables o.Metallic = _Metallic; o.Smoothness = _Glossiness; o.Alpha = ca; }
The final color is determined by the number of fields that the shader must initialize and return in a structure called
SurfaceOutputStandard
. We need to change
Albedo
, which roughly matches the color of the object illuminated by white light.
In the newly created surface shader, albedo is taken from a texture called
_MainTex
. Since the caustic effect is superimposed on top of the existing texture, we will have to perform additional sampling of the texture in
_CausticsTex
.
A technique called UV overlay allows you to understand which part of the texture needs to be sampled depending on which part of the geometry needs to be rendered. This is done using
uv_MainTex
- the variable
float2
, stored at each vertex of the 3D model and indicating the coordinate of the texture.
Our idea is to use
_Caustics_ST
to scale and offset
uv_MainTex
to stretch and move the caustic texture across the model.
void surf (Input IN, inout SurfaceOutputStandard o) { // Albedo comes from a texture tinted by color fixed4 c = tex2D (_MainTex, IN.uv_MainTex) * _Color; o.Albedo = c.rgb; // Caustics sampling fixed2 uv = IN.uv_MainTex * _Caustics_ST.xy + _Caustics_ST.zw; fixed3 caustics = tex2D(_CausticsTex, uv).rgb; // Add o.Albedo.rgb += caustics; // Metallic and smoothness come from slider variables o.Metallic = _Metallic; o.Smoothness = _Glossiness; o.Alpha = ca; }
What happens if Albedo exceeds 1?
In the code above, we add two textures. Color is usually between before However, there is no guarantee that, as a result, some values will not exceed this interval.
In older shaders, this could cause a problem. Here it is actually a feature . If the color value of a pixel exceeds unity, then this means that its influence should “spread” beyond its borders and affect neighboring pixels.
This is exactly what happens when very bright specular reflections are obtained. However, this effect should not be created only by a surface shader. For the effect to work, the camera must have HDR turned on. This property stands for High Dynamic Range ; it allows color values to exceed . Also, to blur an excessive amount of colors on neighboring pixels, a post-processing effect is required.
Unity has its own post-processing stack, which has a bloom filter that does just that. You can read more about this on the Unity Blog: PostFX v2 - Amazing visuals, upgraded .
Preliminary results are shown below:

Animated caustics
One of the most important features of caustics is how it moves. At the moment, they are simply statically projected onto the surface of the model as a second texture.
Animation of materials in shaders can be implemented using the Unity property
_Time
. It can be used to access the current game time, that is, add time to the equations.
The easiest way is to simply offset the texture based on the current time.
// Caustics UV fixed2 uv = IN.uv_MainTex * _Caustics_ST.xy + _Caustics_ST.zw; uv += _CausticsSpeed * _Time.y; // Sampling fixed3 caustics = tex2D(_CausticsTex, uv).rgb; // Add o.Albedo.rgb += caustics;
The
_Time.y
field contains the current playing time in seconds . If reflection moves too fast, you can multiply it by a factor. To do this, the
_CausticsSpeed
variable of type
float2
used in the above code.
You may need to vibrate the caustic texture in a sinusoid for your purposes. It is important to understand here that there is no standard way of realizing the effect. Depending on your needs, you can make caustic reflections move completely differently.
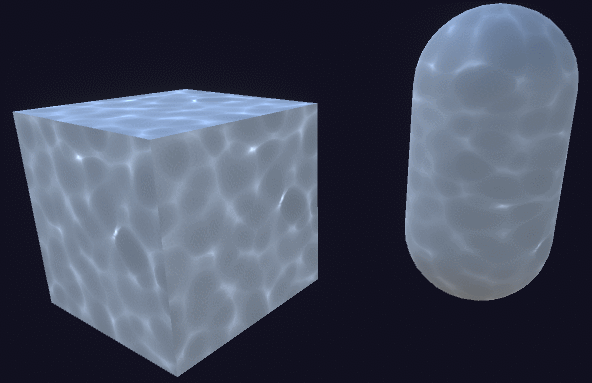
The results shown below are still pretty mediocre. This is normal: we still have a lot to do to make the reflections look beautiful.

Multiple sampling
The effect becomes alive if you sample the caustic texture not once, but twice. If you lay them on top of one another and move them at different speeds, the result will be completely different.
First of all, we duplicate the
_Caustics_ST
and
_CausticsSpeed
properties so that the samples of the two textures have different scales, displacements, and speeds:
[Header(Caustics)] _CausticsTex("Caustics (RGB)", 2D) = "white" {} // Tiling X, Tiling Y, Offset X, Offset Y _Caustics1_ST("Caustics 1 ST", Vector) = (1,1,0,0) _Caustics2_ST("Caustics 1 ST", Vector) = (1,1,0,0) // Speed X, Speed Y _Caustics1_Speed("Caustics 1 Speed", Vector) = (1, 1, 0 ,0) _Caustics2_Speed("Caustics 2 Speed", Vector) = (1, 1, 0 ,0)
Now that we have two caustic samples, they can be mixed using the
min
operator. If you just take the average value, the result will not be very good.
// Caustics samplings fixed3 caustics1 = ... fixed3 caustics2 = ... // Blend o.Albedo.rgb += min(caustics1, caustics2);
Such a small change makes a huge difference:
To keep the code beautiful, you can also wrap the caustic sampling code in your own function:
// Caustics fixed3 c1 = causticsSample(_CausticsTex, IN.uv_MainTex, _Caustics1_ST, _Caustics1_Speed); fixed3 c2 = causticsSample(_CausticsTex, IN.uv_MainTex, _Caustics2_ST, _Caustics2_Speed); o.Albedo.rgb += min(c1, c2);
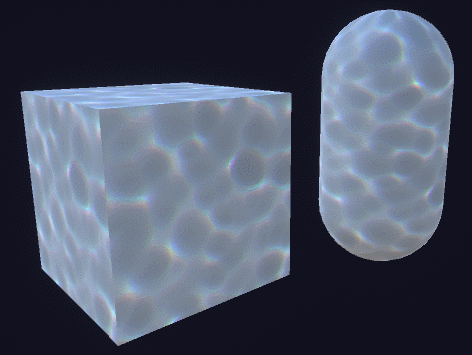
RGB Separation
To make the caustic reflections look good, you need to do the last trick. Passing through a slice, light of different wavelengths is refracted differently. This means that when moving through water, the light can "split" into different colors.
To simulate this effect, we can divide each caustic sample into three, one for each color channel. By sampling the red, green, and blue channels with a slight bias, we get a color mismatch.
Let's start by adding the
_SplitRGB
property, which indicates the strength of the
_SplitRGB
-
_SplitRGB
effect:
// Caustics UV fixed2 uv = IN.uv_MainTex * _Caustics_ST.xy + _Caustics_ST.zw; uv += _CausticsSpeed * _Time.y; // RGB split fixed s = _SplitRGB; fixed r = tex2D(tex, uv + fixed2(+s, +s)).r; fixed g = tex2D(tex, uv + fixed2(+s, -s)).g; fixed b = tex2D(tex, uv + fixed2(-s, -s)).b; fixed3 caustics = fixed3(r, g, b);
You can select the RGB channel offset arbitrarily, but even with this simple offset, you get a very convincing picture:
Conclusion and downloads
If you are interested in learning how to create seamless caustic textures, then you should read the interesting article Periodic Caustic Textures .
Meanwhile, Florian continues to work on his caustic shader and has made some pretty interesting improvements that can be seen.
A complete package for this tutorial is available on Patreon, it includes all the necessary assets to recreate this technique. The package was exported from Unity 2019.2 and requires Postprocessing Stack v2.
- Standard Asset : Shader File Only
- Paid assets : full scene, including caustic texture and materials.
All Articles