Modern NES game written in a Lisp-like language
What Remains is a narrative adventure game for the 8-bit NES video game console, released in March 2019 as a free ROM running in the emulator. It was created by a small team of Iodine Dynamics for two years intermittently. At the moment, the game is at the implementation stage in the hardware: we create a limited set of cartridges from recycled parts.
The game has 6 levels on which the player walks along several scenes with four-way scrolling cards, communicates with the NPC, collects clues, gets to know their world, plays mini-games and solves simple puzzles. I was the chief engineer of the project, so I encountered many difficulties in realizing the team’s vision. Given the serious limitations of NES equipment, it’s quite difficult to create any game for it, not to mention a project with as much content as in What Remains. Only thanks to the created useful subsystems that allow us to hide this complexity and manage it, we were able to work as a team and complete the game.
In this article I will talk about some technical details of the individual parts of the game engine. I hope that other developers will find them useful or at least curious.
Before starting the code, I’ll tell you a little about the specifications of the equipment with which we work. NES is a game console released in 1983 (Japan, 1985 - America). Inside it has an 8-bit CPU 6502 [1] with a frequency of 1.79 MHz. Since the console produces 60 frames per second, there are approximately 30 thousand CPU cycles per frame, and this is quite small to calculate everything that happens in the main gameplay cycle.
In addition, the console has a total of 2048 bytes of RAM (which can be expanded to 10,240 bytes using additional RAM, which we did not do). It can also address 32 KB of ROM at a time, which can be expanded by switching banks (What Remains uses 512 KB of ROM). Switching banks is a complex topic [2] that modern programmers do not deal with. In short, the address space available to the CPU is less than the data contained in the ROM, that is, when manually switched, entire memory blocks remain inaccessible. Did you want to call some function? It is not until you replace the bank by calling the bank switching command. If this is not done, then when the function is called, the program will crash.
In fact, the most difficult thing when developing a game for NES is to consider all this at the same time. Optimizing one aspect of the code, such as memory usage, can often affect something else, such as CPU performance. The code should be effective and at the same time convenient in support. Usually games were programmed in assembly language.
But in our case, it was not so. Instead, a tandem with the game would have developed its own language. Co2 is a Lisp-like language built on Racket Scheme and compiled into assembler 6502. Initially, the language was created by Dave Griffiths to build the What Remains demo, and I decided to use it for the whole project.
Co2 allows you to write built-in assembler code if necessary, but it also has high-level capabilities that simplify some tasks. It implements local variables that are effective both in terms of RAM consumption and access speed [2]. It has a very simple macro system that allows you to write readable and at the same time efficient code [3]. Most importantly, due to the homo-conicity of Lisp, it greatly simplifies the display of data directly in the source.
Writing your own tools is quite widespread in game development, but creating an entire programming language is much less common. However, we did it. It’s not very clear whether the complexity of developing and supporting Co2 proved itself, but it definitely had advantages that helped us. In the post I will not talk in detail about the work of Co2 (this deserves a separate article), but I will constantly mention it because its use is rather closely intertwined with the development process.
Here is a sample Co2 code that draws a background for a scene just loaded before dimming it:
Any real-time game more complex than Tetris is inherently a "system of entities." This is a functionality that allows various independent actors to act simultaneously and be responsible for their own condition. Although What Remains is by no means an active game, it still has many independent actors with complex behavior: they animate and render themselves, check for collisions and cause dialogs.
The implementation is quite typical: a large array contains a list of entities in the scene, each record contains entity-related data along with a type label. The update function in the main gameplay cycle bypasses all entities and implements the corresponding behavior depending on their type.
The way to store entity data is more interesting. In general, the game has so many unique entities that the problem may be the use of a large number of ROMs. Here Co2 shows its power, allowing us to present each essence of the scene in a concise, but readable form - as a stream of key-value pairs. In addition to data such as the initial position, almost every key is optional, which allows them to be declared to entities only when necessary.
In this code,
sets the color palette used for the entity,
sets the number of animation frames, and
prevents the NPC from turning if the player is trying to talk to him from the other side. It also sets a pair of flags of conditions that change the behavior of the entity in the process of passing the game by the player.
This kind of presentation is very effective for storage in ROM, but it is very slow when accessed at runtime, and will be too inefficient for gameplay. Therefore, when a player enters a new scene, all entities in this scene are loaded into RAM and process all conditions that may affect their initial state. But you can not download any detail for each entity, because it would take up more RAM than is available. The engine loads only the most necessary for each entity, plus a pointer to its full structure in ROM, which is dereferenced in situations such as processing dialogs. This specific set of compromises allowed us to provide a sufficient level of performance.
The game What Remains has many different locations, several scenes on the street with scrolling maps and many scenes in rooms that remain static. To move from one to another, you need to determine that the player has reached the exit, load a new scene, and then place the player at the desired point. In the early stages of development, such transitions were described in a unique way as two connected scenes, for example, “first city” and “cafe” and data in the if statement about the location of the doors in each scene. In order to determine where to place the player after changing the scene, you just had to check where he was going from and where, and place him next to the corresponding exit.
However, when we began to fill the “second city” scene, which connects to the first city in two different places, such a system began to fall apart. Suddenly, the pair
no longer fits. After thinking about this, we realized that the connection itself is really important, which inside the game code calls the “portal”. To account for these changes, the engine has been rewritten. which led us to an entity-like situation. Portals could store lists of key-value pairs and load at the beginning of the scene. When entering the portal, you could use the same position information as when leaving. In addition, the addition of conditions was simplified, similar to what the entities had: at certain points in the game, we could modify portals, for example, open or close doors.
It also simplified the process of adding “teleportation points”, which were often used in cinematic inserts, where the player had to move to another in the scene, depending on what was happening in the plot.
Here's what teleportation looks like at the beginning of level 3:
Pay attention to the
value, which indicates the direction for the "entrance" to this portal. When leaving the portal, the player will look in the other direction; in this case, Jenny (the main character of the game) is at home, while looking down.
Rendering a text block turned out to be one of the most complex code fragments in the entire project. NES graphic restrictions forced to go to tricks. To begin with, NES has only one layer for graphic data, that is, to free up space for a text block, you need to erase part of the map against the background, and then restore it after closing the text block.
In addition, the palette for each individual scene must contain black and white colors for rendering the text, which imposes additional restrictions on the artist. To avoid color conflicts with the rest of the background, the text block should be aligned with the 16 × 16 grid [5]. Drawing a text block in a scene with a room is much simpler than in a street one where the camera can move, because in this case it is necessary to consider graphic buffers scrolling vertically and horizontally. Finally, the pause screen message is a slightly modified standard dialog box, because it displays different information, but uses almost the same code.
After an infinite number of buggy versions of the code, I finally managed to find a solution in which the work is divided into two stages. First, all calculations are performed that determine where and how to draw the text block, including the processing code for all border cases. Thus, all these difficulties are brought to one place.
Then, a text block with state preservation is drawn line by line and the calculations from the first stage are used so as not to complicate the code.
If you get used to the Lisp style, then the code is read quite conveniently.
In the end, I will talk about a small detail that does not particularly affect the gameplay, but adds a nice touch that I'm proud of. NES has only two graphical components: a name table (nametable), which is used for static and grid-aligned backgrounds, and sprites are 8x8 pixel objects that can be placed in arbitrary places. Elements such as the player’s character and NPCs are usually created as sprites if they should be on top of the name table graphics.
However, NES equipment also provides the ability to specify a portion of sprites that can be completely placed under the name table. This effortlessly allows you to realize a cool 3D effect.
It works as follows: the palette used for the current scene handles the color at position 0 in a special way: it is the global background color. A table of names is drawn on top of it, and sprites with a z-layer are drawn between two other layers.
Here is the palette of this scene:

So, the dark gray color in the very left corner is used as the global background color.
The effect of layers works as follows:

In most other games, this all ends, however, What Remains has taken one more step forward. The game does not place Jenny completely in front of or under the graphics of the table of names - her character is divided between them in the right way. As you can see, sprites are 8x8 units in size, and the entire character’s graphics consist of several sprites (from 3 to 6, depending on the animation frame). Each sprite can set its own z-layer, that is, some sprites will be in front of the name table, and others behind it.
Here is an example of this effect in action:
The algorithm for implementing this effect is pretty tricky. First, collision data surrounding the player is examined, in particular tiles, which may take a whole character to draw. In this diagram, solid tiles are shown in red squares, and yellow tiles indicate the part with the z-layer.
Using various heuristics, they are combined to create a “reference point” and a bit mask of four bits. Four quadrants relative to the reference point correspond to four bits: 0 means that the player must be in front of the table of names, 1 - which is behind it.
When placing individual sprites for rendering the player, their position is compared with the reference point to determine the z-layer of this particular sprite. Some of them are in the front layer, others in the back.
I briefly talked about the different aspects of the inner workings of our new modern retro game. There is much more interesting in the code base, but I have outlined a significant part of what makes the game work.
The most important lesson I learned from this project is the benefits that can be gained from data driven engines. Several times I managed to replace some unique logic with a table and a mini-interpreter, and thanks to this, the code became simpler and more readable.
I hope you enjoyed the article!
[1] Strictly speaking, a kind of CPU 6502 called Ricoh 2A03 was installed in NES.
[2] In fact, this project convinced me that switching banks / managing ROMs is the main limitation for any NES project that exceeds a certain size.
[3] For this, one should thank the “compiled stack” - a concept used in programming embedded systems, although I hardly managed to find literature about it. In short, you need to build a complete project call graph, sort it from leaf nodes to the root, and then assign each node a memory equal to its needs + maximum number of child nodes.
[4] Macros were added at rather late stages of development, and, frankly, we were not able to take special advantage of them.
[5] You can read more about NES graphics in my series of articles . Color conflicts are caused by the attributes described in the first part.
The game has 6 levels on which the player walks along several scenes with four-way scrolling cards, communicates with the NPC, collects clues, gets to know their world, plays mini-games and solves simple puzzles. I was the chief engineer of the project, so I encountered many difficulties in realizing the team’s vision. Given the serious limitations of NES equipment, it’s quite difficult to create any game for it, not to mention a project with as much content as in What Remains. Only thanks to the created useful subsystems that allow us to hide this complexity and manage it, we were able to work as a team and complete the game.
In this article I will talk about some technical details of the individual parts of the game engine. I hope that other developers will find them useful or at least curious.
NES equipment
Before starting the code, I’ll tell you a little about the specifications of the equipment with which we work. NES is a game console released in 1983 (Japan, 1985 - America). Inside it has an 8-bit CPU 6502 [1] with a frequency of 1.79 MHz. Since the console produces 60 frames per second, there are approximately 30 thousand CPU cycles per frame, and this is quite small to calculate everything that happens in the main gameplay cycle.
In addition, the console has a total of 2048 bytes of RAM (which can be expanded to 10,240 bytes using additional RAM, which we did not do). It can also address 32 KB of ROM at a time, which can be expanded by switching banks (What Remains uses 512 KB of ROM). Switching banks is a complex topic [2] that modern programmers do not deal with. In short, the address space available to the CPU is less than the data contained in the ROM, that is, when manually switched, entire memory blocks remain inaccessible. Did you want to call some function? It is not until you replace the bank by calling the bank switching command. If this is not done, then when the function is called, the program will crash.
In fact, the most difficult thing when developing a game for NES is to consider all this at the same time. Optimizing one aspect of the code, such as memory usage, can often affect something else, such as CPU performance. The code should be effective and at the same time convenient in support. Usually games were programmed in assembly language.
Co2
But in our case, it was not so. Instead, a tandem with the game would have developed its own language. Co2 is a Lisp-like language built on Racket Scheme and compiled into assembler 6502. Initially, the language was created by Dave Griffiths to build the What Remains demo, and I decided to use it for the whole project.
Co2 allows you to write built-in assembler code if necessary, but it also has high-level capabilities that simplify some tasks. It implements local variables that are effective both in terms of RAM consumption and access speed [2]. It has a very simple macro system that allows you to write readable and at the same time efficient code [3]. Most importantly, due to the homo-conicity of Lisp, it greatly simplifies the display of data directly in the source.
Writing your own tools is quite widespread in game development, but creating an entire programming language is much less common. However, we did it. It’s not very clear whether the complexity of developing and supporting Co2 proved itself, but it definitely had advantages that helped us. In the post I will not talk in detail about the work of Co2 (this deserves a separate article), but I will constantly mention it because its use is rather closely intertwined with the development process.
Here is a sample Co2 code that draws a background for a scene just loaded before dimming it:
; Render the nametable for the scene at the camera position (defsub (create-initial-world) (camera-assign-cursor) (set! camera-cursor (+ camera-cursor 60)) (let ((preserve-camera-v)) (set! preserve-camera-v camera-v) (set! camera-v 0) (loop i 0 60 (set! delta-v #xff) (update-world-graphics) (when render-nt-span-has (set! render-nt-span-has #f) (apply-render-nt-span-buffer)) (when render-attr-span-has (set! render-attr-span-has #f) (apply-render-attr-span-buffer))) (set! camera-v preserve-camera-v)) (camera-assign-cursor))
Entity System
Any real-time game more complex than Tetris is inherently a "system of entities." This is a functionality that allows various independent actors to act simultaneously and be responsible for their own condition. Although What Remains is by no means an active game, it still has many independent actors with complex behavior: they animate and render themselves, check for collisions and cause dialogs.
The implementation is quite typical: a large array contains a list of entities in the scene, each record contains entity-related data along with a type label. The update function in the main gameplay cycle bypasses all entities and implements the corresponding behavior depending on their type.
; Called once per frame, to update each entity (defsub (update-entities) (when (not entity-npc-num) (return)) (loop k 0 entity-npc-num (let ((type)) (set! type (peek entity-npc-data (+ k entity-field-type))) (when (not (eq? type #xff)) (update-single-entity k type)))))
The way to store entity data is more interesting. In general, the game has so many unique entities that the problem may be the use of a large number of ROMs. Here Co2 shows its power, allowing us to present each essence of the scene in a concise, but readable form - as a stream of key-value pairs. In addition to data such as the initial position, almost every key is optional, which allows them to be declared to entities only when necessary.
(bytes npc-diner-a 172 108 prop-palette 1 prop-hflip prop-picture picture-smoker-c prop-animation simple-cycle-animation prop-anim-limit 6 prop-head hair-flip-head-tile 2 prop-dont-turn-around prop-dialog-a (2 progress-stage-4 on-my-third my-dietician) prop-dialog-a (2 progress-stage-3 have-you-tried-the-pasta the-real-deal) prop-dialog-a (2 progress-diner-is-clean omg-this-cherry-pie its-like-a-party) prop-dialog-a (2 progress-stage-1 cant-taste-food puff-poof) prop-dialog-b (1 progress-stage-4 tea-party-is-not) prop-dialog-b (1 progress-stage-3 newspaper-owned-by-dnycorp) prop-dialog-b (1 progress-stage-2 they-paid-a-pr-guy) prop-dialog-b (1 progress-stage-1 it-seems-difficult) prop-customize (progress-stage-2 stop-smoking) 0)
In this code,
prop-palette
sets the color palette used for the entity,
prop-anim-limit
sets the number of animation frames, and
prop-dont-turn-around
prevents the NPC from turning if the player is trying to talk to him from the other side. It also sets a pair of flags of conditions that change the behavior of the entity in the process of passing the game by the player.
This kind of presentation is very effective for storage in ROM, but it is very slow when accessed at runtime, and will be too inefficient for gameplay. Therefore, when a player enters a new scene, all entities in this scene are loaded into RAM and process all conditions that may affect their initial state. But you can not download any detail for each entity, because it would take up more RAM than is available. The engine loads only the most necessary for each entity, plus a pointer to its full structure in ROM, which is dereferenced in situations such as processing dialogs. This specific set of compromises allowed us to provide a sufficient level of performance.
Portals
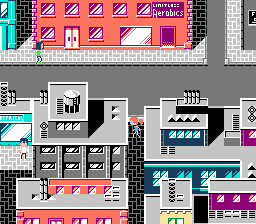
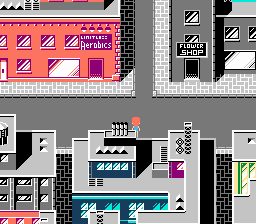
The game What Remains has many different locations, several scenes on the street with scrolling maps and many scenes in rooms that remain static. To move from one to another, you need to determine that the player has reached the exit, load a new scene, and then place the player at the desired point. In the early stages of development, such transitions were described in a unique way as two connected scenes, for example, “first city” and “cafe” and data in the if statement about the location of the doors in each scene. In order to determine where to place the player after changing the scene, you just had to check where he was going from and where, and place him next to the corresponding exit.
However, when we began to fill the “second city” scene, which connects to the first city in two different places, such a system began to fall apart. Suddenly, the pair
(_, _)
no longer fits. After thinking about this, we realized that the connection itself is really important, which inside the game code calls the “portal”. To account for these changes, the engine has been rewritten. which led us to an entity-like situation. Portals could store lists of key-value pairs and load at the beginning of the scene. When entering the portal, you could use the same position information as when leaving. In addition, the addition of conditions was simplified, similar to what the entities had: at certain points in the game, we could modify portals, for example, open or close doors.
; City A (bytes city-a-scene #x50 #x68 look-up portal-customize (progress-stage-5 remove-self) ; to Diner diner-scene #xc0 #xa0 look-down portal-width #x20 0)
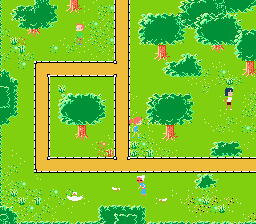
It also simplified the process of adding “teleportation points”, which were often used in cinematic inserts, where the player had to move to another in the scene, depending on what was happening in the plot.
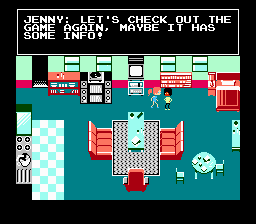
Here's what teleportation looks like at the beginning of level 3:
; Jenny's home (bytes jenny-home-scene #x60 #xc0 look-up portal-teleport-only jenny-back-at-home-teleport 0)
Pay attention to the
look-up
value, which indicates the direction for the "entrance" to this portal. When leaving the portal, the player will look in the other direction; in this case, Jenny (the main character of the game) is at home, while looking down.
Text block
Rendering a text block turned out to be one of the most complex code fragments in the entire project. NES graphic restrictions forced to go to tricks. To begin with, NES has only one layer for graphic data, that is, to free up space for a text block, you need to erase part of the map against the background, and then restore it after closing the text block.
In addition, the palette for each individual scene must contain black and white colors for rendering the text, which imposes additional restrictions on the artist. To avoid color conflicts with the rest of the background, the text block should be aligned with the 16 × 16 grid [5]. Drawing a text block in a scene with a room is much simpler than in a street one where the camera can move, because in this case it is necessary to consider graphic buffers scrolling vertically and horizontally. Finally, the pause screen message is a slightly modified standard dialog box, because it displays different information, but uses almost the same code.
After an infinite number of buggy versions of the code, I finally managed to find a solution in which the work is divided into two stages. First, all calculations are performed that determine where and how to draw the text block, including the processing code for all border cases. Thus, all these difficulties are brought to one place.
Then, a text block with state preservation is drawn line by line and the calculations from the first stage are used so as not to complicate the code.
; Called once per frame as the text box is being rendered (defsub (text-box-update) (when (or (eq? tb-text-mode 0) (eq? tb-text-mode #xff)) (return #f)) (cond [(in-range tb-text-mode 1 4) (if (not is-paused) ; Draw text box for dialog. (text-box-draw-opening (- tb-text-mode 1)) ; Draw text box for pause. (text-box-draw-pausing (- tb-text-mode 1))) (inc tb-text-mode)] [(eq? tb-text-mode 4) ; Remove sprites in the way. (remove-sprites-in-the-way) (inc tb-text-mode)] [(eq? tb-text-mode 5) (if (not is-paused) ; Display dialog text. (when (not (crawl-text-update)) (inc tb-text-mode) (inc tb-text-mode)) ; Display paused text. (do (create-pause-message) (inc tb-text-mode)))] [(eq? tb-text-mode 6) ; This state is only used when paused. Nothing happens, and the caller ; has to invoke `text-box-try-exiting-pause` to continue. #t] [(and (>= tb-text-mode 7) (< tb-text-mode 10)) ; Erase text box. (if (is-scene-outside scene-id) (text-box-draw-closing (- tb-text-mode 7)) (text-box-draw-restoring (- tb-text-mode 7))) (inc tb-text-mode)] [(eq? tb-text-mode 10) ; Reset state to return to game. (set! text-displaying #f) (set! tb-text-mode 0)]) (return #t))
If you get used to the Lisp style, then the code is read quite conveniently.
Sprite z-layers
In the end, I will talk about a small detail that does not particularly affect the gameplay, but adds a nice touch that I'm proud of. NES has only two graphical components: a name table (nametable), which is used for static and grid-aligned backgrounds, and sprites are 8x8 pixel objects that can be placed in arbitrary places. Elements such as the player’s character and NPCs are usually created as sprites if they should be on top of the name table graphics.
However, NES equipment also provides the ability to specify a portion of sprites that can be completely placed under the name table. This effortlessly allows you to realize a cool 3D effect.
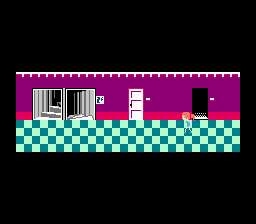
It works as follows: the palette used for the current scene handles the color at position 0 in a special way: it is the global background color. A table of names is drawn on top of it, and sprites with a z-layer are drawn between two other layers.
Here is the palette of this scene:
So, the dark gray color in the very left corner is used as the global background color.
The effect of layers works as follows:
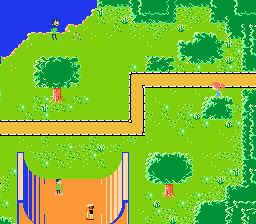
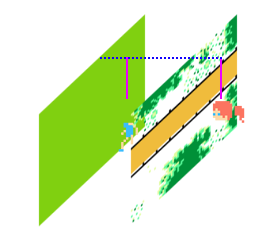
In most other games, this all ends, however, What Remains has taken one more step forward. The game does not place Jenny completely in front of or under the graphics of the table of names - her character is divided between them in the right way. As you can see, sprites are 8x8 units in size, and the entire character’s graphics consist of several sprites (from 3 to 6, depending on the animation frame). Each sprite can set its own z-layer, that is, some sprites will be in front of the name table, and others behind it.
Here is an example of this effect in action:
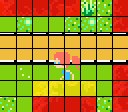
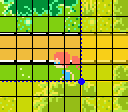
The algorithm for implementing this effect is pretty tricky. First, collision data surrounding the player is examined, in particular tiles, which may take a whole character to draw. In this diagram, solid tiles are shown in red squares, and yellow tiles indicate the part with the z-layer.
Using various heuristics, they are combined to create a “reference point” and a bit mask of four bits. Four quadrants relative to the reference point correspond to four bits: 0 means that the player must be in front of the table of names, 1 - which is behind it.
When placing individual sprites for rendering the player, their position is compared with the reference point to determine the z-layer of this particular sprite. Some of them are in the front layer, others in the back.
Conclusion
I briefly talked about the different aspects of the inner workings of our new modern retro game. There is much more interesting in the code base, but I have outlined a significant part of what makes the game work.
The most important lesson I learned from this project is the benefits that can be gained from data driven engines. Several times I managed to replace some unique logic with a table and a mini-interpreter, and thanks to this, the code became simpler and more readable.
I hope you enjoyed the article!
Notes
[1] Strictly speaking, a kind of CPU 6502 called Ricoh 2A03 was installed in NES.
[2] In fact, this project convinced me that switching banks / managing ROMs is the main limitation for any NES project that exceeds a certain size.
[3] For this, one should thank the “compiled stack” - a concept used in programming embedded systems, although I hardly managed to find literature about it. In short, you need to build a complete project call graph, sort it from leaf nodes to the root, and then assign each node a memory equal to its needs + maximum number of child nodes.
[4] Macros were added at rather late stages of development, and, frankly, we were not able to take special advantage of them.
[5] You can read more about NES graphics in my series of articles . Color conflicts are caused by the attributes described in the first part.
All Articles