Python + OpenCV + Keras: make text recognition in half an hour
Hi Habr.
After experimenting with the well-known base of 60,000 handwritten numbers MNIST, the logical question arose whether there was something similar, but with support not only for numbers, but also for letters. As it turned out, there is, and is called such a base, as you might guess, Extended MNIST (EMNIST).
If anyone is interested how using this database you can make a simple text recognition, welcome to cat.

Note : this example is experimental and educational, I was just interested to see what comes of it. I did not plan and do not plan to do the second FineReader, so many things here, of course, are not implemented. Therefore, claims in the style of “why,” “is already better,” etc., are not accepted. There are probably ready-made OCR libraries for Python already, but it was interesting to do it yourself. By the way, for those who want to see how the real FineReader was made, there are two articles in their blog on Habr in 2014: 1 and 2 (but of course, without source codes and details, as in any corporate blog). Well, let's get started, everything is open here and everything is open source.
For an example we will take the plain text. Here is one:
And let's see what can be done with it.
The first step is to break the text into separate letters. OpenCV is useful for this, more precisely its findContours function.
Open the image (cv2.imread), translate it into b / w (cv2.cvtColor + cv2.threshold), slightly increase (cv2.erode) and find the outlines.
We get a hierarchical tree of contours (parameter cv2.RETR_TREE). First comes the general outline of the picture, then the contours of the letters, then the inner contours. We only need the outline of the letters, so I check that the “outline” is the overall outline. This is a simplified approach, and for real scans this may not work, although it is not critical to recognize screenshots.
Result:
The next step is to save each letter, having previously scaled it to a 28x28 square (the MNIST base is stored in this format). OpenCV is built on the basis of numpy, so that we can use the functions of working with arrays for crop and scaling.
At the end, we sort the letters by the X-coordinate, just as you can see, we save the results in the form of tuple (x, w, letter), so that spaces can be selected from the spaces between the letters.
Make sure everything works:

Letters are ready for recognition, we will recognize them using a convolutional network - this type of network is well suited for such tasks.
The original EMNIST dataset has 62 different characters (A..Z, 0..9, etc.):
A neural network, respectively, has 62 outputs, at the input it will receive 28x28 images, after recognition, “1” will be on the corresponding network output.
Create a network model.
As you can see, this is a classic convolutional network that highlights certain features of the image (the number of filters 32 and 64), to the "output" of which is connected the "linear" MLP network, which forms the final result.
We pass to the longest stage - network training. To do this, we take the EMNIST database, which can be downloaded from the link (archive size 536Mb).
To read the database, we will use the idx2numpy library. We will prepare data for training and validation.
We have prepared two sets, for training and validation. The characters themselves are ordinary arrays that are easy to display:

We also use only 1/10 of the dataset for training (parameter k), otherwise the process will take at least 10 hours.
We start network training, at the end of the process we save the trained model to disk.
The learning process itself takes about half an hour:
This needs to be done only once, then we will use the already saved model file. When the training is finished, everything is ready, you can recognize the text.
For recognition, we load the model and call the predict_classes function.
As it turned out, the images in the dataset were initially rotated, so we have to rotate the image before recognition.
The final function, which receives a file with an image at the input and gives a line at the output, takes up only 10 lines of code:
Here we use the previously saved character width to add spaces if the spacing between letters is more than 1/4 of the character.
Usage example:
Result:

A funny feature - the neural network “confused” the letter “O” and the number “0”, which, however, is not surprising since EMNIST's original set contains handwritten letters and numbers that are not exactly like printed ones. Ideally, for the recognition of screen texts, you need to prepare a separate set based on screen fonts, and already train a neural network on it.
As you can see, it is not the gods who burn the pots, and what once seemed to be “magic” with the help of modern libraries is made quite simple.
Since Python is cross-platform, the code will work everywhere, on Windows, Linux, and OSX. It seems that Keras is ported to iOS / Android, so theoretically, the trained model can be used on mobile devices .
For those who want to experiment on their own, the source code is under the spoiler.
As usual, all successful experiments.
After experimenting with the well-known base of 60,000 handwritten numbers MNIST, the logical question arose whether there was something similar, but with support not only for numbers, but also for letters. As it turned out, there is, and is called such a base, as you might guess, Extended MNIST (EMNIST).
If anyone is interested how using this database you can make a simple text recognition, welcome to cat.
Note : this example is experimental and educational, I was just interested to see what comes of it. I did not plan and do not plan to do the second FineReader, so many things here, of course, are not implemented. Therefore, claims in the style of “why,” “is already better,” etc., are not accepted. There are probably ready-made OCR libraries for Python already, but it was interesting to do it yourself. By the way, for those who want to see how the real FineReader was made, there are two articles in their blog on Habr in 2014: 1 and 2 (but of course, without source codes and details, as in any corporate blog). Well, let's get started, everything is open here and everything is open source.
For an example we will take the plain text. Here is one:
HELLO WORLD
And let's see what can be done with it.
Splitting text into letters
The first step is to break the text into separate letters. OpenCV is useful for this, more precisely its findContours function.
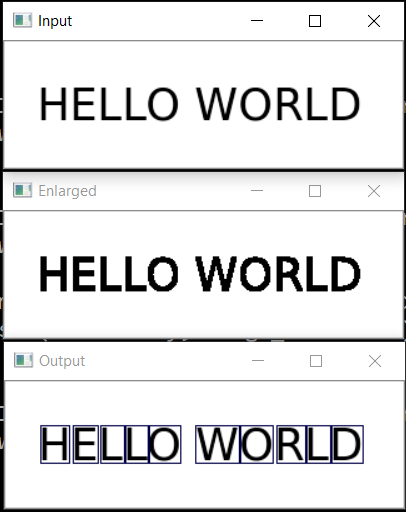
Open the image (cv2.imread), translate it into b / w (cv2.cvtColor + cv2.threshold), slightly increase (cv2.erode) and find the outlines.
image_file = "text.png" img = cv2.imread(image_file) gray = cv2.cvtColor(img, cv2.COLOR_BGR2GRAY) ret, thresh = cv2.threshold(gray, 0, 255, cv2.THRESH_BINARY) img_erode = cv2.erode(thresh, np.ones((3, 3), np.uint8), iterations=1) # Get contours contours, hierarchy = cv2.findContours(img_erode, cv2.RETR_TREE, cv2.CHAIN_APPROX_NONE) output = img.copy() for idx, contour in enumerate(contours): (x, y, w, h) = cv2.boundingRect(contour) # print("R", idx, x, y, w, h, cv2.contourArea(contour), hierarchy[0][idx]) # hierarchy[i][0]: the index of the next contour of the same level # hierarchy[i][1]: the index of the previous contour of the same level # hierarchy[i][2]: the index of the first child # hierarchy[i][3]: the index of the parent if hierarchy[0][idx][3] == 0: cv2.rectangle(output, (x, y), (x + w, y + h), (70, 0, 0), 1) cv2.imshow("Input", img) cv2.imshow("Enlarged", img_erode) cv2.imshow("Output", output) cv2.waitKey(0)
We get a hierarchical tree of contours (parameter cv2.RETR_TREE). First comes the general outline of the picture, then the contours of the letters, then the inner contours. We only need the outline of the letters, so I check that the “outline” is the overall outline. This is a simplified approach, and for real scans this may not work, although it is not critical to recognize screenshots.
Result:
The next step is to save each letter, having previously scaled it to a 28x28 square (the MNIST base is stored in this format). OpenCV is built on the basis of numpy, so that we can use the functions of working with arrays for crop and scaling.
def letters_extract(image_file: str, out_size=28) -> List[Any]: img = cv2.imread(image_file) gray = cv2.cvtColor(img, cv2.COLOR_BGR2GRAY) ret, thresh = cv2.threshold(gray, 0, 255, cv2.THRESH_BINARY) img_erode = cv2.erode(thresh, np.ones((3, 3), np.uint8), iterations=1) # Get contours contours, hierarchy = cv2.findContours(img_erode, cv2.RETR_TREE, cv2.CHAIN_APPROX_NONE) output = img.copy() letters = [] for idx, contour in enumerate(contours): (x, y, w, h) = cv2.boundingRect(contour) # print("R", idx, x, y, w, h, cv2.contourArea(contour), hierarchy[0][idx]) # hierarchy[i][0]: the index of the next contour of the same level # hierarchy[i][1]: the index of the previous contour of the same level # hierarchy[i][2]: the index of the first child # hierarchy[i][3]: the index of the parent if hierarchy[0][idx][3] == 0: cv2.rectangle(output, (x, y), (x + w, y + h), (70, 0, 0), 1) letter_crop = gray[y:y + h, x:x + w] # print(letter_crop.shape) # Resize letter canvas to square size_max = max(w, h) letter_square = 255 * np.ones(shape=[size_max, size_max], dtype=np.uint8) if w > h: # Enlarge image top-bottom # ------ # ====== # ------ y_pos = size_max//2 - h//2 letter_square[y_pos:y_pos + h, 0:w] = letter_crop elif w < h: # Enlarge image left-right # --||-- x_pos = size_max//2 - w//2 letter_square[0:h, x_pos:x_pos + w] = letter_crop else: letter_square = letter_crop # Resize letter to 28x28 and add letter and its X-coordinate letters.append((x, w, cv2.resize(letter_square, (out_size, out_size), interpolation=cv2.INTER_AREA))) # Sort array in place by X-coordinate letters.sort(key=lambda x: x[0], reverse=False) return letters
At the end, we sort the letters by the X-coordinate, just as you can see, we save the results in the form of tuple (x, w, letter), so that spaces can be selected from the spaces between the letters.
Make sure everything works:
cv2.imshow("0", letters[0][2]) cv2.imshow("1", letters[1][2]) cv2.imshow("2", letters[2][2]) cv2.imshow("3", letters[3][2]) cv2.imshow("4", letters[4][2]) cv2.waitKey(0)
Letters are ready for recognition, we will recognize them using a convolutional network - this type of network is well suited for such tasks.
Neural Network (CNN) for recognition
The original EMNIST dataset has 62 different characters (A..Z, 0..9, etc.):
emnist_labels = [48, 49, 50, 51, 52, 53, 54, 55, 56, 57, 65, 66, 67, 68, 69, 70, 71, 72, 73, 74, 75, 76, 77, 78, 79, 80, 81, 82, 83, 84, 85, 86, 87, 88, 89, 90, 97, 98, 99, 100, 101, 102, 103, 104, 105, 106, 107, 108, 109, 110, 111, 112, 113, 114, 115, 116, 117, 118, 119, 120, 121, 122]
A neural network, respectively, has 62 outputs, at the input it will receive 28x28 images, after recognition, “1” will be on the corresponding network output.
Create a network model.
from tensorflow import keras from keras.models import Sequential from keras import optimizers from keras.layers import Convolution2D, MaxPooling2D, Dropout, Flatten, Dense, Reshape, LSTM, BatchNormalization from keras.optimizers import SGD, RMSprop, Adam from keras import backend as K from keras.constraints import maxnorm import tensorflow as tf def emnist_model(): model = Sequential() model.add(Convolution2D(filters=32, kernel_size=(3, 3), padding='valid', input_shape=(28, 28, 1), activation='relu')) model.add(Convolution2D(filters=64, kernel_size=(3, 3), activation='relu')) model.add(MaxPooling2D(pool_size=(2, 2))) model.add(Dropout(0.25)) model.add(Flatten()) model.add(Dense(512, activation='relu')) model.add(Dropout(0.5)) model.add(Dense(len(emnist_labels), activation='softmax')) model.compile(loss='categorical_crossentropy', optimizer='adadelta', metrics=['accuracy']) return model
As you can see, this is a classic convolutional network that highlights certain features of the image (the number of filters 32 and 64), to the "output" of which is connected the "linear" MLP network, which forms the final result.
Neural network training
We pass to the longest stage - network training. To do this, we take the EMNIST database, which can be downloaded from the link (archive size 536Mb).
To read the database, we will use the idx2numpy library. We will prepare data for training and validation.
import idx2numpy emnist_path = '/home/Documents/TestApps/keras/emnist/' X_train = idx2numpy.convert_from_file(emnist_path + 'emnist-byclass-train-images-idx3-ubyte') y_train = idx2numpy.convert_from_file(emnist_path + 'emnist-byclass-train-labels-idx1-ubyte') X_test = idx2numpy.convert_from_file(emnist_path + 'emnist-byclass-test-images-idx3-ubyte') y_test = idx2numpy.convert_from_file(emnist_path + 'emnist-byclass-test-labels-idx1-ubyte') X_train = np.reshape(X_train, (X_train.shape[0], 28, 28, 1)) X_test = np.reshape(X_test, (X_test.shape[0], 28, 28, 1)) print(X_train.shape, y_train.shape, X_test.shape, y_test.shape, len(emnist_labels)) k = 10 X_train = X_train[:X_train.shape[0] // k] y_train = y_train[:y_train.shape[0] // k] X_test = X_test[:X_test.shape[0] // k] y_test = y_test[:y_test.shape[0] // k] # Normalize X_train = X_train.astype(np.float32) X_train /= 255.0 X_test = X_test.astype(np.float32) X_test /= 255.0 x_train_cat = keras.utils.to_categorical(y_train, len(emnist_labels)) y_test_cat = keras.utils.to_categorical(y_test, len(emnist_labels))
We have prepared two sets, for training and validation. The characters themselves are ordinary arrays that are easy to display:
We also use only 1/10 of the dataset for training (parameter k), otherwise the process will take at least 10 hours.
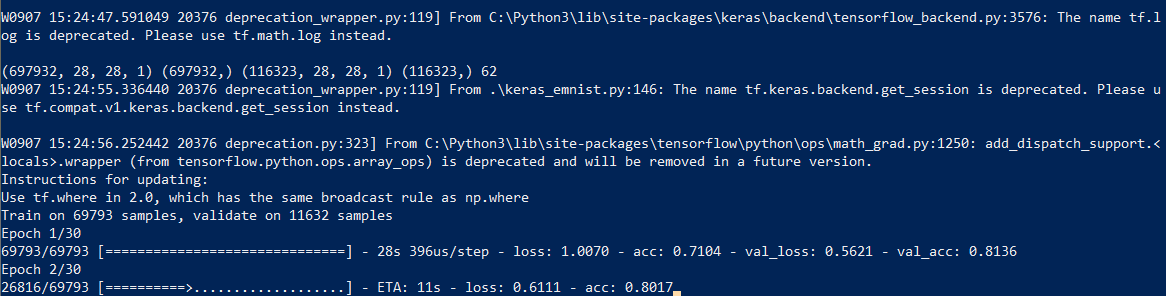
We start network training, at the end of the process we save the trained model to disk.
# Set a learning rate reduction learning_rate_reduction = keras.callbacks.ReduceLROnPlateau(monitor='val_acc', patience=3, verbose=1, factor=0.5, min_lr=0.00001) # Required for learning_rate_reduction: keras.backend.get_session().run(tf.global_variables_initializer()) model.fit(X_train, x_train_cat, validation_data=(X_test, y_test_cat), callbacks=[learning_rate_reduction], batch_size=64, epochs=30) model.save('emnist_letters.h5')
The learning process itself takes about half an hour:
This needs to be done only once, then we will use the already saved model file. When the training is finished, everything is ready, you can recognize the text.
Recognition
For recognition, we load the model and call the predict_classes function.
model = keras.models.load_model('emnist_letters.h5') def emnist_predict_img(model, img): img_arr = np.expand_dims(img, axis=0) img_arr = 1 - img_arr/255.0 img_arr[0] = np.rot90(img_arr[0], 3) img_arr[0] = np.fliplr(img_arr[0]) img_arr = img_arr.reshape((1, 28, 28, 1)) result = model.predict_classes([img_arr]) return chr(emnist_labels[result[0]])
As it turned out, the images in the dataset were initially rotated, so we have to rotate the image before recognition.
The final function, which receives a file with an image at the input and gives a line at the output, takes up only 10 lines of code:
def img_to_str(model: Any, image_file: str): letters = letters_extract(image_file) s_out = "" for i in range(len(letters)): dn = letters[i+1][0] - letters[i][0] - letters[i][1] if i < len(letters) - 1 else 0 s_out += emnist_predict_img(model, letters[i][2]) if (dn > letters[i][1]/4): s_out += ' ' return s_out
Here we use the previously saved character width to add spaces if the spacing between letters is more than 1/4 of the character.
Usage example:
model = keras.models.load_model('emnist_letters.h5') s_out = img_to_str(model, "hello_world.png") print(s_out)
Result:
A funny feature - the neural network “confused” the letter “O” and the number “0”, which, however, is not surprising since EMNIST's original set contains handwritten letters and numbers that are not exactly like printed ones. Ideally, for the recognition of screen texts, you need to prepare a separate set based on screen fonts, and already train a neural network on it.
Conclusion
As you can see, it is not the gods who burn the pots, and what once seemed to be “magic” with the help of modern libraries is made quite simple.
Since Python is cross-platform, the code will work everywhere, on Windows, Linux, and OSX. It seems that Keras is ported to iOS / Android, so theoretically, the trained model can be used on mobile devices .
For those who want to experiment on their own, the source code is under the spoiler.
keras_emnist.py
# Code source: dmitryelj@gmail.com import os # Force CPU # os.environ["CUDA_VISIBLE_DEVICES"] = "-1" # Debug messages # 0 = all messages are logged (default behavior) # 1 = INFO messages are not printed # 2 = INFO and WARNING messages are not printed # 3 = INFO, WARNING, and ERROR messages are not printed os.environ['TF_CPP_MIN_LOG_LEVEL'] = '3' import cv2 import imghdr import numpy as np import pathlib from tensorflow import keras from keras.models import Sequential from keras import optimizers from keras.layers import Convolution2D, MaxPooling2D, Dropout, Flatten, Dense, Reshape, LSTM, BatchNormalization from keras.optimizers import SGD, RMSprop, Adam from keras import backend as K from keras.constraints import maxnorm import tensorflow as tf from scipy import io as spio import idx2numpy # sudo pip3 install idx2numpy from matplotlib import pyplot as plt from typing import * import time # Dataset: # https://www.nist.gov/node/1298471/emnist-dataset # https://www.itl.nist.gov/iaui/vip/cs_links/EMNIST/gzip.zip def cnn_print_digit(d): print(d.shape) for x in range(28): s = "" for y in range(28): s += "{0:.1f} ".format(d[28*y + x]) print(s) def cnn_print_digit_2d(d): print(d.shape) for y in range(d.shape[0]): s = "" for x in range(d.shape[1]): s += "{0:.1f} ".format(d[x][y]) print(s) emnist_labels = [48, 49, 50, 51, 52, 53, 54, 55, 56, 57, 65, 66, 67, 68, 69, 70, 71, 72, 73, 74, 75, 76, 77, 78, 79, 80, 81, 82, 83, 84, 85, 86, 87, 88, 89, 90, 97, 98, 99, 100, 101, 102, 103, 104, 105, 106, 107, 108, 109, 110, 111, 112, 113, 114, 115, 116, 117, 118, 119, 120, 121, 122] def emnist_model(): model = Sequential() model.add(Convolution2D(filters=32, kernel_size=(3, 3), padding='valid', input_shape=(28, 28, 1), activation='relu')) model.add(Convolution2D(filters=64, kernel_size=(3, 3), activation='relu')) model.add(MaxPooling2D(pool_size=(2, 2))) model.add(Dropout(0.25)) model.add(Flatten()) model.add(Dense(512, activation='relu')) model.add(Dropout(0.5)) model.add(Dense(len(emnist_labels), activation='softmax')) model.compile(loss='categorical_crossentropy', optimizer='adadelta', metrics=['accuracy']) return model def emnist_model2(): model = Sequential() # In Keras there are two options for padding: same or valid. Same means we pad with the number on the edge and valid means no padding. model.add(Convolution2D(filters=32, kernel_size=(3, 3), activation='relu', padding='same', input_shape=(28, 28, 1))) model.add(MaxPooling2D((2, 2))) model.add(Convolution2D(64, (3, 3), activation='relu', padding='same')) model.add(MaxPooling2D((2, 2))) model.add(Convolution2D(128, (3, 3), activation='relu', padding='same')) model.add(MaxPooling2D((2, 2))) # model.add(Conv2D(128, (3, 3), activation='relu', padding='same')) # model.add(MaxPooling2D((2, 2))) ## model.add(Dropout(0.25)) model.add(Flatten()) model.add(Dense(512, activation='relu')) model.add(Dropout(0.5)) model.add(Dense(len(emnist_labels), activation='softmax')) model.compile(loss='categorical_crossentropy', optimizer='adadelta', metrics=['accuracy']) return model def emnist_model3(): model = Sequential() model.add(Convolution2D(filters=32, kernel_size=(3, 3), padding='same', input_shape=(28, 28, 1), activation='relu')) model.add(Convolution2D(filters=32, kernel_size=(3, 3), padding='same', activation='relu')) model.add(MaxPooling2D(pool_size=(2, 2))) model.add(Dropout(0.25)) model.add(Convolution2D(filters=64, kernel_size=(3, 3), padding='same', activation='relu')) model.add(Convolution2D(filters=64, kernel_size=(3, 3), padding='same', activation='relu')) model.add(MaxPooling2D(pool_size=(2, 2), strides=(2, 2))) model.add(Dropout(0.25)) model.add(Flatten()) model.add(Dense(512, activation="relu")) model.add(Dropout(0.5)) model.add(Dense(len(emnist_labels), activation="softmax")) model.compile(loss='categorical_crossentropy', optimizer=RMSprop(lr=0.001, rho=0.9, epsilon=1e-08, decay=0.0), metrics=['accuracy']) return model def emnist_train(model): t_start = time.time() emnist_path = 'D:\\Temp\\1\\' X_train = idx2numpy.convert_from_file(emnist_path + 'emnist-byclass-train-images-idx3-ubyte') y_train = idx2numpy.convert_from_file(emnist_path + 'emnist-byclass-train-labels-idx1-ubyte') X_test = idx2numpy.convert_from_file(emnist_path + 'emnist-byclass-test-images-idx3-ubyte') y_test = idx2numpy.convert_from_file(emnist_path + 'emnist-byclass-test-labels-idx1-ubyte') X_train = np.reshape(X_train, (X_train.shape[0], 28, 28, 1)) X_test = np.reshape(X_test, (X_test.shape[0], 28, 28, 1)) print(X_train.shape, y_train.shape, X_test.shape, y_test.shape, len(emnist_labels)) # Test: k = 10 X_train = X_train[:X_train.shape[0] // k] y_train = y_train[:y_train.shape[0] // k] X_test = X_test[:X_test.shape[0] // k] y_test = y_test[:y_test.shape[0] // k] # Normalize X_train = X_train.astype(np.float32) X_train /= 255.0 X_test = X_test.astype(np.float32) X_test /= 255.0 x_train_cat = keras.utils.to_categorical(y_train, len(emnist_labels)) y_test_cat = keras.utils.to_categorical(y_test, len(emnist_labels)) # Set a learning rate reduction learning_rate_reduction = keras.callbacks.ReduceLROnPlateau(monitor='val_acc', patience=3, verbose=1, factor=0.5, min_lr=0.00001) # Required for learning_rate_reduction: keras.backend.get_session().run(tf.global_variables_initializer()) model.fit(X_train, x_train_cat, validation_data=(X_test, y_test_cat), callbacks=[learning_rate_reduction], batch_size=64, epochs=30) print("Training done, dT:", time.time() - t_start) def emnist_predict(model, image_file): img = keras.preprocessing.image.load_img(image_file, target_size=(28, 28), color_mode='grayscale') emnist_predict_img(model, img) def emnist_predict_img(model, img): img_arr = np.expand_dims(img, axis=0) img_arr = 1 - img_arr/255.0 img_arr[0] = np.rot90(img_arr[0], 3) img_arr[0] = np.fliplr(img_arr[0]) img_arr = img_arr.reshape((1, 28, 28, 1)) result = model.predict_classes([img_arr]) return chr(emnist_labels[result[0]]) def letters_extract(image_file: str, out_size=28): img = cv2.imread(image_file) gray = cv2.cvtColor(img, cv2.COLOR_BGR2GRAY) ret, thresh = cv2.threshold(gray, 0, 255, cv2.THRESH_BINARY) img_erode = cv2.erode(thresh, np.ones((3, 3), np.uint8), iterations=1) # Get contours contours, hierarchy = cv2.findContours(img_erode, cv2.RETR_TREE, cv2.CHAIN_APPROX_NONE) output = img.copy() letters = [] for idx, contour in enumerate(contours): (x, y, w, h) = cv2.boundingRect(contour) # print("R", idx, x, y, w, h, cv2.contourArea(contour), hierarchy[0][idx]) # hierarchy[i][0]: the index of the next contour of the same level # hierarchy[i][1]: the index of the previous contour of the same level # hierarchy[i][2]: the index of the first child # hierarchy[i][3]: the index of the parent if hierarchy[0][idx][3] == 0: cv2.rectangle(output, (x, y), (x + w, y + h), (70, 0, 0), 1) letter_crop = gray[y:y + h, x:x + w] # print(letter_crop.shape) # Resize letter canvas to square size_max = max(w, h) letter_square = 255 * np.ones(shape=[size_max, size_max], dtype=np.uint8) if w > h: # Enlarge image top-bottom # ------ # ====== # ------ y_pos = size_max//2 - h//2 letter_square[y_pos:y_pos + h, 0:w] = letter_crop elif w < h: # Enlarge image left-right # --||-- x_pos = size_max//2 - w//2 letter_square[0:h, x_pos:x_pos + w] = letter_crop else: letter_square = letter_crop # Resize letter to 28x28 and add letter and its X-coordinate letters.append((x, w, cv2.resize(letter_square, (out_size, out_size), interpolation=cv2.INTER_AREA))) # Sort array in place by X-coordinate letters.sort(key=lambda x: x[0], reverse=False) # cv2.imshow("Input", img) # # cv2.imshow("Gray", thresh) # cv2.imshow("Enlarged", img_erode) # cv2.imshow("Output", output) # cv2.imshow("0", letters[0][2]) # cv2.imshow("1", letters[1][2]) # cv2.imshow("2", letters[2][2]) # cv2.imshow("3", letters[3][2]) # cv2.imshow("4", letters[4][2]) # cv2.waitKey(0) return letters def img_to_str(model: Any, image_file: str): letters = letters_extract(image_file) s_out = "" for i in range(len(letters)): dn = letters[i+1][0] - letters[i][0] - letters[i][1] if i < len(letters) - 1 else 0 s_out += emnist_predict_img(model, letters[i][2]) if (dn > letters[i][1]/4): s_out += ' ' return s_out if __name__ == "__main__": # model = emnist_model() # emnist_train(model) # model.save('emnist_letters.h5') model = keras.models.load_model('emnist_letters.h5') s_out = img_to_str(model, "hello_world.png") print(s_out)
As usual, all successful experiments.
All Articles