Generating documents using ONLYOFFICE DocumentBuilder

Hello, Habr.
I want to talk about a utility called DocumentBuilder, which allows you to generate documents, tables and presentations, and also show how you can use it to solve your problems, using the example of creating resumes from templates.
The builder works as follows: you write code in js using special methods from the documentation, give it to the utility, and it collects the document. Or does not collect if there are errors.
Using a builder is advisable if you want to solve tasks of the following type:
- You need to make a lot of documents with small variations or documents based on a lot of data.
- You need to integrate the generation of documents in any service.
There are services that allow you to create a resume: the user fills in the necessary fields, and the system generates a document and gives it to the user. This will be an example of how to use the builder.
As tools I will use Node.js (express).
Plan:
- The user enters data into the form on the page in the browser, the form is sent to the server.
- On the Node.js server, it creates a script for the builder based on user data.
- Node.js gives the script to the builder.
- The builder makes a document using a script.
- Node.js returns a link to the document to the user.
Form creation
First, create a form in which the user will enter their data. The form will have 8 fields: "Full name", "Phone number", "email", "profile", "degree", "university", "location", "year", "skill". The skill field can be cloned.
We create the index.html file, and add the template code to it.
<div class="fill-name"> <input type="text" id="fill-name" placeholder="full name"> </div> <div class="phone-number"> <input type="number" id="phone-number" placeholder="phone number"> </div> <div class="email"> <input type="text" id="email" placeholder="email"> </div> <div class="profile"> <textarea id="profile" placeholder="Insert a brief description of yourself"></textarea> </div> <div class="education"> <input type="text" id="degree" placeholder="degree"> <input type="text" id="university" placeholder="university"> <input type="text" id="location" placeholder="location"> <input type="date" id="year" placeholder="year"> </div> <div class="skills"> <div class="skill"> <input type="text" id="new-skill" placeholder="skill" onkeyup="add_skill_by_enter(event)"> <button onclick="add_skill()">+</button> </div> </div>
Here I use two functions: add_skill_by_enter (event) and add_skill (). They are needed to add several fields by pressing the + or Enter button. I will describe these functions a bit later.
Add a button to submit the form to the server:
<button onclick="sendForm()">Send</button>
Now we will write functions for working with the form.
The first function is add_skill ()
add_skill = () => { const newSkill = document.getElementById("new-skill"); if (newSkill.value === '') {return; } // , const div = document.createElement("div"); .// div const span = document.createElement("span"); // const button = document.createElement("button"); // span.innerText += newSkill.value; // span newSkill.value = ''; // newSkill.focus(); // button.innerText += "-"; button.onclick = () => { // div.remove(); }; div.appendChild(span); // span div div.appendChild(button); // document.getElementsByClassName('skills')[0].appendChild(div); // }; add_skill_by_enter() add_skill_by_enter = (event) => { if (event.code === "Enter") { // , enter add_skill(); } };
We add a simple function to collect data from the fields and send them to the server.
get_skill_values = () => { const skills = []; if (document.getElementById('new-skill').value !== '') { skills.push(document.getElementById('new-skill').value); } Array.from(document.getElementsByClassName('skillfield')).forEach(current_element => { skills.push(current_element.innerHTML); }); return skills; }; sendForm() sendForm = () => { fetch('/', { method: 'POST', headers: { 'Content-Type': 'application/json' }, body: JSON.stringify({ userData: { fillName: document.getElementById('fill-name').value, phoneNumber: document.getElementById('phone-number').value, email: document.getElementById('email').value, profile: document.getElementById('profile').value, education: { degree: document.getElementById('degree').value, university: document.getElementById('university').value, location: document.getElementById('location').value, year: document.getElementById('year').value, }, skills: get_skill_values() } }) }).then(res => res.json()) .then(response => { location.replace('/' + response.filename); // , }) .catch(error => console.error('Error:', error)); };
The server part for working with the form
I write the server part on express. Connection of all libraries, server configuration and description of get and post methods look like this:
const path = require('path'); const express = require('express'); const bodyParser = require('body-parser'); const app = express(); app.use(bodyParser.json()); app.get('/', (req, res) => { res.sendFile(path.join(__dirname + '/index.html')); }); app.post('/', (req, res) => { // }); app.listen(3000, () => console.log(`Example app listening on port ${3000}!`));
Run express:
node main.js
Open the address in the browser:
http:localhost:3000
We see the created form. We fill it with arbitrary data:
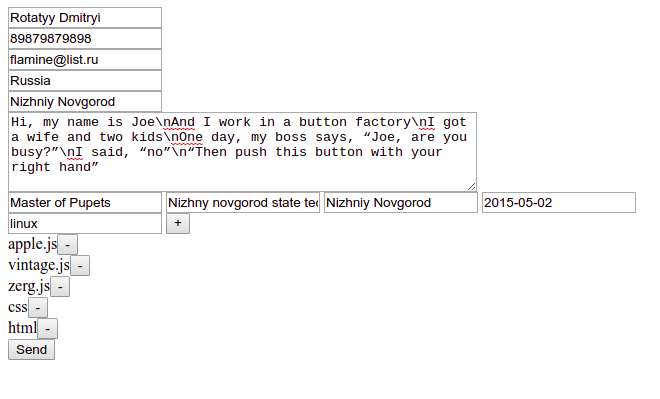
We get the following json:
{"userData":{"fillName":"Rotatyy Dmitryi","phoneNumber":"89879879898","email":"flamine@list.ru","profile":"Hi, my name is Joe\nAnd I work in a button factory\nI got a wife and two kids\nOne day, my boss says, “Joe, are you busy?”\nI said, “no”\n“Then push this button with your right hand”","country":"Russia","city":"Nizhniy Novgorod","education":{"degree":"Master of Pupets","university":"Nizhny novgorod state technical university","location":"Nizhniy Novgorod","year":"2015-05-02"},"skills":["apple.js","vintage.js","zerg.js","css","html","linux"]}};
Now you need to write a script for the builder. I took as a basis the template that Google Docs offers (resume template).
This template looks like this:
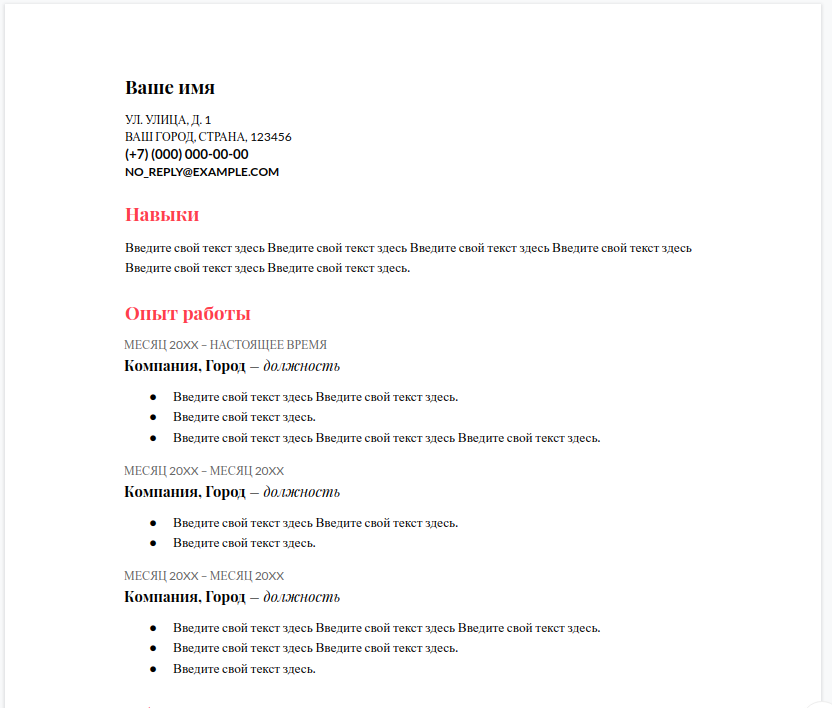
Using this data and the template, you need to make a script with which the builder will create the document.
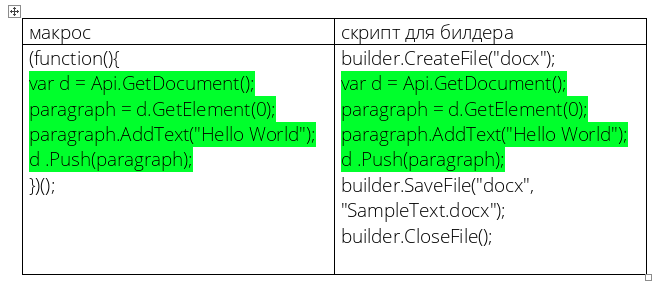
There are several options for how to do this, and the simplest is to download the desktop version of ONLYOFFICE editors and write a macro that will create the document using the data. And then add to the macro the creation and saving of the file - you get a script for the builder. This will work because macros and the builder use the same API.
Creating a script for a builder
We start by initializing the page object and adding the data that came from the user:
const Document = Api.GetDocument(); const data = {"userData":{"fillName":"Rotatyy Dmitryi","phoneNumber":"89879879898","email":"flamine@list.ru","profile":"Hi, my name is Joe\nAnd I work in a button factory\nI got a wife and two kids\nOne day, my boss says, “Joe, are you busy?”\nI said, “no”\n“Then push this button with your right hand”","country":"Russia","city":"Nizhniy Novgorod","education":{"degree":"Master of Pupets","university":"Nizhny novgorod state technical university","location":"Nizhniy Novgorod","year":"2015-05-02"},"skills":["apple.js","vintage.js","zerg.js","css","html","linux"]}};
Now you need to add the paragraph with the full username. It is written in bold, and this paragraph has a line spacing of 1.15.
let paragraph = document.GetElement(0); // FullName_style = Document.CreateStyle("FullName"); // FullName_style.GetTextPr().SetFontSize(28); // FullName_style.GetTextPr().SetBold(true); // bold paragraph.SetStyle(FullName_style); // paragraph.SetSpacingLine(1.15 * 240, "auto"); // paragraph.AddText(data.userData.fillName); //
// Country and city const CountryCity_style = Document.CreateStyle("CountryCity"); CountryCity_style.GetTextPr().SetFontSize(20); CountryCity_style.GetTextPr().SetCaps(true); CountryCity_style.GetTextPr().SetBold(true); paragraph = Api.CreateParagraph(); paragraph.AddText(data.userData.country + ', ' + data.userData.city); paragraph.SetStyle(CountryCity_style); paragraph.SetSpacingAfter(0); Document.Push(paragraph); // phone number const PhoneNumber_style = Document.CreateStyle("PhoneNumber"); PhoneNumber_style.GetTextPr().SetFontSize(20); PhoneNumber_style.GetParaPr().SetSpacingAfter(0); PhoneNumber_style.GetTextPr().SetBold(true); paragraph = Api.CreateParagraph(); paragraph.AddText(data.userData.phoneNumber); paragraph.SetStyle(PhoneNumber_style); Document.Push(paragraph); // email const Email_style = Document.CreateStyle("Email"); Email_style.GetTextPr().SetFontSize(18); Email_style.GetParaPr().SetSpacingAfter(0); Email_style.GetTextPr().SetBold(true); paragraph = Api.CreateParagraph(); paragraph.AddText(data.userData.email); paragraph.SetStyle(Email_style); Document.Push(paragraph); // SectionHeader style const SectionHeader = Document.CreateStyle("SectionHeader"); SectionHeader.GetTextPr().SetBold(true); SectionHeader.GetTextPr().SetColor(247, 93, 93, false); SectionHeader.GetTextPr().SetFontSize(28); SectionHeader.GetParaPr().SetSpacingBefore(1.33 * 240); SectionHeader.GetParaPr().SetSpacingLine(1 * 240, "auto"); // add header Profile: paragraph = Api.CreateParagraph(); paragraph.AddText("Profile:") paragraph.SetStyle(SectionHeader); Document.Push(paragraph); // add profile text: paragraph = Api.CreateParagraph(); paragraph.AddText(data.userData.profile) Document.Push(paragraph); // add header Education: paragraph = Api.CreateParagraph(); paragraph.AddText("Education:") paragraph.SetStyle(SectionHeader); Document.Push(paragraph); // add education year: const EducationYear_style = Document.CreateStyle("EducationYear"); EducationYear_style.GetTextPr().SetColor(102, 102, 102); EducationYear_style.GetTextPr().SetFontSize(18); EducationYear_style.GetParaPr().SetSpacingAfter(0); paragraph = Api.CreateParagraph(); paragraph.SetStyle(EducationYear_style); paragraph.AddText(data.userData.education.year) Document.Push(paragraph); // add education university: paragraph = Api.CreateParagraph(); run = Api.CreateRun(); run.AddText(data.userData.education.university) run.AddText(', ') run.AddText(data.userData.education.location) run.SetBold(true); paragraph.AddElement(run); run = Api.CreateRun(); run.AddText(' – ' + data.userData.education.degree) paragraph.AddElement(run); Document.Push(paragraph); // add header Skills: paragraph = Api.CreateParagraph(); paragraph.AddText("Skills:") paragraph.SetStyle(SectionHeader); Document.Push(paragraph); // add skills text: paragraph = Api.CreateParagraph(); const skills = data.userData.skills.map(x => ' ' + x).toString(); paragraph.AddText(skills) Document.Push(paragraph);
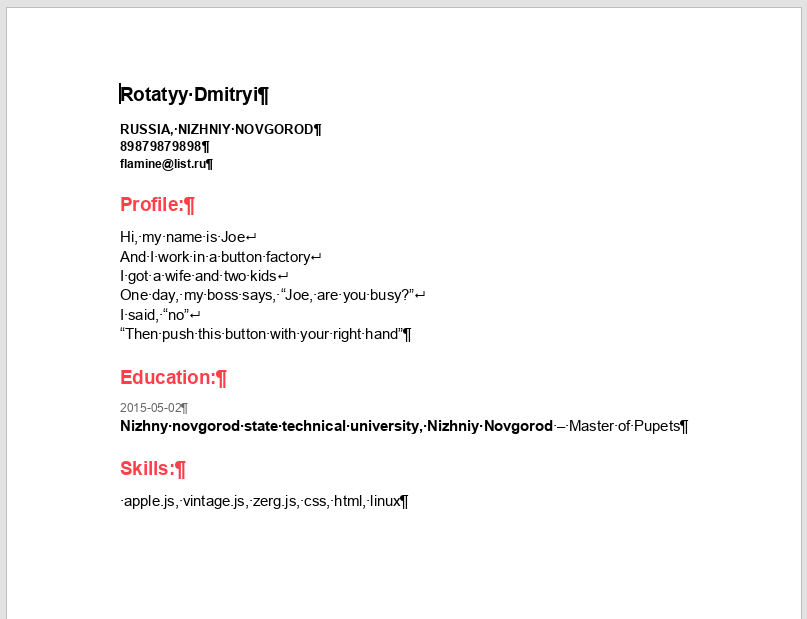
By executing this script, we get the following document:
Now it's time to add features to write script code to a file and generate a document.
We generate the script -> write to the file -> give the file to the builder -> return the user the link to the file.
We add a connection of add-ons for working with files and running commands using Node.js, and also create a “public” folder and make it public:
const {exec} = require('child_process'); const fs = require('fs'); app.use(express.static('public'));
The function for generating text with a script will be very simple - it will simply return a string with all the code for the builder, while adding user data. It is important to add a line break at the end of each line, otherwise nothing will work.
generate_script = (data) => { let first_template = 'builder.CreateFile("docx");\n' + 'const Document = Api.GetDocument();\n'; first_template += 'const data = ' + JSON.stringify(data) + ';\n'; first_template += 'let paragraph = Document.GetElement(0);\n' + 'FullName_style = Document.CreateStyle("FullName");\n' + .... ~~~~~~~~~~~ return first_template; };
Now you need to write the script to a file and give it to the builder. In fact, all work with the builder will be reduced to the fact that we need to execute the documentbuilder path/script.js Node.js
command documentbuilder path/script.js Node.js
Let's write a build function that will do this:
build = (data, res) => { const filename = Math.random().toString(36).substring(7) + '.docx'; // let script = generate_script(data); script += 'builder.SaveFile("docx", "' + __dirname + '/public/' + filename + '");\n' + 'builder.CloseFile();'; fs.writeFile('public/' + filename + 'js', script, () => { exec('documentbuilder ' + 'public/' + filename + 'js', () => { res.send({'filename': filename }); }); }); };
Add a call to the build method (req.body, res); when post request
app.post('/', (req, res) => { build(req.body, res); });
And you're done. Just in case, I posted the full example code here .
So you can embed ONLYOFFICE DocumentBuilder in a web application.
I hope that despite a large number of simplifications, everything is clear. I used only the required minimum code to show how everything works.
At the moment, there are thoughts to finish the utility and expand the range of problems to be solved. I would be grateful if you share the real cases of generating documents (well, of tables with presentations, of course, too) in the comments or in PM.
All Articles