Zabbix + Voximplant: monitoring with calls, or how to stop worrying and quickly set it up
Zabbix - smart, flexible, customizable - can do everything. Or almost everything. It would be strange if he could not make friends with cloud telephony, especially when the latter has a convenient HTTP API - use your health. Today we will demonstrate how to configure Zabbix for notification calls via Voximplant, which can be very useful in an emergency case (“there is no time to explain, you need to call - the battle server just fell”).

Based on the frame from the movie "The Matrix" (The Matrix (1999), Warner Bros.)
Our example uses VDS with CentOS 7, on which Zabbix 4.2.6 is installed (the latest stable version at the time of writing). We will monitor the same server where Zabbix works. Voximplant needs an account on the platform and a call processing script for JS. And now a little more.
No rocket science, let’s do a very simple monitoring that responds to the appearance of the / tmp / habrTriggerFile file : when such a file appears, Zabbix will contact Voximplant via the HTTP API, a script will work that will call the specified phone number, say “Attention. A file was created on the server. ”And hangs up. If you delete / rename the file, and then return it back, then there will be a call again. If you do nothing, there will be only one call.
Log in to your account (or register ) and create the habr app . Inside the application, go to the Scenarios tab and create a notification script with this code:
You can run this script with an HTTP request (and do without buying a phone number). Do not forget to substitute phone numbers in callPSTN : the first is who the platform will call, the second is callerid, which will be displayed on the called subscriber; it can be either your personal number that has been verified on the platform, or a number previously purchased from Voximplant (note, virtual numbers cannot be used). The script calls the number, after the connection it reports that a file has been created and hangs up.
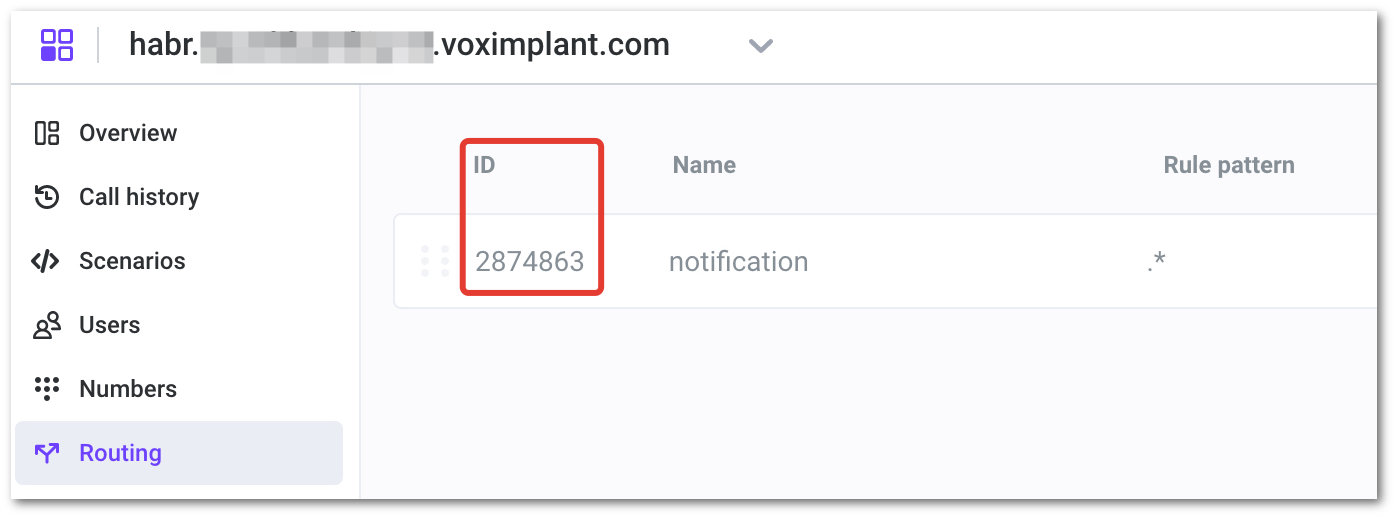
Save the script and go to the Routing tab to create a rule:

Save the rule and - note - copy its ID.
Next, you will need API keys, take them in the appropriate section of the main menu.
Knowing the API keys and the rule ID, you can substitute them into the StartScenarios method of our HTTP API, it will look something like this:
A little later, we use this request when setting up monitoring, which can already be started.
Enter your Zabbix frontend as your user (or administrator), then in the Configuration - Hosts section, click Create host. In the name, write localhost , in groups specify test group and click Add below.
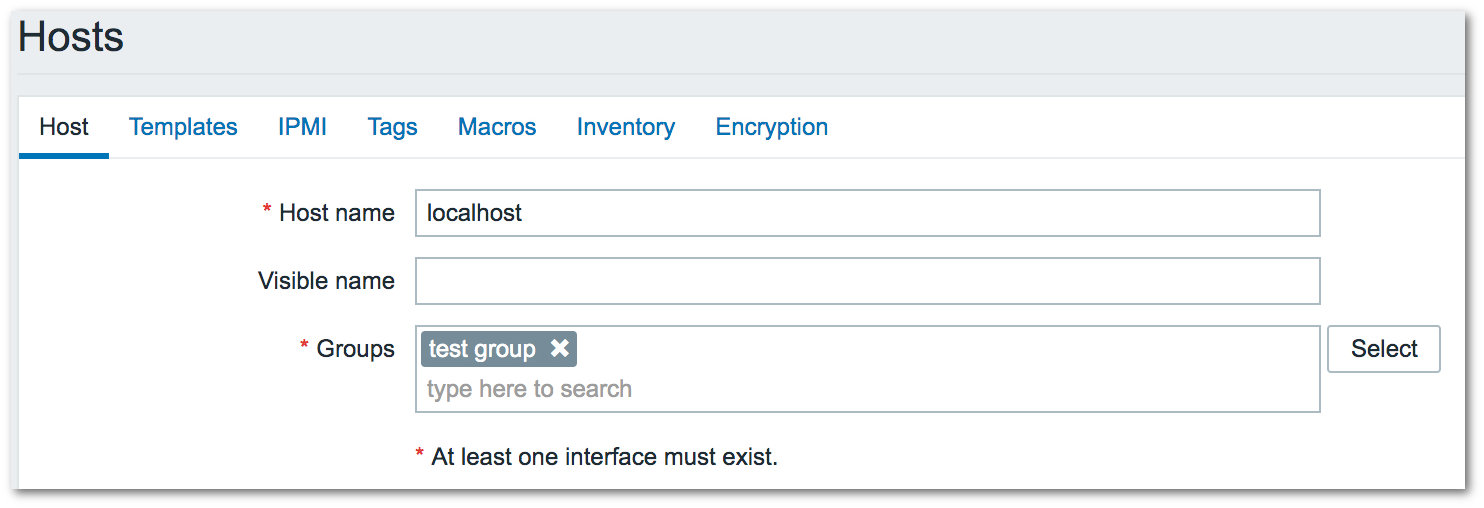
Now in the list of hosts you will see both the default Zabbix server and localhost. From here we will continue to configure.
Zabbix monitoring is based on a chain of 3 entities: Item - Trigger - Action. All three links are mandatory, so you need to create each of them in sequence.
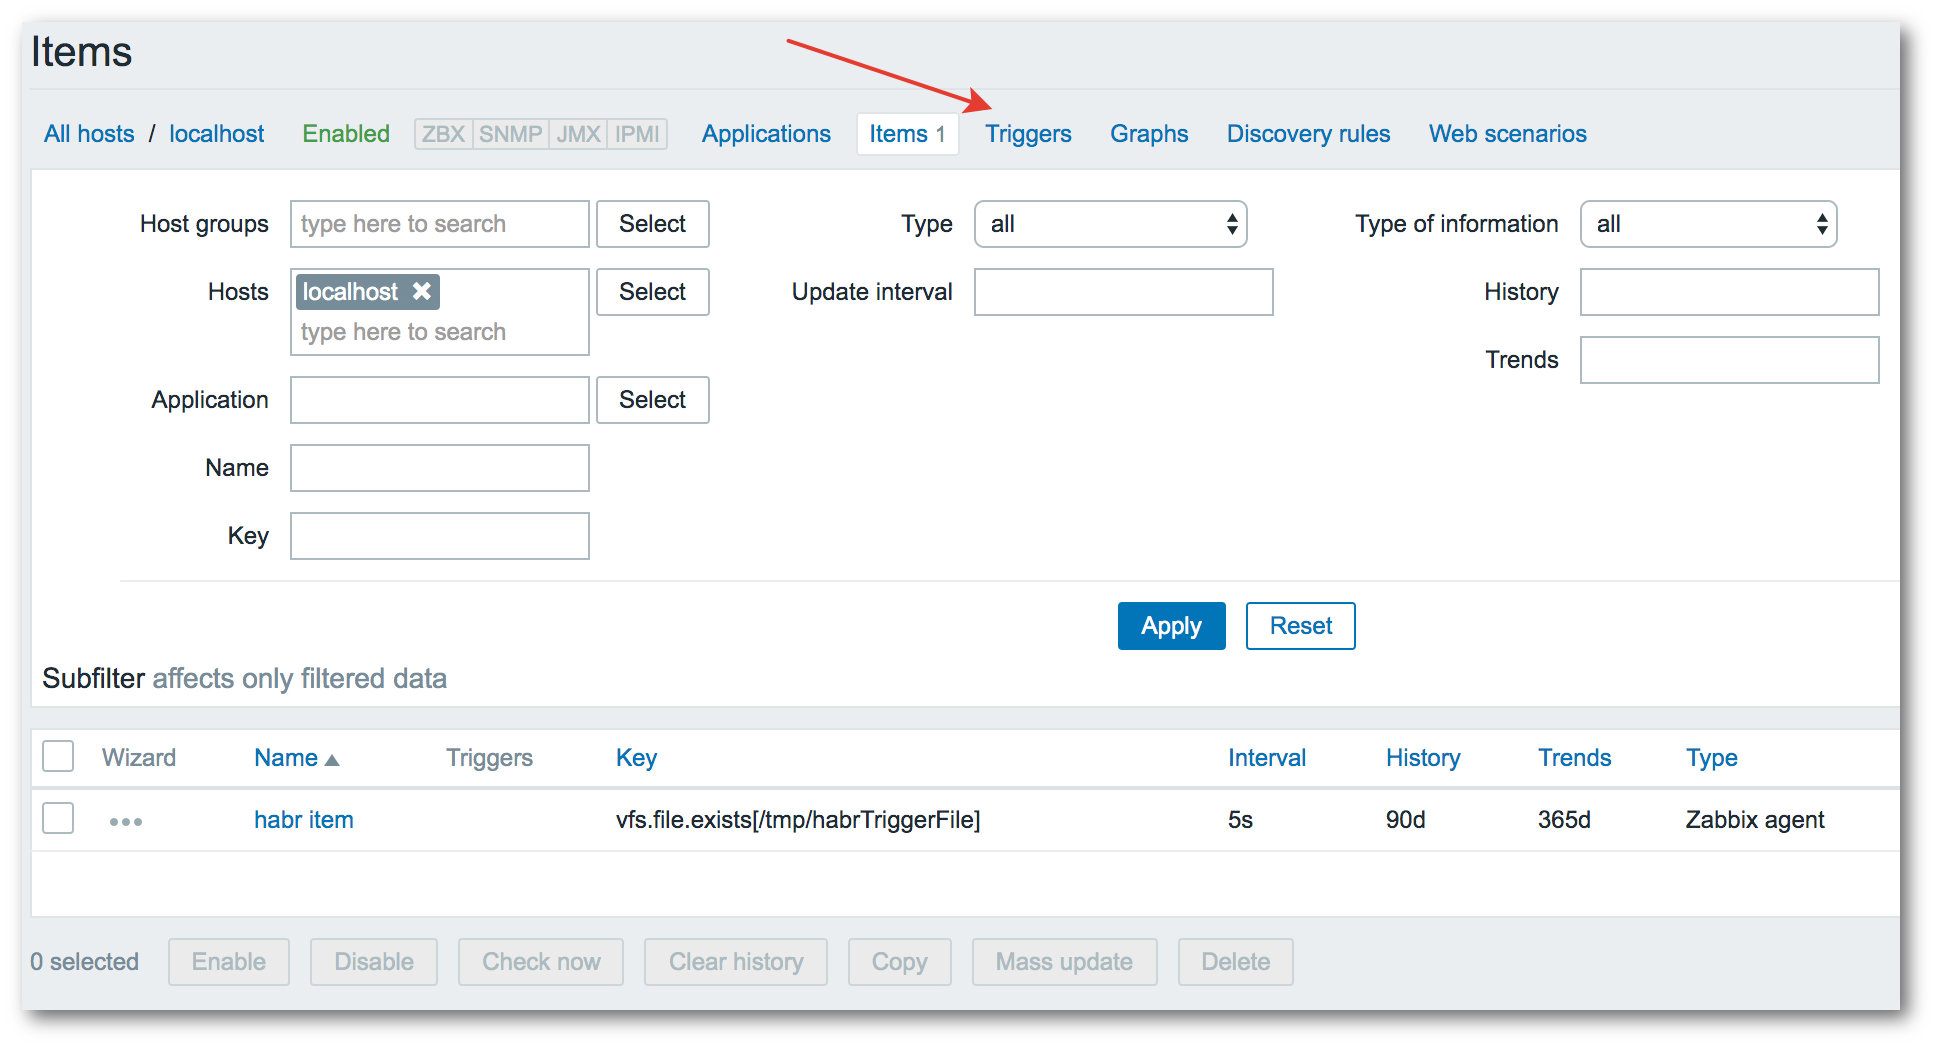
Item is a data accumulator, and without data monitoring will not react to anything. To create an Item, in the list of hosts, click Items to the right of the localhost name. You can also click on the host name itself and on the screen that opens, go to the Items tab - the essence is the same. Once in the Items tab, click Create item in the upper right corner. Enter the name - habr item , then click Add next to the Key field - scroll down, we need the standard key vfs.file.exists , select it and it will be substituted in the Key field. Replace file with the current path, in our case the key will be like this: vfs.file.exists [/ tmp / habrTriggerFile] . In the Update interval field, set 5s so that the monitoring responds faster when we create the file on the host. At the bottom of the page, click Add, and immediately see the new item.

Triggers evaluate the collected data and when they reach the specified threshold, they react - they start the action. On the screen with the created item, go to the Triggers tab:
Click Create trigger, name it habr trigger . The value for the Expression field is conveniently collected using the constructor - the Add button. Set the settings as in the screenshot and click Insert:

Click Add at the bottom of the page - done, the trigger is created.
Action is an action that fires a triggered trigger. Open the Configuration - Actions tab, click Create action. The name is suddenly - habr action . Below, in the New condition block, leave everything as default and add habr , as a result, the Trigger name contains habr condition will be obtained. Click Add to add a condition - it will immediately appear in the Conditions block, see screenshot:

Here, go to the Operations tab, then in the Operations block, click New to add an action. In the Operation type, select Remote command, the Target list block and the Commands input field will appear. In the Target list block, click New, you will be offered the default target - Current host, you need it - click Add and the target will appear in the list. In the input field, insert curl + a previously generated request to Voximplant:
Then add this action (Add as a link), and only then click the Add button to complete the creation of the Action.

An important point: we chose the type of Remote command action, which is turned off by default in the Zabbix agent config. To fix this, on the host, open the config and put a value of 1 for EnableRemoteCommands:
After that, restart the agent service:
In the Zabbix panel, go to the Monitoring - Problems section. Soon we will see a warning here that the trigger worked.
On the host, create a file:
After 5 seconds in the Problems panel we will see a new message; PROBLEM will flash in the Status column, and if you click on the icon in the Actions column, you will see the details of the action (the screenshot is clickable):

Along the way, a call will be made to the phone number that we specified in the Voximplant script.

Based on the frame from the movie "The Matrix" (The Matrix (1999), Warner Bros.)
If you rename the file,
then after 5 seconds the status of the problem will become RESOLVED.
Done! You are great because you have configured the host – Zabbix – Voximplant interaction chain and, by the same principle, you can configure arbitrarily complex logic for notification calls.
Based on the frame from the movie "The Matrix" (The Matrix (1999), Warner Bros.)
Note: the tutorial assumes that you already have a working Zabbix and configured Zabbix frontend. The initial installation of Zabbix is not the purpose of this article, curious / in need of such a guide can look at the official documentation and / or google.
What we will work with
Our example uses VDS with CentOS 7, on which Zabbix 4.2.6 is installed (the latest stable version at the time of writing). We will monitor the same server where Zabbix works. Voximplant needs an account on the platform and a call processing script for JS. And now a little more.
What do we do
No rocket science, let’s do a very simple monitoring that responds to the appearance of the / tmp / habrTriggerFile file : when such a file appears, Zabbix will contact Voximplant via the HTTP API, a script will work that will call the specified phone number, say “Attention. A file was created on the server. ”And hangs up. If you delete / rename the file, and then return it back, then there will be a call again. If you do nothing, there will be only one call.
Voximplant
Log in to your account (or register ) and create the habr app . Inside the application, go to the Scenarios tab and create a notification script with this code:
VoxEngine.addEventListener(AppEvents.Started, () => { const call = VoxEngine.callPSTN(" ", " ") call.addEventListener(CallEvents.PlaybackFinished, () => { VoxEngine.terminate() }) call.addEventListener(CallEvents.Connected, () => { setTimeout( () => call.say(". .", Language.RU_RUSSIAN_FEMALE), 1000 ) }) })
You can run this script with an HTTP request (and do without buying a phone number). Do not forget to substitute phone numbers in callPSTN : the first is who the platform will call, the second is callerid, which will be displayed on the called subscriber; it can be either your personal number that has been verified on the platform, or a number previously purchased from Voximplant (note, virtual numbers cannot be used). The script calls the number, after the connection it reports that a file has been created and hangs up.
Save the script and go to the Routing tab to create a rule:
Save the rule and - note - copy its ID.
Next, you will need API keys, take them in the appropriate section of the main menu.
Knowing the API keys and the rule ID, you can substitute them into the StartScenarios method of our HTTP API, it will look something like this:
https://api.voximplant.com/platform_api/StartScenarios/?account_id=1&api_key=4ed5695e-4690-448r-95e8-3f8f0001287c&rule_id=28
A little later, we use this request when setting up monitoring, which can already be started.
Zabbix
Enter your Zabbix frontend as your user (or administrator), then in the Configuration - Hosts section, click Create host. In the name, write localhost , in groups specify test group and click Add below.
Now in the list of hosts you will see both the default Zabbix server and localhost. From here we will continue to configure.
Zabbix monitoring is based on a chain of 3 entities: Item - Trigger - Action. All three links are mandatory, so you need to create each of them in sequence.
Item
Item is a data accumulator, and without data monitoring will not react to anything. To create an Item, in the list of hosts, click Items to the right of the localhost name. You can also click on the host name itself and on the screen that opens, go to the Items tab - the essence is the same. Once in the Items tab, click Create item in the upper right corner. Enter the name - habr item , then click Add next to the Key field - scroll down, we need the standard key vfs.file.exists , select it and it will be substituted in the Key field. Replace file with the current path, in our case the key will be like this: vfs.file.exists [/ tmp / habrTriggerFile] . In the Update interval field, set 5s so that the monitoring responds faster when we create the file on the host. At the bottom of the page, click Add, and immediately see the new item.
Trigger
Triggers evaluate the collected data and when they reach the specified threshold, they react - they start the action. On the screen with the created item, go to the Triggers tab:
Click Create trigger, name it habr trigger . The value for the Expression field is conveniently collected using the constructor - the Add button. Set the settings as in the screenshot and click Insert:
Click Add at the bottom of the page - done, the trigger is created.
Action
Action is an action that fires a triggered trigger. Open the Configuration - Actions tab, click Create action. The name is suddenly - habr action . Below, in the New condition block, leave everything as default and add habr , as a result, the Trigger name contains habr condition will be obtained. Click Add to add a condition - it will immediately appear in the Conditions block, see screenshot:
Here, go to the Operations tab, then in the Operations block, click New to add an action. In the Operation type, select Remote command, the Target list block and the Commands input field will appear. In the Target list block, click New, you will be offered the default target - Current host, you need it - click Add and the target will appear in the list. In the input field, insert curl + a previously generated request to Voximplant:
curl "https://api.voximplant.com/platform_api/StartScenarios/?account_id=1&api_key=4ed5695e-4690-448r-95e8-3f8f0001287c&rule_id=28"
Then add this action (Add as a link), and only then click the Add button to complete the creation of the Action.
An important point: we chose the type of Remote command action, which is turned off by default in the Zabbix agent config. To fix this, on the host, open the config and put a value of 1 for EnableRemoteCommands:
vi /etc/zabbix/zabbix_agentd.conf // EnableRemoteCommands = 1
After that, restart the agent service:
service zabbix-agent restart
We start a chain of actions
In the Zabbix panel, go to the Monitoring - Problems section. Soon we will see a warning here that the trigger worked.
On the host, create a file:
touch /tmp/habrTriggerFile
After 5 seconds in the Problems panel we will see a new message; PROBLEM will flash in the Status column, and if you click on the icon in the Actions column, you will see the details of the action (the screenshot is clickable):
Along the way, a call will be made to the phone number that we specified in the Voximplant script.
Based on the frame from the movie "The Matrix" (The Matrix (1999), Warner Bros.)
If you rename the file,
mv /tmp/habrTriggerFile /tmp/habrTriggerFile_
then after 5 seconds the status of the problem will become RESOLVED.
Done! You are great because you have configured the host – Zabbix – Voximplant interaction chain and, by the same principle, you can configure arbitrarily complex logic for notification calls.
All Articles