We are building an interface for entering documents through selection

In various business applications, the task of document input often arises. Typically, a document consists of a heading and some lines, each of which refers to some object (for example, product). Most often, a regular table is used to enter records into a document, in which the user can add and delete rows, as well as change their contents.
However, in some cases, such a scheme is not always convenient for users. In this article I will tell you how you can build a convenient user interface using the technique of selecting products.
Task
As a rule, when entering documents for the user, there is a restriction on the set of objects that can be added to it. In this case, it is logical for the user to show a list of such objects with the ability to quickly include (and exclude) them in the document. In the columns, for each of the objects, it is also convenient to show the data necessary for making a decision on the need to include it in the document. And finally, together with the object, there is often a need to enter its quantity.
Consider three types of documents that are often found in business applications:
- Purchase order . In such documents, it is logical for the user to show a list of all the goods available for ordering from the supplier. In the columns it is convenient to show the current balance, sales for a certain interval, the quantity ordered for purchase and sale.
- Sales order . Here, most often, a list of goods that are on the remains of the selected warehouse and available for sale to the selected customer is shown. Current prices should also be shown.
- Change in balances . This document is used to adjust current balances in case of any discrepancies with the actual amount. All products are usually shown in the selection, with the ability to enter the actual balance for any of them. At the same time, a product is added to the document with an amount equal to the difference between the actual and current balance.
Decision
Next, I will show how to quickly and easily implement this logic based on the open and free lsFusion platform. As an example, let's create logic for entering a purchase order.
First, add the product directory through the standard CRUD interface:
CLASS Product '' ;
|
We create the concept of a supplier, and in the form of editing we give the opportunity to choose the products with which he works:
CLASS Supplier '' ;
|
Declare the order logic with the lines:
CLASS Order '' ;
|
Add products and quantity to the lines:
product '' = DATA Product (OrderDetail);
|
We proceed directly to the construction of the order editing form we need. First, add the order itself and its lines to it:
FORM order ''
|
Thus, we get a standard interface for working with order lines through adding and deleting.
Next we add the selection functionality we need to this form. To do this, first create an object on the form with a list of all goods, in which we filter only those that are allowed to order from the selected supplier:
EXTEND FORM order
|
We set up the design so that the order lines and the selection are displayed as tabs of one container:
DESIGN order {
|
We build auxiliary properties for displaying and entering the quantity by the user in the corresponding column:
quantity '-' (Order o, Product p) =
|
The first property considers the quantity for this order and product in this document. The second finds the last line (the user can enter several lines with one product).
Next, we create an action that will process the user entering the value in the corresponding column in the selection tab:
changeQuantity ' -' (Order o, Product p) {
|
Finally, we add a column to the form, indicating the action that should be performed when the user tries to change its value:
EXTEND FORM order
|
It remains only to draw a form with a list of orders and add it to the navigator:
FORM orders ''
|
The resulting form will look something like this:
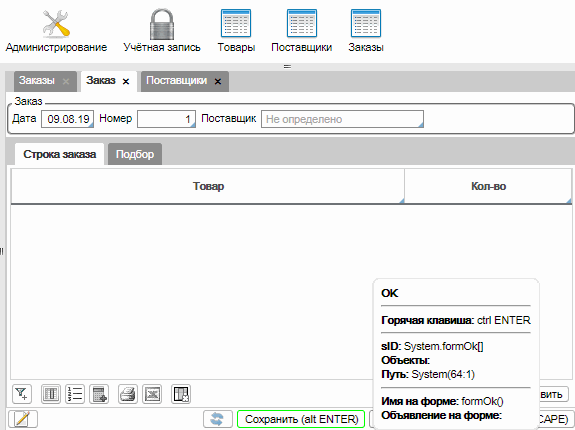
Any changes made to any of the tabs will automatically be reflected to the other.
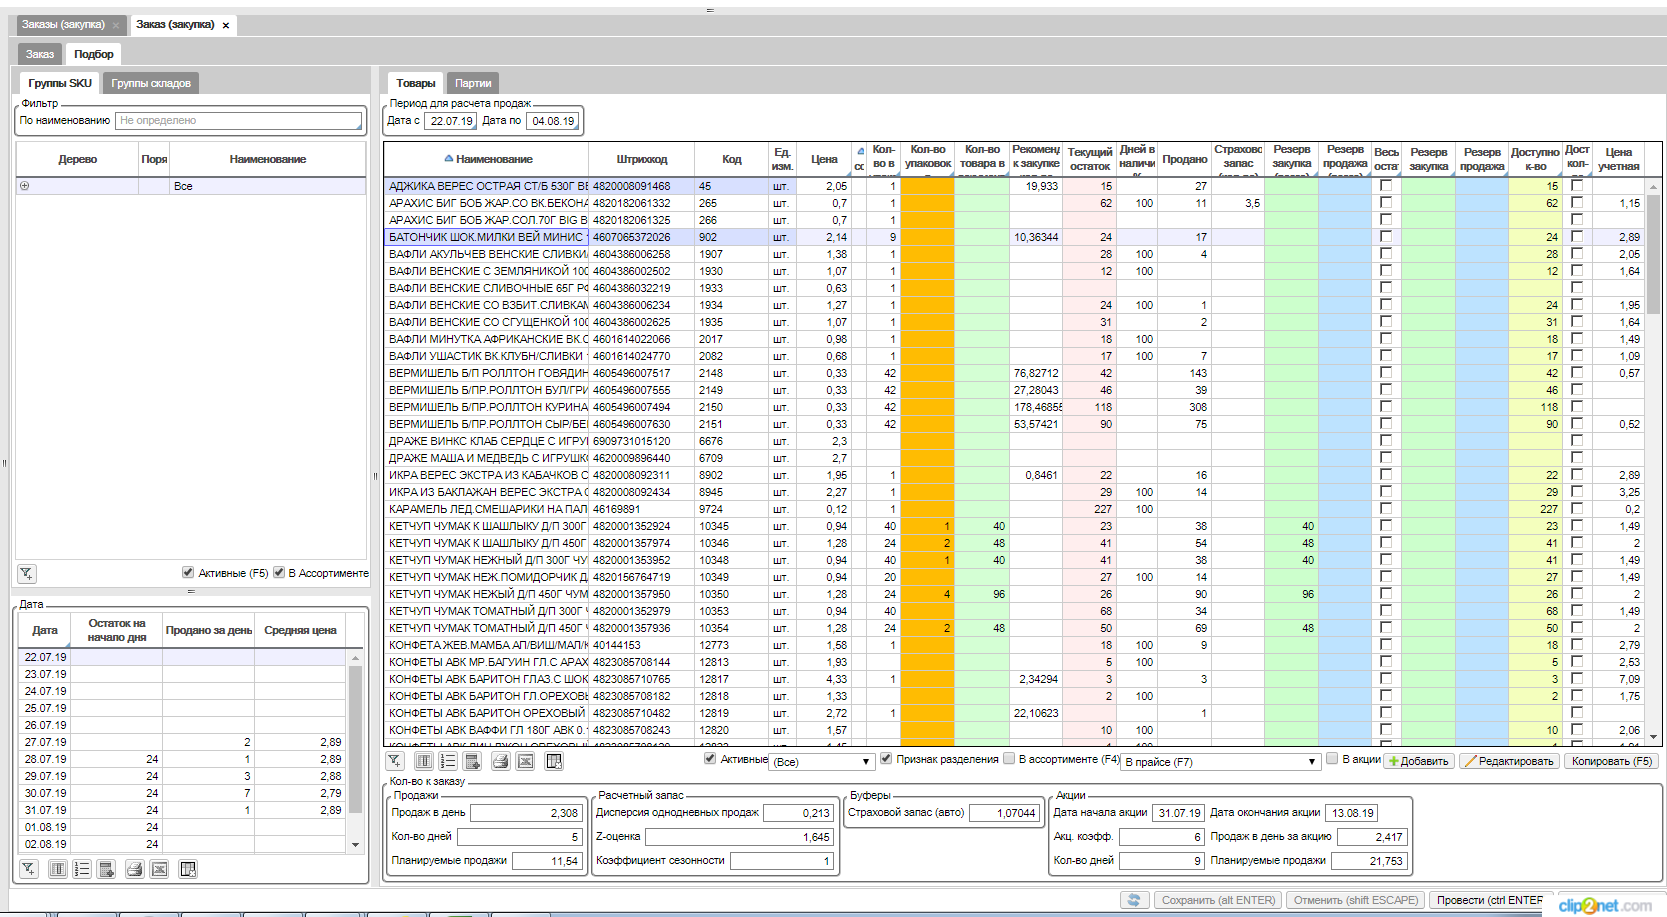
In real ERP systems, significantly more columns and other elements are added to the form. For example, in one of these implementations, it looks like this:
Let's see how this functionality is implemented in other business applications.
1C
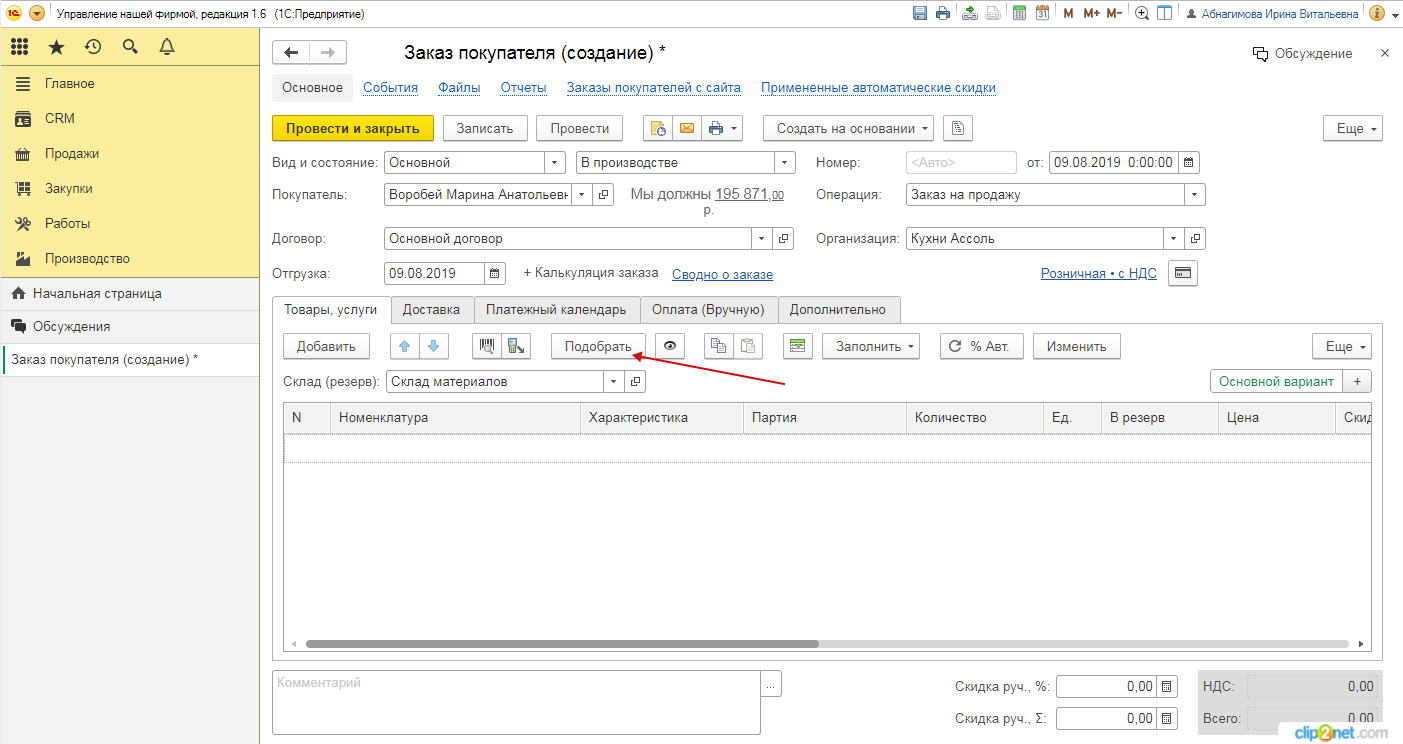
In different 1C configurations, the selection logic has certain differences, but the principle is more or less the same. On the document editing form there is a Select button, which brings up a dialog with the choice of goods:
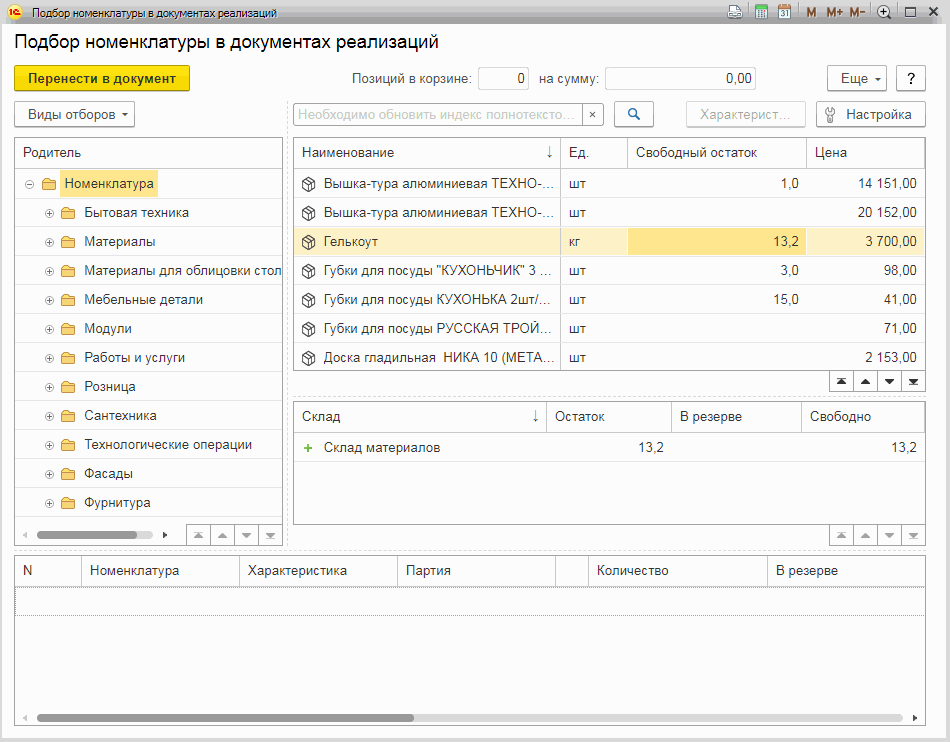
In this dialog, you can select the goods as follows:
There are at least two inconveniences in this mechanism.
Firstly, in order to add the quantity of the product to the document (and most often the user already knows the quantity that he wants to add), you must first double-click on the product, add it to the lines, and then change the quantity in the lines. Moreover, the user does not see in the list of products whether this product has already been added and with what quantity. In addition, such a scheme “eats” additional space, since you have to display two tables on one screen instead of one.
Secondly, after the lines have been added directly to the document, if you click the Select button again, the selection will begin “from scratch”. It does not appear any rows in the bottom table, and at the time of re-selection it will not be clear what is already in the document and what is not. It also violates one of the important rules when building the interface: if the user is mistaken, then he needs to be given the opportunity to go back and fix the error. Here it turns out that he will not be able to return to the selection of goods having the same data as before pressing the add button to the document.
However, it is possible in 1C you can implement the above scheme, but for some reason, in the typical configurations that are available on the site with demos, another one is used.
Microsoft Dynamics 365
As a solution, I took Retail (only in it I found similar functionality from available at https://trials.dynamics.com ). In it, you can call the selection on the Purchase orders form in two ways:
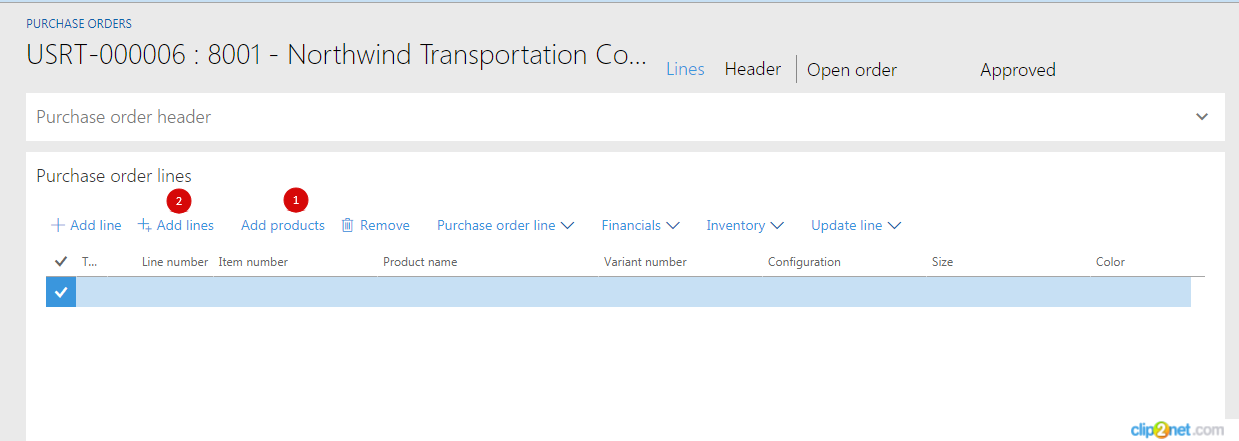
The first button is implemented according to the 1C scheme (although there are much fewer columns), so I will not dwell on it.
The second button brings up a dialog with a list of products where the quantity can already be entered into columns. But this is done in a very peculiar way.
Firstly, by default, only product codes are displayed there (even without names). Of course, I understand that you can create extensions and include other columns there, but to see this behavior in the basic version is a bit strange.
Secondly, Microsoft was apparently so carried away by the design that for some reason they scored on the normal processing of scrolling data, processing tricks and events. It looks something like this:
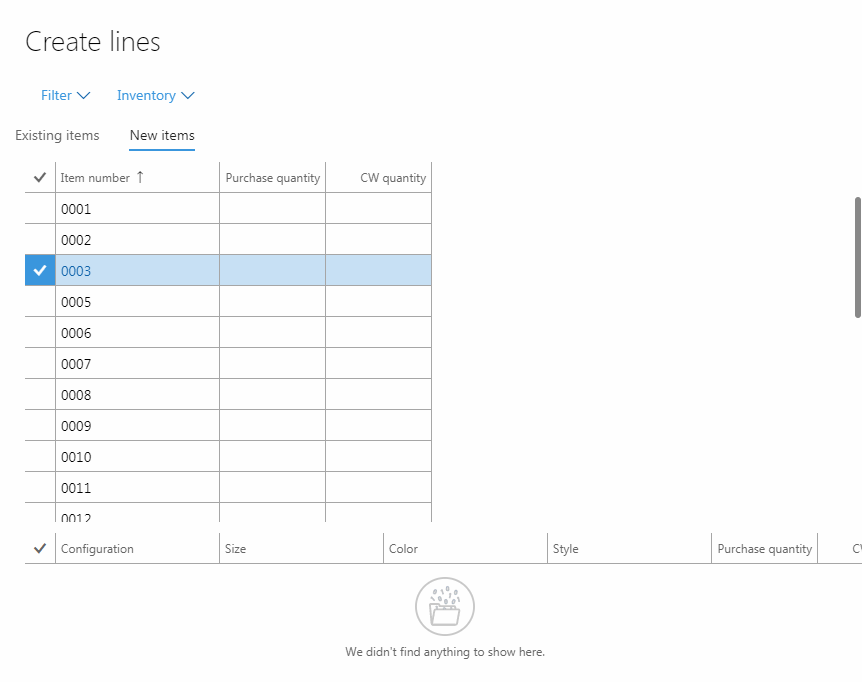
During normal keyboard operation, the current series are constantly switched when re-reading data. At the same time, you can start to enter only after waiting for all event processing, otherwise the quantity is either not entered at all or entered in the wrong series. How real users work with this remains a mystery to me. Apparently, few people use this functionality specifically. Well, or these are the limitations of the demo versions, but in operation everything works well.
Conclusion
The described document input scheme through a separate selection tab was well appreciated by our users.
In practice, this concept can be complicated in various ways. For example, instead of a product list, display a list of articles with the ability to enter different quantities for individual characteristics. Or in one of the documents there were warehouses in the rows, and it was required to set the quantities for each of these warehouses in the columns.
Such a scheme can be implemented, for example, in the same React, using the current lines of the document as a state and displaying it with two components in two different tabs. But it should be remembered that there can be a lot of entries in the table with the goods, and so-called “infinite scroll” will have to be implemented. In addition, it is advisable to add to the user the ability to sort and filter products in this list (and this must be done on the server, and not on the client, so as not to drag extra data there). All this becomes a rather non-trivial task for the developer.
In the lsFusion platform, this functionality is implemented out of the box and requires only the code described above. You can try how it works, and if you wish, you can modify the code online on the corresponding page . Here is the entire source code, which you can insert on the Platform tab and then click Play:
Source
CLASS Product '' ;
|
All Articles